Re: Eclipse, a fellow traveler I know just arrived at Woodhead Park, Idaho early to beat the crowd. It’s a 124 site first come first served $18/night campground. He reports it’s practically empty and owner does not think it will fill up ??? I hope that’s the case in Newport OR where we will be.
Will decide on 1″ vs multiple layers when we have the van next year and can see the topography up close. On the wiring, it will be planned long before we place the van order and wiring diagram drawn up. Usually service wiring that never changes could be buried, maybe. Generally speaking all wiring just like all plumbing has to be accessible for changes, upgrades or (gasp! repairs).
Which leads me to this question. Ever hear of a van needing serious body work due to accident and the interior side of the skin is engulfed in sprayed foam ? Wonder how typical repairs are done, I know it depends on the nature of the repair. Well, I don’t have accidents so it will not likely happen but …
Hi Santiago,
That’s interesting that they are not busy yet — maybe just too early.
We are staying in McCall, ID, and then will drive 30 mi down to Cascade, ID on E day. Have been talking to people in the area to try to find a good place, and they are expecting big crowds, but I don’t think they know for sure.
Sounds good on waiting until you get the van to decide on insulation single or multipe sheets.
I ran the wires in just a small number of places — one ceiling cross rib and down the main pillar that is half way back on the drivers side. I just decided to not insulate these at all and take the heat loss. I have an IR camera and next time we get a cold night, I’m going to take some pictures and see if I can spot where the leaks are.
Some people use Thinsulite or something like that in the ribs.
I don’t think that having the foam on the inside would impact the cost of having body work done by any significant amount. With some detrmination, you can scrape the foam off with a sharp scraper. I can’t imagine it adding more than half an hour of labor to a body repair.
Looking at all sides but it keeps coming back to plan A, ( iso board with GS ).
Just like everyone else visiting your site, I trust your judgement.
I like and have iso boards in several thicknesses as well as GS canisters with pro gun at home. Will give it a shot as you so wisely suggested followed by band saw dissection. This will have to wait till after this coming trip to Oregon starting next Sunday, the Eclipse is almost a week later but we want to get to our campsite before the mob arrives.
Will plan on Thinsulate or equivalent for nooks, crannies and odd hard to get to areas. Not too concerned with stuffing stamped structural components but will devise way to thermally reduce bridging, as much as it can be under the circumstances, prior to adding finished panel.
Question: because the vapor barrier will basically be iso board/GS and the walls and ceiling to my knowledge are not flat, wouldn’t using 1/2″ iso as the barrier apply easier than the more rigid 1″ and likely to have more gaps? The initial 1/2″ board on skin would be the barrier. After initial 1/2″ board fully cures you could apply additional iso boards of 1/2″, 1″ or whatever is suitable knowing you already have a good sealing first layer. This could open opportunities to assist with the bridging issue using either thinner or same thicker iso board with dado cuts over structural members.
Hi Santigo,
We are going to head for the eclipse too — hope its not too much of a zoo, but suspect it will be.
I think that using a couple layers of half inch would work OK, but not sure its needed. Most of the PM panels have pretty low curvature and the wooden spring sticks appear to do a good job of holding it against the van skin. The exception might be where the roof curves fairly steeply into the side wall panel.
I’m a little more relaxed about small thermal bridging areas than some. When all is done, and the inside paneling is in place, you will have something line R2 even in areas with no insulation. Insulated areas may be more like R8 — so, non-insulated areas might be about 4 times worse than insulated. It seems like as long as they are small they won’t be a big part of the total heat loss. Not saying you should not try to get all the areas you can insulated, but if some are really difficult to insulate well, maybe its not such a big deal?
You want to think about where you are going to run your wires and whether you want to leave the insulation out in this area.
The way I see it, if residential double glazed windows supposedly hermetically sealed can leak and condense between sealed panes, causing fogging, Great stuff and iso boards will sooner or later especially being in a dynamic environment (shaking van) verses a residential window practically static.
Once leakage occurs the cold skin is available to condense. I think this mostly takes place in cold weather. Under those conditions do you think there will be enough heat on the skin side to evaporate the liquid back to a gaseous state then find its way back out ? I would think maybe if the van went into a very hot dry environment reversing the original process. I can’t see that happening.
Having said that, iso board with GS is at the top of my list of way to insulate.
Because I still have a little time to mull over this, will keep an open mind to other insulating processes perhaps with no vapor barrier and allow any condensate formed on skin to run and drain out the bottom and or return same way it freely went in, evaporate back to the warm drier cabin air calling it back home.
Hi Santiago,
Maybe, but Great Stuff is very good and the seal with the van skin is over the whole area of the polyiso sheet. The window only has a linear seal along the edge and every time the window is in the sun, it expands and then contracts overnight — quite a bit of thermal cycling. Even with that window seal failures are not common.
One thing I’d suggest is get a piece of polyiso, some great stuff and just try using the Great Stuff to bond a couple ft square of polyiso to a flat, smooth surface. Let it cure for a week or so. Then take it apart and see what you think about the bond quality — I think you will be pleasantly surprised how good the bond is.
I think that any moisture that did get behind the polyiso would be vaporized and driven out the next time the van was in the sun — even if the weather is fairly cool, the van skin gets warm when exposed to sun.
If you have an insulation that is vapor permeable (fiberglass, Thinsulate, ..) every time the van is a little humid inside (people, cooking, just humid weather) and cool outside (as in overnight) there will be condensation over the full area of inside of the van skin. It will likely see these conditions many times during its life — even with this, its not common that vans insulated this way have a problem with excessive corrosion or rust — it does happen, but its not common. It seems to me that the situation with polyiso is much better, and the chances of rust or corrosion is very remote, but who knows for sure?
Hi Santiago,
I don’t think that moisture does get to the areas behind the polyiso, and I guess whatever path the water vapor took into the area behind the polyiso would be available for it to dry out?
I’ve not heard of any reports of moisture or corrosion behind the polyiso.
The van skin has pretty good corrosion protection on it as it comes from the factory. Lots of vans go through life without insulation or with insulation that pass water vapor readily, but occurances of rust or corrosion from all of the condensation that these vans must have on the inner skin only occasionally result in a problem.
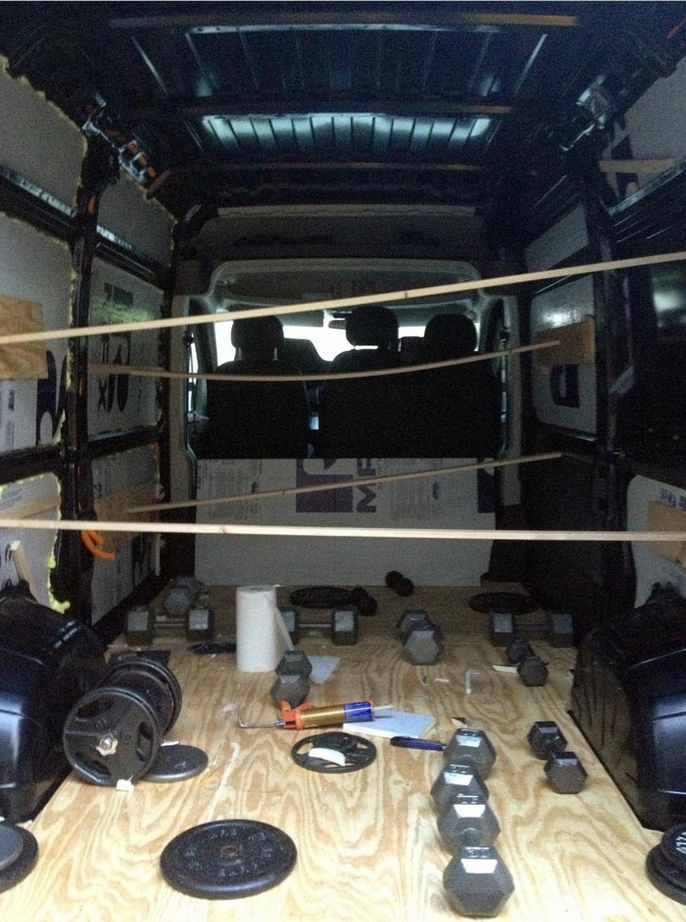
Bear in mind that my van is insulated with spray urethane (not sheet polyiso), so I don’t have any direct experience. But, what I would do is to do a heavy run of Great Stuff Pro around the perimeter and then grid of Great Stuff pro in the area inside the perimeter run. Idea would be to end up with near 100% of the area between the polyiso and the van skin to be filled with the Great Stuff. Most people also do a bead around the edge of the panel after the Great Stuff on the back of the panel has cured. You will need something like spring sticks to hold the polyiso against the van skin while the Great Stuff is curing.
I have heard recommendations for doing vertical runs of the Great Stuff only so that there would be vertical drain channels if water somehow go behind the panel. Not positive which method is best, but I’d use the perimeter plus grid method myself.
Hi Marc, should moisture sneak in due to one of many factors, it will be trapped and likely to be beginning of corrosion. Has this been considered ?
Also, do you apply glue to the board, using great stuff, around inside perimeter forming a bond and seal? What about applying great stuff to center sections of the board as well ? I realize when the glued board cures you then caulk all edges with great stuff.
Hi Gary,
Re: Eclipse, a fellow traveler I know just arrived at Woodhead Park, Idaho early to beat the crowd. It’s a 124 site first come first served $18/night campground. He reports it’s practically empty and owner does not think it will fill up ??? I hope that’s the case in Newport OR where we will be.
Will decide on 1″ vs multiple layers when we have the van next year and can see the topography up close. On the wiring, it will be planned long before we place the van order and wiring diagram drawn up. Usually service wiring that never changes could be buried, maybe. Generally speaking all wiring just like all plumbing has to be accessible for changes, upgrades or (gasp! repairs).
Which leads me to this question. Ever hear of a van needing serious body work due to accident and the interior side of the skin is engulfed in sprayed foam ? Wonder how typical repairs are done, I know it depends on the nature of the repair. Well, I don’t have accidents so it will not likely happen but …
Hi Santiago,
That’s interesting that they are not busy yet — maybe just too early.
We are staying in McCall, ID, and then will drive 30 mi down to Cascade, ID on E day. Have been talking to people in the area to try to find a good place, and they are expecting big crowds, but I don’t think they know for sure.
Sounds good on waiting until you get the van to decide on insulation single or multipe sheets.
I ran the wires in just a small number of places — one ceiling cross rib and down the main pillar that is half way back on the drivers side. I just decided to not insulate these at all and take the heat loss. I have an IR camera and next time we get a cold night, I’m going to take some pictures and see if I can spot where the leaks are.
Some people use Thinsulite or something like that in the ribs.
I don’t think that having the foam on the inside would impact the cost of having body work done by any significant amount. With some detrmination, you can scrape the foam off with a sharp scraper. I can’t imagine it adding more than half an hour of labor to a body repair.
Gary
Gary, thank you for the reassurance.
Looking at all sides but it keeps coming back to plan A, ( iso board with GS ).
Just like everyone else visiting your site, I trust your judgement.
I like and have iso boards in several thicknesses as well as GS canisters with pro gun at home. Will give it a shot as you so wisely suggested followed by band saw dissection. This will have to wait till after this coming trip to Oregon starting next Sunday, the Eclipse is almost a week later but we want to get to our campsite before the mob arrives.
Will plan on Thinsulate or equivalent for nooks, crannies and odd hard to get to areas. Not too concerned with stuffing stamped structural components but will devise way to thermally reduce bridging, as much as it can be under the circumstances, prior to adding finished panel.
Question: because the vapor barrier will basically be iso board/GS and the walls and ceiling to my knowledge are not flat, wouldn’t using 1/2″ iso as the barrier apply easier than the more rigid 1″ and likely to have more gaps? The initial 1/2″ board on skin would be the barrier. After initial 1/2″ board fully cures you could apply additional iso boards of 1/2″, 1″ or whatever is suitable knowing you already have a good sealing first layer. This could open opportunities to assist with the bridging issue using either thinner or same thicker iso board with dado cuts over structural members.
Hi Santigo,
We are going to head for the eclipse too — hope its not too much of a zoo, but suspect it will be.
I think that using a couple layers of half inch would work OK, but not sure its needed. Most of the PM panels have pretty low curvature and the wooden spring sticks appear to do a good job of holding it against the van skin. The exception might be where the roof curves fairly steeply into the side wall panel.
I’m a little more relaxed about small thermal bridging areas than some. When all is done, and the inside paneling is in place, you will have something line R2 even in areas with no insulation. Insulated areas may be more like R8 — so, non-insulated areas might be about 4 times worse than insulated. It seems like as long as they are small they won’t be a big part of the total heat loss. Not saying you should not try to get all the areas you can insulated, but if some are really difficult to insulate well, maybe its not such a big deal?
You want to think about where you are going to run your wires and whether you want to leave the insulation out in this area.
Gary
Hi Gary, thanks for your input.
The way I see it, if residential double glazed windows supposedly hermetically sealed can leak and condense between sealed panes, causing fogging, Great stuff and iso boards will sooner or later especially being in a dynamic environment (shaking van) verses a residential window practically static.
Once leakage occurs the cold skin is available to condense. I think this mostly takes place in cold weather. Under those conditions do you think there will be enough heat on the skin side to evaporate the liquid back to a gaseous state then find its way back out ? I would think maybe if the van went into a very hot dry environment reversing the original process. I can’t see that happening.
Having said that, iso board with GS is at the top of my list of way to insulate.
Because I still have a little time to mull over this, will keep an open mind to other insulating processes perhaps with no vapor barrier and allow any condensate formed on skin to run and drain out the bottom and or return same way it freely went in, evaporate back to the warm drier cabin air calling it back home.
Hi Santiago,
Maybe, but Great Stuff is very good and the seal with the van skin is over the whole area of the polyiso sheet. The window only has a linear seal along the edge and every time the window is in the sun, it expands and then contracts overnight — quite a bit of thermal cycling. Even with that window seal failures are not common.
One thing I’d suggest is get a piece of polyiso, some great stuff and just try using the Great Stuff to bond a couple ft square of polyiso to a flat, smooth surface. Let it cure for a week or so. Then take it apart and see what you think about the bond quality — I think you will be pleasantly surprised how good the bond is.
I think that any moisture that did get behind the polyiso would be vaporized and driven out the next time the van was in the sun — even if the weather is fairly cool, the van skin gets warm when exposed to sun.
If you have an insulation that is vapor permeable (fiberglass, Thinsulate, ..) every time the van is a little humid inside (people, cooking, just humid weather) and cool outside (as in overnight) there will be condensation over the full area of inside of the van skin. It will likely see these conditions many times during its life — even with this, its not common that vans insulated this way have a problem with excessive corrosion or rust — it does happen, but its not common. It seems to me that the situation with polyiso is much better, and the chances of rust or corrosion is very remote, but who knows for sure?
Gary
Hi Santiago,
I don’t think that moisture does get to the areas behind the polyiso, and I guess whatever path the water vapor took into the area behind the polyiso would be available for it to dry out?
I’ve not heard of any reports of moisture or corrosion behind the polyiso.
The van skin has pretty good corrosion protection on it as it comes from the factory. Lots of vans go through life without insulation or with insulation that pass water vapor readily, but occurances of rust or corrosion from all of the condensation that these vans must have on the inner skin only occasionally result in a problem.
Bear in mind that my van is insulated with spray urethane (not sheet polyiso), so I don’t have any direct experience. But, what I would do is to do a heavy run of Great Stuff Pro around the perimeter and then grid of Great Stuff pro in the area inside the perimeter run. Idea would be to end up with near 100% of the area between the polyiso and the van skin to be filled with the Great Stuff. Most people also do a bead around the edge of the panel after the Great Stuff on the back of the panel has cured. You will need something like spring sticks to hold the polyiso against the van skin while the Great Stuff is curing.
I have heard recommendations for doing vertical runs of the Great Stuff only so that there would be vertical drain channels if water somehow go behind the panel. Not positive which method is best, but I’d use the perimeter plus grid method myself.
Gary
Hi Marc, should moisture sneak in due to one of many factors, it will be trapped and likely to be beginning of corrosion. Has this been considered ?
Also, do you apply glue to the board, using great stuff, around inside perimeter forming a bond and seal? What about applying great stuff to center sections of the board as well ? I realize when the glued board cures you then caulk all edges with great stuff.
Thanks