This calculator allows you to experiment with different types of insulation packages for your camper van conversion, and to see how they compare on reducing heat loss (or gain) for the van.
This could help you size your furnace or AC, size your heating fuel tank, and to determine how much heating fuel different insulation strategies may use over a few days.
Go back to the main camper van conversion page…
Download Heat Loss Spreadsheet
Download the RV heat loss calculator PMHeatLoss … (an Excel spreadsheet)
The calculator is an Excel spreadsheet. You will need Excel (or something runs Excel files) on your computer to run it — I’ve been told that Open Office works fine.
Follow the instructions in the spreadsheet to estimate your heat loss.
Using the Calculator
This is a sample output from the spreadsheet. It shows the heat loss for a non-insulated van in blue compared to my van insulation package in orange.
You can download the spreadsheet and plug in the insulation R values for your van and see how it comes out.
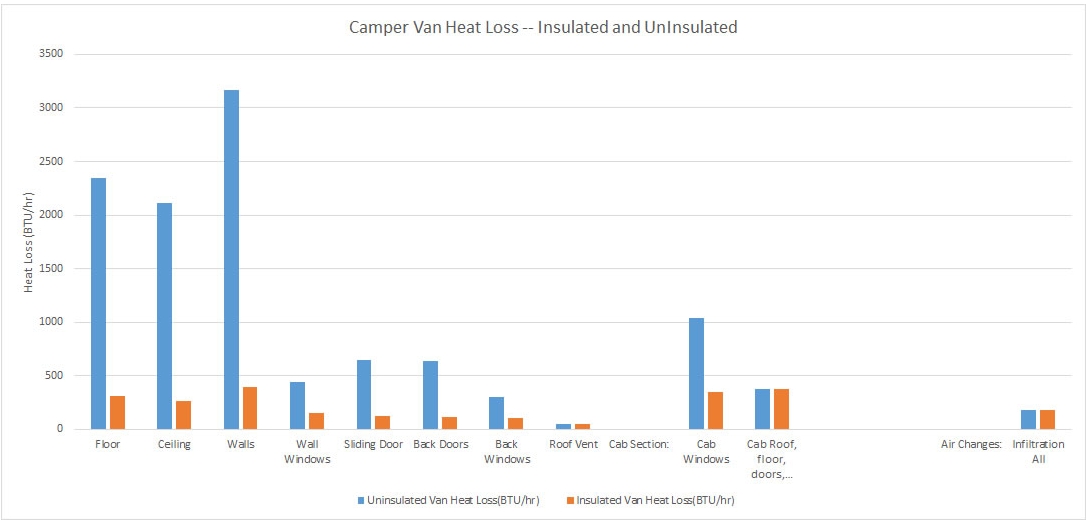
This is a copy of the spreadsheet table for a case with an outside temperature of 32 F and with the inside of the van maintained at 70F:
| Back Section: | Uninsulated Van | Insulated Van | |||||||
|---|---|---|---|---|---|---|---|---|---|
| Item | Area(sf) | Rvalue | UA | Heat Loss(BTU/hr) | Rvalue | UA | Heat Loss(BTU/hr) | % Reduction | |
| Floor | 61.7 | 1.0 | 61.7 | 2344.6 | 7.5 | 8.2 | 312.6 | 87% | |
| Ceiling | 55.5 | 1.0 | 55.5 | 2109.0 | 8.1 | 6.9 | 262.0 | 88% | |
| Walls | 83.3 | 1.0 | 83.3 | 3165.4 | 8.1 | 10.3 | 393.2 | 88% | |
| Wall Windows | 11.7 | 1.0 | 11.7 | 444.6 | 3.0 | 3.9 | 148.2 | 67% | |
| Sliding Door | 25.5 | 1.5 | 17.0 | 646.0 | 8.1 | 3.2 | 120.4 | 81% | |
| Back Doors | 25.0 | 1.5 | 16.7 | 633.3 | 8.1 | 3.1 | 118.0 | 81% | |
| Back Windows | 8.0 | 1.0 | 8.0 | 304.0 | 3.0 | 2.7 | 101.3 | 67% | |
| Roof Vent | 1.4 | 1.0 | 1.4 | 53.2 | 1.0 | 1.4 | 53.2 | 0% | |
| Cab Section: | |||||||||
| Cab Windows | 27.3 | 1.0 | 27.3 | 1037.4 | 3.0 | 9.1 | 345.8 | 67% | |
| Cab Roof, floor, doors, | 30.0 | 3.0 | 10.0 | 380.0 | 3.0 | 10.0 | 380.0 | 0% | |
| Air Changes: | Volume(cf) | ACH | Heat Loss(BTU/hr) | ACH | Heat Loss(BTU/hr) | Reduction | |||
| Infiltration All | 550.0 | 0.5 | 175.6 | 0.5 | 175.6 | 0% | |||
| Total (BTU/hr) | 11293.1 | 2410.3 | 79% | ||||||
| Gal Propane/hr (70%efic) | 0.18 | 0.04 | 79% |

This shows the window and vent arrangement on the van used for the heat loss calc. There are two PM windows in back door, and one window on the opposite side that is same as larger window on this side.
Some Notes On How R Values Were Estimated
This goes over how I estimated the insulation R values for my particular insulation package — it may be helpful in determining R values for your insulation package. There is also some more information on estimating R values for various insulation types in the next section.
Metal Walls/Floors/Ceilings:
The sheet metal has negligible R value itself, but it does have air layers on the inside and outside that do have an R value. I used the same convention that is usually used in doing window R values, which is a still air layer on the inside with an R value of 0.7 and a moving air layer on the outside with an R value of 0.3 — if you park in a calm area, you get an automatic R value boost of 40% because you get two still air layers instead of one 🙂
Windows:
Windows are done in the same way as the metal panels — R0.7 inside + R 0.3 outside = R1.
This is pretty much the standard for a single glazed window.
Floor:
The floor is done by the usual process of adding up the R values of each layer to get a total R value:
Outside air layer (moving) = R0.3
Sheet metal = R0
1 inch Polyiso rigid foam insulation = R6
1/4 inch plywood = R0.4
1/8 inch Vinyl = R0.2
Inside air (still) = R0.7
R total = 0.3 + 0.0 + 6 + 0.4 + 0.2 + 0.7 = R7.6
Wall and Ceiling:
The floor is done by the usual process of adding up the R values of each layer to get a total R value:
Outside air layer (moving) = R0.3
Sheet metal = R0
1 inch Polyurethane spray foam insulation = R6
air layer = R0.7
1/4 inch plywood = R0.4
Inside air (still) = R0.7
R total = 0.3 + 0.0 + 6 + 0.7 + 0.4 + 0.7 = R8.1
Air Infiltration:
Infiltration of cold outside air into to the van is a heat loss in that it requires the furnace to heat the incoming cold air up.
I used an air infiltration rate of 0.5 air changes per hour. The actual infiltration rate may be significantly different than this, but it does not appear that this would have a large impact on the total heat loss.
R Value Notes
Accuracy: Real heat transfer is very complicated and depends on more factors than you would ever want to try to keep track of. These one dimensional engineering approximation calculations are just that — approximations. If they end up being within 20%, that would be a good day. But, they are still a lot better than nothing and lots of practical heat transfer design problems are worked successfully with nothing more.
R values for many insulating and building materials:
Estimating R values of assemblies…
Claims: The claims of manufacturers insulating materials should be looked on with a healthy dose of skepticism. The published values for things like fiberglass, polystyrene, polyurethane, plywood, … are well established and reliable, but when you start getting into things that rely on reflective or low esmissivity layers or “space age” developments be careful — look for third party lab tests and for reviews by qualified impartial observers.
Reflective Layers: For insulation that incorporate a reflective layer to improve R value, the reflective surface has to face an airspace to be effective. The reflective layer(s) also have to stay reflective over time. For example, radiant barriers in attics lose effectiveness as dust settles on them.
Other Factors: R value is not by any means the only important thing to look for in insulation — it has to handle (and maybe control) the moisture levels in the cavities, handle high temperatures, stand up to the mechanical strains of a moving vehicle, not make a lot of noise, … And, it would be nice if it also cut down noise levels.
If you look on the ProMaster and Sprinter forums, there are dozens of theories on how best to insulate van cavities — good luck on trying to make sense of it all. It would be nice if the forum community could organize some actual thermal performance tests and evaluate long term durability and moisture performance of various insulation schemes.
Thermal performance tests of a van insulation package can could be done with nothing more than an electric space heater, a KillAWatt meter and a couple thermometers — you basically just need to know how much power it takes to keep a van at a constant inside temperature for a known outside temperature.
Insulation Package Impact for Me
Some quick observations about the insulated vs non-insulated configurations:
The idea that it does not make sense to insulate the metal walls/ceiling/floor because you have big windows does not pan out. The big losers are the huge metal surfaces and even if you don’t insulate the windows at all, you can achieve very large reductions in heat loss by insulating walls/floors/ ceiling. I believe that this logic comes from home building where typically windows make up a lot of the home heat loss because they are poorly insulated and walls are well insulated — in the van, everything starts out very poorly insulated, so it pays to insulate everything.
My insulation package achieves an about 80% reduction in heat loss. For me, on winter trips, this is enough to 1) allow a much smaller furnace even for very cold temperatures, 2) achieve a week or so of operation on one small five gallon propane tank, and 3) save a few bucks on heating fuel. The small furnace and small propane tank free up valuable space in the van.
But, the pros and cons will be different for everyone’s unique situation.
Gary
December 2014, June 27, 2015
Comments? Questions?
How did you insulate the cab with PUR foam?
Doors, floor, firewall seem tough to do like that…
Hi Maciej,
Initially, I did not insulate any of these cab areas.
After a couple years when I was looking for ways to improve the insulation, I added some Thinuslate to the cab ceiling between headliner and sheet metal. The headliner can be pulled down a few inchs from the aft edge by just removing the plastic plug fasteners – then just slide the Thinsulate in.
I think I also added some to the door panels.
I agree it would be very difficult to use the urethane foam in these areas.
Gary
So…these calculations seem to be too optimistic in the cab area…
Yes – a bit, but there is not much area up there that is not window and is not already insulated to some extent. I hope I made it clear that this is a plus/minus 20% ish sort of engineering estimate – not good to the nearest BTU 🙂
Gary
Yes…but once we remove insulation from cab sheet metal in your calculations then we’ll arrive at cab + ventilation accounting for more than 1/3 of the total heat loss (37% in my spreadsheet that I based on your calculations, but modified somewhat so it may not give exactly the same results) – even with a thin insulation like yours.
Thickening that insulation layer further would be already a bit into diminishing returns. One could double that thickness – it’s easy and drop the lossess by about a quarter. But if one wants to improve that even further – they really need to address thermal bridges.
The areas and R values used in the original calculation are shown on this page: https://www.buildagreenrv.com/design-and-build-information-for-camper-vans/heat-loss-calculator-for-camper-van-conversions/
In the cab, I show now insulation for the cab roof, doors, and floor. I show insulating the windows with removable panels (we use the ones from EuroCamper).
So, I think its OK. If anything maybe a little pessimistic in that the cab roof does have some insulation/sound treatment, and the space between the roof and the shelf is normally stuffed with miscellaneous stuff that has some insulating value.
Some material on insulation for thermal bridging here: https://www.buildagreenrv.com/thermal-bridging-insulation-due-metal-frames/
Gary
re: “How did you insulate the cab with PUR foam?
Doors, floor, firewall seem tough to do like that…”
“very difficult to use the urethane foam in these areas.”
It’s easy if using 2-part expanding foam, in fact, arguably easier than any other method (other than spray foam, which is basically the same material), since it expands to fill every nook and cranny, and will avoid unwanted overflow & adhesion if constrained by plastic bags.
Examples:
Handi-Flow Spray Foam Slow Rise (Cavity Fill) Insulation
US Composites Urethane Pour Foam
The latter of these is not much more than polyiso sheet foam
Hi there, I love the theory, but at the end of the day what does it mean? Are we talking about saving 1/4 liter of petrol on the Webasco in the winter or a couple amps on the MaxxFan in the summer?
I am just curious in your opinion, because I do believe that insulation does moderate the extremes, but IMHO tons of it bring relatively little value and none is also lacking.
Thanks in advance for your reply. Cheers.
Hi,
It does depend a lot on how you use the van — if its used in moderate climates with no trips to cold climates in the winter or hot climates in the summer and only used (say) 20 times a year, then a lot of insulation is probably not needed. But, even for these conditions an insulated van will be easier to heat/cool, will be more comfortable, and will be quieter, since insulation is also noise treatment and vans are noisy tin boxes without it.
The difference in cost and time between minimal insulation and good insulation is small, and gives you the added flexibility to tackle tougher climates or times of year. It may also make the van more appealing at resale time.
More insulation also means filling the propane tank less often, which is both a money consideration and a logistic consideration.
More insulation makes it feasible to use a smaller AC in the summer and may even make it possible to use the AC on batteries without shore power or a generator (ugh!).
My van is pretty well insulated, but if I were doing it again, I’d use more insulation and I’d take some steps to reduce thermal bridging at the frames — but, we do use the van in cold weather, so it may be more important for us.
As you can tell, I’m a fan of good insulation 🙂
Gary
Thank you for your perspective…AB
Had a little trouble searching this page for specific information. Did you use spray foam as your sole material? I think that stuff off-gasses some pretty toxic fumes, and even more so with the kind of heat a van is exposed to. Might be useful info for anyone beginning their build.
Hi Robin,
This page gives all the details on how I insulated:
https://www.buildagreenrv.com/our-conversion/our-conversion-insulation/
When actually spraying the foam, there are toxic fumes, but once the foam is cured it does not give off toxic fumes — this is based on quite a bit of reading I did before going this way.
The spray urethane foam is used a lot in new home construction.
Gary
have you done a thermal evaluation using an electric heater? do they verify your heat loss?
my sprinter is “almost” all insulated, and i’m surprised by the heat loss. my recollection is 1200 watts of heat only raises the internal temperature by 15 degrees.
Hi Milt,
I’ve not done a check with an electric heater — will try to do that after Christmas.
My past experience with this kind of heat loss method where Heat Loss = (Area)(Tin-Tout)/Rvalue do tend to under predict the actual heat loss.
We kept track of propane use on a winter trip, and I would say that the average propane use per night of 0.58 gallons is somewhat more than the calculated heat loss would give.
https://www.buildagreenrv.com/trip-reports-experiences-and-lessons/banff-trip/
Gary