Most van conversions will want to have some kind of system to provide fresh water for washing dishes, cooking, showers, … And, some kind of system to safely and legally handle the water (grey water) that drains from sinks and basins. This section covers a couple options to satisfy these needs.
Fresh Water System Features
The fresh water system in a camper van or RV is all the stuff needed to deliver fresh water to the kitchen and bathroom for washing, cooking, showering…
A fresh water system will include:
- A means to store fresh water ready for use.
- A means to fill the storage tank
- A means to deliver water from the tank to the points of use (sinks, …)
- Tanks located in the van must be well secured.
- A means to drain the whole system
- A means to protect the system from freezing.
- A means to sanitize the system
Grey Water System Features
Grey water refers to water that has been used for things like washing dishes, cooking, and showering. Toilet water (called black water in RVeze) is not grey water and is typically stored in a black water tank — see the toilet section.
The grey water system includes all the stuff to collect the drain water from sinks and showers and safely store it and dispose of it.
The grey water system includes:
- A means to store grey water
- A means to deliver the grey water from sinks and shower to the grey water storage tank.
- A means to drain the grey water tank
- Tanks located in the van must be well secured.
- A means to protect the system from freezing
Most grey water systems use a tank or closed container to hold the grey water, but the simplest arrangement just allows the grey water to drain into a container placed outside the van on the ground — the container is then drained at an appropriate place as needed.
How Big Should the Tanks Be?
The size of the fresh water tank depends on: 1) how many days you want to be able to go between fills, 2) what water uses you have (drinking, cooking, washing, showers, …), and 3) your habits — that is, how conservative or wasteful you are.
This can cover a huge range. At the extreme low end, for survival, you only need about 0.5 gallons per person per day to drink. At the other end, homeowners average about 50 gallons of water use per person per day not including lawn irrigation. So, your needs will probably fall somewhere between half a gallon a day and 50 gallons per person per day!
As one example, our camper van has a 17 gallon fresh water tank. There are two of us, and we don’t have many water uses. We drink the water, do some cooking, some sponge bath type washing, and minimal dish washing. We don’t have a shower and the toilet is composting, so no shower or toilet flush water. When we are in travel mode, some of our water needs are covered by places we stop.
I will track this more carefully on future trips, but I believe that our 17 gallon tank lasts about 4 days. This would come down to only 2.1 gallons per person per day. This is probably near the bottom of the design range.
To this, you could add:
Showers: A minimal “Navy” shower in which you get wet, turn the water off, soap up all over, then turn the water back on to rinse and all using a low flow shower head can probably be done for about 2 gallons per shower. A normal sort of home shower with a low flow shower head might be about 1.5 gallons per minute for 4 minutes gives 6 gallons. But, its certainly possible to use much more than that.
Toilet flushing: RV toilets don’t usually use a lot of water to flush. One model of Porta-Potties claims 56 flushes from the 4.2 gallon tank — so, 0.075 gallons per flush. On regular RV toilets, its kind of up to you how much water to use per flush, but 0.1 or 0.2 gallons per flush seems about right — so, maybe a gallon per day per person? It is also possible to use grey water for toilet flushing. Some toilets come with a built in tank for flushing.
Larger RVs typically have fresh water tanks in the 40 gallon range.
As an example, if you want to be able to go 4 days between fillups, you have 3 people, you want to have a “Navy” shower every other day, and you have a toilet that uses flush water — then a rough estimate of fresh water tank size is:
- Drinking and minimal dish and person washing (2.1 gal*3 people*4 days) = 25.2 gal
- Toilet flushing (1 gal)*(3 people)*(4 days) = 12 gallons
- Showers (2 gal)*(3 people)*(2 showers in 4 days) = 12 gallons
Totals to 49 gallons — it does add up!
If you want to preserve the capability to do occasional trips in which you will need to supply your own water for a longer period than your tanks are good for, then you can always: 1) carry some extra water in the 5 gallon plastic Jerry cans, or 2) conserve water so you don’t need as much. Or, both. This probably makes more sense than putting in larger than tanks than you really need except on rare occasions.
This is a good set of hints for conserving water when dry camping…
Grey water tanks can typically be somewhat smaller than the fresh water tank in that not all the water you use ends up in the grey water tank — e.g. water for drinking and cooking and toilet flushing.
Example Systems: Fresh and Grey Water Systems for Our Simple Van Conversion
Fresh Water
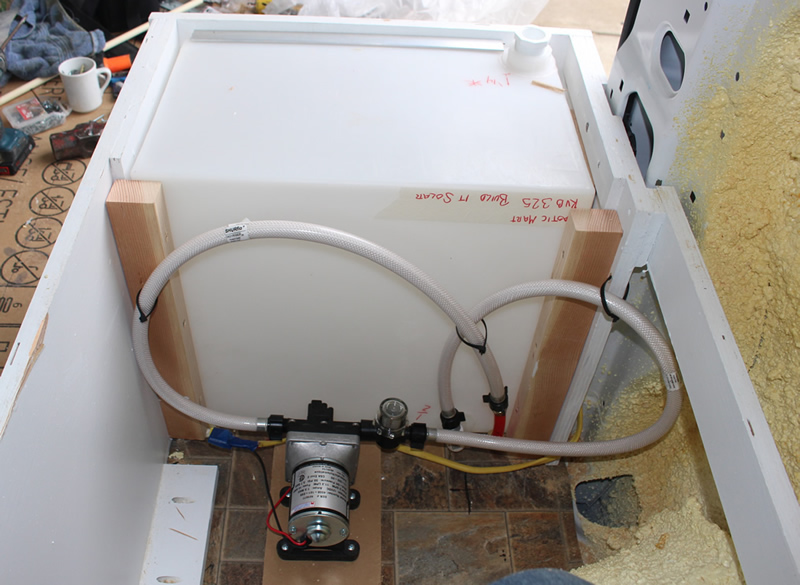
We have a simple fresh water system that consists of a 17 gallon polyethylene tank housed in the passenger side bed platform. The tanks come in a wide selection of sizes, so it is usually possible to fit your space. A single PEX pipe line runs from the tank to the galley sink, which is the only water using utensil in the van. Water is pumped from the tank to the sink using a 12 volt DC pump that is made specifically for this purpose. The pump turns on automatically when a faucet is opened, and runs until the faucet is closed. These pumps have been used for years in RVs and while they could be a bit problematic years ago, our new Shurflo 408 works very well.
In our system, the tank fill system is very simple. The forward right corner of the tank is right at the van sliding door, and the fill plug is located right at the corner. So, to fill, the fill plug is unscrewed and a garden hose is inserted directly into the tank via the sliding door opening, and the tank filled. The fill plug has a small hole drilled in it to vent the tank. Most RVs have a fill fitting on the outside of the van that goes through the van wall and is piped to the tank.
The system has a drain near the tank. You open the drain valve, and the water in the tank and the plumbing drains out via a pipe through the floor. For freeze protection, we also disconnect the flex hoses going to the pump and allow the water in the pump to drain out. This arrangement drains the system well enough that no antifreeze is needed for winterizing.
There is no indicator or meter to tell you how full the tank is, but its easy to directly observe the water level through the translucent tank wall.
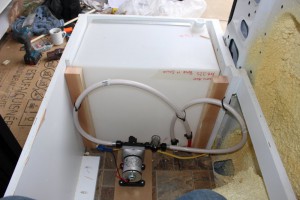

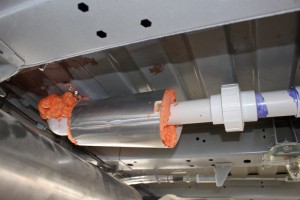
The left pictures show the polyethylene tank and pump. The tank is housed in the driver side bed platform, which is bolted through the floor to keep the tank in place in case of a crash. The fill port is visible on the upper back right corner — to fill, just unscrew the plug and fill tank with a garden hose. The pump is a Shourflo 408 with the recommended set of flex hoses to reduce pump noise. The single red pex plumbing line crosses the van under the finished floor to service the sink on the other side.
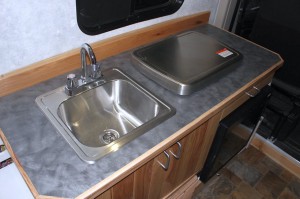
The right pictures show the stainless steel sink, which is a sold for RVs and also for use as a bar sink.
A full description of our system with LOTS more detail here…
Based on a couple trips, the fresh water system has worked well. Given that we don’t have a shower, and that our composting toilet does not use water for flushing, the 17 gallons lasts us quite a while.
At some point in the distant future, we may add a small water heater, but not really missing it for now.
Grey Water
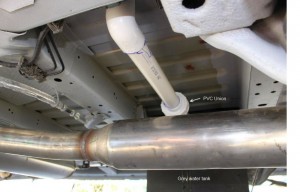
Our grey water system consists of an 11 gallon tank mounted under the floor of the van using straps. The inlet from the galley sink comes in near the top of the inboard side of the tank. The drain plumbing from the sink to the tank is just ordinary PVC pipe with a regular household P trap.
The outlet comes out of the tank near the bottom on the outboard side. The outlet has a threaded cap and a ball valve to open for draining. Since the van does not have a black water (toilet) tank, there is no need for the larger RV sewer pipe — I just used 1.5 inch PVC pipe. For draining, a flex hose of the same size goes from the tank drain to the dump drain.
The tank is vented via a small opening and pipe that only goes a few inches upward from the tank. But, grey water tank vents are often run up to through the roof.
The grey water tank is an experiment — it is made from Medium Density Overlay plywood — this is a specialized plywood that is used for highway signs and chemical tanks. I did this because I could not find a tank that fit the space I had well, and because I wanted to see how well the MDO would do — so far, so good 🙂 The tank actually took a pretty good whack with the ground on our last trip due to an error in driving judgement and came through just fine.
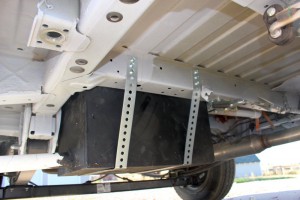
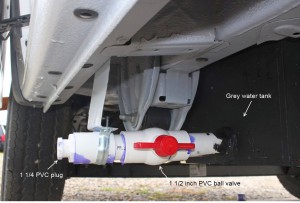
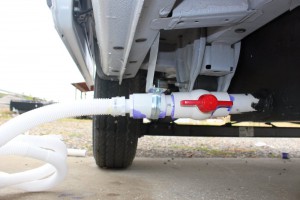
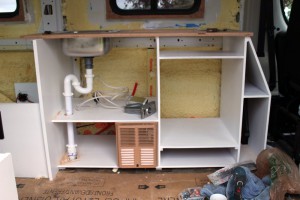
The top left picture shows the MDO tank strapped in place under the van. Top right and middle left pictures show the tank outlet and the drain hose. Since only grey water (no black water) is involved, the 1. 5 inch outlet works fine.
The remaining pictures show the PVC drain plumbing from the sink to the grey water tank.
A full description of our system with LOTS more detail here…
Based on a couple trips, the fresh water system has worked well. Given that we don’t have a shower, and that our composting toilet does not use water for flushing, the 11 gallons of grey water capacity lasts us quite a while.
One thing that I am planning to add is an indicator that tells us when the tank is (say) 3/4 full. Right now, there is no way to know how full it is.
We seriously considered a simpler system (like the one described below). The main factor in not going that way was that the fresh and grey water containers use up a lot of the space in the galley cabinet and we wanted that area for storing food and utensils.
Example Systems: A Very Simple Water System
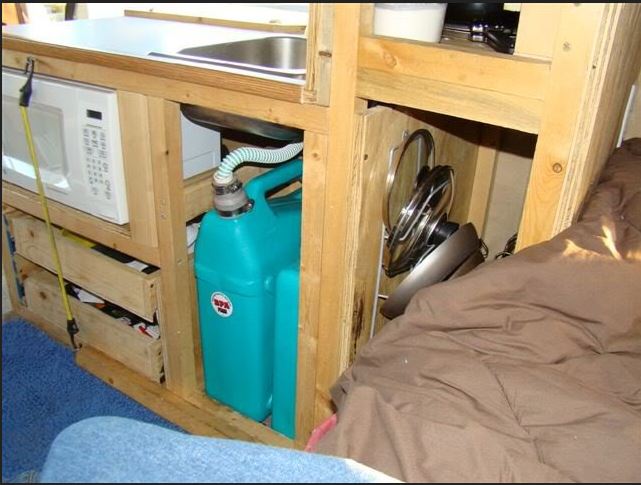
An even simpler system just uses Jerry can style plastic water containers located right under the sink in the the galley cabinet. The pump can either be a hand powered, or small electric submersible pumps that go right inside the fresh water container. This is a really compact and simple system with no plumbing extending outside the galley cabinet. If more water is needed, and 2nd or 3rd Jerry can can be carried.
A couple examples of the submersible electric pumps: Whale, and Rule — people generally seem happy with them.
The hand pump version of the system is the simplest of all, but the hand pumps can be pretty slow.
Grey water in this system can be a 2nd Jerry can under the sink that is plumbed to the sink drain, or some people have a container or bucket outside the camper on the ground with the sink drain plumbed to it.
Here is an example of this simple system from Steve Vandweller’s blog:
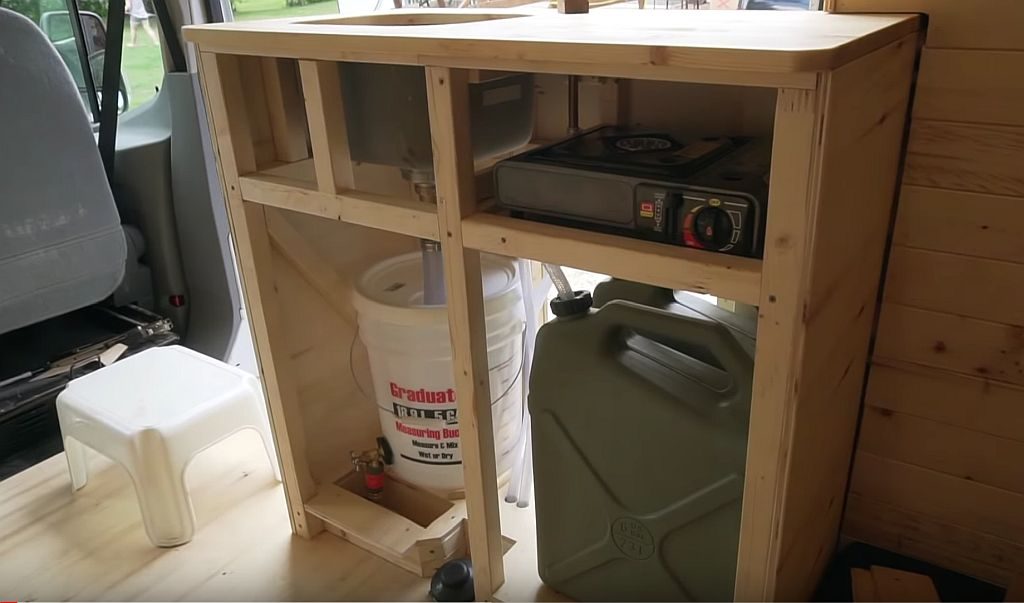
Another simple system that uses two jerry jugs for fresh and a five gallon bucket for grey water… Very simple and lots of detail in the video. My only concern is that you might get some odor up the sink drain from the grey water bucket — maybe add a simple trap.
Traditional RV Water Systems
The fresh and grey water systems in larger RVs are similar to the system we have in our van (above), but with some additional features.
Typically there will be more water use locations (e.g. kitchen sink, bathroom sin, shower, …), and a hot water tank to supply hot water.
Freeze Protection
If you think that you may be operating in freezing temperatures, have a look at this Freeze Protection page for some ideas.
Quantity Indicators
You may want to add a tank level indicator for your fresh, grey, and black water tanks. There are several technologies.
Some examples:
Old School monitors — the older level monitoring systems use 4 sensors mounted through the tank wall and located at empty, 1/3rd full, 2/3 rds full, and full. They only sense those discrete levels, so you can be at 1/3rd full, take out a pint of water and be at empty (that is, it will read empty at any level from empty up to 32% full). In addition, the sensors are exposed to the tank fluid and may tend to get “cruded” up and become unreliable. KIB is one brand.
Garnet SeeLevel — uses a sensor strip mounted on the outside of the tank to sense level via the density each sensor sees. Requires access to the side of tank to mount sensor strip to tank via adhesive strip. About $240 for 3 tank sensors and panel. Good description.
Electrosense — This unit uses a sensor that mounts in the top of the tank with several rods of various lengths extending down into the tank. These sensors provide six discrete levels of sensing, and the levels are tailored to the type of tank. They claim that the sensors cannot be fouled by their contact with the tank fluid. You have to have access to the top of the tank, and have some vertical clearance above the tank to allow the sensor to be inserted. About $200.
There are others out there — have a Google around.
One thing to keep in mind is that if you can mount your tank in such a way that the side of the tank is visible once you open a cover or door, and the tank is made from the usual translucent plastic, then you will be able to directly see the water level — nothing beats that! Also, if the top of the tank is accessible and has a plug that can be removed, you could just use a dipstick to directly measure the water level.
MSNomers No Plumbing System
The Nomers have worked out a water system with no plumbing at all for their ProMaster camper van. It has no fresh water tank, no grey water tank, no plumbed sink, and no plumbing. The system saves space, money, saves build time, and eliminates freezing issues.
Its all described in detail on their website on these pages…
Definitely worth considering.
It was mentioned that you need a way to deliver the grey water from the sinks and shower to the grey water storage tank. My sister is wanting to convert a van so that she can travel and just love out of the van. I will have to let her know that it may be a good idea to look into a grey water pump.
how do I buy part/s equipment to build a green camper van water system- kitchen, showeer, bath?
Hi Bowie,
This page: https://www.buildagreenrv.com/our-conversion/promaster-camper-van-conversion-plumbing-and-the-fresh-and-grey-water-tanks/
gives sources for all the parts used in my conversion (tanks, pump, plumbing, sink,…)
We don’t have a shower, but should be pretty easy to find — googling “RV shower stall” brings up some.
I’ve listed some good suppliers on this page: https://www.buildagreenrv.com/resources/resources-suppliers/
Gary
Hi, very nice, well written article and responses to inquiries. I have acquired a 30′ 1954 Spartan Aircraft Manufacturing “Mansion” that I have gutted the interior back to the framing. The unit as originally built while having both bath (toilet, shower and lavatory) and kitchen sink had no storage tanks. System designed to dump into fixed sewer inlet for drainage and water hose inlet with electric HWH. I am in the process of designing the plumbing system and was planning for freshwater tank, grey water and blackwater tanks. First I read with interest your use of MDO plywood for the grey water holding tank. 1) How long has your “custom” tank been in use? 2) How is it holding up? 3) How did you treat the joints at the corners to eliminate leakage and how are the joints connected?
Secondly I was thinking to reuse the original small Kilgore flush Toilet. I read that you have moved away from flush toilets to go with composting toilets. What are your reasons for that decision. Thank you for taking the time to write your blog and responding to information requests.
Hi Don,
There is quite a bit of detail on the construction of the MDO tank here:
https://www.buildagreenrv.com/our-conversion/promaster-camper-van-conversion-plumbing-and-the-fresh-and-grey-water-tanks/
It went into service in late 2014, so about 3 years of service so far. So far, it has held up well — no problems and no leaks. The van now has a bit over 40,000 miles on it with quite a few trips. I’ll do an inspection tomorrow and report back if I see anything going amiss.
I do like the composting toilet better than any of the toilets we have had in past RVs, which includes a couple of toilets with black water tanks and a portapotti style toilet. Ours is built from scratch one, but if you want an off the shelf one, I’d look at Natures Head. The videos on the Natures Head site are good.
This page has a lot of detail on our composting toilet and some of the comments go into the whys:
https://www.buildagreenrv.com/our-conversion/promaster-camper-van-conversion-composting-toilet/
If you stick with the black water tank toilet, you are saddled with finding RV dump spots, the somewhat disagreeable task of emptying the black tank, using questionable chemicals to treat the black tank, trying to keep it from freezing.
Some of the RV dump sites are being closed due to the problems with the chemicals people use to treat the waste — making it harder to find dumps and for more waiting to use them. I don’t like contributing to what is a not very environmentally acceptable way of disposing of waste.
You can read over the description and comments on the page at the link above and see how we use our composting toilet — if this matches your usage, then you can see how much easier life is with the composting toilet, and consider giving it a try.
I know I would never go back to a black water tank toilet or any water flush based toilet that just stores the waste.
Gary
I did take a look at the MDO grey water tank as promised above, and it looks fine. No leaks, no significant degradation to the outer faces MDO, no seams opening up, and straps look good.
Can’t really look inside the tank, so don’t know for sure how its doing, but no evidence on the outside that there is a problem.
A while back, I did attach an alum angle (about 1 by 1 inch) to the lower forward facing edge of the tank to protect it from rocks thrown up by the tires, and that is working fine.
Gary
Hey,
Thanks so much for this resource. I am totally new to everything that has to do with converting a van and learning as I go. Would you foresee any problems with locating the tank at the back of the van and running pipe towards the main area (near slider) where I would have the sink/pump located?
thanks
– kati
Hi Kati,
I think you are talking about the fresh water tank?
I don’t see any problem with locating the fresh water tank away from the sink as long as you can find a good place to route the pipe. You will want to be able to drain the pipe between uses (particularly in the winter), so locate a drain valve at a low point that drains down through the floor. The pipes and the pump are all susceptible to freeze damage, so draining is a must.
If you have a grey water tank under the van, it gets much harder to find a route for the drain pipe under the van — there is a lot other stuff to avoid. So, be sure to work out the route the drain pipe is going to take before you finalize the sink and grey water tank location.
Gary
I am trying to convert a RTD shuttle bus into a rv. Any suggestions on placement of clear, grey & black water tanks would be appreciated. Also do each of these tanks require a vent ? If so does it have to be a roof vent?
Hi Jim,
So, I guess this is a full size bus? Should be lots of room for tanks.
I think there are some advantages to placing the fresh water tank above the floor — its easier to protect the tank and plumbing from freezing.
I personally would never have a black water tank again — I’d use a composting toilet.
https://www.buildagreenrv.com/design-and-build-information-for-camper-vans/installing-toilet/
You can read to link above for why composting toilets work well.
The grey water tank would normallly be mounted under the floor, and the main issuues are finding a place where it will fit and where you can get the plumbing routed to it. The plumbing routing can be a pain as there are so many things under the vehicle that can get in the way. So, be sure you have a clear route from the galley and shower to the tank location.
You can get the tanks made in just about any size you want to fit the space available under the bus — Plastic Mart is one of the places that does custom tanks.
This page has some details on how I installed my tanks:
https://www.buildagreenrv.com/our-conversion/promaster-camper-van-conversion-plumbing-and-the-fresh-and-grey-water-tanks/
To vent our fresh water tank, I just drilled an about 1/8 inch diameter hole in the fill cap. This has worked just fine. It does not take much of a hole to let air in as you remove water.
The grey water tank also needs a vent, or draining from sinks etc will be very slow. For mine, I just ran a half inch vent pipe from the top of the grey water tank to a point under the van a couple inches higher than the top of the tank. This has worked fine with no water spills from the vent. If you have to go higher for the vent, I’d probably try running the vent up into a fender well. I don’t think its necessary to run the vent up through the roof of the bus.
A black water tank may require the full roof vent treatment, but not sure.
It seems to me I’ve seen a forum somewhere for bus conversions — probably worth trying to find.
Gary
Great article. We did our water installation this way: http://van-derlust.com/kitchen-part-2-water-installation/
Great post! How would I find metal straps like the ones you used to secure the gray water tank? Thanks!
Hi Devon,
I’m 95% sure I bought it at Home Depot — probably out of that rack they have with some basic metal shapes.
Actual dimensions are:
width 1.4 inches
Thickness 0.08 inches
Its galvanized steel with predrilled holes along its length.
edit: on this page https://www.buildagreenrv.com/our-conversion/promaster-camper-van-conversion-plumbing-and-the-fresh-and-grey-water-tanks/ there is a picture of the strap, that if you click it to get the full sized picture, you can read the label on the strap.
Gary
Hi! Your page is the best resource I have found thus far – thank you! I am hoping to get some advice from you. I just bought a 14′ cargo trailer and I am trying to figure out my water system and I have learned a lot but still have unanswered questions. I am looking at this setup:
Pump choices:
1) https://www.amazon.com/gp/product/B00DLKT4OO/ref=oh_aui_slice_detailpage_o01_?ie=UTF8&psc=1
or
2) https://www.amazon.com/SHURflo-4008-101-E65-Revolution-Water-Pump/dp/B002XM5G70/ref=pd_bxgy_263_img_3?_encoding=UTF8&pd_rd_i=B002XM5G70&pd_rd_r=GHTWX821J1A8W8VQSTCK&pd_rd_w=Vwpfg&pd_rd_wg=Jr9gM&psc=1&refRID=GHTWX821J1A8W8VQSTCK
==================================================
Accumulator tank:
https://www.amazon.com/SHURflo-182-200-Pre-Pressurized-Accumulator-Tank/dp/B000N9VF6Q/ref=pd_sim_60_3?_encoding=UTF8&pd_rd_i=B000N9VF6Q&pd_rd_r=ZR3DGFAFDGBMWSM1DSDX&pd_rd_w=D0igh&pd_rd_wg=BBTzo&psc=1&refRID=ZR3DGFAFDGBMWSM1DSDX
==================================================
Pump Strainer: https://www.amazon.com/SHURFLO-255-213-Twist-Pipe-Strainer/dp/B000V2W0GE/ref=pd_bxgy_263_img_2?_encoding=UTF8&pd_rd_i=B000V2W0GE&pd_rd_r=32HKX42NN68CK40PABQA&pd_rd_w=EDttR&pd_rd_wg=bCAz2&psc=1&refRID=32HKX42NN68CK40PABQA
==================================================
Tubing:
https://www.amazon.com/gp/product/B000WN5F96/ref=crt_ewc_title_dp_3?ie=UTF8&psc=1&smid=ATVPDKIKX0DER
==================================================
Clean/Grey Water Jugs: http://www.cabelas.com/product/Reliance-Rhino-Heavy-Duty-Water-Jug/1311504.uts
Now I am stuck. I have learned A LOT through my research and I have gotten this far and understand quite a bit of the terminology. However, I am worried I am missing something!!
As far as my setup goes – I never will be, or want to be, hooked up to city water. I will only be using these two jugs as my water supply (I only need the sink to wash my hands). Ideally, I want to keep all the water jugs on the exterior of the cargo trailer. I am very limited in storage space inside the trailer. I would like to be able to just open the trunk of my car and swap out jugs. But now I am struggling to find the right inlet for this. I could just do a simple feed through inlet, but I would rather just have something to screw into from the outside.
Any ideas/thoughts would be helpful Thank you for your time!!!
Also my other restrictions are:
-Conserving water (dont want to have to change a lot of jugs! ie low water pressure) but it needs to be enough pressure to clean off dirty hands.
-Noise. I really want a quiet pump since it will be inside the trailer. The shurflo looks more quiet, but it takes more power and has a higher pressure meaning more water usage.
Hi Torie,
I can say that the Shurflo pump works well — its the same one I have now, and they are very common in RVs. They don’t hold up at all to freezing, so be sure to have a way to drain the pump/plumbing if you do freezing temps.
I use the same pump tubing kit to keep down the pump noise, and when I want to drain the pump etc for freezing temps, I just disconnect the hoses at the pump.
I don’t have any experience with the other pump, but it looks like it would also work, and it does have a lot of good reviews — so, probably OK qualitywise.
I don’t think you need any kind of accumlator tank for your simple system.
But, for what you want to do, I’d look at the simple submersible pumps that go right in the jerry jug. They apparently work well, and are really simple. You would have to figure out a way to get 12 volt power to the pump — maybe mount a receptacle on the outside of the trailer. This power would want to go to a switch near the sink to turn the pump on/off.
There is an example of the simple jug based system on this page and also at http://vandwellersteve.blogspot.com/p/water.html
But, using the shurflo type pump mounted in the trailer under the sink would also work fine. It should be able to pull the water from the jug that is sitting outside the trailer on the ground as it is self priming. You would not need a switch to control the pump as it will turn itself off automatically when you turn off the faucet.
I’d not be too concerned about to much flow rate and wasting water as you can control this with the sink faucet.
The Shurflo is pretty quiet and the hose kit also helps. You will hear it when its running, but I don’t find it objectionable.
Gary
Thanks for your quick feedback! The main reason I was looking at the accumulator sink was for noise purposes. I read that it reduces the noise coming from the pump. I will be teaching classes in the trailer so that is why I need to make sure it is quiet.
I considered those submersible pumps but choose against it because I can’t locate it outside of my trailer (I don’t think at least).
Again – thanks for all your info!
I’m converting a ford transit currently trying to put a shower in.
Could you offer any advice on How big a pump I need? I know I want it running from 12v DC but What volume pump should I use for a shower?
I am pretty handy in general but I’ve no experience with water pumping around a van. I’m a bit lost trying to figure out what pump I need
Hi Gary,
On this page that has some collected ideas on showers, there are some pumps listed — one of those might work: https://www.buildagreenrv.com/design-and-build-information-for-camper-vans/installing-a-shower/
The submersible ones that will go right into a jug of hot water might make the shower pretty simple.
Gary
I will Gary. Thanks again.
– Greg
Thanks for the blog. Very useful start. I want a hot shower, water for cooking/dish washing and urinal.
Toilet will be old fashioned “compost.” I do like long showers and my home use shower uses 35 gallons for a 7min shower! This is one area where i will have to modify my behavior:(
The photos help me to really think out the layout I will need. Safe travels.
-greg
Yes — I think 35 gallons of hot water would be really tough:)
Most of them do about 5 gallons.
Please let us know how the conversion goes.
Gary