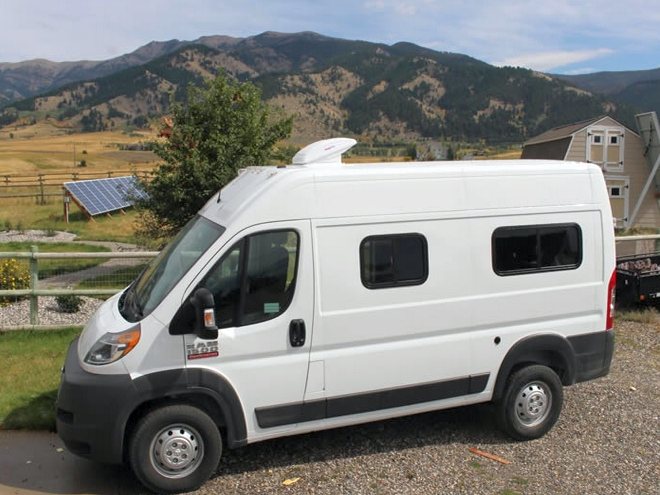
This section covers the van’s plumbing system, including the fresh water and grey water tanks.
Go back to the main camper van conversion page…
The van has a very simple plumbing system. The fresh water supply side consists of the 17 gallon fresh water tank, a 12 volt pump, and a single PEX line to the kitchen sink — no hot water heater.
The grey water drain system consists of a drain from the kitchen sink to a grey water tank under the van, and an outlet to dump grey water overboard.
There is no toilet (blackwater) tank or drain as we use a composting toilet, and there is no shower, although we might add an outside shower panel later at the back of the van depending on how things go.
Fresh Water System
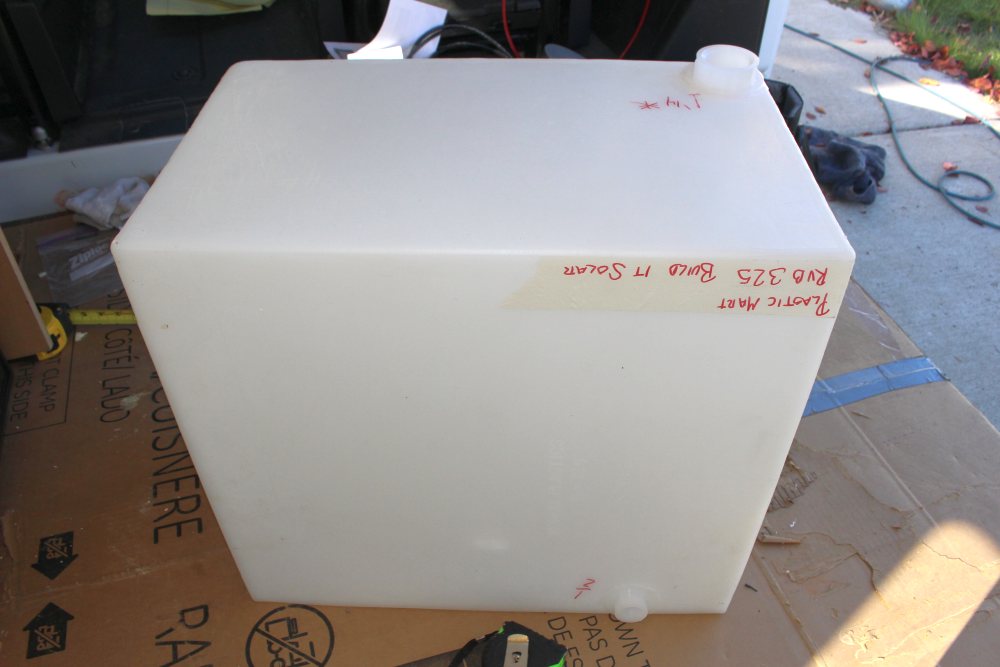
The fresh water tank is from Plastic Mart. They offer quite a few sizes, and we were able to find one that fit our space well. They will install fittings in the tank where you want them and to the size you want. Ours has a 1 1/4 NPT thread fitting on the top for filling, and a half inch NPT fitting down low for drawing water out of the tank. The basic tank starts at what seems like a bargain $68, but by the time you add the fittings and pay the $50! shipping and handling, its up to $140 — less of a bargain.
I don’t have a vent fitting on the tank, and not sure what I will do about this — maybe just leave the threaded plug on the filler fitting a bit loose? Update: Feb 2015 — based on first trip, the leaving the filler plug a bit loose seems work fine.
The tank appears to be well made and has relatively thick walls.
The 17 gallon capacity is a bit on the small side as far as commercial RV’s go, but the fact that we will have a composting toilet and not be using any of the water for toilet flushing makes the effective size of the tank quite a bit larger. We also don’t have a shower. It also seems like potable water is pretty readily available in most areas. Update: Feb 2015 — Based on the first week long trip, the 17 gallons appears to be fine.
Trial fitting the tank in place. It goes into the forward end of the passenger side bed. It fits well in that spot, and with the tank in this position, it can be filled by just opening the sliding door and running fill hose into the 1 1/4 inch filler fitting on the top — no need for another hole in the van for an outside fill port.
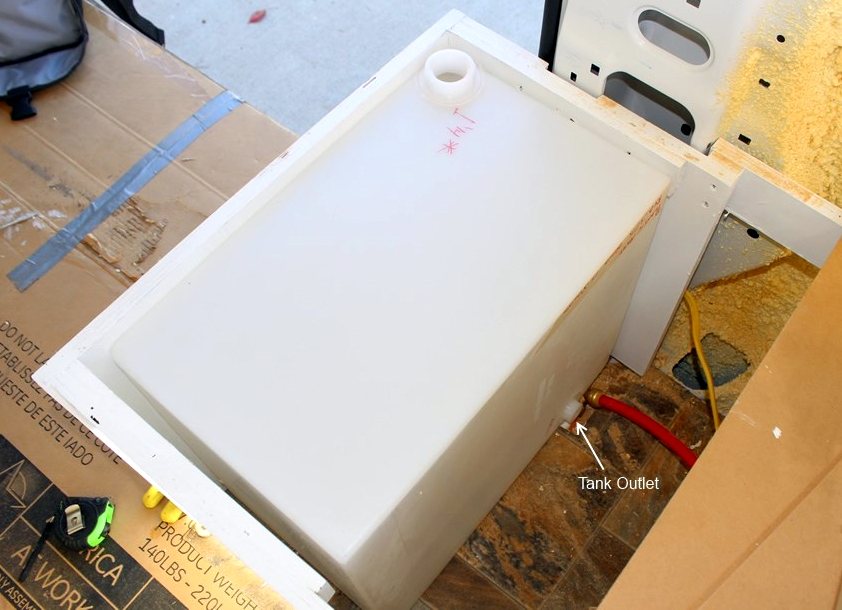
The tank in position. The fill port is the large fitting on top. The water outlet for the tank is the small (1/2 inch NPT) white plastic fitting near the bottom. The red PEX line is going off to the galley on the other side of van (see floor section for routing).
Mounting the tank.
The tank is secured in place by the two blocks of wood (1 1/2 by 2 inches) you can see at the front of the tank. These are screwed to the bed box which is bolted through the floor. The aluminum angle iron across the front of the tank (which is screwed to the bed box) keeps the tank from moving upward in those pesky negative g situations. There are spacers on the right and left ends of tank that keep the tank from moving side to side.
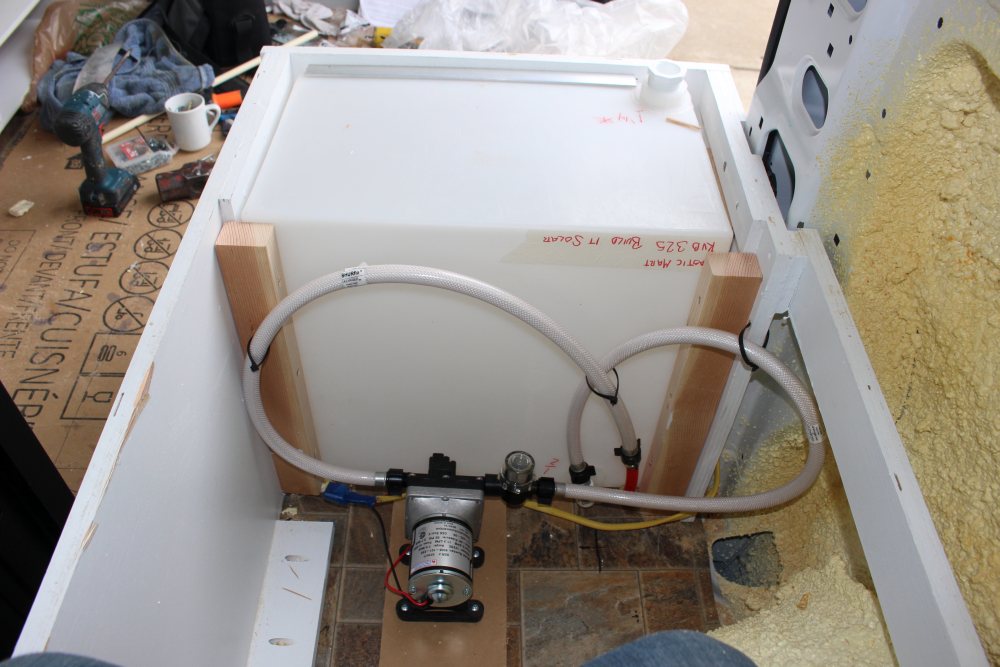
Hooking up the pump:
The pump is a 12 volt DC Shurflo Revolution 4008. This is a 3 gpm pump that automatically turns off and on with demand. This model is supposed to be an improvement on the one that Shurflo has sold for years for RV that works but is fairly noisy and cycles a lot. The reviews I read indicate that the new model is a big improvement — will see. Update: quite happy with it after first trip — seems like a good improvement over the old Shurflos a lot of RVs had.
I also got the flexible hose kit and the strainer for the inlet that Shurflo recommended. The strainer keeps junk out of the pump, and the flexible hoses keep the pump from transmitting vibration (noise) to the van. The hoses just screw on to half inch NPT threads finger tight — very quick to install.
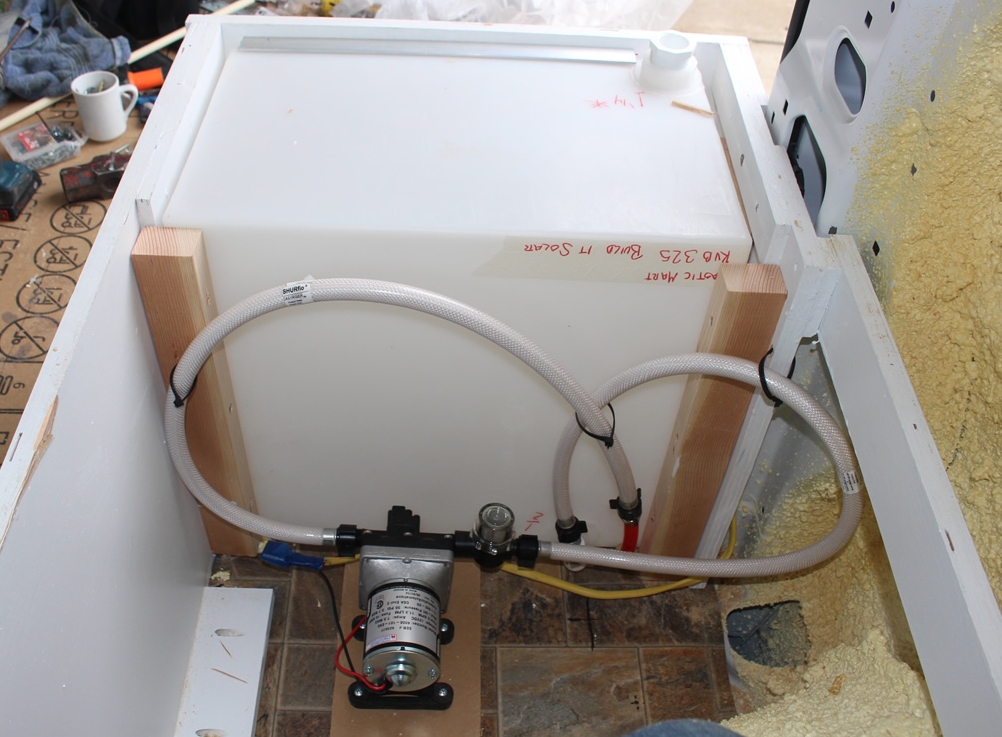
The pump mounting pad is rubbery to absorb vibration and noise.
The hose coming into the right (strainer side) of the pump is the from the tank outlet fitting, and the hose from the left of the pump is the outlet and goes to the one and only water use point in the van — the sink on the other side.
The MDO plywood pad that the pump is screwed down to is just silicone caulked to the floor.
I used a few zip ties to keep the flexible hoses from wandering too far.
About $100 for the pump, strainer and hoses.
I can mention from past experience that for winter in freezing areas, the tank and as much of the plumbing as possible needs to be drained, and the hoses disconnected from the pump.
If you are looking for a very simple water system a jerry jug in the galley cabinet with one of these pumps going to the galley faucet could work quite well. Use the pump switch to control the water flow.
Update 2024: Backup Water System
We have had our water system fail a couple times on trips. The Shurflo pump failed once, and on another occasion we had some extremely cold weather and the pipe to the galley froze and stayed frozen for days. We decided it would be good to have a backup water system so that no matter what happened to the regular water system, we would still have water.
We decided to add a small submersible pump that would fit into the water fill port on the top of the tank. The new pump plugs into a 12 volt cigarette style socket that I added near the tank, the pump goes down into the fill port, and the tube attached to the top of the pump is used to fill pots or whatever. The line from the 12 volt socket to the pump has an inline switch that is used to turn off/on the flow. When not in use, the pump, cable and tube roll up into a compact package that stows next to the tank.
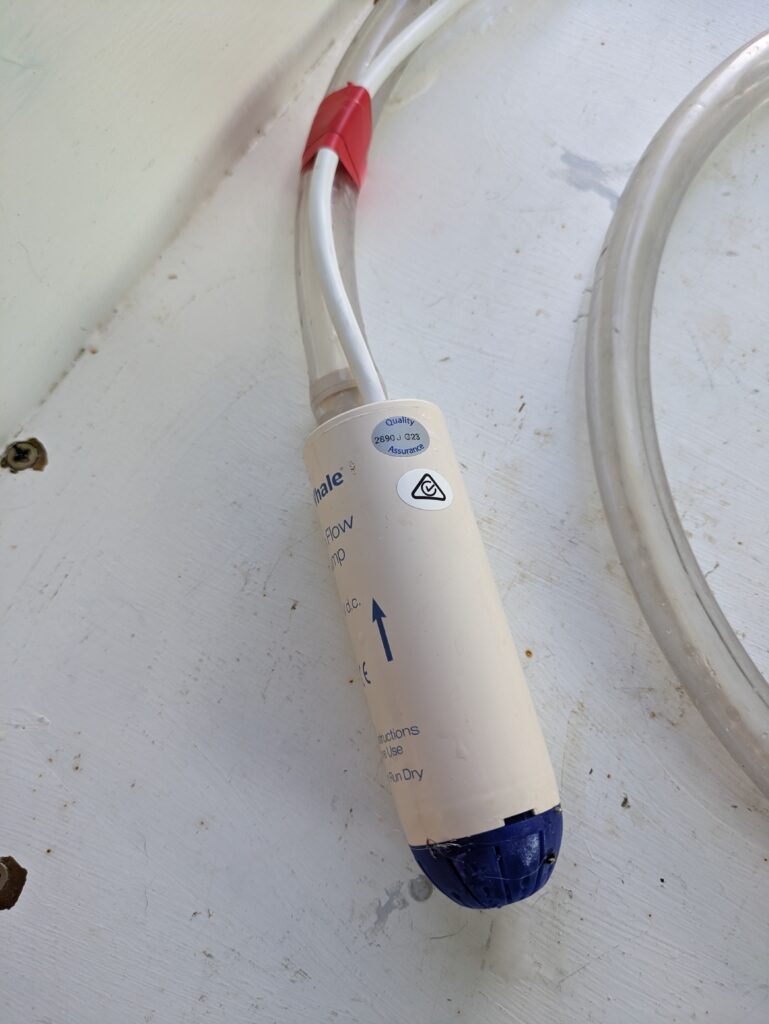
The submersible bump – 1.4 inch diameter, 16 liters/min
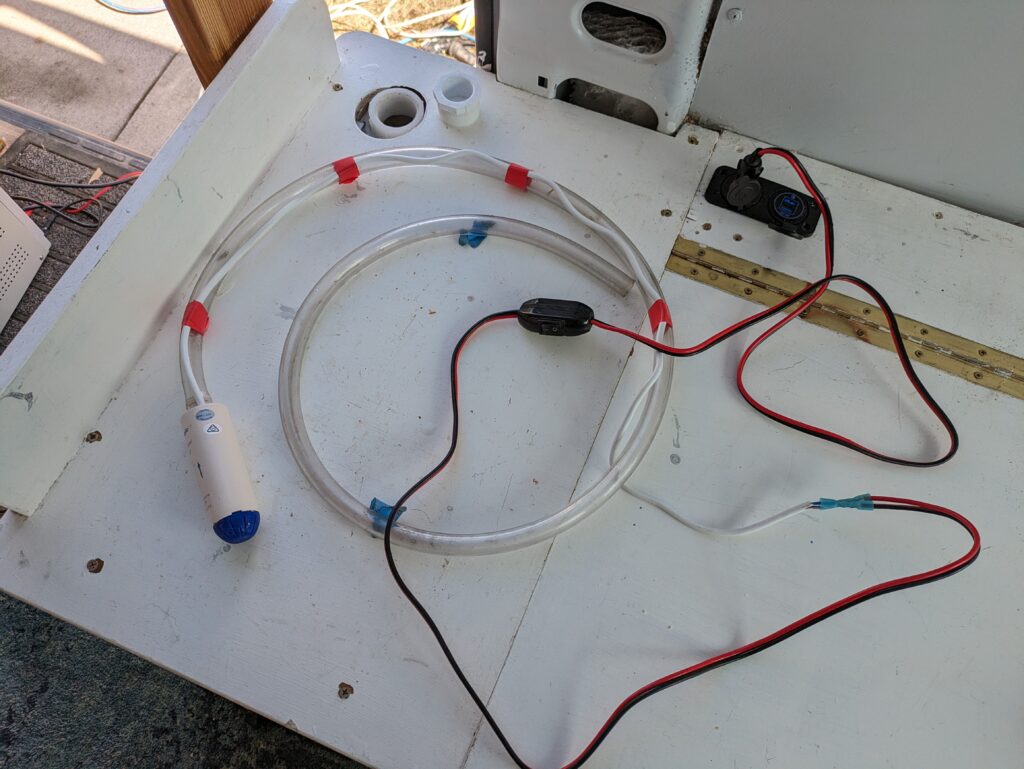
The whole setup. Pump goes into fill port at upper left, pump plugs into 12 volt outlet at
upper right, water comes out of the clear vinyl tube.
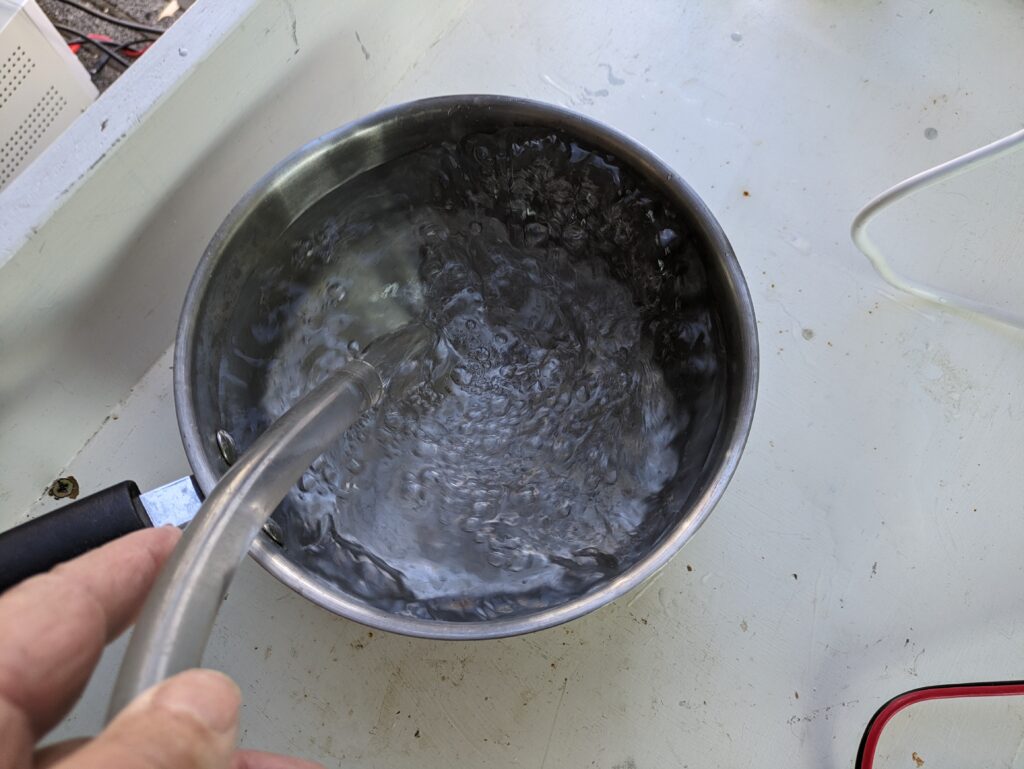
Pumping water into a pot. Impressively fast for such a small pump – fills the pot in about 5 seconds.
Grey Water System
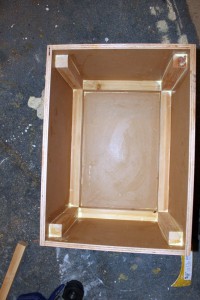
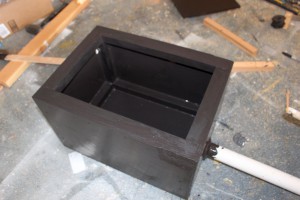
The grey water tank is an experiment that may or may not work out. I made the tank from MDO plywood that I had left over from the beds. Its basically a glued and screwed box made from the MDO. MDO is Medium Density Overlay plywood — its a premium plywood with resin impregnated face sheets on each side. One of its industrial uses is to make tanks, so maybe this will be OK.
Part of the reason I decided to go this way was just curiosity on how well it would hold up, but the other part is that is hard to find a plastic tank that fits the underside of the ProMaster and gives a descent volume without sticking down too far. I think that some of the commercial RV’s remove the spare tire to make room for the tank, but we go on long gravel roads, and I don’t want to be without a good spare. If this does not work out we will probably mount the spare on the rear door and used the place where the spare was for a commercial grey water tank.
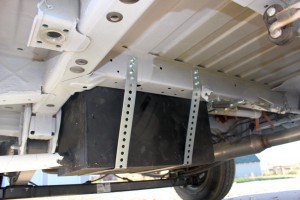
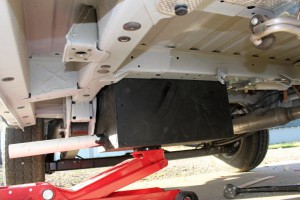
The finished tank is 11 gallons (a bit less than I would like), and fits below the ProMaster leaving 10 inches of ground clearance — the PM’s gas tank extends a bit lower than than the grey water tank.
The drain from the galley sink comes in high on one side of the tank, and the tank drain leaves low on the opposite side of the tank. The drain line is 1.5 inch PVC and has a ball valve to allow draining.
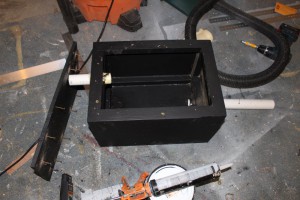
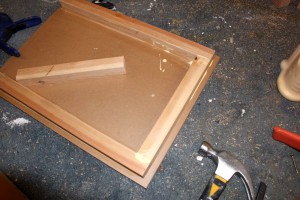
Construction of Grey Water Tank:
These pictures show the construction sequence for the grey water tank.
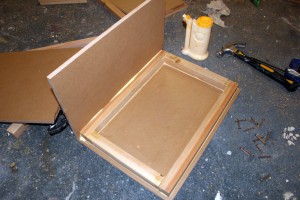
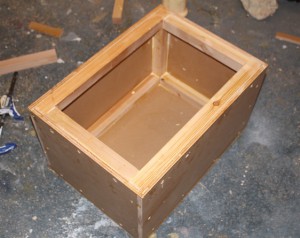
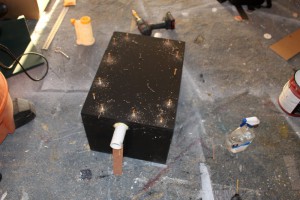
In the end, the tank cost essentially nothing to build as all the materials were left overs. The tank got two coats of Behr latex house paint inside and out. I don’t think that the MDO requires much protection, but it does help to seal the unprotected edges. After one trip, I’m guardedly optimistic that its going to work out OK.
Update April, 2017: After 3 years and 31,000 miles, the tank is still doing well. No leaks or evidence problems. It even survived a pretty good bump from an unplanned off road experience.
Update May, 2019: Still going strong — no leaks.
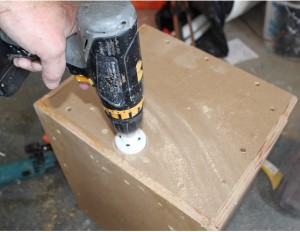
Installing the Grey Water Tank:
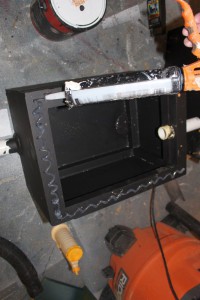
These pictures show placing and securing the tank under the ProMaster.
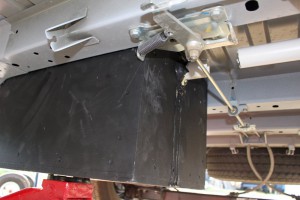
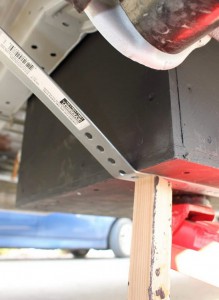

One negative for the MDO tank is that it weighs more than the poly tank — The 17 gallon poly tank is about 12 lbs and the 11 gallon MDO tank about 20 lbs.The straps are galvanized steel about 0.08 inches thick from Home Depot .
On the plus side, it probably is a bit more resistant to freezing and to rocks thrown at it by the tires.
Grey Water Plumbing
Sink to tank:
The only water coming into the grey water tank is from the galley sink. I used regular household plumbing supplies from Home Depot to make the connections.
The sink is a Houzer bar sink that they also sell for RV use. Also bought the Pfister G171 faucet set that Amazon offered along with the sink. Found out after the fact that Home Depot had a very similar bar sink, faucet and strainer combination available locally.
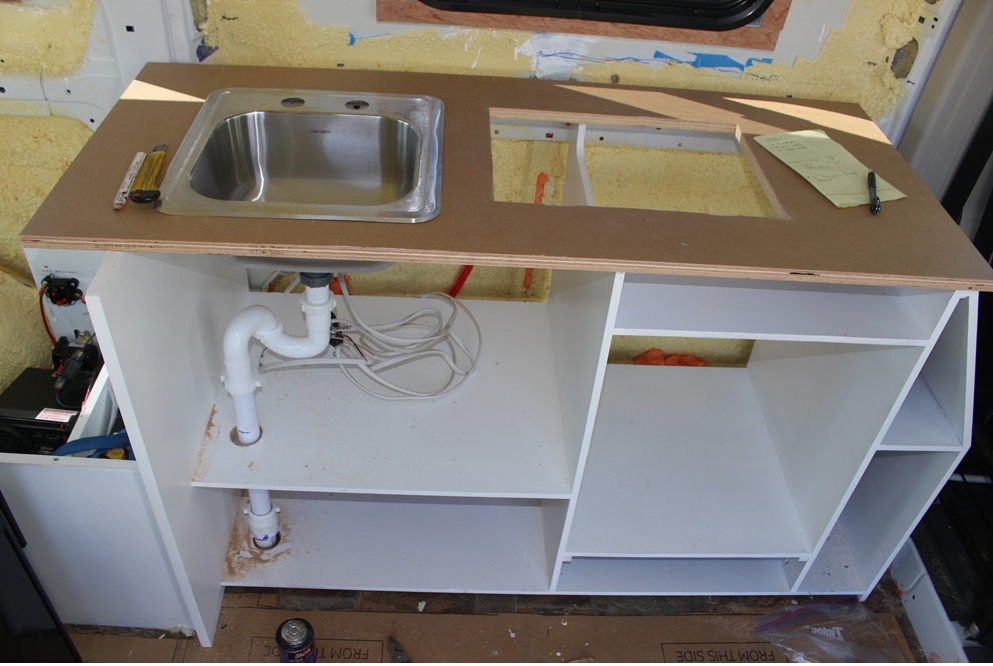
Picture shows the standard household sink plumbing down through the van floor. The only change I made was to go down to 1 1/4 PVC pipe at the floor level to make the pipe a bit easier to run under the van floor.
The sink is just temporarily set in place here to work out the plumbing. I’m waiting for the counter top laminate material to arrive beforkkkhe permanent install. The galley cabinet will have a fridge in the big hole to the right, and drawers and cabinet doors for the rest — waiting on materials to finish this up.
One thing I’d offer as a caution is make sure you have a good route for the drain pipe from the sink to the tank under the van. Its easy to locate the galley and sink, and then find that you can’t find a good route for the drain pipe. For example, in the picture above, I would like to have pushed the drain pipe back close to the van wall, but there was just no way to do this give the way the van frame and the exhaust pipe ran.
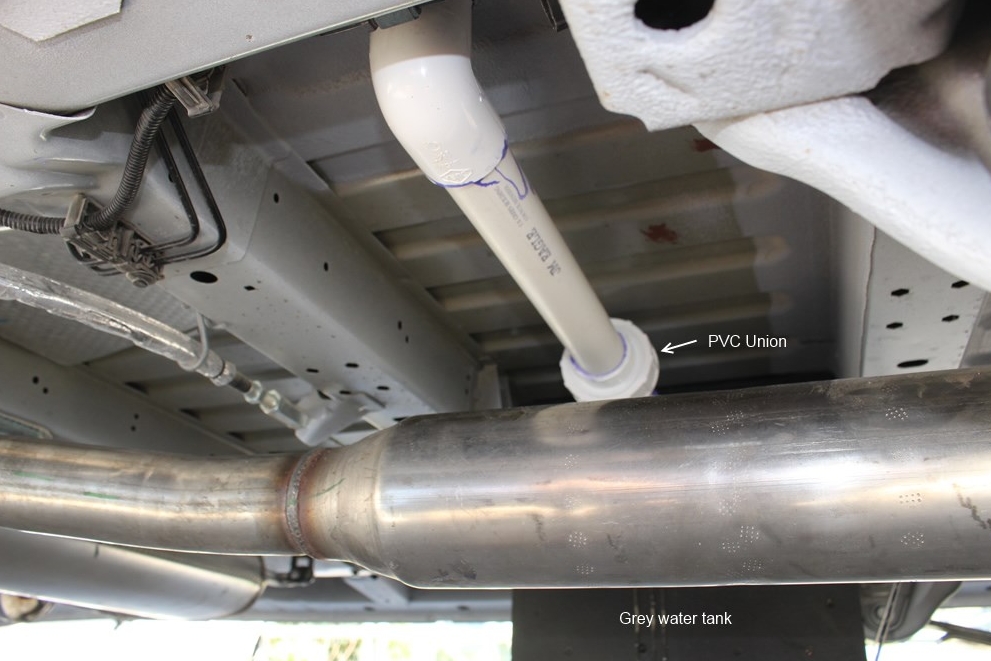
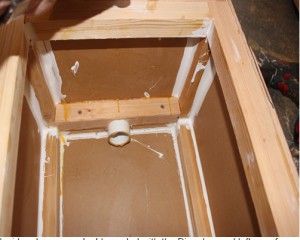
The picture above shows the routing of the grey water line from the sink to the grey water tank under the van. The elbow in the foreground is coming down from the sink, and the 1 1/4 PVC line goes directly over to the top of the grey water tank. The bulge in the middle is a union that allows sink line to join with the tank line without having any space to slide the two pipes into a standard glued coupling — also allows for easy removal of the tank down the line.
Update: Jan 2015 — I had to add a vent pipe near the top of the tank to allow air to leave the tank as water drains into the tank and fills it. Without the vent tube, the water drained very slowly from the sink into the the tank. The vent is a piece of half inch PVC pipe that enters the tank right near the top and just forward of where the “PVC Union” appears on the picture above. For now, this vent tube ends just a few inches outside the grey water tank and does not run up to the van roof or sidewall — I may change this down the line, but it does appear to work OK as is.
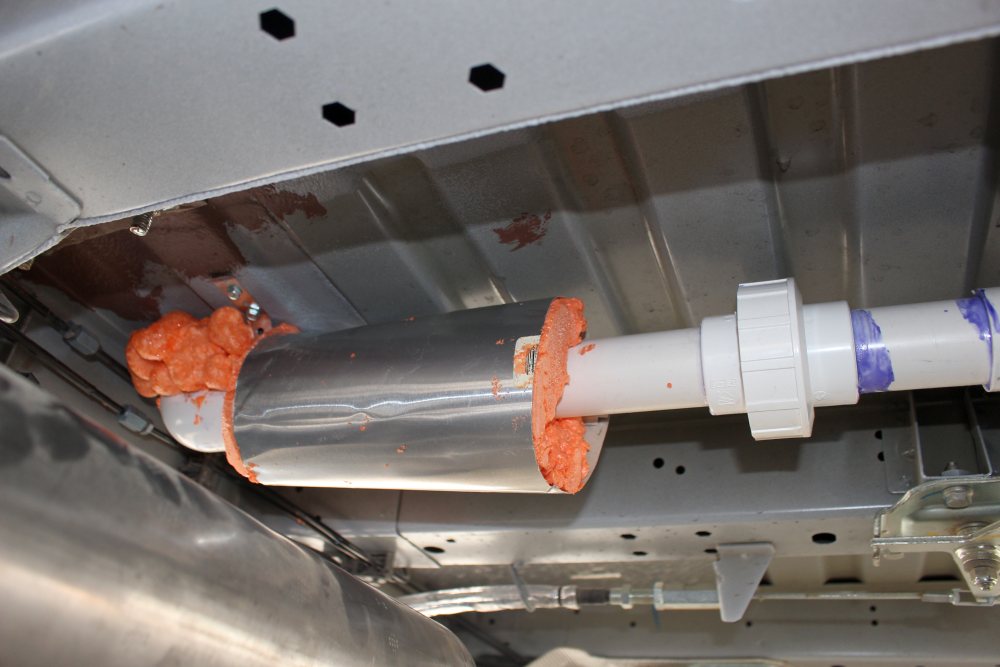
Another view of the grey water pipe under the van. I added a piece of 4 inch aluminum HVAC duct over the PVC pipe and filled it with Great Stuff Pro foam to protect the PVC from potential overheat by the exhaust system. The Great Stuff Pro foam is approved as a fire block, so it should be OK for this, but will keep an eye on it. Also foamed the area where the PVC pipe goes up through the floor.
The PVC pipe has a slight down slope toward the tank so that there is no water accumulates in it.
Grey water tank drain out:
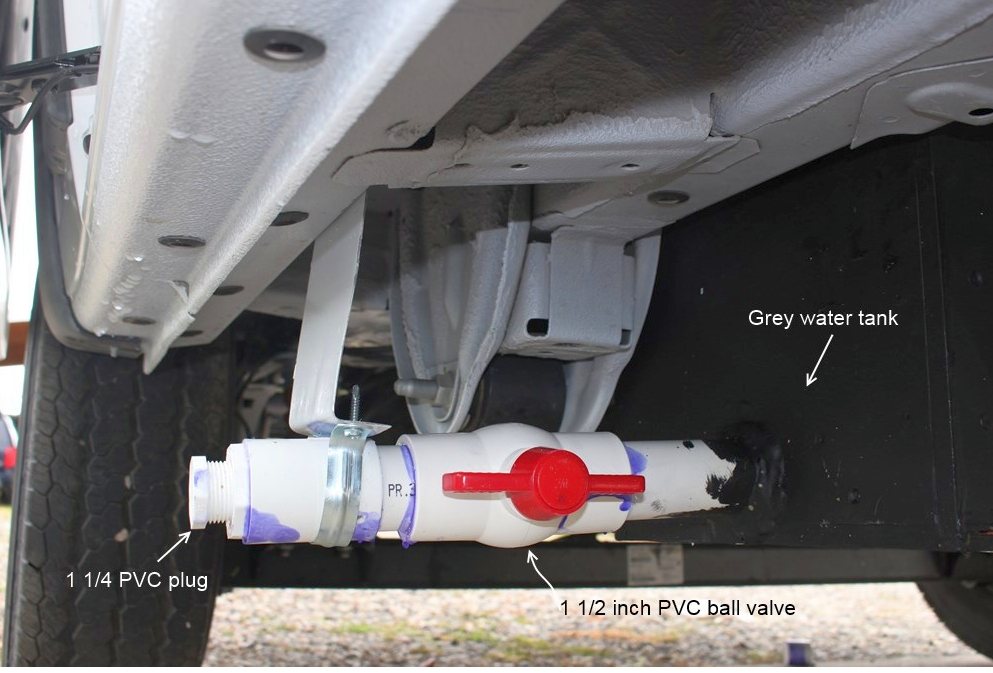
This shows the arrangement for draining the grey water tank. The 1 1/2 inch PVC line comes out near the bottom of the grey water tank and goes into a 1 1/2 ball valve. The line then continues on a little ways and terminates in a threaded 1 1/4 inch female fitting that has a 1 1/4 PVC plug screwed into it.
The support is made from one of the window cutouts and a standard 1 1/2 inch PVC pipe clamp. All Home Depot stuff. It feels VERY solid.
Will have to see if more protection from rocks kicked up by the tires is needed — I do plan to add mud flaps on both front and rear tires.
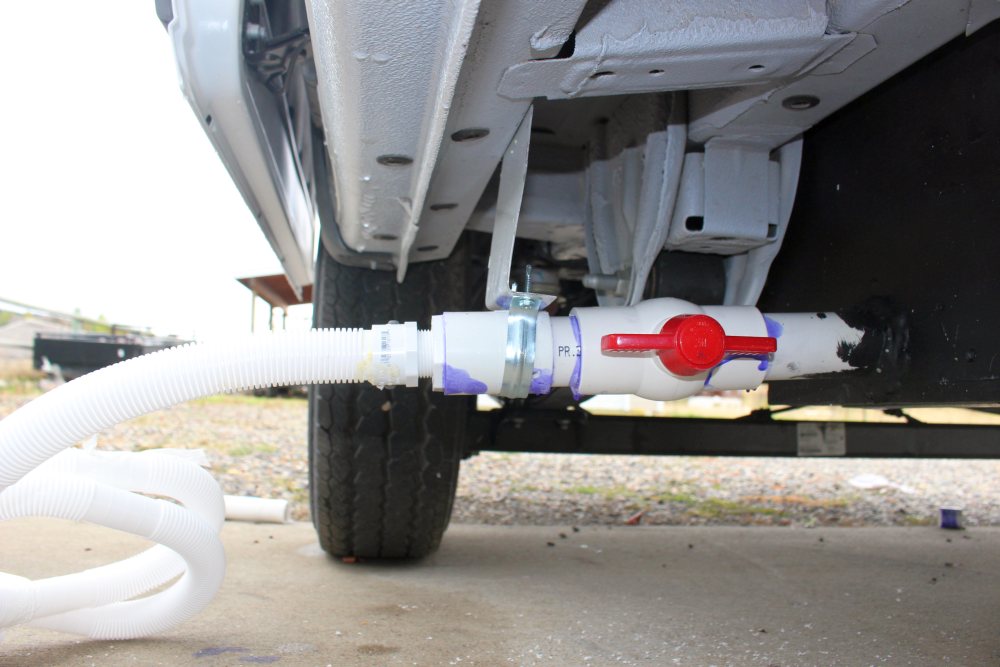
This shows the drain hose arrangement. The hose is made for bilge pumps. The end of the hose is polyurethane glued into a 1 1/4 inch PVC threaded to slip adapter. To use the hose, you just screw the hose and adapter into the fitting on the end of the tank drain pipe and open the ball valve.
I used this unusual arrangement because I do not like the bulky hose used on most RV’s, and the bad experiences I’ve had in the past with the regular RV dump plumbing and valves. I think I can cut off most of the length of the bilge pump hose, but will wait to see how it works out in practice. The only water coming into this tank is from the sink which has a strainer that prevents larger stuff from going down the drain, so I think the 1 1/4 diameter hose will be OK.
For areas that allow it, a bucket or the like could be placed under the drain pipe and the ball valve left open. In the morning, just empty the bucket in the approve area.
Update April, 2017: The drain hose arrangement has worked out fine over the past 3 years. Its easy to hookup and easy to use — no hose or pipe clogs. Much better for our situation than the bulky RV sewer hoses and connections.
If I were doing this over, I’d try to get the ball valve a little closer to the sidewall of the van so that it would be easier to reach. The ball valve takes a fair bit of force to turn, and having it a foot in from the edge of the truck makes it awkward to turn off and on. I made an extension for the valve handle to make this easier.
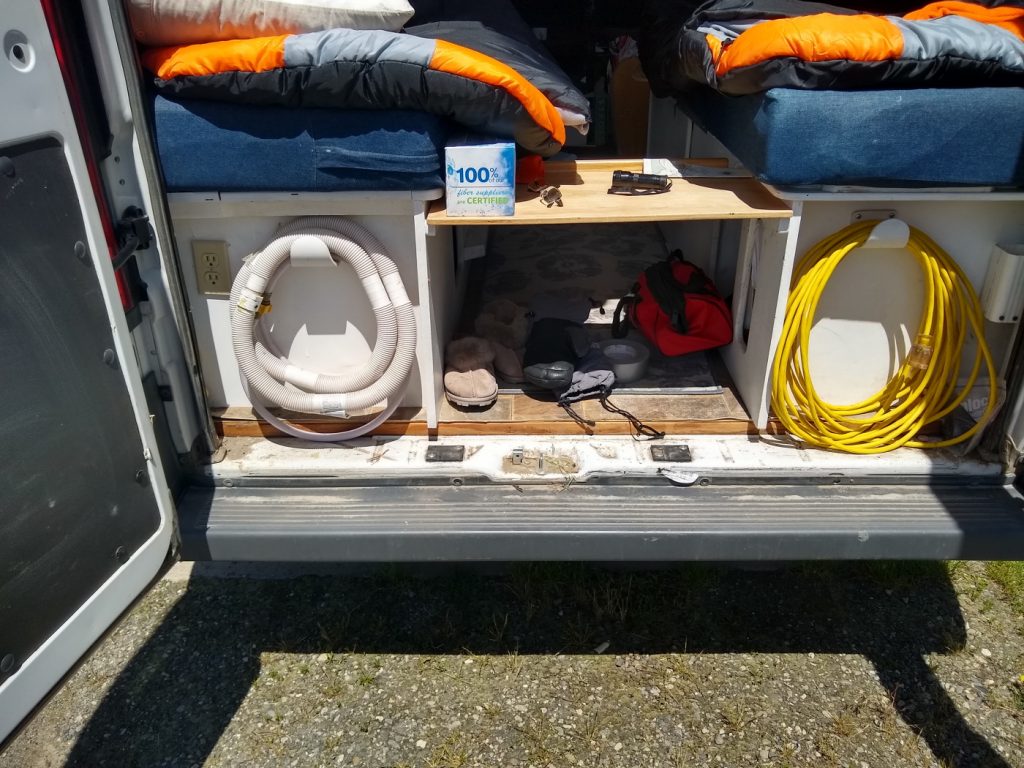
Stow Hoses
This is how we are storing the fresh water fill hose, the grey water drain hose, and the extension cord for the shore power hookup. Its a nice handy place to access from the outside and has worked well for us. The hoses and cord are stowed on the back of the bed platforms.
The hold up hooks are cut out for PVC pipe (about 3 inch I think).
The two ends of the grey water hose nest together by friction, so any odor from the grey water hose is trapped inside it. After I empty the grey water tank, I swing the hose around a few times to get any remaining water out of it.
Freeze Protection
If you think that you may be operating in freezing temperatures, have a look at this Freeze Protection page for some ideas.
Cost and Weight
The installation of the fresh water tank took about an hour with another hour to install the pump.
Making the grey water tank was about 3 hours, with some breaks for paint and sealer to dry.
Installing the grey water tank took about 2 hours.
The grey water plumbing was about 3 hours.
That totals to about 10 hours — probably more like a couple full days.
| Item | Cost | Weight |
|---|---|---|
| Fresh Water Tank | $139 (incl $50 shipping) | 12.3 lb |
| Pump | $101 (with strainer and pipes) | 2 lb ? |
| PEX Plumbing run | $10 ? | 3 lb ? |
| Grey Water Tank | $0 | 20.7 lb |
| Grey Water Plumbing | $20 ? | 4 lb? |
| Total | $270 | 42 lbs |
After Thoughts
We did consider a water system that just used 5 or 6 gallon plastic “jerry” cans. Some conversions have used these successfully, and I’m not sure that overall it would not be quite satisfactory. You can get submersible pumps that go right into the 5 gallon plastic can and provide water to a sink faucet. The drain water from the sink just goes into another poly can, which might be located outside the Van.
I think that its good to consider this simple approach, and see if it works out well for your situation.
On the plus side, the jugs solution is a really simple solution and saves a lot of install work, but on the negative, it take up space in the galley cabinet, and limits the amount of water you can carry.
Gary
October 1, 2014, June 24, 2015
Comments and Suggestions…
I’d be happy to hear any ideas, suggestions, corrections, or questinons — use the Comments link just above.
Gary, That’s good to know I could do it with a plywood disk too. Maybe I replace the valve with a brass one, it’s more expensive but I think it will be easier to operate. the one with the handle, like this: https://www.lowes.com/pd/AMERICAN-VALVE-Brass-1-1-2-in-FNPT-Ball-Valve/1000241715
HI Gary,
I’m also using a PVC valve following your design, however I have a hard time opening and closing it. I can do it with a slip joint plier, but I’m afraid to broke it, or worse: broke the pipe joint at the tank.
Any ideas? what’s your experience with that?
I like the idea to mount it closer to the side of the van for easy access, but that will create more leverage when force to open is applied.
Hi Rafael,
Yes — mine is stiff also.
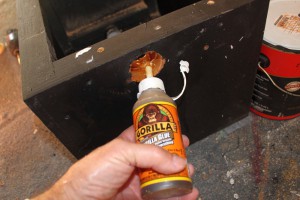
I took a circular disk of 5/8 inch plywood and cut a slot/hole in the middle that is a snug fit for the PVC valve handle, and then glued it onto the PVC valve handle with Gorilla glue.
This works pretty well — you still have to position yourself to get a good grip on the plywood disk, but it turns easier, and no danger of breaking the valve handle. The valve handles do break – I broke one half of the handle off on another application.
Gary
Wow, that Grey water tank is genius, thank you for this site. I’m planning a 6 x 12 trailer build now. Great job.
Hi Billy,
Keep us posted on how it goes.
Gary
Billy, We’ve built a 6×12 trailer too and have learned so much from this site, youtube, and super helpful workers at Home Depot! It’s a little tight for us and our three kids but super fun. We added electrical last week with solar panels, lights, fans, battery and pure sine wave inverter. Next up is a shower and plumbing and the rest of the insulation! Would love to see your build!
That looks like a good solution.
If you do the brass valve, please let us know how it works out.
Gary
Hi Gary,
Finally finished the van. Took me a year! I will send you some photos; I am so greatful for your guidance, really. Could not have done it without your site. On plumbing, how do you winterize the potable water during freezing? And if you drain it, how do you get all the water out of the supply line, the pump lines and the pump? We live where it Freezes (Flagstaff, AZ) but do trips all winter in the desert, so I am looking for a simple way to empty the system in between trips.
Hi John,
Please do send pictures and description!
On a boat now with limited and expensive internet — will put up full answer when we get to good internet.
Gary
Hi John,
Great to hear the conversion is finished. Please do send photos — my email is on this page:
For freeze protection I do drain the system. I have drain that Tees off of the supply line comes out of the bottom of the fresh water tank and goes to the inlet of the pump. The drain line goes to a ball valve and the drops through the floor — its half inch. I open this drain and it drains nearly all of the tank. Then I open the sink faucet (which starts the pump) and let it run until air comes out of the sink faucet. Then I disconnect the inlet and outlet lines to the pump (these are easy hand screw off rubber hoses). I then run the pump for a couple seconds more to clear water out of the pump.
The pump is very subject to freeze damage, so make sure it does not have water left in it. The rest of the plumbing (as far as I can tell) its not that critical to get all the water out as long as most of it is gone and any ice has a place to expand to.
I also drain the grey water tank.
When we camp in cold weather, the fresh water tank and plumbing is inside the van, so as long as we keep the van warm its OK. The grey water tank can freeze, and sometimes we put some RV antifreeze down the sink drain.
From my experience, as long as the grey water tank is not full, it will survive a freeze, but I suppose its best not to push it.
Gary
This is a great page! Much better then the information I have been finding. One question: You put your fresh water inside, but the grey water outside. Are you ever in cold weather and worry about your grey water freezing?
Hi Zoe,
We do some camping in cold weather.
Sometimes I will add a little non-toxic RV antifreeze (Propylene Glycol, not Ethylene Glycol) to the grey water tank via the kitchen sink. This works pretty well.
I have had occasions on past RVs where the grey water tank froze solid and basically stayed that way until we got back to above freezing temperatures. Probably not great for the tank, but it did survive OK for the couple times this happened.
I guess if the grey tank were full and it frooze, it would break it, so letting it freeze only works for part full tank.
They do sell tank electric heating elements for tanks. I’ve never tried one and don’t like the idea that you would have to supply it with electricity all the time.
I guess one way to handle frequent camping in cold weather would be to use one of those 5 or 6 gallon plastic jerry jug type tanks under the kitchen sink. Then keep the temp inside the van above freezing (or add a little RV antifreeze to the jug). If you have a heater in the RV, it should not take much heat to keep it above 32 F. Or, if the grey water jug was well insulated, a small electric immersion heater would probably not use a lot of juice.
Please let us know what you work out.
Gary
Hi there, I was wondering how your gray water tank has held up? Seems like a solid plan and a great way to save money. I’m planning on copying if yours worked well over the long term.
Thanks!
Hi,
So far so good.
No signs of problems.
It actually got a pretty good bump last year on a small, unplanned off road experience, but no apparent damage.
Has also had a few days when its contents were frozen, again with no apparent damage. But, the tank was not full when it froze, so the expansion had a place to go.
Gary
So 3 years of use, and the box has no deterioration from liquids/debris?
Right.
Hi! Curious as to how your CPVC pipe insulation held up where it crossed your exhaust. I’m looking to do something similar with some PEX water liens that are crossing the exhaust.
Thanks!
Hi John,
I went out and took a look at it, and its fine.
The insulation is still firm and sound, there are no signs of burning on the PVC pipe or the insulation or the alum cover.
I’ll try to remember to take some temperature readings with the IR gun and just see how hot things are running, but it looks OK after quite a few trips.
Gary
Because we do not boondock, and because of the predictability of our digestive cycles, our toilet is designed for #1 use only. It consists of the upper part of a Coleman porta-potti modified and installed inside a box (with a cushioned lid) that doubles as a seat. The modification includes the replacement of the bellows with a small 12v submersible pump and on/off flush button.
A pvc pipe connects the toilet to a 4+ gallon “gray” water tank ( which I recently replaced with one made of 6″ PVC pipe). The sink’s waste water is also piped to that gray water tank. The tank is emptied into a the park’s sewer via a hose. If a sewer is not available, we empty the tank into a jerry can and carry it to the campground’s toilet for disposal. No leaks, no odors whatsoever inside the van.
We have used this “system” for number of years and it has worked well for us. Understandably, it’s not for everyone.
Nice job with the gray water tank. I made mine using 6in PVC sewer pipe. It can hold around 4 gallons which is adequate for us. Also I installed the drain on the driver’s side so that the hose does not get in the way.
Hi,
Like the idea of using the large PVC pipe — should be very durable.
Have you got any pictures you could send in? https://www.buildagreenrv.com/contact-gary/
Gary
Hi Gary,
I emailed a few photos to you.
Cheers,
Thanasis
Hi,
Did not get the pictures — can you resend them?
Try: gary AT BuildItSolar DOT com
Thanks — Gary
I just tried but it failed at first, because BuidtSolar has a typo in it. I tried again at BuiltSolar and went through. Let me know it you got them this time
Well, that is certainly the most unique grey tank I’ve yet seen 🙂
Where did you hide the vent?
If you go to Sherwin Williams, they can give you some good options for coating the inside with products from their industrial line, that are rated for submersion. Other aspects of your experiment aside, that house paint will just turn into a mess in relatively short order…
Hi Brad,
It is certainly in the “experimental” category 🙂
There is a little blurb on the vent:
“Update: Jan 2015 — I had to add a vent pipe near the top of the tank to allow air to leave the tank as water drains into the tank and fills it. Without the vent tube, the water drained very slowly from the sink into the the tank. The vent is a piece of half inch PVC pipe that enters the tank right near the top and just forward of where the “PVC Union” appears on the picture above. For now, this vent tube ends just a few inches outside the grey water tank and does not run up to the van roof or sidewall — I may change this down the line, but it does appear to work OK as is.”
So far the vent appears to do its thing OK in this position. If it shows signs of needing to extend up further I think I will try attaching a tube to it that goes up further, but I’d rather not have to run it up through the van and the roof.
One thing is that the MDO itself if pretty resistant to water exposure — one of its uses is for chemical tanks. So, I may not have had to paint the inside at all.
The Sherwin Williams finishes sound like a good way to go.
Gary
Hi Gerry,
We don’t have a blackwater tank because we use a composting toilet.
Info on ours here: https://www.buildagreenrv.com/our-conversion/promaster-camper-van-conversion-composting-toilet/
It has worked well for us so far.
There are commercial ones as well like the Natures Head, which appears to work well.
Another simple solution is to use a porta potty or a cassette toilet.
Our last RV after doing a big floor plan change went from a conventional toilet with black water tank to a porta potty — I thought it was fine.
I think that one sort of little known truth of RVing is that people tend to use the poo function with their RV toilet a fair bit less than they think they will. This is just because there are typically so many opportunities to use regular toilets.
Gary
Hi…I am attempting a conversion to my 2016 159″ PM. I notice there is no mention of a black water tank. I have been trying to figure out what to do with toilet and tanks, etc. Maybe cassette? Macerator? Shower pan? If I can get beyond these issues…the balance is something I can handle.
Any insight you can share greatly appreciated.