This page covers some testing of the insulation types commonly used to insulate van conversions. It seems like there are so many claims and opinions on the best type of insulation to use in van conversions, that some actual data might be helpful to people trying to decide (the other factor is that I’m Covid bored and really needed a project to work on).

The testing is mostly aimed at moisture management and condensation, but also does a rough comparison of thermal performance. I’m also starting a mold test to see if any of the tested insulations are susceptible to mold growth — results on the mold test are a few weeks out.
The moisture management parameters measured include: condensation formation, humidity levels in the insulation, moisture pickup over a typical van night, and dry out time after a van night.
Van Moisture Situation
Some thoughts on the moisture situation in camper vans.
People generate moisture through breathing and perspiration — from about 40 grams per hour sleeping up to 90 grams per hour doing light work. So,two people might add 3000 grams of water to the van in a full day/night. A dog would add some more. Cooking or even making coffee or tea contributes moisture, this can be up to 3000 grams per day, but likely less in most van settings. Other sources include showers (if so equipped) and drying out wet cloths. Non-vented propane heaters also add moisture if used.
So, how much moisture does it take to get the van relative humidity up to (say) 70%?
A typical van volume is about 630 cubic ft, which is 47 lbs of air. The water weight with 70F temperature and 70% relative humidity is 5 grams per lb of air. So, the total water weight in the van for 70F and 70%RH is about 240 grams.
Vans have a metal outer skin that is a near perfect vapor barrier, so none of the moisture gets out via that route.
So, it seems like with people etc. generating several thousand grams of moisture per day and it only taking 240 grams of water weight to get the van up to 70% humidity, that: 1) there needs to be good ventilation in the van to get rid of the excess water, and 2) that even with good ventilation there are likely to be extended periods when the relative humidity in the van will be high.
If the van air is at 70F with 70% RH, then the dew point is 60F. This means that if the van air gets to a surface (eg the van skin or outer part of insulation) that is below 60F, then the water vapor will condense into liquid water. This is potentially a bad thing from the point of view of rust or mold.
This makes the van a challenging environment for moisture management.
Setup
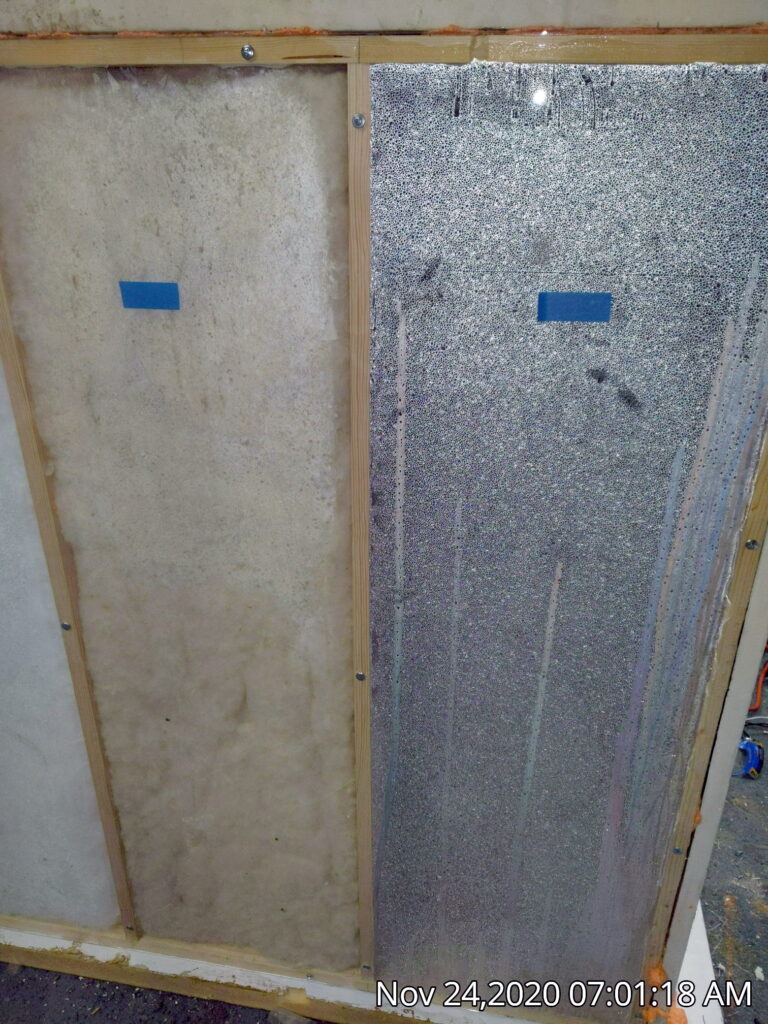
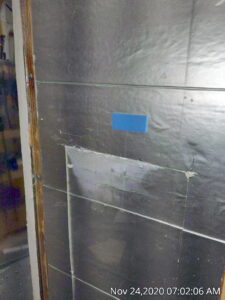
The setup consists of a box that is about 4ft high by 5 ft wide by 3 ft deep. The front face of the box is glazed with 1/8 inch plexiglass and the rest of box is constructed with rigid insulation board. The Plexiglass is used in place of the van sheet metal so that any condensation can be directly observed. The plexiglass face is divided into four bays, each of which can accommodate an insulation sample, but normally one bay is not insulated to give a comparison to un-insulated van skin. Each bay is 14 inches wide and 48 inches high.
The box has a heater (light bulbs) and a humidifier which are run by a controller so that humidity and temperature inside the box can be controlled. The box is located in my garage/shop and the temperature is roughly regulated by opening doors to cool or turning on the heater if it gets too cold.

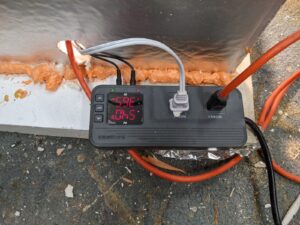
The heater and humidifier are plugged into this controller in order to keep the temperature and humidity inside the box at a constant level.
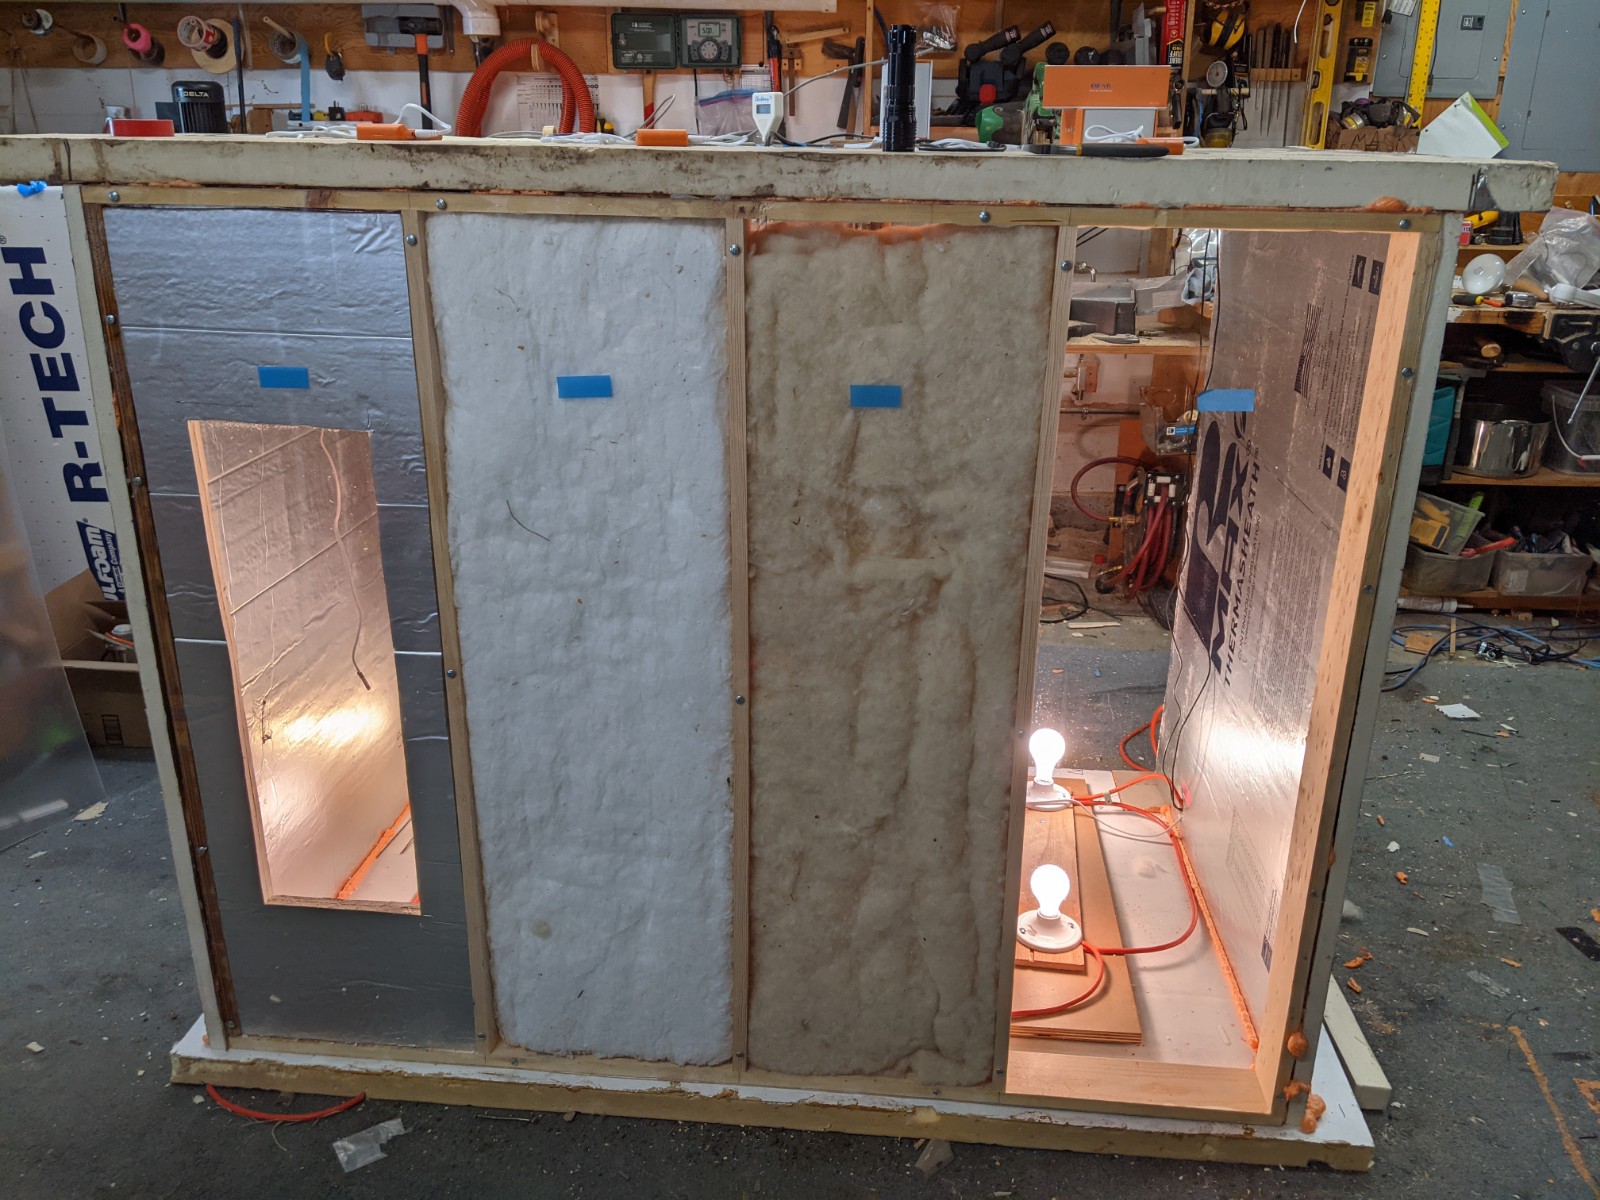
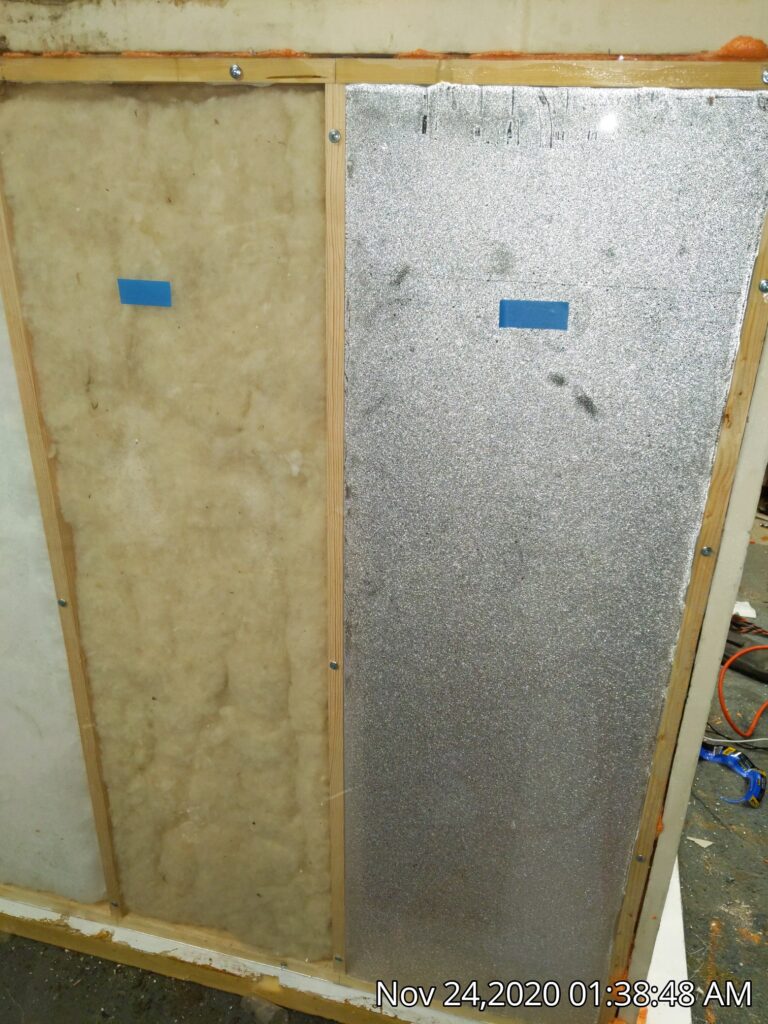
The four bays from left to right: Polyiso, Thinsulate, Wool and no insulation (just Plexiglass).
The Plexiglass is sealed to the wood frame with with silicone to prevent air leakage.
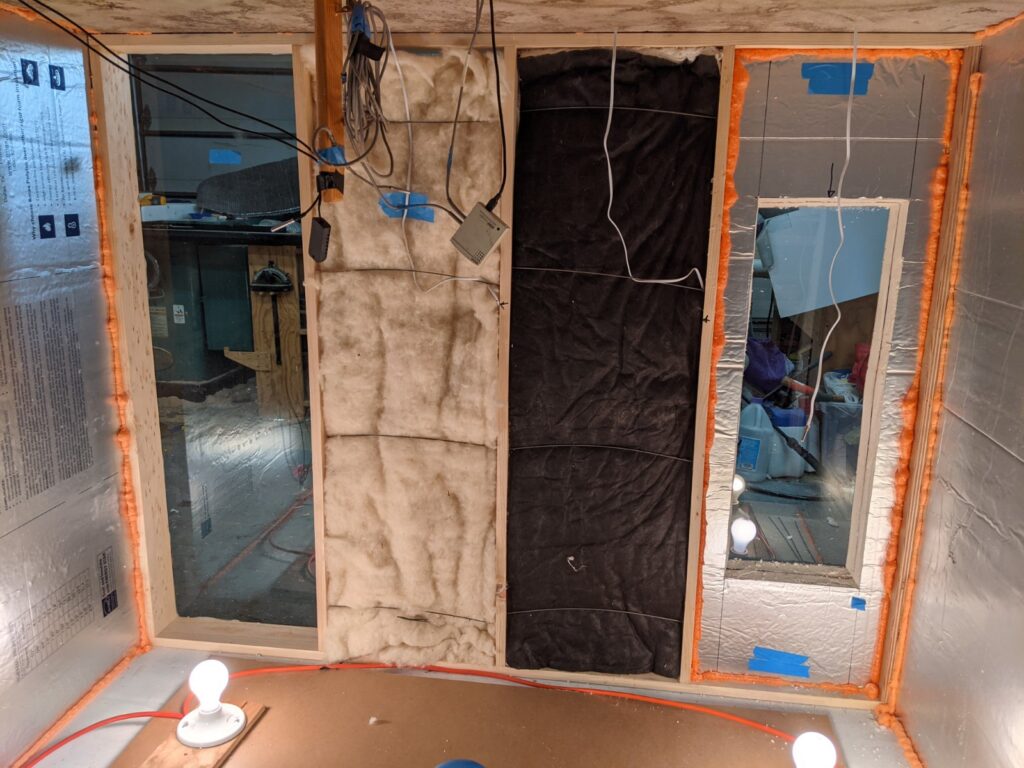
The insulation panels from back side.
The Polyiso panel (right) is sealed around the edges with Great Stuff urethane foam to try to keep water vapor from migrating to Plexiglass side of the panel. The center part of the Polyiso panel is removable so that it can be weighed for moisture pickup during the test.
The Thinsulate and Wool samples are held in place with spring wire to keep them snug (but not compressed) to the Plexiglass. This allows them to be quickly removed for weighing.
The parameters that are measured and logged during the test are:
- Temperature and relative humidity inside the box
- Temperature and humidity outside the box
- Humidity in the middle of each insulation sample
- Initial and final weights of each insulation sample (to measure moisture accumulation)
- Thermal camera pictures for rough assessment of thermal performance
Generally a test run starts by weighing and then installing each insulation sample in its own bay. Then the inside of box temperature and humidity are set on the controller. The test is then run for a time roughly equal to a night in an RV. Photos and IR pictures are taken once in a while during the test to record condensation levels and see if there are any changes in thermal performance. At the end of this period, the insulation samples are weighed to get water pickup, and then quickly reinstalled. Then the humidifier is turned off while the heater is left on, and ventilation is increased to get a warm and dry environment in the box for drying. The test then continues until all of the insulation samples have dried out, and a final weight of each sample is taken.
Test 1 – Two layers Insulation
In this first test, the temperature inside the enclosure was maintained at 70F, and the relative humidity at 70%. The outside the box temperatures varied from about 39F up to about 45F.
The enclosure was kept at these conditions for 15 hours while monitoring condensation and humidity levels in the insulation. Then the humidifier was turned off and ventilation increased while still maintaining 70F inside the enclosure to see how long it takes the insulation to dry out.
The 4 bays were configured as:
- No insulation (just plexiglass)
- Wool: 2 batts thick for total thickness of 3.5 inches
- 3M Thinsulate: 2 thicknesses for total thickness of 3.375 inches
- Polyisocyanurate: 2 boards for a total thickness of 2 inches
One reason for testing with two thicknesses of each insulation was to be able to log the humidity exactly half way into the insulation stackup. This is hard to do with a single thickness.
Test Timeline:
Some events along the test timeline are noted below…
0 hour
Install the 3 batts.
Place humidity sensor at mid thickness of each batt.
Turn on heater only set to 70F – no humidifier for the first part of test.
0.6 hour
The enclosure is run for a while with the heater on but humidifier off in order let heat flows stabilized for an IR picture with everything dry.
IR picture of front of enclosure with all batts dry.
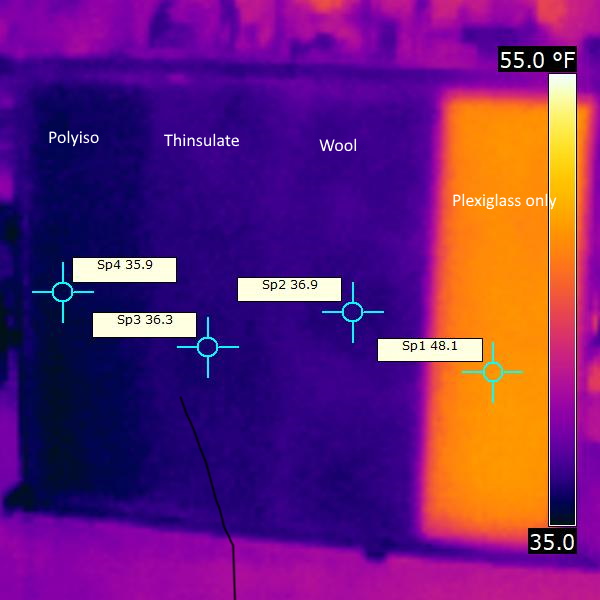
Plexiglass (right) is bright because its losing quite a bit of heat.
Wool, Thinsulate and Polyiso much cooler (darker) as they are insulating. Polyiso is a bit darker indicating that it is insulating a bit better.
The temperatures in the IR pics are the outer surface of the Plexiglass (IR does not penetrate Plexiglass, so you are not seeing into the enclosure). The colder (darker) these temperatures are, the less heat is being lost from the enclosure to the room. The plexiglass with no insulation is much warmer (lighter) than the panels with insulation because its losing heat much faster.
Note that all of the IR pictures are adjusted for a temperature range of 35F to 55F, so they can be compared to each other.
Humidity in enclosure at this point is about 30% (dry).
0.8 hour
Turn on humidifier, which is set to get to and maintain 70% RH.
It takes about 2 hrs to get humidity up to 70%.
With 70F temperature and 70% RH, the dew point is about 60F, so as air containing water vapor makes its way into the insulation, condensation will begin to form at the point where the insulation temperature reaches 60F.
2.5 hour
First visible condensation on Plexiglass with no insulation.
No visible condensation yet for any of the insulation panels.
4 hours
About 1.5 hours after humidity reached 70%.
Plexiglass only panel showing more condensation.
Wool panel showing no condensation.
Thinsulate showing some light condensation.
Polyiso showing no condensation.
9.5 hours
About 7 hours after humidity reached 70%.
Plexiglass only panel showing more condensation.
Wool panel showing no visible condensation.
Thinsulate showing significant condensation (but less than bare Plexiglass)
Polyiso showing no condensation.


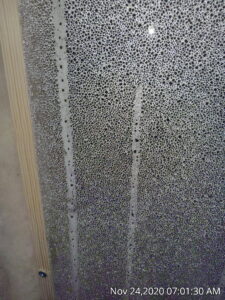
Note that the Polyiso panel shows a little condensation where I cut it to allow the center part to be removed for weighing and did not tape over the cut carefully.
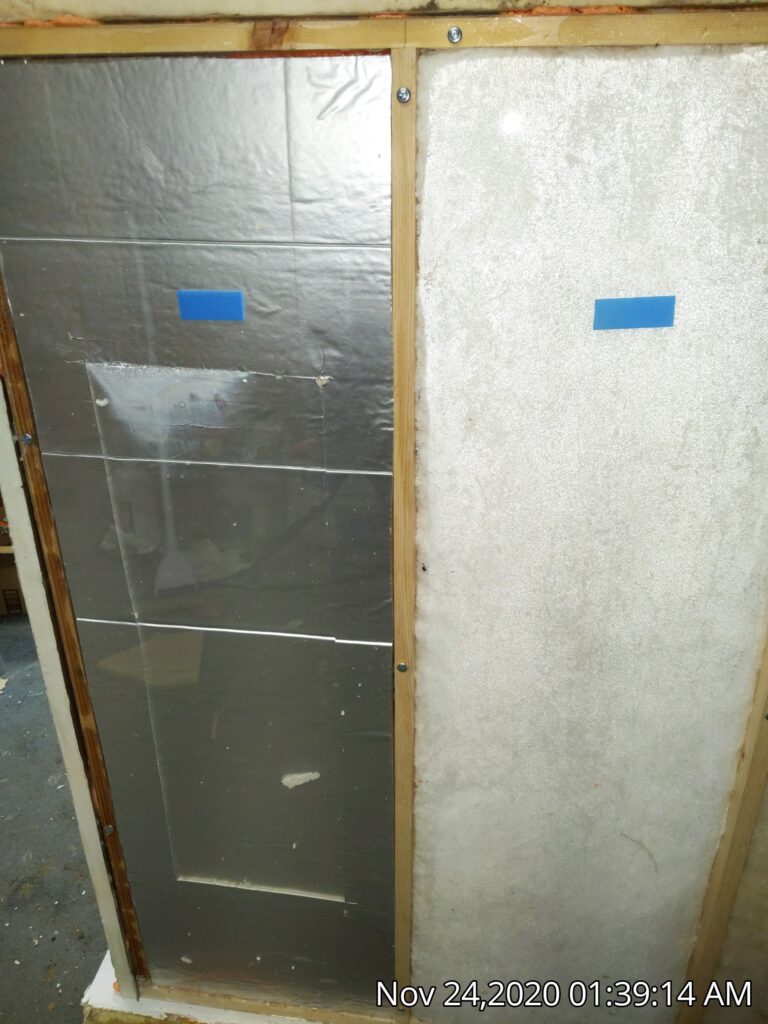
15 hours – max condensation
About 13 hours after humidity reached 70%.
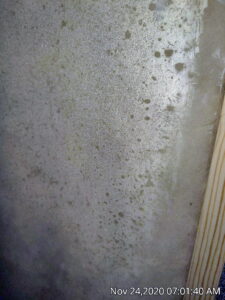
Bare Plexiglass panel showing considerable condensation and beginning to drain down.
Wool panel showing significant condensation, but less than Thinsulate.
Thinsulate showing significant condensation, but less than bare Plexiglass.
Polyiso showing no condensation.

Thermal camera picture at 15 hours.
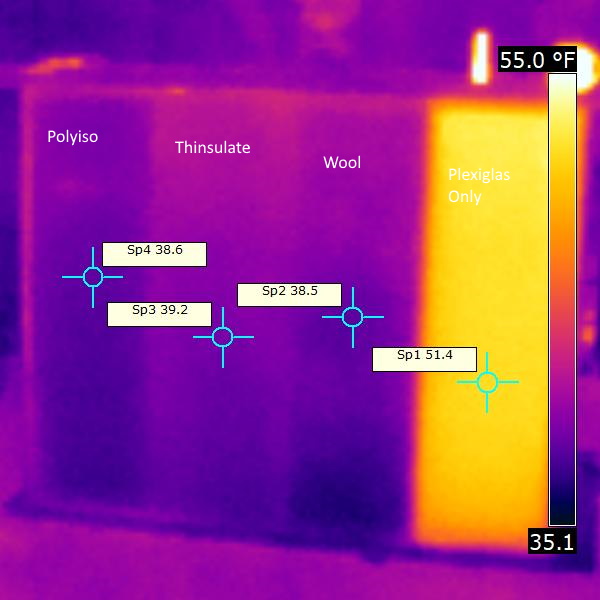
I was thinking that the condensation in the outer layers of the fibrous insulation might effect its R value, but the thermal picture does not show much of any change from the initial one, or much difference between the Polyiso (impermeable to water vapor) and the Thinsulate or Wool.
16.1 Hours – start dry out
Turned off humidifier and begin the drying out part of test.
The test continues with humidifier off, but heater on and more ventilation to bring the inside humidity down and see how long it takes for the different types of insulation to dry out.
At this point, the insulation panels are quickly taken out, weighed and then reinstalled to see how much moisture the batts have picked up.
- Wool batt felt damp to touch on outer surface,
Weight went from 768 g to 804 g (+36 g of water pickup) - Thinsulate felt damper than wool,
Weight went from 640 g to 651 g (+11 g of water pickup) - Polyiso felt dry,
Weight went from 270 g to 270 g (+0 g of water pickup)
Even though the wool batt picked up quite a bit more moisture, it felt a bit dryer than the Thinsulate batt. Perhaps due to the wool absorbing some of the water into its fibers. This could be a pro or a con depending on how you think about it.
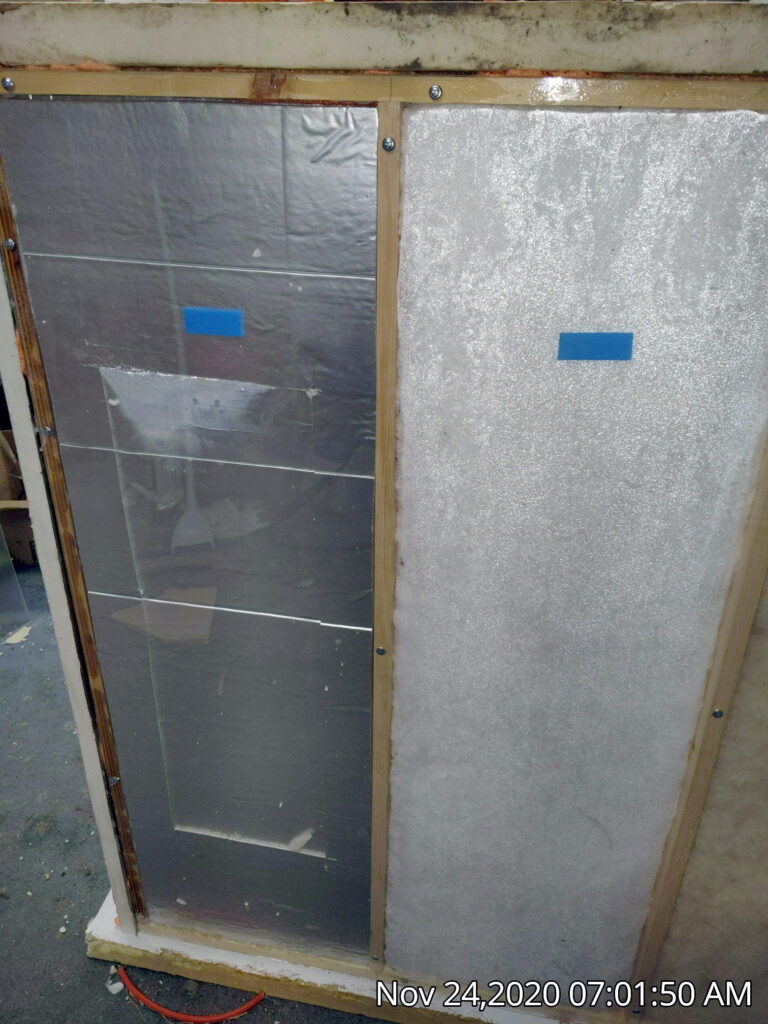
24 hours – end of test
Final insulation panel weights:
- Wool batt felt dry, but weighed in at 782 g, so it still had 14 g more moisture in it than when it was fully dry at start of test.
- Thinsulate still felt a bit damp to touch and there were still a few (not many) drops of condensation on the glazing. The Thinsulate batt weight 641 g, so almost down to its dry weight at start of test.
- Polyiso felt and looked dry and weighed the same 270 g as it did at start of test.
Insulation Sample Weight Gain
Each of the insulation samples was weighed at the start (dry), at the end of condensation test (wet), and after a dry out period.
| Insulation | Starting Weight (grams) | End humid period (grams) | Humid period gain (grams) | End drying period (grams) | Gain over test (grams) |
|---|---|---|---|---|---|
| Wool | 768 | 804 | 36 | 782 | 14 |
| Thinsulate | 640 | 651 | 11 | 641 | 1 |
| Polyiso | 270 | 270 | 0 | 270 | 0 |
At the end of an 8 hours of drying, the Wool sample still retained about 40% of its water gain from the previous night. This means that if there there are multiple days of condensing conditions in the van, that the wool will start each day with less of its water absorbing capacity intact.
Humidity and Temperature Logs For Test
I inserted an humidity logger sensor in the middle of each of the insulation samples to log the relative humidity inside the insulation sample over the full test.
For the wool, it was between the two thicknesses (batts) of the wool, for Thinsulate it was between the two layers of the Thinsulate, and for the Polyiso it was between the two sheets of Polyiso.
Thinsulate:
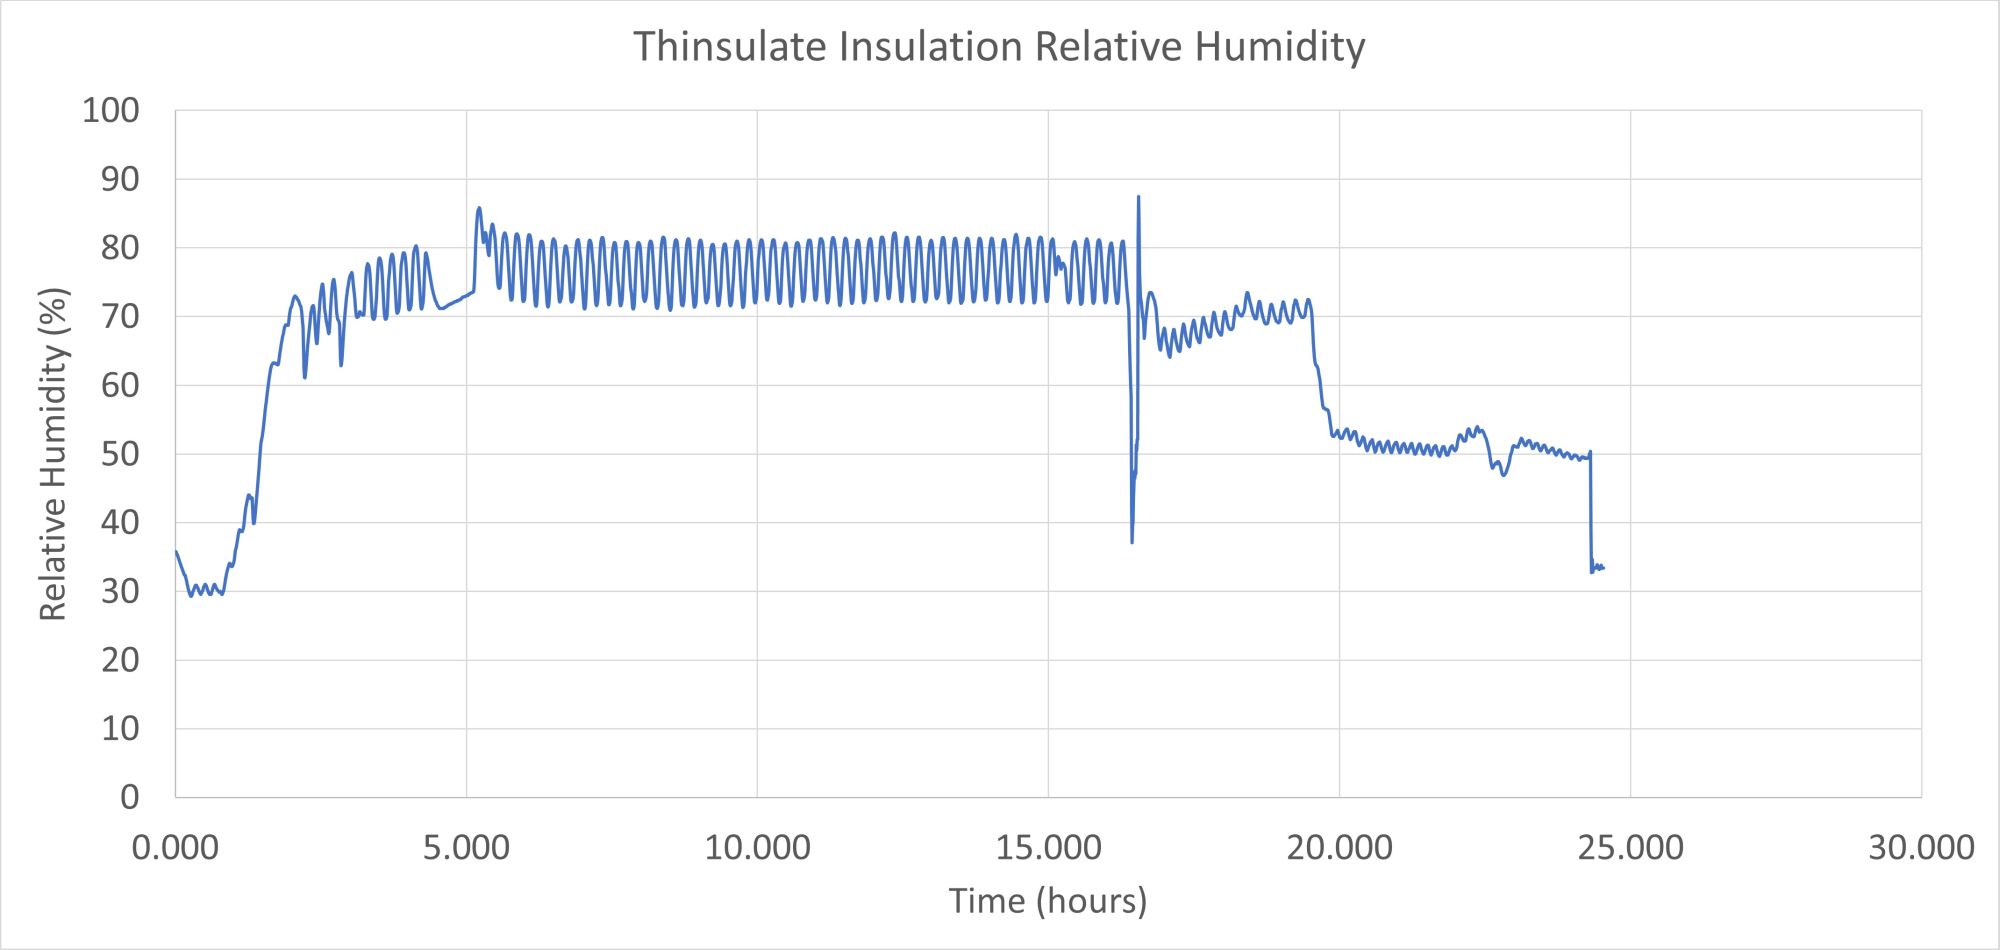
At about 2 hours the humidifier is turned on in the enclosure, and the RH in the Thinsulate climbs pretty quickly up to about 78% and stays there until the dry out part of the test starts. Note that as the temperature of air goes down, its relative humidity goes up even though the absolute amount of water vapor in the air does not change. So, as van air works its way out toward the van skin, the RH keeps going up until it reaches 100% and condensation starts.
The dry out part of the test starts at hour 16. The big change at about hour 20 was caused by increasing the ventilation in the box to speed up drying.
Wool:
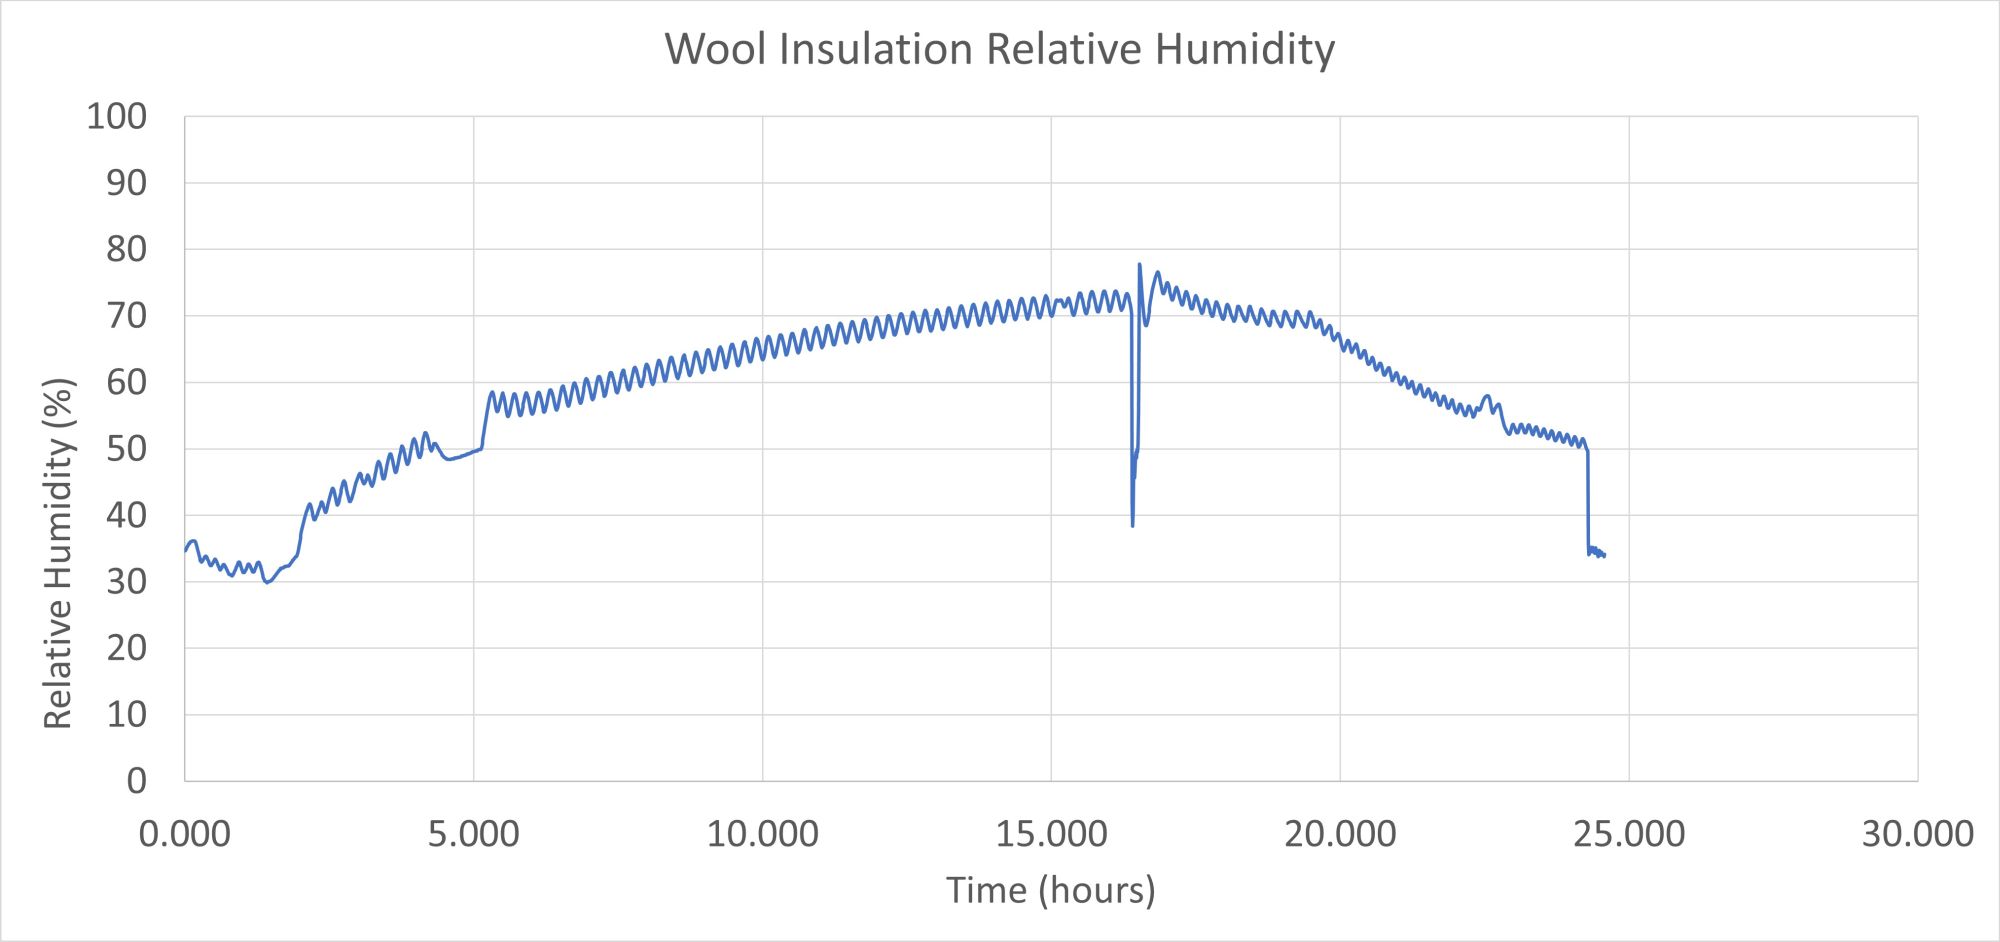
The wool insulation has a more gradual increase in RH at mid batt than the Thinsulate. This might be due to the Wool absorbing some of the water vapor into its fibers.
Polyiso:
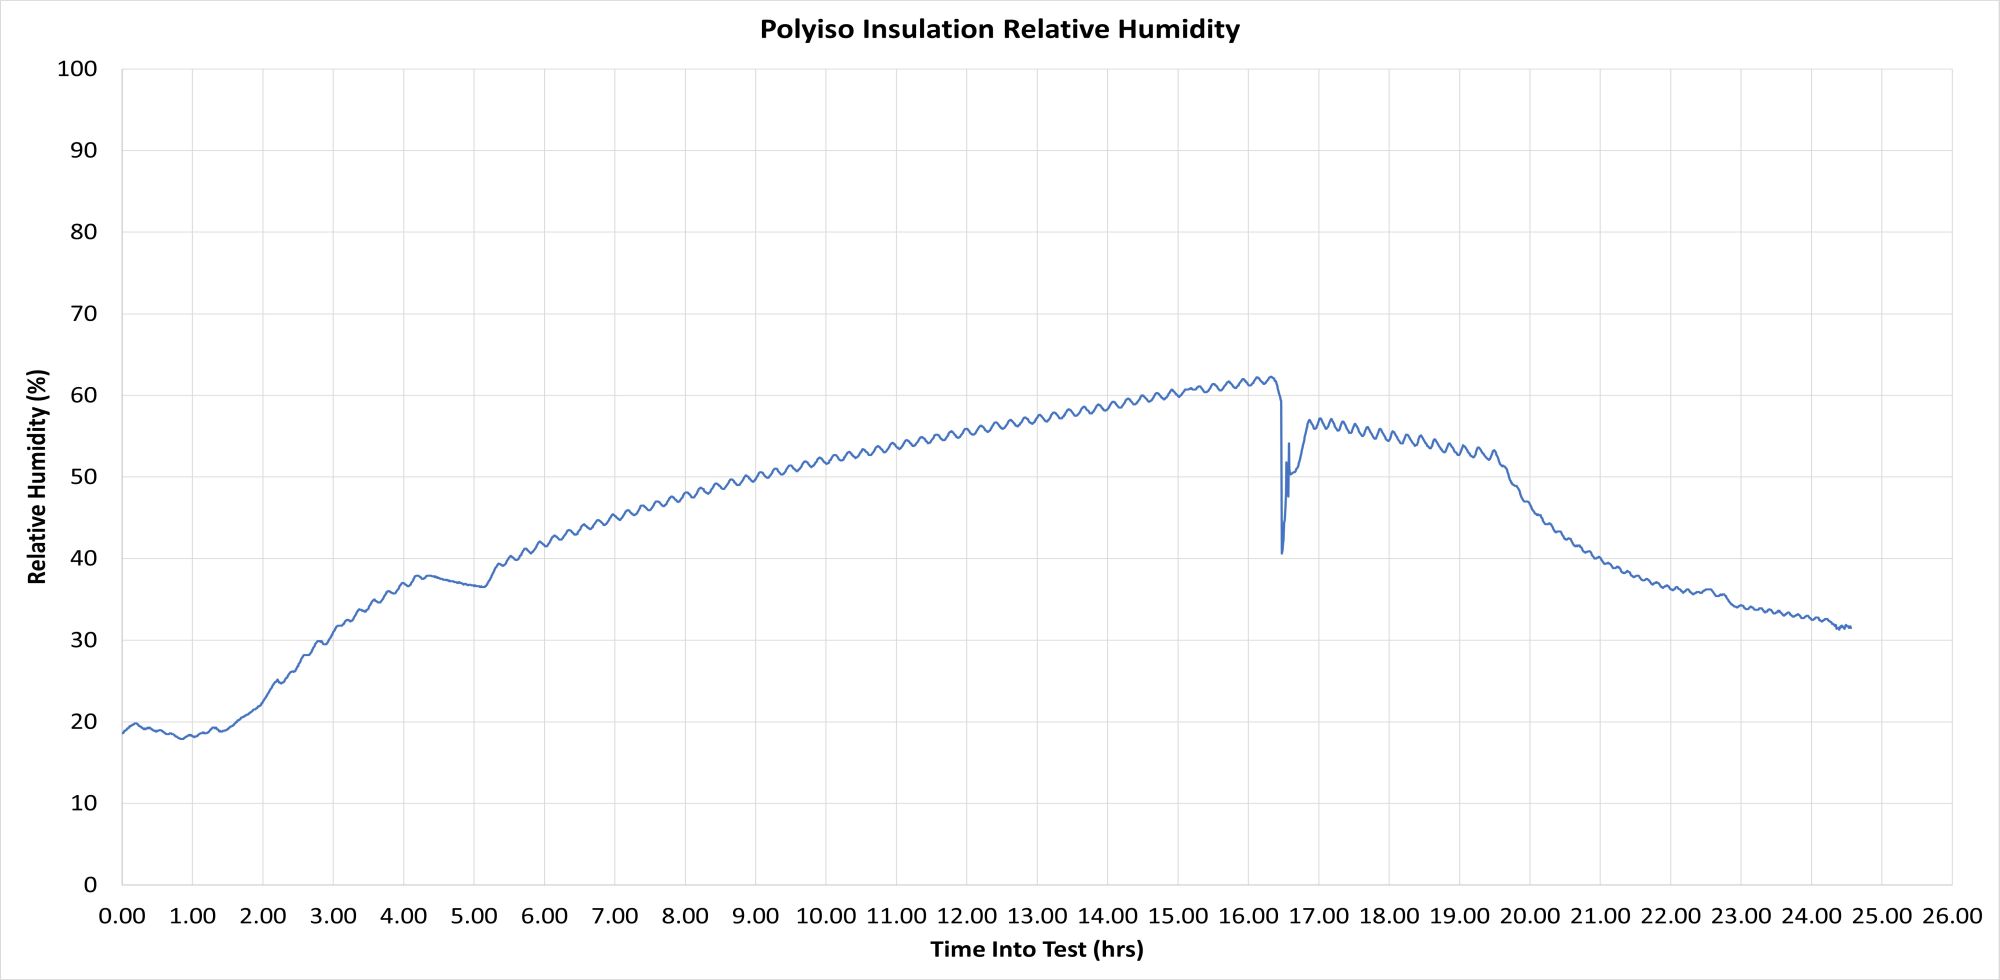
For the Polyiso, I cut a little plug out of the inside polyiso board, placed the humidity sensor in the hole, and them reinstalled the plug with tape. I suspect this does not seal the sensor in all that well, and the humidity it reads is just some air that leaks into the sensor area. Since the Polyiso is essentially impermeable to water vapor, I’m not much to be learned from this plot.
Enclosure Humidity/Temperature:
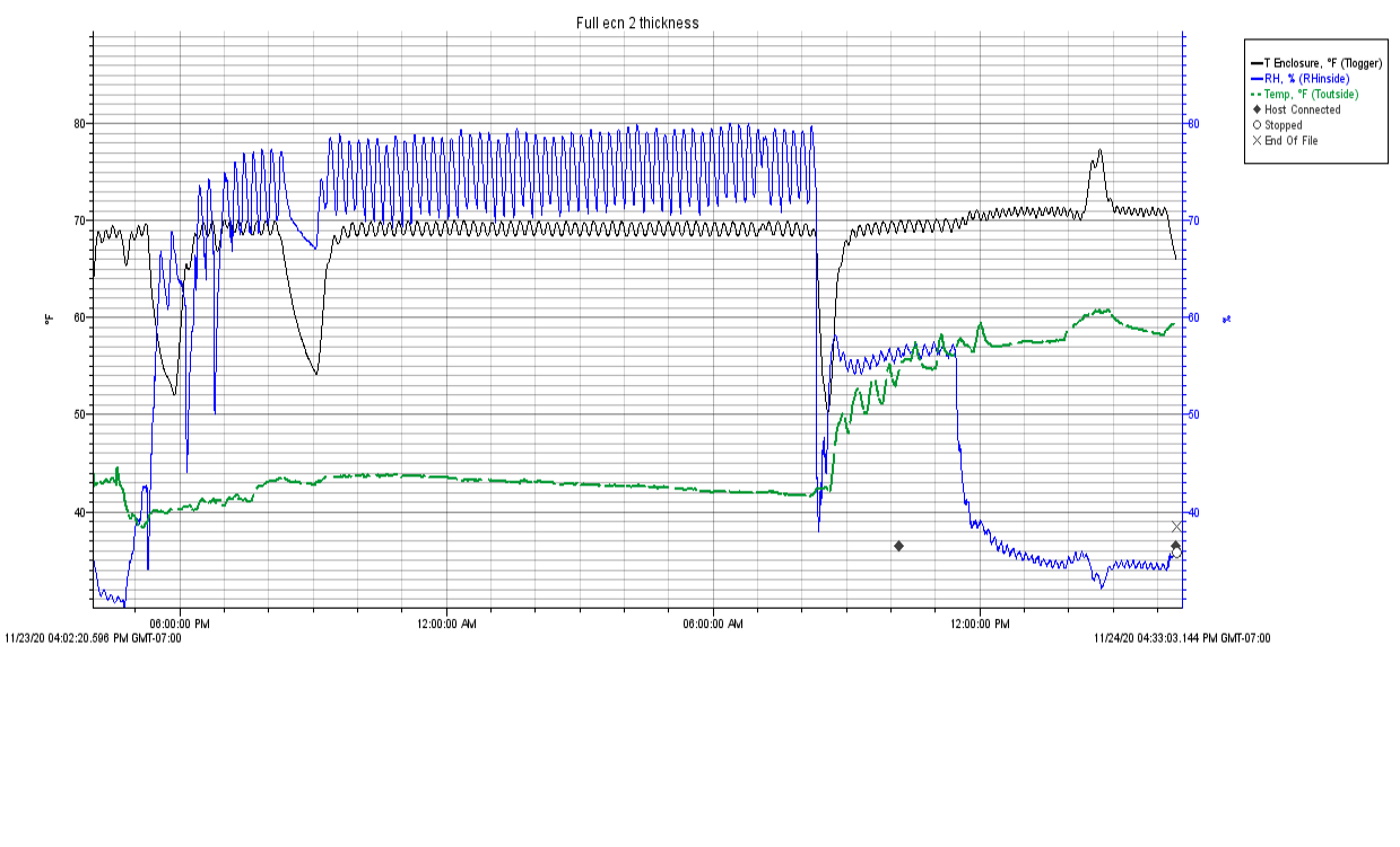
This plot shows the humidity and temperature near the middle of the enclosure.
Blue line is relative humidity inside the enclosure (%)
Black line is temperature inside the enclosure (F)
Green line is temperature outside the enclosure (F)
The first 0.6 hours, the humidifier is off and humidity is down around 30%.
Then the humidifier is turned on and in a bit over an hour, the RH goes up to the target level of 70%.
At about 6 PM, the humidifier is turned on and remains on until about 8 AM the next morning.
The change at about 8 PM is from my accidentally turning off the heater for a while.
The change at about 8 AM on the 2nd day is the humidfier was turned off — that is, the start of the drying period. The change at about 11 AM is introducing more ventilation into the enclosure to lower humidity and speed up drying.
Conclusion
First, I would encourage everyone to read over the test details and see what they mean to you in your situation.
Beyond that, here are a few things that seem pretty obvious…
- Judging by thermal pictures, all of the insulation types tested do insulate! And, it appears that for the level of condensation in this test, the insulating properties (R values) are not strongly effected by the condensation (which surprised me).
- Both of the fiber insulations (wool and Thinsulate) do allow water vapor to penetrate and condense both in the outer layers of insulation and on the van wall. The Polyiso with sealing around the edges did not let water vapor penetrate and does not condense water on either its outer or inner face.
- The wool appears to have less visible condensation than the Thinsulate – probably due to some of the water being absorbed into the wool itself. Havelock calls this moisture management, but others would say that having insulation absorb water into its fibers is just not a good thing. Take your choice 🙂
Beyond what’s tested here, there are other things to consider:
- Ease of installation
- Cost
- Chemical or allergy sensitivity
- Noise reduction properties
Mold
I’ve started a mold test. I know zip about mold, but talked to a mold expert at MSU, and she suggested this simple test as a start: In a separate container for each insulation, add some dirt and plant matter (which will contain a variety of mold spores), then add the insulation sample to each container. Using a spray bottle with non-chlorinated water, moisten each container and place the containers in a warm spot — keep moist over the length of the test. See if mold forms on the insulation samples — this may take several weeks.
Thanks very much to Dr. Cripps at MSU for suggesting this test.
Since some of the insulation types produce moist warm temperatures, there is at least the possibility of mold growing. Both Thinsulate and Havelock wool offer arguments that mold will not grow on their insulation, but other people commenting on this are skeptical.
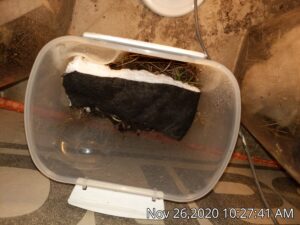
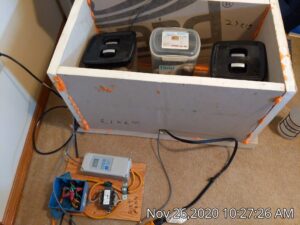
Left picture is one of the three containers that has some dirt/plant and an insulation sample. Right picture shows the temperature controlled box with the three samples in it. Temperature is set to 77F.
I do realize that in addition to oxygen, moisture and warm temperatures, that mold requires food to grow, but from what I’ve read the food can be as subtle as organic dust particles, oil from your hands, dead skin cells… And, these may be present even if the insulation itself is not digestible by the mold?
If you have any thoughts on how the mold test might be made more effective, I’m all ears.
Follow On
First, if you see anything in the testing that looks like a screw up, please let me know.
I’ve not taken apart the insulation test chamber yet, so if you have ideas for other (practical) tests that might be helpful, let me know in the Comments below, or on the ProMaster Forum.
I’ll report on how the mold test comes out in a few weeks.
I do plan to set up the humidity/temperature logger in the van for our next van trip just to see what the actual humidity levels are on a real trip.
Comments and Questions
Gary November 28, 2020
Hi, I am researching which insulation production to use in my new van build and this experiment sure got me thinking. I think the main goal is to keep moisture away from bare metal (steel) so it will not rust. Might be a good idea to spray rust prevention along all floor-wall seam welds, since gravity will direct any water droplets that direction. I find that welds are the weakest link in regards to areas where vehicles rust, because they’re difficult to seal completely with paint. This interesting experiment showed that a very small crack in the polyiso will allow moisture to get to the van shell, so it would be very important to seal all openings that would allow moisture to get behind the polyiso, where it may drip down to the bottom of the van. Maybe the fiber insulations would allow for this moisture to dissipate more effectively as the humidity inside the van decreases. Certainly, a semi-impermeable interior wall will limit the amount of moisture that would contact the insultation, and maybe that’s partially why this doesn’t appear to be a big issue in the real world. Above all, the experiment showed that any non-insulated (and probably low-insulated) areas of the van will collect moisture. Windows are probably a great place for water to condense and drip down into or behind the insulation.
I’ve seen videos where people caulk around their van flooring, thinking this is a good way to prevent liquid from spills getting under the flooring. Might also be a good way to prevent any moisture from dripping down the walls to the van floor.
If vanning moisture issues are anything like tent camping, then aside from having a leaky van, most moisture issues will occur from your breath at night. Probably want to keep that exhaust fan on all night and install it right above your breathing zone, to get that wet exhaust breath outside. However, just wondering if anyone has issues with that breath condensing on the fan casing/hood (with the fan on or off) and then dripping back down into the van. Would be very irritating to have a drip, drip on my face at night.
Jry
Hi Jry,
I was very concerned with condensation on the van metal behind the insulation on my 2014 van conversion, and that was one the reasons I used urethane spray foam insulation. This has worked well, but I think that it was probably not necessary. People use a variety of products to do the insulating, and its rare to hear of a moisture problem. If I were doing another van, I’d probably use the Polyiso rigid insulation bonded to the van sheet metal with Great Stuff Urethane foam and pushed into the van sheet metal while the foam cures. Then a bead of Great Stuff all the way around the edge of the Polyiso panels. I think this would prevent any water vapor from getting behind the Polyiso panel.
I agree that some form of night time ventilation is a good idea. We generally just leave the cover on our roof fan up, but with the fan motor off. Depending on climate, it probably makes sense to run the fan on low speed. all night. I’ve not heard of anyone on the forum having problems with getting dripped on by the fan.
I’d like to hear what you end up doing.
Gary
In health care we often use wool for wound care management in elderly people and burns. It is critical that the wound stays dry and not get infected. Wool does an amazing job of doing this. It does absorb moisture but wicks it away from the surface and doesn’t grow bacteria etc easily on the surface keeping the wound clean and dry. I used this logic for the van walls. Sprinters are known to rust. Not sure my logic is 100% sound here but if the wool is pulling the moisture away from the metal it should be less likely to rust. Yes it will release that moisture out once it starts to dry but in theory a fan, diesel heater, etc should also help dissipate that moisture. To me, better that moisture be in the wool rather than as condensation on the metal wall where it can collect and pool in nooks and crannies to assist with premature rusting. That’s just my logic though.
Hi,
It seems like the situation is a bit different in that the source of moisture for a wound is probably the skin itself and something that wicks moisture away from it is good. For the van, the source of moisture is the van air, and an insulation that keeps the van air from reaching the van sheet metal will be very effective at preventing condensation on the van skin and rust. This is the way Polyiso works – no van air gets to the back side of the insulation, so no condenstation and no rust.
Wool and Thinsulate allow van air to flow through the insulation and condense on the cold van skin, but wool absorbs some of the moisture in the van air, so less moisture gets to the van skin. I think, as you say, the moisture absorbed by the wool will dry out, but this depends on how humid the van air is.
I personally would use Polyiso on a new van, but a whole lot of people have used wool and Thinsulate and you very seldom see stores of people having a moisture/rust problem. So, I think for most people any of the three is probably fine.
Gary
I congratulate you on the time you spent doing these tests. The conclusion I get is that polyiso does an excellent in keeping moisture out if it is completely sealed around the edges. In that case no moisture can get through the polyiso, and being completely seal around the edges, no moisture can get in. In my Promaster it would be very time consuming to seal all the edges to make a complete vapor barrier. So one advantage that Thinsulate may have is that it is breathable and hydrophobic where as polyiso could trap moist air on the metal surface if it gets in. Does this conclusion make any sense?
Hi Howard,
I think that if you use a good pattern of Great Stuff on the back of the Polyiso and then followup with a bead around the edge of the panel, that this is fast and makes it very unlikely that there will be any air pockets or any way for air to get behind the panel. If you follow the forums, many people use this method and I’ve not heard of any problems.
If you use Thinsulate, there will be times when condensation forms on the metal van skin, but, as you say, it will dry out. As a practical matter, I don’t think its a problem based on how many people have used it and how few problems there are.
If I were doing another van, I’d use Polyiso, but if I bought a van that was already insulated with Thibsulate, I’d not be concerned about it.
Gary
re: “If you use Thinsulate, there will be times when condensation forms on the metal van skin, but, as you say, it will dry out. As a practical matter, I don’t think its a problem based on how many people have used it and how few problems there are.”
I’d be willing to bet that most of the people using it don’t have air conditioned living space in hot humid climates. The moisture that accumulates within the spaces between Thinsulate’s polyolefin fibers is dependent on relatively dry air to evaporate, basically the same as fiberglass, which also doesn’t absorb moisture into the fibers themselves.
Hi Elvis,
I agree that if we had more vans used frequently with AC in warm moist climates, that we would likely see more problems with Thinsulate. The few problems I know about with fiberglass are from warm moist climates.
The testing clearly shows that there will be times with Thinsulate when you have condensation on the van skin and in the outer layers of fibers. I can only conclude from the fact that you don’t see anyone on the forums reporting long term problems that the van skins are pretty well protected and that the moisutre does dry out.
I can see why people like Thinsulate. Its nice to work with and easy to install.
Gary
re: “In my Promaster it would be very time consuming to seal all the edges to make a complete vapor barrier.”
Applying a liquid waterproofing coating (e.g.: Ames Blue Max or Lanco Aqua Proof) is fast & easy, especially if you have a hopper gun type sprayer (the type often used for undercoating). Both of these can also be rolled or brushed on too though.
I would avoid the use on any type of fibrous insulation in this application. In the case of Thinsulate, it has low R-value per inch, low acoustic attenuation in the “problem” frequencies (400-500 Hz), is not self supporting, and last but not least, is expensive relative to all these metrics.
Gary,
Didn’t Dave Orten send you a piece of the Armacel/Aeroflex foam he used for testing? If so, and if you did test, if the results are up in another thread on this site, point me to it. Thanks.
FYI: That type of foam comes in *many* different variants (differentiated only by the exact model number), some of which have excellent Acoustic Noise Reduction in the target frequency. But those variants are not the most commonly available.
Hi Elvis,
He did send a sample of the Aeroflex and I did do a 2nd insulation test and included it in that.
I tested it as one of the bays in that 4 bay test setup and had the same kind of temperature and humidity control as in the first test. I sealed the edges all the way around the Aeroflex with a thin bead of silicone caulk (did not want to glue the full face of it to the plexiglass as it would be hard to get out and I wanted to weigh all of the samples for water pickup). The Aeroflex did quite well — in a nutshell did not absorb any water, had an insulation value close to polyiso, and its nice to work with. I would call it best overall except for the steep price. Dave said he used it for highly curved areas (like wall to ceiling), and I think this makes a lot of sense.
One of these days I’ll get to writing up the 2nd test with the Aeroflex, but the test did not uncover anything new over the 1st test. I was a bit bummed out that the high tech heat flux sensor did not work to expectations.
I still want to read over the test work that Chris Purdue did on noise absorbing materials and see what would be involved in doing a test setup that would be representative of vans. I downloaded the REW software and it looks like it would do a lot of the work.
Gary
re: “Dave said he used it for highly curved areas (like wall to ceiling), and I think this makes a lot of sense.”
This type of foam is possibly the best sheet insulation to get into partially enclosed spaces like doors. And even the most commonly available types Armacel/Aeroflex foam do provide worthwhile vibration dampening when glued to the inside of the sheet metal skin. But the R-value is not nearly as high per inch thickness as the better grades of polyiso/polyurethane foam. And as you mentioned, the Armacel/Aeroflex foam is very expensive compared to sheet polyiso, and IIRC, even 2-component flexible PU foam is less expensive per cubic foot.
This is a really well done experiment. Thank you for reporting the results. I’ve bookmarked it to refer others to it who have questions about van insulation.
Did your second insulation test include rock wool, and if so, what were the results. There is a lot of debate about using rock wool insulation. I used it in my van with a vapor barrier toward the inside of the van. I have been very happy with its insulating and noise deadening properties. It is inorganic, non-absorbing, relatively easy to work with and much cheaper than any of the three insulations you tested here. I’m really curious about how it would measure up compared to the three tested here.
Hi Kate,
On the 2nd test, I added Aeroflex foam to the test, but not Rockwool.
Rockwool certainly does have some attractive properties.
Did you find it easier to work with than fiberglass from the point of view of not being itchy and losing fibers into the air? How did you adhere it to the van metal?
A lot of people are leery of adding a vapor barrier on the inside because the space in between has vapor barriers on both sides and no way to get rid of any moisture to get out. What has your experience been with this?
Gary
Gary, I appreciate greatly the way you think and your experimental approach to topics affecting the use to vans as campers.
I did my own natural experiment this last winter where I slept in my unheated van through a Pacific Northwest winter, while also building it out. I was probably in the van 10 hours a day. I insulated with wool. I did wonder about condensation and investigated a bit. The big difference was north side and south side of the van. The observation I can offer is in cavity filling.
On the north side, where the wool was flush to the wall there were no water droplets, where there were gaps I could feel droplets. I’m assuming, but haven’t checked, that there were also droplets in the vertical channels but that would be worth checking as those would also have air flow.
On the south side of the van there was no condensation regardless of air gap between the insulation and the metal. I’m guessing this is due to the sun heating up the metal.
I think if I were to repeat this I would get a dehumidifier and run it once or twice a week enough to bring the humidity down.
I did get the moisture absorbing crystals and they did reduce humidity. But you’d need a lot of that to remove the amount of moisture that a person makes.
In the short run I’m not worried because I think I’ll spend future winters in dry places where the van can dry out during the day.
Hi Nancy,
Thanks for the report — that is quite helpful.
Just to remind people — your experience with condensation and moisture will depend on the climate you camp in, how many moisture generating activities you have, how much you heat the van, and how much ventilation you use.
As Nancy did, its good to actually check on what’s happening inside your insulation.
Gary
I am highly sensitive to mold and mildew, so hope to know which insulation is the best at which R value.
Crossing my fingers you get it figured out for us!
Hi Susan,
I am not by any means an expert on mold with insulation, so don’t take what I say as final.
There are three insulations most commonly used in vans:
Thinsulate – when its cold outside, Thinsulate allows water vapor in the van air to flow through it to the van skin and condense into water. So, you have some of the conditions for mold, but I’ve not heard reports of mold with Thinsulate – probably because there is no food for it.
Wool – Same as Thinsulate on water vapor and condensation. Even though the wool is organic, the wool folks claim that it has ingredients that make it reisistant to mold. I’ve not heard of anyone having mold problems with wool, but its use in vans is relatively new.
Polyiso – Is a rigid insulation board that is impervious to water vapor, so as long as the edges are sealed to the van skin water vapor can’t get to the cold van skin, so no condensation. Again, no one that I know of has reported any mold problems with Polyiso.
If it were me, and I wanted the most mold resistant solution I’d go with Polyiso, and make sure to seal it well to the van skin with Great Stuff foam.
In addition, I’d consider using a space heater and ventilation to dry the van out well after trips.
Try searching the ProMaster Forum for posts on the mold issue, the subject has been discussed there several times.
Gary
Another thing that would be useful to test:
Whether or not partially filling small “hat” type channels, or the larger “beam” type channels, with strips of materials like Thinsulate makes *any* measurable difference in heat transfer through that member.
My own testing shows that even when fully filling small channels with 2-part foam (~R6/inch), it barely makes any difference. My guess is that a strip of fibrous insulation pulled in with a string that only partially fills the cavity makes no measurable difference.
Two other alternatives that cut/trim with shears as easily as Thinsulate but outperform it at the same thickness:
In this case, it would be used doubled up with foil side out on both sides:
https://www.knaufnorthamerica.com/en-us/products/duct-wrap-insulation/atmosphere-duct-wrap
…ending up with about R-10 in about 3″ thick.
…and this stuff is R-4.3/inch, stiffer (relatively self-supporting), has facers on both sides, and can still be cut with heavy shears or utility knife: https://www.knaufnorthamerica.com/en-us/products/air-duct-board-insulation/eclipse-air-duct-board
Both types are available in many brands and are usually readily available locally even in small towns.
Gary, if your test rig is movable without too much trouble, I’d suggest re-configuring it to test heat gain whenever time permits and your local weather is full-on sunshine for at least a day or two.
Hi Elvis,
I’ll give that some thought.
Its hard to get hot and humid conditions in our Montana climate.
I guess some form of cooling would be inside space would be needed.
Gary
Your previous test shows how much moisture the tested materials gain from humidity. If the Armacell that Dave Orton sent you is the version with a “skin” on both sides, it’s going to perform almost the same as foil-faced Polyiso foam.
What I was suggesting was a test of the heat gain from solar irradiance. The chamber can be in the shade, or actively cooled with an air conditioner.
What I have used in the past are separate boxes for each material tested. I have also used identical (cheap) coolers with identical blocks of ice in each one to test heat gain by measuring interior temperature rise over time. I use two types of temperature probes: ASINs: B07R586J37 & B01MY9A0G1
Naturally, you and I both already know the answer: foil-faced Polyiso is going to win again, because of the materials you tested, not only does it have the highest R-value per inch, it’s the only one with a radiant barrier. And that’s why I keep (stubbornly) recommending despite the objections of the “Thinsulate Mafia” led by Hein, acting in his company’s commercial interest.
The question is, how much more poorly does something like Thinsulate or wool perform when placed directly against a vehicle exterior skin, compared to one or two radiant barrier surfaces separated by an air gap. In the former case, foil-faced polyiso foam is applied directly to the inside of the exterior sheet metal; in the latter, radiant barrier foil only (or a foil-faced dampening material) is applied directly to the inside of the exterior sheet metal, and the foil-faced polyiso foam sheathing is farther inboard, as it might be if installed into the large openings of the wall structure and/or onto the ‘ribs’ or ‘hat channels’ of the wall structure. This latter arrangement leaves most of the exterior wall cavity open for drainage, something that some people are very concerned about.
You’ll need an analog of white painted sheet metal. White flashing works.
Keep up the good work!
PS: In addition to cheap styrofoam coolers, I have also used ‘banker’s boxes’ as test cells, if I want to test all insulation applied to all sides.
Fascinating stuff, well done and thanks.
I would be very curious to see the results if paneling was added to the inside. I think that regardless of insulation some significant amount of moisture will work its way in and having an insulation system that allows it to get out is important.
Hi,
Testing with paneling was next on the agenda, but not sure when I’m going to have a chance to get to that — maybe next winter.
I agree that water vapor would get behind the paneling — if not through it, then at the gaps above and below as most people don’t make any attempt to seal the edges. It seems like an insulation that allows drying out or one that is vapor impermeable would be better for this — just as in houses.
Gary
Gary – excellent! This is what a controlled test looks like. Kudos to you. The results validated what I’ve been trying to tell DIYers for a long time. Let’s all spread the word!
My comments are:
1. The “R-Tech” polyiso you used is about the lowest quality commonly available. But I understand why you used it (Home Depot stocks it). J-M AP-Foil is a better grade polyiso product and Thermax is a step above that, especially at low temperatures. Thermax cellular structure is far more consistent than R-Tech/R-Max.
2.Although a lot of people use the regular Great Stuff (red can) foam to glue & seal the edges of foam boards, it is also the lowest quality choice. Red Can Great Stuff foam has a relatively low closed cell percentage compared to the alternatives. As I’ve mentioned before, just because a foam is claimed to be “closed cell” does not mean its cellular structure is 100% closed. Most mono-component foams fall far short of that, with Red Can Great Stuff being close to the bottom.
A better alternative is GS Window & Door (if someone only wants to use what they can buy at Home Depot). But better yet is Loctite Tite Foam (for Windows & Doors). The BEST choice in mono-component spray foam is still DAP Draftstop 812.
3. As far as possible distortion of exterior sheet metal when using 2-part spray foam (e.g.: ‘Froth-Pak’), the best way to be sure to avoid that is to apply a layer of viscoelastic foam to the inside of the exterior sheet metal first. This will serve as a cushion for rigid foam, and also dampen low-frequency noises (e.g.: idling diesel engine) that are almost impossible to reduce significantly with fibrous acoustic absorbers like Thinsulate. The other way to avoid distortion of exterior sheet metal is to use a 2-part foam that remains somewhat flexible when fully cured, which requires finding an installer that uses that type.
Again, kudos to you for the outstanding work on this test!
Hi Gary and all,
It’s April 28, 2021 and I am curious about the outcome of your mold test? Also, I understand that when you have insulation that doesn’t collect moisture that there is still moisture that is present; where does the moisture go? I understand that it will pool at the bottom and eventually mold. Most synthetic materials won’t absorb including foam but can create a toxic environment?
Hi,
The mold test was inconclusive. Did not really get any mold, but I’m not sure I really created and maintained the right conditions long enough. I may try it again — if anyone has any ideas on a better procedure, please let me know.
If you use an insulation that is water vapor permeable, then there will be condensation on the inside of the van sheet metal when its cool outside and relative humidity inside is above 50% or so. I think its important that there be enough drying periods to let this moisture evaporate. On trips, maybe try to create conditions during the daytime that are dryer and warmer than at night, and/or at the end of trip do a drying out period — maybe some heat in the van with ventilation, or maybe even a dehumidifier. Some climates won’t require any of this, but if you live in a more moist climate, I think it would be worthwhile.
Gary
Gary you are the man. Thanks for this helpful test and using science when so many opinions are running rampant.
Thanks!
Gary
Have you heard about the insulated windows from Arctic Tern? I used them and they seem to perform very well. Even covered/insulated the windshield will become a mini-amazon of condensate while the added windows might have a light fog.
They are pricy (but you get retractable insect screen and privacy/insulation shade in the deal) but it would be great to see what their performance is in your humidity box, embedded, say, in a polyiso “wall”. Maybe get a loaner?
Hi Larry,
I have been following the Arctic Tern windows and reading comments from people who have them. They seem to have a lot of happy campers.
If I were doing my van again, I’d definitely consider using them. The only thing I am still a bit hesitant about is the plastic glazing scratching — although I’ve not yet seen anyone complain about that.
That would be a neat test — I’ll think about dropping them an email.
Gary
Hi,
It took me a while to find this amazing article again, thanks for the hard work.
I don’t know why but I swear to have seen this test as a video, am I dreaming?
Is there a video out there of this test, or something very similar, or I’m just “youtubizing” my memories?
Hi,
No video that I know of, but if you find it, please let me know.
I did do some more testing in this area, but since the conclusions were pretty much the same, I’ve not put them up.
Gary
commenting just to see the mold test results
Hi,
I guess I would say it was inconclusive. I did not see any mold on any of the samples, but I was not consistent in keeping the samples damp.
Rethinking how to do the test better.
Gary
Amazing how detailed and thorough your experiments are.
I wonder about any condensation between the polyiso and van wall (little as it may be) – could that freeze and create larger gaps, possibly compromising the polyiso attachment to the van wall? I may not be as good an installer of polyiso, and if some condensation can get between the polio’s and van wall…
Hi Dave,
If you start with an air pocket under the polyiso that is 6 inches by 6 inches by half an inch thick, and the air in the pocket starts at 70F with 70% humidity, and you condense out all of the water in the air pocket, the volume of the water is 0.0026 cubic inch. A very very tiny fraction of the volume of the air pocket. So, as long as an air pocket is sealed off and no new moist air can get into it, I don’t think ice is a problem.
If the polyiso install allows van air to freely circulate behind it, them maybe the ice could be a problem. But, I know some people make a point of installing the polyiso and leaving air access to the back side and I’ve not heard of any of them having a problem.
On the test, just a small bead of Great Stuff around the periphery of the Polyiso was enough to seal it and prevent condensation on the Plexiglass.
If installing Polyiso myself, I would use a grid pattern of Great Stuff on the back of the Polyiso such that when the Polyiso was pressed against the van skin the Great Stuff would cover almost all of the Polyiso surface, and then do a bead of Great Stuff around the full periphery.
Gary
Very nice for someone to start trying to get empirical evidence on this most contentious of issues.
In a real van the skin of the van is curved. Thus any rigid insulation board will not sit flush with the van skin. It would be interesting to see a follow up where an airgap is introduced between the polyiso and the simulated van skin.
Hi,
I guess that depends on the particular van.
The ProMaster wall panels and ceiling are pretty flat and for 1 inch Polyiso it is pretty easy to bend the Polyiso to the curvature. Most people use “spring sticks” to hold the Polyiso against the van skin while the Great Stuff cures and glues the panels into the curved shape.
This may be harder on other vans — not sure?
But, I do think that as long as there is a good bead of Great Stuff all the way around the periphery of the Polyiso panel that some trapped air behind the panel will not have enough moisture to produce any visible condensation. I went through the numbers on this, and as far as I can remember, a cup of air contains less than half a drop of water. It think it takes a porous insulation with a flow of water vapor laden air flowing through it to get visible condensation.
But, I’ll see if I can work in an air gap on one of the tests.
Gary
Very informative and interesting. Thanks
You didn’t observe condensation with the polyiso. Is there any air gap between the Polyiso and plexiglass? That information would tell us a little bit more about the importance of avoiding air gaps.
Ideas for others tests:
It would be very interesting to add a period of low humidity at the end of your cycle to monitor how well the insulation materials are drying out.
The often put forward advantage of Thinsulate is the fact that it is hydrophobic (doesn’t absorb moisture). It should dry out quickly. The chemical formula of Thinsulate is very close to many other petroleum based polymers such as Polyester fibers that are used in garments and that can be bought at any good fabric store at cheap price. That would be very interesting if you would add a panel to compare the performances of both Thinsulate and Polyester.
Hi Dennis,
There was no air gap between the Polyiso and the plexiglass, but I think the key to the no condensation was the bead of Great Stuff around the periphery of the Polyiso. That is, any air pockets between the plexiglass and Polyiso don’t contain enough water vapor to make visible condensation. I thin it takes an influx of water vapor laden air to get condensation.
I do plan to do a multi day test to see if each of the insulation panels continues to pick up more and more moisture, or if it reaches an equiliberium — I’ll think about adding a longer drying out period at the end.
On the first test, the Thinsulate did dry out faster than the wool, so , maybe that is an indication it will dry out pretty well given some time.
Will think about trying to find some polyester to test.
I am adding Aerocel closed sell foam to the insulation samples. This seems like a good candidate, but it is pricey.
Thanks for the feedback.
Gary
I have been reading everything I can find on this topic. I appears that everything conflicts everything else. I dont plan to live in my van just weekend – maybe a week at a time. i think the best plan for me is to supply plenty of ventilation so that water vapor never gets into walls but have plenty of DRY makeup heated air to stay warm “enough” and use an electric blanket if needed. I think spray in Iso is probably the only real option for fully insulated ” Live -in”
vans.
Hi Frank,
It is confusing to have so many opinions out there on insulation — and, so little data to support those opinions. That’s why I thought some actual data might be helpful to people.
I have spray urethane foam on my van, and I’m happy with it. It does prevent water vapor from getting to the van walls and condensing. I believe that the same thing can be accomplished with rigid polyiso sheets adhered to the van wall with Great Stuff and then a full bead of Great Stuff around the periphery. That’s what I would likely do on a next van.
Good ventilation will help minimize condensation, but my feeling is that there will be times when you can’t ventilate enough to prevent condensation. I plan to do some more testing on this in my van in the near term.
Honestly, I would not overthink this too much. There are lots of van conversions around out there and its rare to hear of anyone having a serious problem caused by a bad insulation job.
Gary
Very informative and appreciated! Im debating what insulation to go with in my sprinter conversion. several trips made w o insulation and woke up to a dewy sleeping bag.
Newbie question, if the insulation is attracting some moisture doesn’t that reduce the level of moisture in the air and what might end up on my bag through the night? My trips are 3-4 nights max with weeks in between, wondering how much i should worry about the moisture level or in my case maybe its a slight positive? thinking of thinsulate so far, ease of use and i liethe black side showing. thank you for any thoughts. Jason
Hi Jason,
The wool insulation folks make the claim that wool absorbs water vapor into it and that this helps to control the humidity, and then when the humidity in the van drops, the wool gives back the water it has absorbed to the van.
I’m skeptical of this in that the amount of water that the wool can hold is far less than the water vapor generated by people, cooking, coffee making, clothes drying etc. — the write gives a rough estimate of what the water sources add up to. I think that its likely that the only way to really control the humidity and condensation in the van is via ventilation. Pulling in dryish outside air and heating it up so it can hold more water, and letting it pick up moisture in the van, and then exhausting humid air should control humidity in the van — and, some people have reported that this does work. It does mean the furnace will run more to heat up the outside air you bring in.
One person who’s opinions are usually well thought out is that one technique for reducing humidity in the van is to leave some windows without an inside insulating shade results in lots on condensation on that window, and that this reduces the relative humidity in the van. Not sure about this myself, but worth a try.
I do plan to do some multi day tests and track how much moisture the insulation picks up at night compared to how much it dries out during the day — does it end up falling behind and getting water logged? But, I don’t think this will change the logic above that says ventilation is the key – but, I’ve been wrong many times in the past 🙂
Gary
Hi Anne,
Still have the mold test going — should not be much longer.
Gary
I am speaking only for a consumer view, but this is tremendously helpful! I look forward to the results of your mold test, since I live in the PNW. Thanks for doing these valuable tests.