This page covers the installation of the finished floor for our RAM ProMaster camper van conversion.
We decided to go with a Vinyl sheet floor. Thought about carpet, but decided it was too likely to get dirty and be hard to clean.
The Vinyl sits on top of thin plywood.
The floor is insulated with rigid polyiso insulation board. If you are wondering whether insulation is worth the bother …
Go back to the main camper van conversion page…
Construction
From bottom to top, the floor constructing is:
- The truck floor, which is ribbed.
- Plywood slats to fill in the spaces between the ribs in traffic areas.
- An inch of rigid foam board insulation.
- A layer of quarter inch plywood
- The Vinyl sheet floor
The insulation is bonded to the truck floor with Great Stuff polyurethane foam, and the quarter inch plywood is in turn bonded to the top of the insulation board with Great Stuff.
The Vinyl sheet floor just floats on top of the plywood.
The quarter inch plywood might seem on the thin side, and it probably is, but we are trying to minimize weight, and using 3/4 inch plywood would have added about 70 lbs. The way everything is bonded together with the foam polyurethane, the steel floor, insulation, and thin plywood act as a single unit, and the finished product seems quite stiff and strong to walk on.
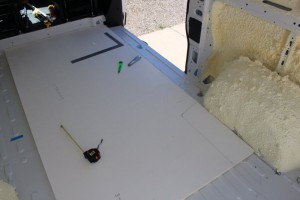
This is the ProMaster floor before starting. Note the low spaces between the floor ribs.
Filling the Space Between Ribs
I filled the spaces between the floor ribs with strips of 1/4 inch plywood glued to the metal floor in order to give the insulation a flat surface to rest on.
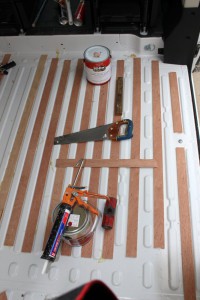
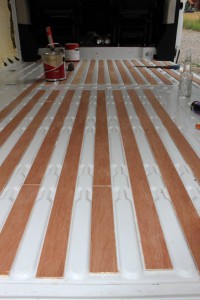
These pictures show the filler strips going down. I only used them in the areas subject to foot traffic, not under the beds or galley. The paint cans are weights while the glue dries.
I tried a couple of things to glue them down the — I wanted something that would not require weighting.
The product I used to hold the filler strips in place is Loctite PL Premium 3X, and it worked well.
Update 10/24: I no longer believe that its necessary to fill the spaces between the ribs. Quite a few people on the ProMaster Forum have left out the fillers, and there have not been any negative effects. Leaving them out also leaves a bit of a path for water to get out if you have a leak at some point.
Insulation Board
The insulation board I used is 1 inch thick polyisocyanurate rigid foam board. The brand I used has thin face sheets that appear to be made of a fiber reinforced material. Atlas RBoard is one brand that has this kind of face sheet. I think that the more normal polyiso with the reflective alum foil face sheets would also work OK — I used the ones already had on hand.
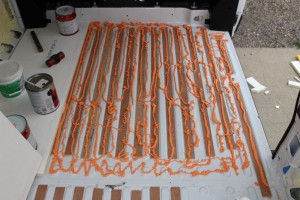
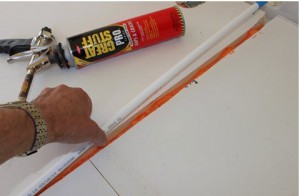
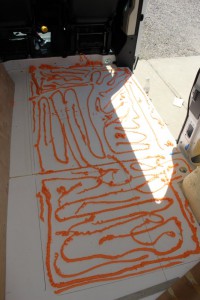
I used beads of Great Stuff polyurethane foam in a can to bond the insulation panels to the floor (its the orange stuff).
I used the Great Stuff Pro version, because I had it on hand, but the regular Great Stuff (I think) bonds even better.
Using Great Stuff for an adhesive might seems strange, but I’ve used it on a number of projects and it works well — its a very tenacious adhesive, and it fills voids well.
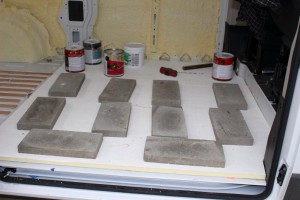
This shows the foam insulation board being weighed down with concrete pavers we had around. The weights keep the foam from expanding upward and pushing the foam board up.
I drilled out the the tiedown locations that would be located under furniture for any potential future use. This turned out to be all but two of the tiedown locations.
Update 10/24: If I were doing this again today, I would probably use XPS (Extruded Polystyrene) instead of Polyiso insulation for the floor. The reason being that the while the XPS is not quite as good for R value, it is better for moisture resistance, and floors are subject to spills and plumbing leaks. In 10 years we have not actually had a problem with the Polyiso absorbing moisture, but the XPS just seems like a slightly better choice for the floor.
I would not use XPS for wall or ceiling insulation due to its low maximum service temperature and the high temps wall and ceiling sheet metal can get to.
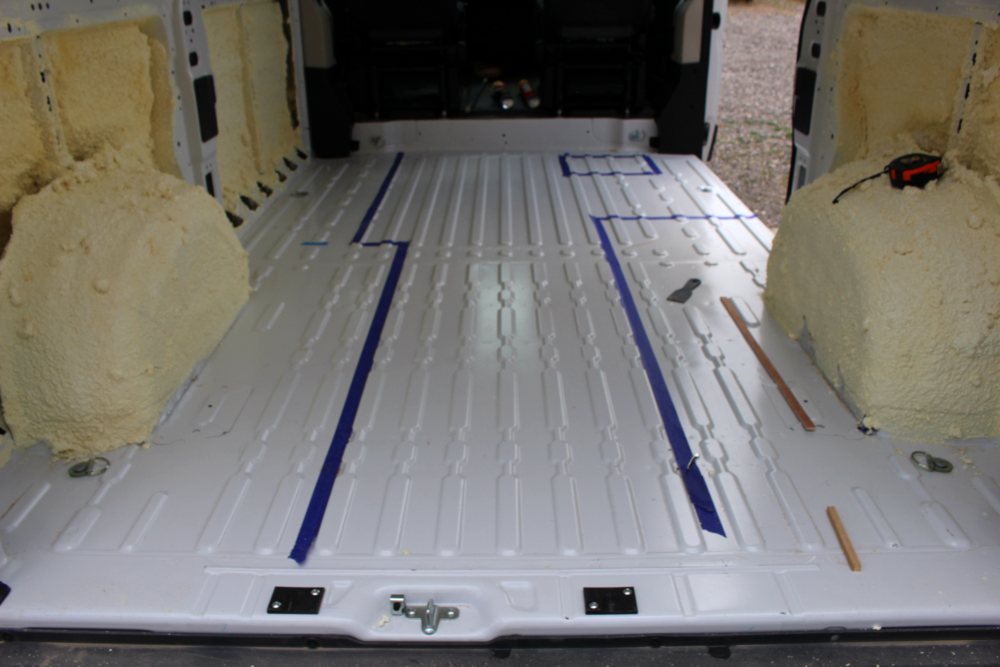
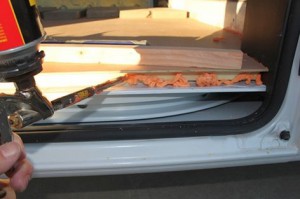
Water Pipe
We are going to have the fresh water tank on the passenger side just aft of the sliding door, and the galley sink is on the drivers side, so I needed to run a water supply pipe between the two. Running under the floor seemed like the most logical place for the pipe.
Its a little hard to see in the left picture, but there is a space between the forward and aft insulation panels just wide enough for a half inch PEX line. The PEX tubing is white and is already in the groove.
The right picture shows the groove partly filled with Great Stuff (for insulation under) with the PEX pipe being pushed into the groove.
I will probably have to use a SharkBite elbow fitting to connect to each end when doing the plumbing as its probably to tight to get the crimper in.
Update 10/24: This solution of running the PEX pipe just under the plywood floor with a little bit of insulation under it has worked out well, but under VERY cold conditions, we have had this pipe freeze. So, if you plan to use the van in VERY cold weather you might consider a different approach. Possibilities: 1) put the water tank and galley on the same side of van so that you can use more insulation; 2) see this page on freeze protection…,; 3) run a low voltage heater wire beside the pipe so that you can heat the pipe a little and unfreeze it (but be careful to not overdo this and damage the PEX).
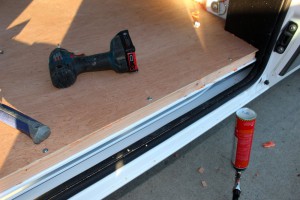
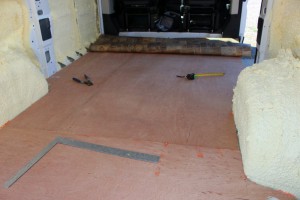
Plywood Floor
I used 1/4 inch laun plywood over the insulation board. This spreads out the load of walking on the floor to enough area that the underlying insulation board does not dent when you jump on it.
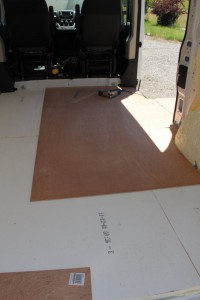
The left pictures shows the plywood sheet being trimmed to fit the wheel wells and the front step area. I positioned the plywood so that the seams did not coincide with the insulation board seams.
The right picture shows the Great stuff over the insulation board to bond the plywood and the insulation board together.
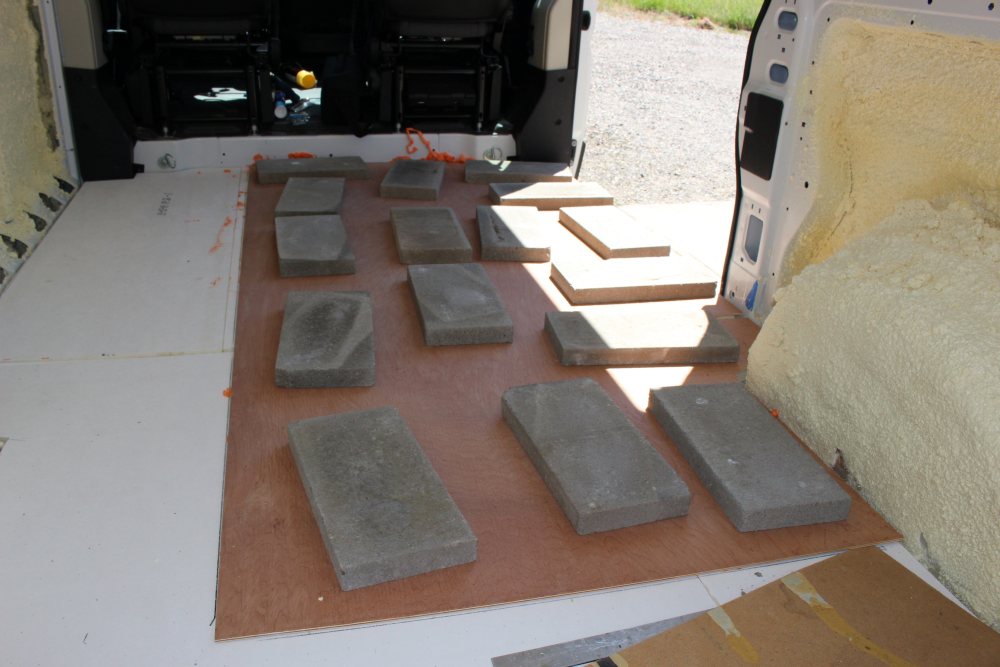
The picture above shows the plywood weighted down while the Great Stuff is curing.
Update 10/24: If I were doing this again, I’d probably use half inch plywood rather than the quarter inch. Its not that the quarter inch has not held up, but just that half inch seems like a better choice. I would likely use half inch double sided MDO plywood due to its greater stability and resistance to water.
Edge Strips
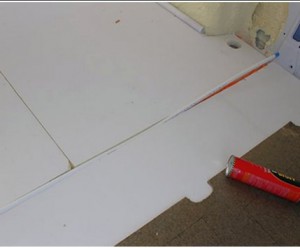
I put in wood edge strips to support the edge of the plywood at the two doors, to keep the edge of the insulation from being compressed down.
The left picture shows how the plywood overhangs the insulation board by about an inch to allow room for the edge board that supports the edge of the plywood. The edge board is sitting on the plywood just above. I put a bit of Great Stuff in before installing the edge board just to bond things together.
The right picture shows the edge board being tapped into position.
There will eventually be a metal molding to protect the edge of the Vinyl.
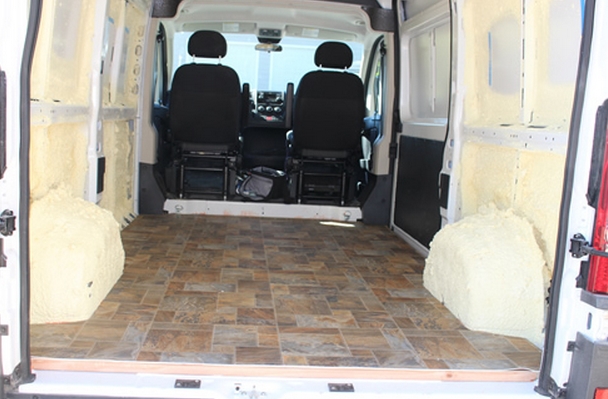
Vinyl Floor
We decided on a Vinyl floor because it would be easy to clean.
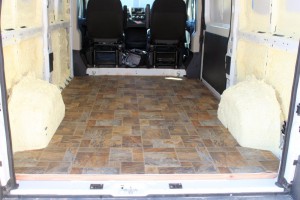
I cut the Vinyl to 72 inches wide and 122 inches long and then unrolled it in the van.
Trimmed the edges by just pushing it into the corners and edges and cutting with a utility knife — leaving about 1/8 inch for expansion — this goes surprisingly fast.
After reading the instructions on the adhesive can and talking to the floor store person, we decided not to glue the floor down, but just let if float. The adhesive says that repeated freeze thaw events and temperatures below 10F may damage it (not sure if the “it” is the adhesive or the floor), and the floor store people said that they have some difficulties with RVs that live outside and some types of Vinyl floor cracking with the heating and cooling cycles. According to the floor store, the floating installation is fine and they do it quite a bit.
Will probably do something later to finish the step up to the seats at the front (or not).
Update 10/24: The Vinyl floor is now 10 years and 140,000 miles old. It is still serviceable, but it is showing some signs of age. There are some small locations where it has bubbled up. I’m not sure what we will replace it with when the time comes.
Cost, Weight and Time
The time to do the floor was about 2 1/4 days — these are lazy old retired guy days, so you might do much better.
| Item | Cost ($) | Weight (lb) |
|---|---|---|
| 3 sheet luan plywood | $36 | 37 |
| 2 sheets 1 inch polyiso insulation | $38 | 16 |
| Vinyl Floor | $110 | 26 |
| Great Stuff Foam (about 1.5 of the Pro size cans) | $20 | 1? |
| Total | $204 | 80 lbs |
The weights are based on the actual square footage used, while the costs are based on the materials bought and include waste.
Go back to the main camper van conversion page…
Gary
July 21, 2014
Gary,
I saw on the promaster forum your suggestion to mount a spare tire on the back for when you’re doing offroad or bad roads, and then to remove the spare for city driving and rely on the inflator kit. I want to do that. Can you please share details on how you mounted that spare that I see in your photo there, including where to buy the mount?
Hi Bernie,
This is the page with all the details on how I mounted the spare on the door…
https://www.buildagreenrv.com/diy-spare-tire-carrier-for-promaster-van/
Its still going strong with no problems.
Gary
Hello.. I Have to repair my RV flooring I don’t want to do the whole floor.. You are using the same flooring I need, where did you get it I am trying to hunt it down. Do you know the manufacture? product Number?
Hi Jim,
We picked it up at a local floor store.
It was a leftover from a larger job they did.
Its been a long time, and I don’t remember the brand.
Gary
Hi Gary,
Thank you for all of this wonderful information. Is it possible to use sound deadening material on the bare metal, then gluing the polyiso over it?
Hi Ron,
Yes, I think so.
The sound deadening material I used adhered very well to the metal, and I don’t think it would be any problem to use Great Stuff to glue the Polyiso to the sound deadening material.
You might ask on the ProMaster forum to be certain — I’ve seen several cases of people doing this on the forum.
Gary
Update Sep 11, 2020
Everything is good now! I reinstalled everything and it worked out well. I used Minicel, 1″ XPS and 1/2″ Baltic birch this time.
Thank-you,
Keith.
Hi Keith,
Good to hear — thanks for reporting back.
Gary
Hi Gary,
I like your idea of bolting down the bed and heavy furniture / batteries etc to the floor of the van but worry about thermal bridging. Have you had any problems with bridging – cold spots and or condensation? Do you use your van in very cold conditions? Have you done anything to mitigate thermal bridging? We are just planning our build, and would be grateful for any advice.
Hi Rosey,
Good questions.
We do use the van in cold weather — we had one trip at -10F – quite and experience
https://www.buildagreenrv.com/camping-in-the-van-at-10f/
and another not so extreme one in the 20’s F.
https://www.buildagreenrv.com/trip-reports-experiences-and-lessons/banff-trip/
Neither of the trip reports mentions thermal bridging as we did not really feel it was an issue.
I did do some testing on thermal bridging for some of the large metal frames that our wall paneling scheme left — these are pretty big areas and there is no insulation on the frames.
These are tests…
https://www.buildagreenrv.com/thermal-bridging-insulation-due-metal-frames/
and for insulating the bridged areas…
https://www.buildagreenrv.com/insulating-thermal-bridges-due-metal-frames/
There are some thoughts in the test reports about how one might do some insulating of the bridges, and you could probably use the same methods to insulate bolt heads.
We do get some condensation on our wall panels in the places where the the wall panels are screwed directly to the metal frames — this has caused some water staining of the panels. If I were to do it over again (and I may 🙂 ) I’d use kind of thin foam insulation tape to create a break between the metal frames and the panels – this would help the heat loss a bit and do away with the condensation.
One thing to keep in mind is that thremal bridges due to (say) bolts are not as low in thermal resistance as some make them out to be. The bolt itself has low resistance (low R value), but there are air layers inside and outside that do have an R value of about 0.3 up to about 0.6 depending on whether the air is still or moving. So, even a direct thermal bridge has an R value of about 1 — much lower than an insulated van wall at about R7, but the area of the thermal bridges – especially for something as small a bolts – is quite low.
So, that’s a very long way of saying bolts are probably not a problem, but if you plan to use the van in cold weather I’d give some thought to some of the other thermal bridge areas, and to things like the water system freezing.
Gary
I have been researching thermal bridging for my bus build and agree with Gary‘s comment, “I’d use kind of thin foam insulation tape to create a break between the metal frames and the panels – this would help the heat loss a bit and do away with the condensation.”. After a fair amount of research I found a product that is specifically designed for this purpose. It’s from a company called Echo Tape and the product is called ‘Single Sided Thermal Break Tape (1/4″ & 1/8″ thick)’. I purchased the 3” x 1/4” roll and have been eagerly awaiting its arrival for weeks. I believe it’s coming from Europe so the shipping is a bit pricey (about $14 to US I believe). They have a very nice spec sheet on their website listing R value of both thicknesses, material composition, and sizes available…etc. Good luck on your build!
Maria
Hi Maria,
That looks like a good find.
The specs look good. The max service temp is a little low at 130F, but this should be fine for use use on the inside of frames for thermal breaks.
I think it will be effective for thermal breaks and easy to apply with the adhesive back.
Please let us know how it works out.
Thanks Gary
Hi Keith,
The Polyiso is a bit stiffer than the XPS, but not by a huge margin.
If you think the floor is too soft with the 5 mm plywood over the XPS, I’d give some thought to going to half inch plywood. If you have not taken up the XPS yet, maybe just try putting a piece of half inch plywood over the XPS and see if that works for you — this would save the work of taking up the XPS.
Just a note on XPS as insulation for the rest of the van: it has a maximum service temperature of 165F and the walls/roof of the van can get up to those temperatures on hot sunny days — so, I don’t recommend using it for wall or ceiling insulation. Some people do use XPS, and I’ve not heard any disaster stories, but I’d still not use it if you have a choice.
Gary
Well, I tried not installing the filler strips in the corrugations and I am not happy with the result. I tried forcing a liberal amount of GREAT STUFF Gaps & Cracks Insulating Foam by poking a hole into the one inch foamboard and giving it a 5 second shot every square foot or so. My thought was to spray foam would work its way around and fill any voids underneath. There is still too much sag under foot and the floor squeaks. I will be using the 1/4 inch merranti plywood on top so I need it to be stable. I am going to have to pull it up and install the filler strips of 1/4 plywood. I might try the sill gasket as mentioned or maybe two thickness of corroplast. I am sad but it has to be done 🙁
Hi Keith,
Sorry to hear that.
What kind of plywood or other material are you using over the 1 inch foam board? Is the foamboard Polyiso?
Please report back on what you find out as you work through this.
Gary
Okay, is see my problem. It is not polyiso that I used. I assume the polyiso is very hard wherease XPS is a bit bendy? The plywood is 5.5mm meranti/lauan.
I can buy the sill plate sealing tape locally. I will try that.
Thank-you
http://www.panoplywoodproducts.ca/plywood/plywood-underlay/
https://www.dupont.com/products/styrofoam-brand-cladmate.html
Hi Keith,
The Polyiso is a bit stiffer than the XPS, but not by a huge margin.
If you think the floor is too soft with the 5 mm plywood over the XPS, I’d give some thought to going to half inch plywood. If you have not taken up the XPS yet, maybe just try putting a piece of half inch plywood over the XPS and see if that works for you — this would save the work of taking up the XPS.
Just a note on XPS as insulation for the rest of the van: it has a maximum service temperature of 165F and the walls/roof of the van can get up to those temperatures on hot sunny days — so, I don’t recommend using it for wall or ceiling insulation. Some people do use XPS, and I’ve not heard any disaster stories, but I’d still not use it if you have a choice.
Gary
Your calclation for vinyl is typo?
Good catch — thanks!
Gary
Hi Gary,
Had our Promaster 2016 (2500) 136 inch model for three years now and finally paid it off. We have about 34,000 miles on it and have not had any problems. Love how it drives and the large windshield (takes time to get a little used to it). Followed a lot of your suggestions and usually camp from two days to three months at a time. Several trips across USA and Canada. We have an apt in Oregon as our base.
As we get older (age 83), I love the ease of handling as compared to our former 27 foot Lazy Daze RV (with engine failure at 100,000 miles on Ford chassis). That put me off of the Ford Transit. Fortunately, we live in an area where the mountains or coast are just an hour away. Really love the vinyl sheet floor as it’s so easy to take care of plus takes the rough daily grind without showing wear and tear. Thanks again for your excellent website. Wishing you a healthy and prosperous New Year in 2020. Bravo to you and your work!
Hi David,
Well, as one old fart to another, congratulations on your successful conversion!
Gary
Thanks so much for detailing your work, Gary. I’m thinking it might be better to use insulation material to fill the gap between the insulation board and the metal floor. What do you think of using foam weather stripping? Or spray Great Stuff in the groove and let it fill the gap before installing the board. I think 1/4″ plywood is plenty thick. I can’t image in what mode the Wood is going to fail. The insulation board is stronger than it looks. Static force won’t compress it down. I would be easy to do the test. Wood is not a good insulation and heavy. What do you think of using vinyl countertop instead of plywood. I understand it’d be hard to mechanically fasten anything on it but it’d be much lighter.
Hi Duo,
It seems to me that thin foam insulation in the floor channels would likely be fine. There is a foam product that is used to seal between the sill plate and foundation on homes that might work well — link below. I think it would be a bit difficult to use Great Stuff as it does not cure to a uniform depth.
Just following what folks are doing on the ProMaster Forum, a lot of people are just doing without the filler in the floor corrugations at all and this seems to work fine, so, that’s another option.
The 1/4 inch plywood has worked out well for us over the last five years — no problems. I think its fine as long as you don’t carry heavy loads like motorcycles.
I don’t have any experience with the vinyl countertop material — please let us know what you find out if you try it.
Gary
Sill Seal:
https://www.homedepot.com/p/Owens-Corning-FoamSealR-3-1-2-in-x-50-ft-Multi-Use-Ridged-Sill-Plate-Gasket-1FS/202084452?g_store=3104&mtc=Shopping-B-F_D22-G-D22-22_4_INSULATION-Generic-NA-Feed-LIA-NA-NA-&cm_mmc=Shopping-B-F_D22-G-D22-22_4_INSULATION-Generic-NA-Feed-LIA-NA-NA–71700000044087233-58700004607994983-92700038798652237&gclsrc=ds&gclsrc=ds
Hi, so glad I found your site. I really appreciate your approach, especially that piece on insulation using the heat camera. So, if I do ‘floating’ floor with furrings & sheep wool, what thickness plywood on top? Guessing I have to go thicker because there’s no hard foam. Still hoping for light as possible. Build out will be lightest imaginable. Thx for advice! N
Hi Gary –
am proceeding with my build, your advice being very helpful. this is again about flooring. I’ve put down polyiso and then ply. Am not finding top layer I want. Do you know Life Proof Rigid Core vinyl product? it is new-ish I think, claims to be water proof, looks great, but only comes in planks of 46 inches by about 8 (not sheet). https://www.homedepot.com/b/Flooring-Vinyl-Flooring-Resilient-Flooring-Vinyl-Plank-Flooring/LifeProof/N-5yc1vZbzjzZets?storeSelection=8548,2555,2562,2552,2564
it seems much better than the old style click and lock, but I am still leery of putting something on the floor that has seams that could be disrupted by movement of the van. or is not not a concern? Outdoor Wanderlust on YouTube uses this and seems to like it tho I can’t figure out how to contact him. BTW, I would post this question to the promaster forum but I can’t figure out how to start a thread…..
Hi Amy,
Glad to hear the build is coming along.
I don’t have any experience with that type of Vinyl flooring — it looks good.
They do say in the install instructions not to use it for RVs, trialers,… but, they may say this for all Vinyl floors even though they are used in RVs quite a bit.
https://images.homedepot-static.com/catalog/pdfImages/01/018cc06a-4edd-45f5-a66c-4b5c82445898.pdf
I would think that the interlocking design and the fact that they are floated (not glued down) would make them good for the RV/van type floor, but I don’t really know.
I guess worst case is that it would not hold up, and you would have to take it out, which should be pretty easy in that its not glued down.
As far as getting set up on the ProMaster Forum, I guess you have to go through the registration process (see “register” on home page), then you have to do an initial post on the Introduction form. The Intro post is just to avoid spammers. You should then shortly be approved for posting and you can then post on any of the forms. There is an explanation of the intro post here: https://www.promasterforum.com/forum/forumdisplay.php?f=122
Don’t ask any questions in the intro post — wait until the approval comes through.
Its a very valuable resource, so worth going through the hassle of the getting registered.
Gary
Hi Amy,
I used the Life Proof vinyl product and so far am pleased with it.
It was super easy to install and will be super easy to remove if ever necessary. The video/instructions says that you can cut with utility knife but that proved to be very difficult. Instead I used a jigsaw and a dremel tool–both of these made cutting through the tiles very easy.
I’m a surfer and use the van to trek around the coast looking for waves. With waves comes sand and unfortunately there is constantly sand inside the van. The sand has caused small abrasions on the vinyl tiling but nothing major, and frankly, it still looks great.
Let me know if you have any other questions.
Hi Gary – thanks so much for another helpful tutorial. I hope you haven’t already answered this — I didn’t see the specific question/answer yet here. I have purchased Thinsulate for insulating my floor (tho using polyiso foam board for walls and ceiling) and want to use bamboo ply for flooring — probably 3/4. I assume gluing it all down (as described here in your post but using thinsulate not foam, which is more like a blanket than a board) will work, but my husband is skeptical. Your view? I want to avoid holes in van floor; but you also note in your post that you bolt furniture/batteries etc. to floor, and the logical reasons for that (safety); but how do you completely seal those holes? and if that’s fairly easy, why not also screw the flooring into the van? thanks so much for your help, your site is awesome!
Hi Amy,
If you use Thinsulate for the floor insulation, you will need some strips along the floor to space the bamboo floor above the metal floor, so that the Thinsulate won’t be compressed down to almost nothing. It has to be able to fluff up to work as an insulator.
I’d consider using the polyiso under the floor. Its makes things a bit simpler in that its strong enough to walk on as long as there is something like your bamboo floor to spread the load a bit. You could use the If you already have the Thinsulate, you could use it to add insulation under the headliner, in the door cavities and in the frame cavities.
I do think that gluing the floor in place will hold it in place well as long as you use a good adhesive. The only negative I see to gluing it is that if you want to take it up someday, it will be a bit of work to get it up.
As far as I can recall, the thinking on using glue instead of screws was that I did not want to accidentally run a screw through something important that was just below the floor, and I thought the glue would be less likely to develop squeaks.
The holes I did put through the floor were for 3/8 and half inch bolts and I sealed around them with silicone caulk, which seems to be holding up fine.
Gary
Looks like no one’s commented in a while, but hopefully you’ll still see this..
First off, your page has been very helpful, thanks!
I’ve just finished insulating my walls with 2-part spray foam insulation, & I noticed it looked like you used that as well. I had planned to use that for the floor as well, spraying a thin layer in the low spots between the ribs, and then then about an inch thick between a floor “joist” frame built out of 1×1’s. (Which will then be covered with 1/4 luan and vinyl flooring)
Is there a reason you didn’t use the spray foam for the floor? Is there a reason I shouldn’t? I really don’t want to regret my decision a few months down the road.
Thanks for your input!
Hi Alanna,
Comments have been slow the last couple weeks — maybe the -30F out there has people slacking off 🙂 Anyway, WordPress wakes me up whenever there is a new comment.
On the floor, I would use the rigid polyiso insulation board. If you used the foam, it would work OK, but it would be hard to get it level enough to install the floor on.
I actually think that if I were doing the floor over, I’d probably skip the little fillers to fill in the gaps between the ridges on the floor.
The van has 73K miles on it at this point, and floor is still doing fine.
Gary
Hello All,
First off, out of all the material on the web I have latched on to your site and will use it as I begin my journey. Thanks for all of the great information!
I just bought my van and it has the composite flooring from the factory. Any recommendations on dealing with the composite floor? Should I leave it in and build on top of it? Strip it and start from scratch?
My initial thought was to leave it in and add sound cancelling material, plywood, then vinyl flooring. My only fear is that this will add a considerable amount of weight….
Thoughts are greatly appreciated.
Hi Corey,
There has been a lot of discussion of this issue on the ProMaster Forum. People have taken pretty much every approach. Worth doing the search on the Forum and reviewing what people have done and why — quite a range of opinions.
If you plan to use the van in cold weather, I’d be want to get some insulation in the floor. Some people have taken the factory floor out, put in an inch of polyiso and then reinstalled the factory floor and put a finish floor over it. Others have taken out the factory floor, and used it as a pattern to cut a new, lighter weight floor. Others have just left the factory floor in.
If you have a ProMaster where the factory floor is held down by blobs of glue here and there, people report that it comes out with a reasonable amount of effort (but it’s not real easy).
If you said it would save 100 lbs, that’s worth about 0.1 mpg. Does not sound like a huge amount, but it’s over the life of the van, and when combined with other weight savings, it adds up.
Another consideration is whether you are going to be loading heavy things (like motorcycles) in the back, where the factory floor would have some advantages.
Gary
Thanks Gary. I’ve decided to leave the composite floor. Over it I’ll include 1/2″ polyiso, 1/2″ plywood, and then thin vinyl flooring.
Great, helpful site. Just wondering what you think about the Promaster option of a composite wood floor that comes factory installed? My thought is cut a floating indoor/outdoor carpet to cover it, cut to fit around the fixed furniture, maybe with some foam carpet padding underneath. I’m more concerned with noise insulation than thermal; camped my last 20 years in a 1989 VW Westy with a vinyl floor and carpet, and never really noticed a thermal problem off the floor. The factory composite wood floor is flat, filling all the ribbed spaces, and would seem to save an awful lot of work, but I’m concerned it might transmit a lot of road noise.
Hi Michael,
If you don’t plan to camp much in the winter in cold climates, I think the factory floor is probably a good option. Not an expert on noise, but I think the factory floor would do a pretty good job on noise reduction — it adds mass and stiffens the floor, which I think would be helpful for noise.
If you do plan to camp in cold weather and run a furnace for heating, the uninsulated floor is a pretty big hole in the thermal envelope — thermally, its kind of like having another 60 sqft of single glazed window. This has been discussed on the ProMaster forum, mostly from the standpoint of is it worth it to remove the factory floor in order to insulate and then reinstall the factory floor over the insulation. Strong opinions on both sides. But, for me, the floor heat loss is a big factor for cold weather camping — it also is important if you plan to have an AC unit as it will reduce heat gain through the floor in the summer.
If you do your own floor similar to the one shown above, I’d forgo the strips to fill in the floor ribs — not really necessary. Also, a lot of people have used the approach shown above but with half inch plywood rather than the 1/4 inch I used — even though I’ve not had any problem with the 1/4 inch, I’d probably use half inch if doing it again.
I think you are talking maybe a day and a half of extra labor to do your own floor with insulation vs the factory floor.
Gary
Hi George,
Glad you found the Sportsmobile stuff — I like their floor layout tool.
Somewhere I have some links to fairly detailed drawings — I’ll see if I can find them later today.
Gary
Hi Gary,
Thanks for the write up- this is really helpful. Wondering if we used 1/2 inch plywood would that be enough to bolt our bed platform, galley, etc to? Or do you think it is necessary to bolt through the floor? Also, did you put anything between the sheets of polyiso foam? We are concerned about squeaking with the sheets of polyiso rubbing right against eachother
Thanks!
Hi Abby,
I would use the bolts through the floor.
In a 30g crash, a 200 lb galley and contents has 6000 lbs of forward force acting on it. I don’t think the half inch plywood will hold up to this.
I think that I did use some Great Stuff to bond the panel edges of the sheets of polyiso together. Have not had any floor squeaking.
There has been a discussion on the PM forum about floors and some of the people report using nothing to bond the polyiso to the floor or to the plywood and say they have had no problems, so maybe its not so critical to bond all the layers together — but, I still would.
Gary
Oops, meant to say I was using 1/2″ MDO ply, not mod 🙄
Gary, I am to the point where it is time to glue the polyiso to the van floor. Rib spaces are filled with 1/4″ ply,glued with PL. How quick do you have to be once you have laid down the Great Stuff before getting the ply in place. Can’t imagine the nightmare it would be if it cured before getting the ply (1/2″ mod) laid and positioned. Any other hint would be appreciated.
Thanks,
David in Great Falls
Hi David,
I guess it depends on how much moisture is in the air as it cures using the moisture in the air. But, I would not count on anymore than a minute or two. I’d trial fit the MDO, and have all the weights ready to go.
That said, I don’t remember it being difficult to get it done in time.
Gary
Hi, I am about to do the floor my van and planned on using 1/2″ plywood to over the insulation so I have something to bolt down the bed and build a countertop, shelves, etc. I like your idea of 1/4″ plywood but I don’t know how I would do that and bolt down bed and other stuff. Do you have any pictures of how you bolted down the bed? Thank you for this site. Excellent resource.
Hi Al,
I bolted the heavier stuff (bed platforms, galley etc.) through the floor using half inch bolts with larger steel washers or plates. The taller items are also bolted to the van sidewall frames or longerons using Rivnuts or bolts.
I think you need to do more than just bolt the heavy items to the plywood.
In a 20g crash, that set of batteries that normally weighs 120 lbs now “weighs” 2400 lbs!
Pictures on these pages:
https://www.buildagreenrv.com/our-conversion/promaster-camper-van-conversion-installing-the-propane-system/
https://www.buildagreenrv.com/our-conversion/our-conversion-beds/
https://www.buildagreenrv.com/our-conversion/promaster-camper-van-conversion-galley/
Gary
I’m looking to do my flooring with the same approach as you’ve outlined here, had just a couple questions:
I still couldn’t bring myself to use the 1/4″, so I purchased 15/32″ BCX plywood (sanded finished but not as smooth as the laun or birch), questions:
1. Do you think the 15/32″ would be prone to warp from temp/humidity changes, which would pull away from the adhesive? I imagine the 1/4″ is flexible enough to eliminate this risk, but I worry about the thicker stuff, given that the plywood already has some warp in it from the store (tough to get a flat piece).
2. Has the laun continued to hold up? No compression of the rigid foam under load? No warping or pulling from the adhesive? This will be a full time home for me, so I certainly want this floor lasting.
Thanks!!
Mike
Hi Mike,
Not sure on the greater tendency to warp more strongly — I’d be inclined to think it would be OK. You do have stuff (furniture, beds, ..) weighting down the plywood that should help. If you could figure out a way attach the edges together where two sheets of plywood meet, that might also help — maybe thin sheet metal at the edges to splice them together? You could try biscuits, but half inch is pretty thin for biscuits.
I realize you have bought the plywood, and this might not be practical, but you might consider using MDO (Medium Density Overlay) plywoo. Its a good quality plywood with resin impregnated face sheets on each side — its very stable and water resistant — used to make things like freeway signs and chemical tanks. Its a bit pricey at about $50 per sheet. You might have to look around for it, but a couple lumber yards carry it in Bozeman. I’ve used it for various things for years and been very happy with it.
Our floor has been fine. No warpage or other problems. But, we don’t do anything heavy duty — like carry motorcycles in back.
Gary
Hi Gary-
Went to the hardware to get great stuff today. They told me the adhesive needed a gun for another $50. Will the other types of great stuff work? Also, can I just put a second layer of reflectix on the walls for insulation? I’ve already got some and would hate to waste it. Thanks.
My Nissan NV van came with a rubber mat over the ribbed floor. I like your idea of the 1″ insulation covered with 1/4″ plywood and vinyl flooring. Do I need to remove the rubber mat and put wood strips between the floor ribs, or might a 3/8″ plywood over the insulation be stiff enough? Thanks.
Hi Jon,
I think that the 3/8 plywood over 1 inch rigid insulation would probably work OK.
Try to be careful with where you put the joints and don’t let the insulation panel joints align with the plywood joints.
If you are carrying heavy stuff in the back (eg motorcycles) you might need a more robust floor design?
Gary
Hi Jon,
The regular Great Stuff that comes in the cans with an included plastic tube applicator is at least as good an adhesive as the “Pro” version of the Great Stuff. Having used both quite a bit, I think the regular Great Stuff might even be a little better as an adhesive (but both are excellent). The Pro stuff has some other features — I think that better fire resistance is one of them.
The reason I use the Pro is that the applicator gun is much easier to control than the built in tube applicator on the regular GS. There is a world of difference, and if you are going to use a lot of Great Stuff, I think the Pro applicator is worth it. Try Amazon — I think I paid $35 for mine.
If you have not used Great Stuff before, be careful. If you get it on your hands you will be wearing it for a week. If you overspray it on to parts of the van you did not want to spray, its a bear to get off. Acetone will take it off before it cures, but after cure about the only way is a scraper. Wear old clothes.
Gary
On the Reflectex, I’d save it to make covers for the van windows — its quite effective as a thermal window shade.
https://www.buildagreenrv.com/our-conversion/promaster-camper-van-conversion-curtains-for-windows/
Gary
Thank you for the detailed flooring instructions. I have only one question. Did you nail/screw the plywood through the van floor? i
Hi Janice,
Its all just glued together with Great Stuff urethane foam.
It has held up fine so far.
Gary
i enjoyed your site so very much. thank you. i found you accidentally and am
so glad i did. i found so much i could relate to. i am an
older, single woman who has dreamed of creating a camper out of a new
van for many years. i just purchased a ford transit cargo van, 150, 130 wb, medium roof, so clearly i could very much appreciate your story of your promaster conversion. i am SO with you – simple, airy,
spacious and not complicated. you can shower at campgrounds; the portatoilet gets you through, and a simple, practical galley is all anyone needs.
my son feels i should build a “U” shaped piece of furniture that works as a couch (for a whole lot of people who will NOT be in my camper! ) that would convert into a full sized bed at night with the addition of a middle piece…i feel that this will turn my lovely van/car into a “bed on wheels” and cramp my space during the day when i might want to just sit in a chair and read, and keep my labrador company. so we disagree. and things are moving
slowly. i am grappling with how to create two comfortable beds that can
be folded down at night and used as sofas by day. i have my galley done:
a lovely stainless drop-in sink, with a manual hand pump system for water
use. i have a Norcold fridge/freezer (just right for two people for three days or
so) that is built in, with ventilation, of course. i carry a Gladiator coleman gas stove and would use it inside with windows/doors open, if caught in a rain storm and simply HAD to cook something. otherwise, i love to cook outdoors – why go camping if you plan to stay cooped up inside? i love your idea of maintaining space, openness, and keeping it simple and easy. one has to worry about the over-all weight these vans can transport, i think it wise
not to overload and create a claustrophobic living quarter. thank you for your blog/site. i enjoyed it tremendously and would love to read more and keep track of your conversion. i am with you in spirit!
Hi Jean,
Congratulations on the new van!
The nice simple layout has really worked out well for us so far.
My personal thought is that the bed part is more important than the seat part — that is, its really important to have good comfortable bed with a good mattress. We used to have a Coachman class B RV that had a couch that converted to a bed, but the bed was so uncomfortabe that we ended up redoing the whole interior to get a simpler layout that had a good bed.
With the layout we have with beds on each side, we just sit in the beds with feet going into the space between. We have a few loose pillows that can be arranged to make a back cushion. For us, this works fine. The only way its not so comfortable to sit in is that its a bit high and your feet dangle rather than touching the floor. I put a couple of blocks of wood to rest feet on to help with this.
For this last trip, we have added a removable shelf that spans between the two bunks at the back (near he back doors) — its 18 inches deep. The main reason for this was to have a place to put a cup of coffee or a plate when eating.
Really like the idea of a stove that can be used outside — if we were doing the conversion again, I’d go that way.
Please keep us posted on your conversion.
Gary
Gary,
Finally I am completing the floor for our van. I really like the colors of the vinyl sheet you selected. Where did you purchase it and what is the ID number to check it out? Thanks. Your site is amazing and extremely helpful. Great work!
David
Hi David,
It was just the local floor shop in Bozeman.
I don’t see any identifying numbers on the part of the floor that I can get to.
Maybe just take one of the pictures down to your local floor shop?
Gary
Question – So you didn’t screw anything down to the frame with this floor setup? From what I saw it’s adhesive for wood floor joists to the metal frame, and then Great Stuff for the insulation and plywood. Is that correct? Do you plan for the furniture being bolted down to the frame to hold the floor in place? Or do you think the adhesive was enough on it’s own.
Thanks for such a great site, by the way! I’m just starting my Transit conversion and would be lost without you and a few others I’ve found.
Hi,
The floor is held in place with bonding only and this has worked out fine — no problems at all. It might be a different story if were carrying something that put more load on the floor — maybe motorcycles?
The furniture (beds and gally) are bolted down through the vans metal floor with plates underneath to keep the bolts from pulling through the floor. The galley is also anchored to the body side panel frames near the top of the galley. I tried to size these to stay in place in a crash.
Gary
What glue did you use for glueing the plywood strips (slats) to the metal floor on the first part of the floor installation? You mentioned XXX. What is XXX?
Thanks.
Hi David,
It was this stuff: http://www.homedepot.com/p/Loctite-PL-Premium-10-fl-oz-Polyurethane-Construction-Adhesive-1390595/202020473
Gary
I am doing a very similar flooring and thought maybe the 1″ of rigid foam board and 1/4″ of plywood wouldnt be enough support (considered 1/2″) and was contemplating breaking up the insulation into segments with support boards between them. But it looks like you went without any additional support. Do you find that the rigid foam is plenty strong to support walking around/cabinetry/etc. Are you still content with the 1/4″ plywood?
Thanks a bunch and I love the site, it’ an amazing resource.
Hi Justin,
I had the same fear, but decided to try the 1/4 inch to keep the floor weight down.
It has been fine so far — don’t notice any soft spots or cracking of the plywood or places that appear to be lower.
I don’t really know how to determine if the insulation has been compressed at all, but I don’t see any evidence of this.
This is just with foot (human and big dog) traffic — might be different if you plan to carry some heavy loads?
Gary