This section covers our homemade composting toilet for our ProMaster camper van conversion.
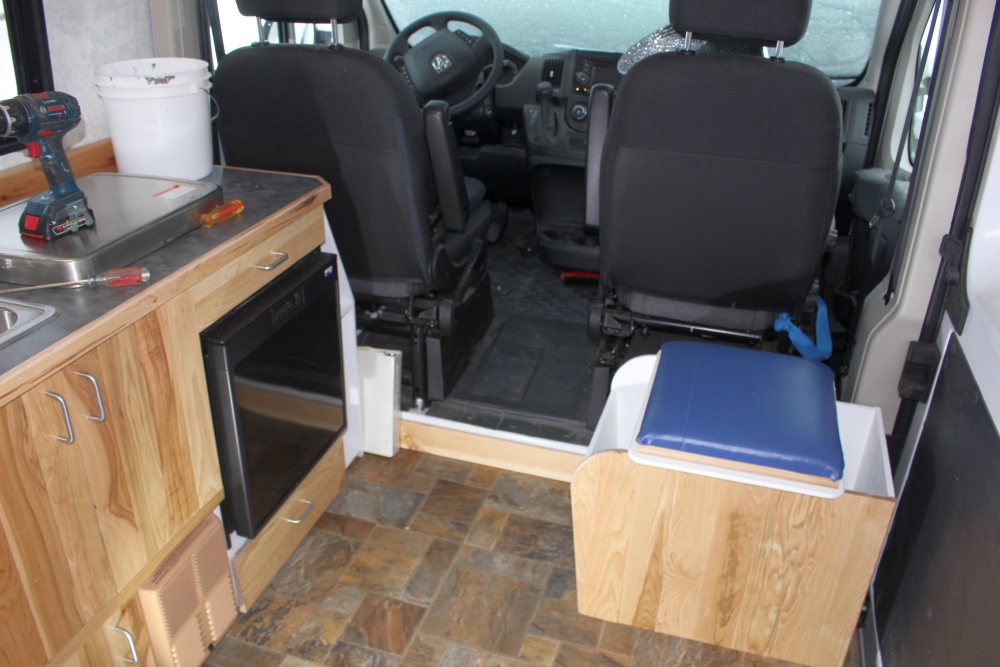
The DIY composting toilet is located up front just behind the passenger seat and next to the sliding door. It also provides some map etc storage and an extra place to sit.
The toilet design includes urine separation and includes a small vent fan that runs all the time to keep odors down and maintain an aerobic composting process.
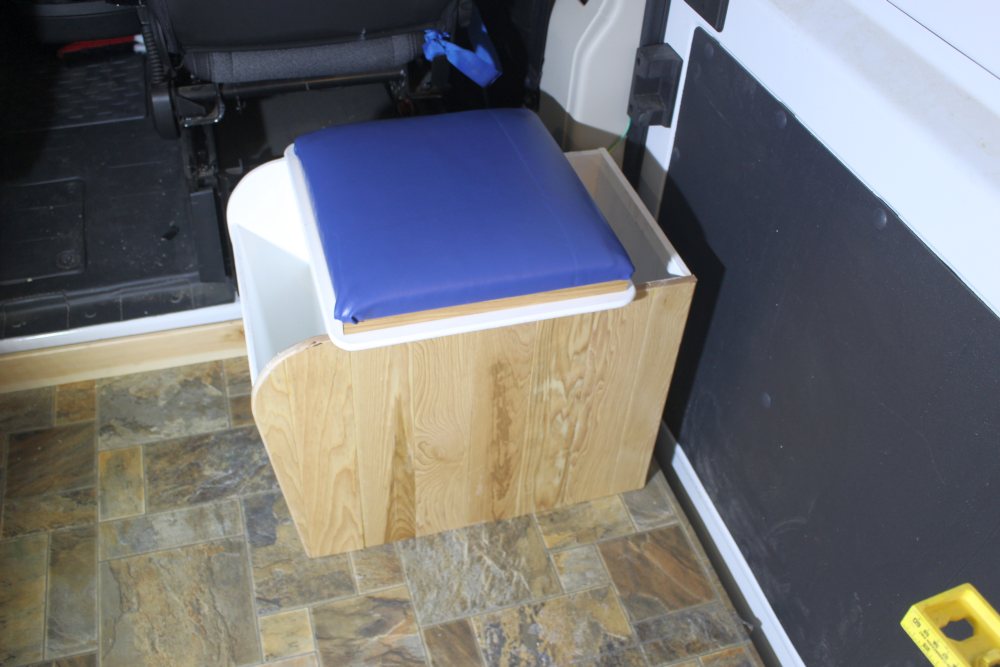
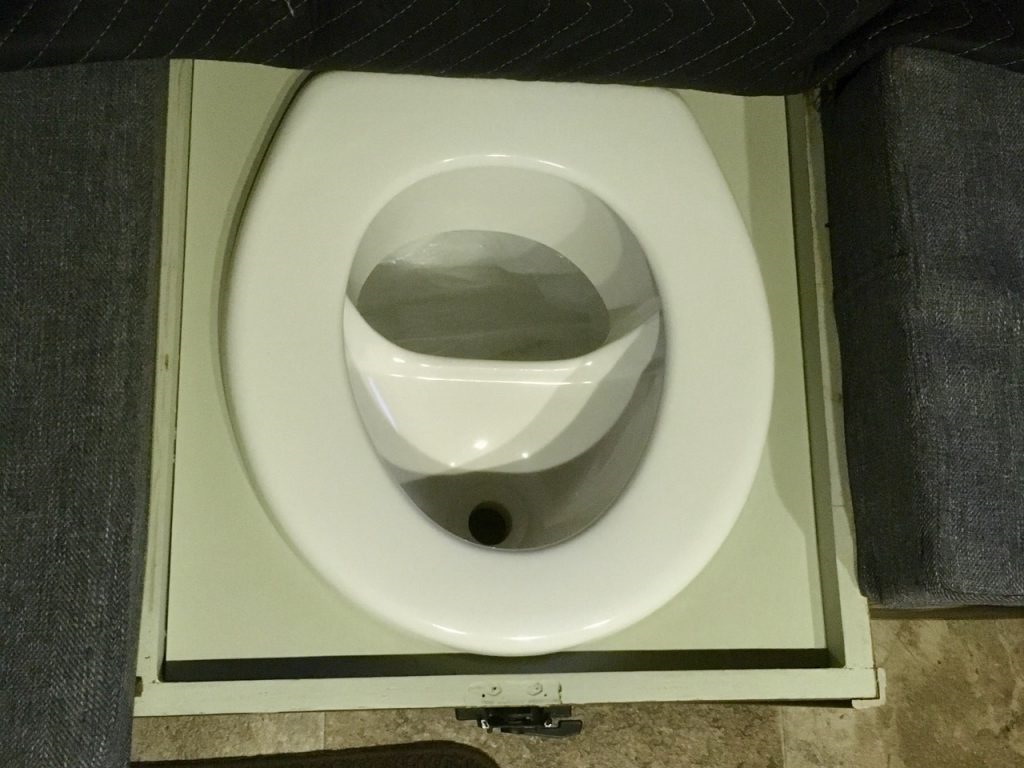
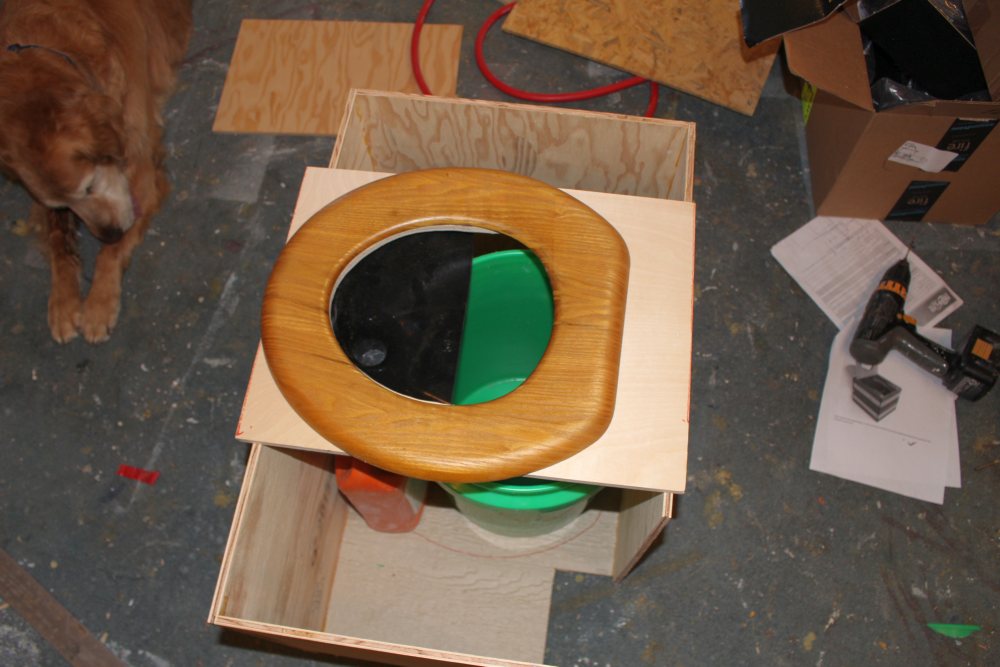
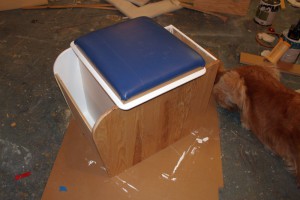
The finished toilet installed behind the van passenger seat. The blue cushion comes off to reveal the toilet seat.
Go back to the main camper van conversion page…
How it Works
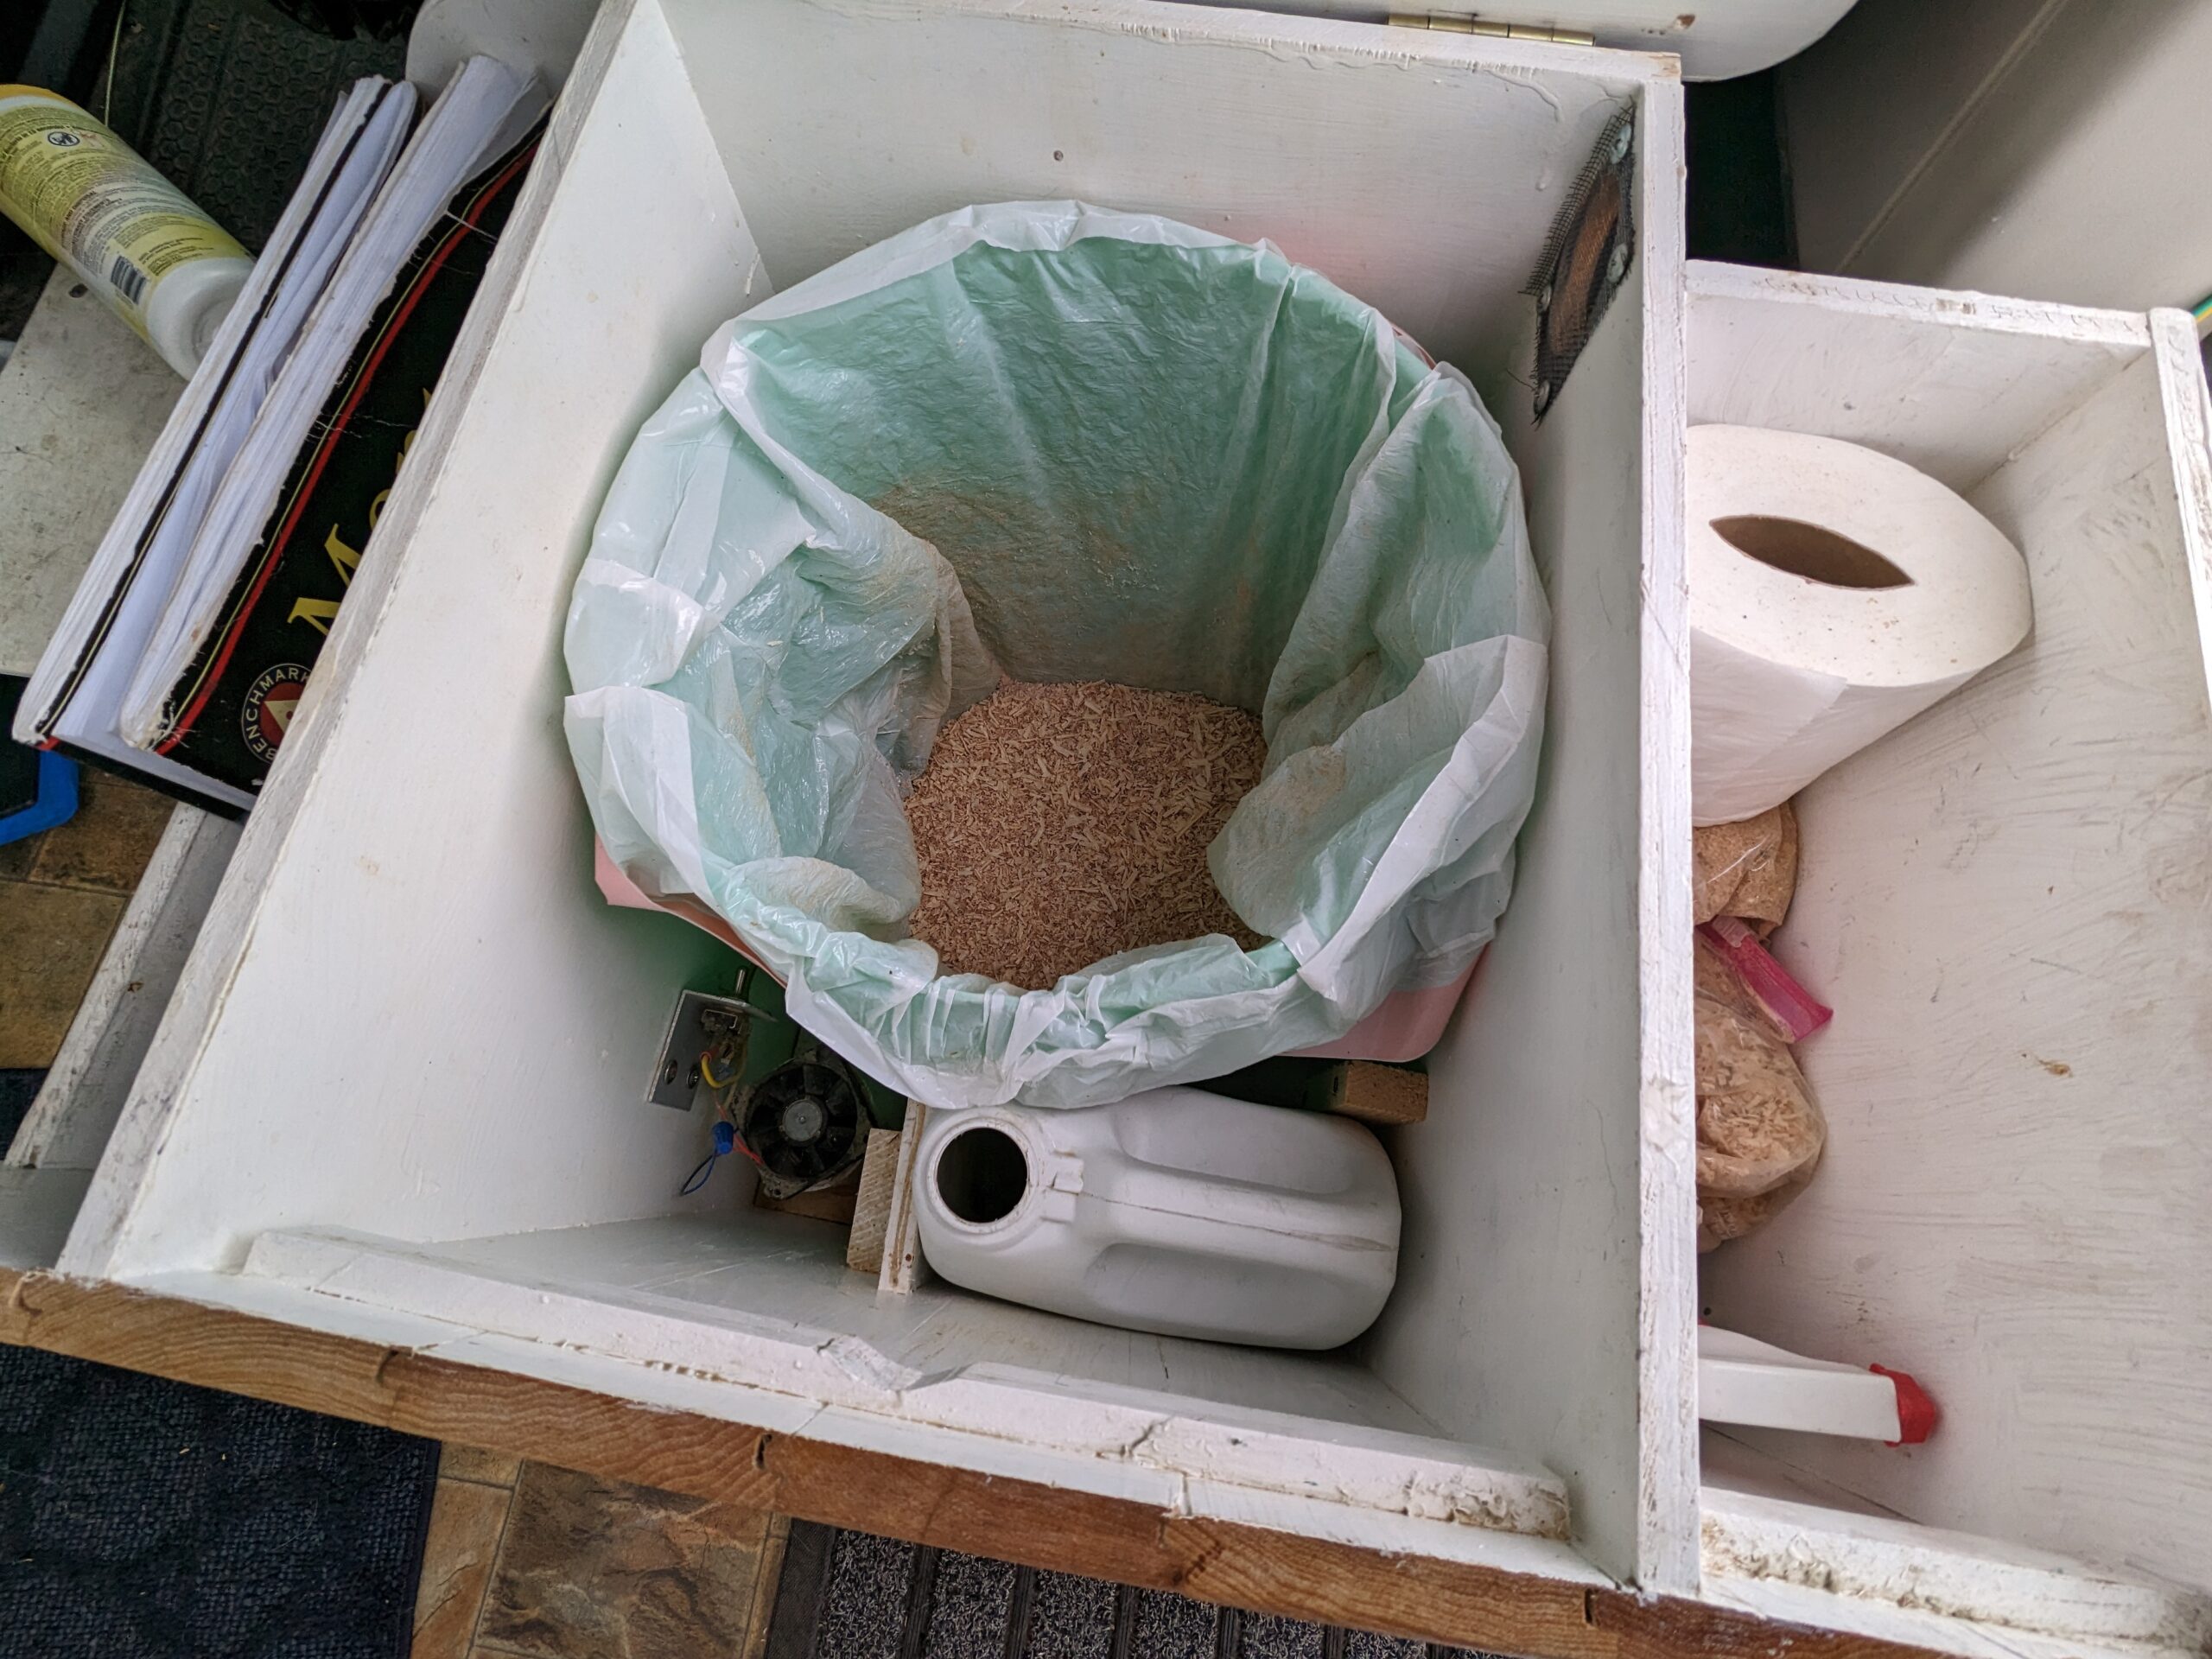
You start by adding some peat moss or sawdust to the bucket — this provides Carbon for composting and provides more air in the mix.
When you use the toilet, the urine is diverted into the pee bottle, and poo drops down into the bucket. After each poo, you add a bit more peat moss to the bucket.
The pee bottle is dumped as necessary throughout the trip. How often will depend on the size of your pee bottle and how often you use it vs other facilities. An adult is said to generate about 1 liter of urine per day.
The mix in the poo bucket will compost some over the course of the trip. When you get back home, you can dig a hole in the yard for it to finish composting in, or you can place it in a plastic bag and put it in the garbage. The volume is said to be much less than you would expect as the composting process reduces volume.
Reality update to the paragraph above:
Normally, the mixture in the bucket does not have time to compost over the length of a trip. We use a Costco Kitchen bag to line the poo bucket, and when its time to empty it, just pull it out, tie the plastic straps and throw it in a dumpster – really really easy. Typically, a liner bag lasts about three weeks for us.
The way the “composting toilet” works in the context of camper vans for us is: 1) in many cases we use the campground facilities and don’t often poo in the van – talking to others, this is very common; 2) when we do use the poo function, the fact that there is no urine mixed with the poo and the vent fan and sawdust dry the poo out quickly; 3) the vent fan and drying out of the poo eliminate odor; 4) when its time to empty the poo bucket, you just pull out the lite as a feather (because its dried out) liner bag, pull the straps tight and throw it in a dumpster.
After 8 years of using this toilet in the van, we would never go with anything else. Its the best camper van decision we made – so easy.
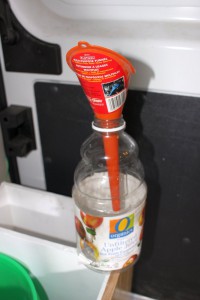
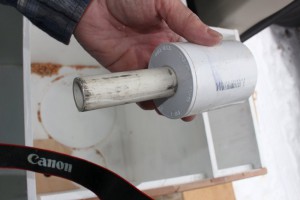
The picture below is the updated composting toilet with the kitchen bag liner and the larger (1 gallon) pee bottle.
The references listed below go into a lot more detail on how the composting works and how to keep the composting toilet working well.
The compartment on the inboard side provides some storage for maps, books, etc. that is accessible to driver or passenger while driving.
The toilet has a removable seat cushion that seals the top and serves as an extra place to sit.
The compartment on outboard side stores toilet paper and peat moss/sawdust.
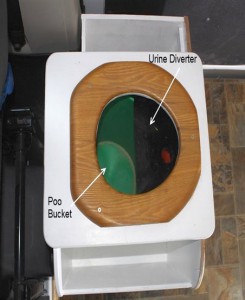
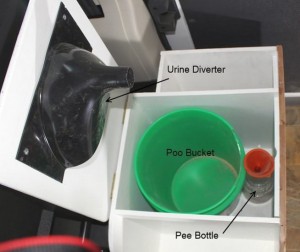
The urine diverter diverts urine into the pee bottle in the base of the toilet — this makes for better composting conditions in the poo bucket, slower filling of poo bucket, and less possibility of odor. The diverter works for both males and females as long as everyone sits down to pee.
Composting Toilets for RVs Information
I know near nothing about how composting toilets work, and was skeptical that they would be a good solution for an RV. The references below from people with lots of experience with composting toilets in RVs convinced me that it is a solution worth trying.
They advantages the composting toilet offers over the usual RV approach:
- No odor
- Efficient on space utilization (can be as small as a 17 inch cube).
- No need for black water tank and no need for the fun job of emptying the black water tank or finding a place to empty it.
- Long periods of operation without the need to empty
- No need for toxic toilet chemicals
- More environmentally sensible.
These are some of the references that convinced me to give this a try:
- Gordon’s homemade composting toilet…
- Video on using Nature’s Head composting toilet…
- The Wynn’s on composting toilets…
These are from people who are actually successfully using small composting toilets in RV’s or very small cabins and have been doing it for a long time. There is lots of good practical information on building and using small composting toilets in these references.
I want to thank Gordon and Sue for submitting all the details on building and using their composting toilet in their RV over the years — this is what got us off the fence on trying the composting toilet.
Another option found by Dennis is this Kildwick composting toilet kit.
It appears to be a high quality kit with all the essential components.
See Dennis description and pictures in the Comments section below.
Here is a video on another DIY composting toilet similar to ours…
Building the Toilet
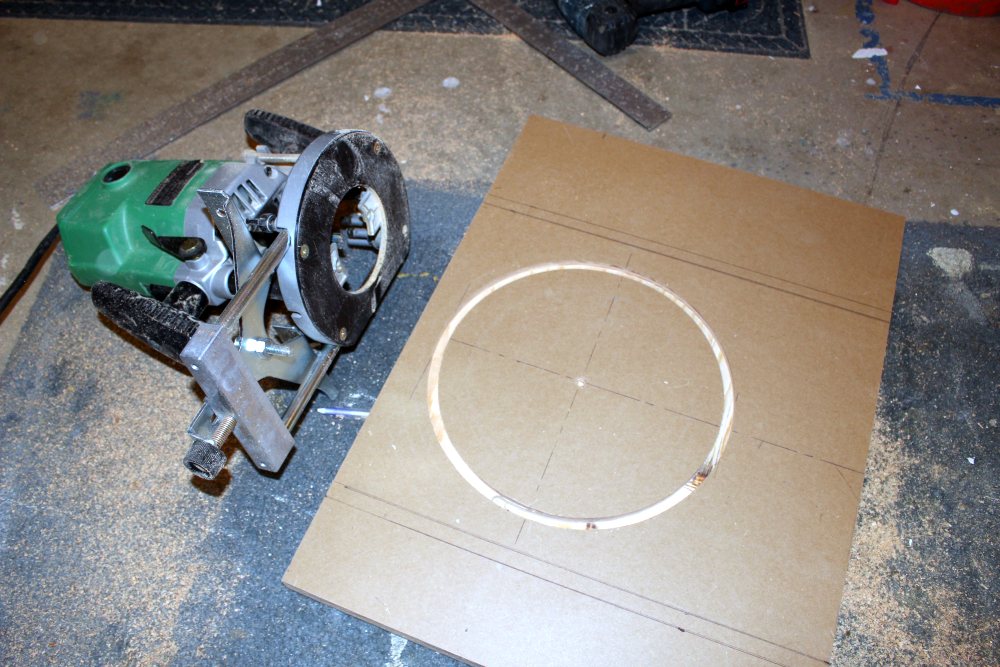
Mockup
We wanted the toilet to be as compact as possible in that its located in an area with limited space. In order to get the size down as small as possible and to make sure that it would fit in the intended area OK, I built a full size mockup — this allowed playing with the relative locations of the bucket, pee bottle, toilet seat, and urine diverter to get a compact arrangement. It also allowed actual testing of the urine diverter.
Simple mockup helped to get the geometry right.
Toilet Seat
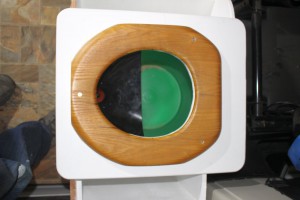
The toilet seat is a standard one off the Home Depot shelf. They sell ones with round openings and with oval openings — this one is a round opening which uses less space and seems to fit the urine diverter better.

The lid that came with the toilet seat was removed, and the bumpers on the bottom of the seat part are removed so that the toilet seat can be sealed right down to the lid of the toilet box. It is important to not leave any openings for insects to get in.
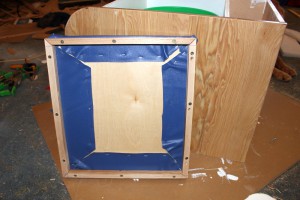
I trimmed the left, right, and front edges of the toilet seat to create flats that the seat cushion could fit against — the seat cushion (see below) is just a friction fit against the flats on the toilet seat.
The board the toilet seat is mounted on is hinged at the back to allow access to the poo bucket and pee bottle.
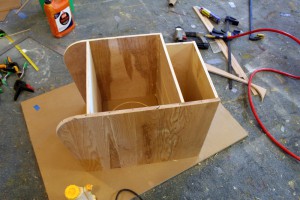
The Box
The box closes in the bucket, bottle and vent fan, provides for storage for peat moss and toilet paper, and provides an enclosure for the airflow created by the vent fan.
The box is 17 inches front to back, 23 inches wide (including storage areas), and 18 inches tall. We tried to make these as small as possible because the space we have is limited. If you have more space, I’d consider allowing for a bigger bucket and particularly a larger urine container.
This is the basic box. The center part holds the poo bucket and pee bottle, the right compartment is storage for peat moss and toilet paper, and the left part is a stowage bin for maps etc that is reachable from the drivers or passenger seat (I suppose it could also be toilet reading material 🙂

The base of the box is made from some 3/4 inch Medium Density Overlay (MDO) plywood I had left over.
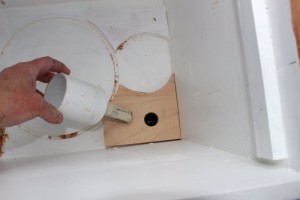
I routed a groove in the base for the bottom of the bucket to fit into.
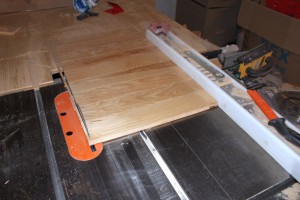
The back and sides of the box are made from some left over half inch birch plywood.
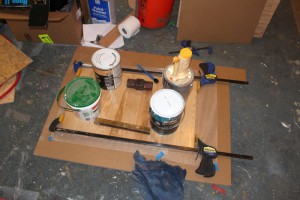
glue
The front of the toilet box is made from the same Hickory boards that we used for the galley cabinet — I had some of this left over from the galley cabinet and thought it would be nice to have the two cabinets match.
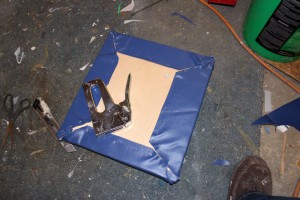
The Seat Cushion
The seat cushion fits over the toilet seat — it provides an extra place to sit and seals the opening of the toilet so insects cannot get in

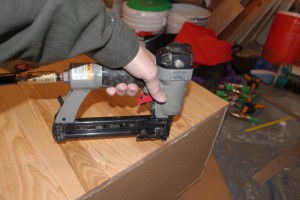
Assembly
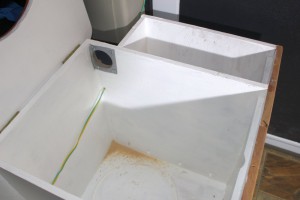
Some pictures showing how the poo bucket and pee bottle fit in the box.
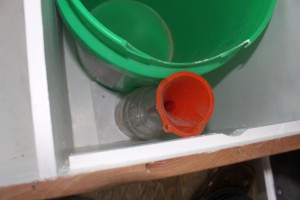
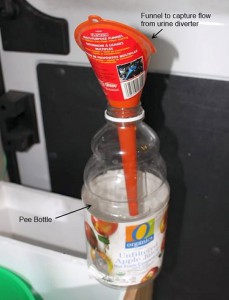
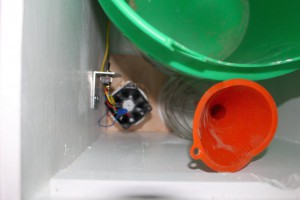
The little funnel channels the urine from the urine diverter into the pee bottle. I was going to use a piece of tubing, but ran across the funnel lying around, and it seems to do the job. The vertical stack up of pee bottle, funnel, and urine diverter is near perfect.
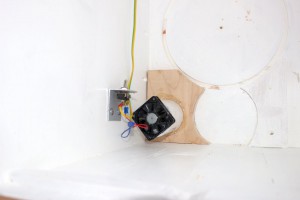
Vent Fan
Based on the references, I wanted to be sure to include continuous low flow volume ventilation of the toilet box with the vent flow exhausted to the outside. This helps to keep an aerobic composting process going and helps to avoid the more smelly anaerobic process — it also carries away any potential odors.
The fan for the venting should be low volume, low power, and low noise as it runs all the time. I had a few 12 volt fans on hand and tried them out to pick the quietest one. The selected fan is about 2 inches on a side, and uses 75 ma, or about 0.9 watt — this is about 1.8 amp-hours a day out of the 200 amp-hour house battery.
The jury is still out on whether the fan is quiet enough — if not will have to buy a quieter one. Update: the noise level is fine – you can’t hear it unless you put your ear right next to the toilet.
The fan is on its own fuse, and since the wires going to it are small gauge, I’ll use a small fuse.
Also included an on/off switch near the fan so that if the toilet was not in use for a long period the fan could be turned off.
The vent fan is siliconed to the top of a 2 inch PVC coupling, which it fits nicely. I did not want to drill a 2+ inch hole through the floor, so I used a reducing bushing to cut the size down to 3/4 inch PVC (which fits through a hole slightly over 1 inch in diameter). I ran the 3/4 inch PVC through the floor and siliconed it all in place. I’m not sure if reducing the diameter down to 3/4 inch will reduce the flow too much, but it still seems pretty good — will make the hole larger if need be.
Still in Doubt
We have not used the toilet yet — plan to soon.
Even though there were some good examples out there to model the design after, I’m still in doubt about a few things:
- Whether it will be necessary to mix up the poo bucket to keep enough air in it to maintain aerobic composting.
- Whether the ventilation air flow will be sufficient and whether the air flow pattern through the toilet compartment is correct.
- How often it will have to be emptied.
Updates
Update after first trip: A couple things learned from the first trip: 1) the pee bottle I used is too small — it should probably be more like a gallon, 2) the toilet cushion gets used a lot as an extra seat — its in a handy place for sitting.
2nd Update September 2016: We have now used the toilet on many trips and it has worked well. One thing we did find is that the half gallon pee bottle is too small. After a bit of hunting around, I found a 1 gallon jug that would fit in the same place with only minor rework and that has worked out fine. The new jug is a bit taller and I ended up siliconing a cut off funnel into the urine diverter outlet — the funnel outlet is small enough to fit directly into the pee jug opening.
I do want to point out that we don’t tend to use the poo function on the toilet a lot. We are usually in National Forest campgrounds or the like and we use the toilets there for pooing. I think that most people do the same. But, if you want to be away from conventional toilets for extended periods, I don’t see any reason why this design would not work fine — this is based on other writeups I’ve seen on similar composting toilets used in boats and cabins as the only toilet.
On the last couple trips, I’ve taken to putting a Costco kitchen size plastic bag into the empty poo bucket, and then add sawdust to the bag. At then end of trip, I just take the bag out and put it in the garbage — since most of the moisture has been dried out of the poo, its light as a feather. I also take along an extra bag just in case the first one fills up during the trip, but we have not come even remotely close to this even on trips that last a couple weeks.
Having owned RV’s in the past with a black water tank toilet and also with the porta potty solution, I’d never go back to one of those — the composting toilet with urine diverter is just better all around.
Third Update – Jan 2021:
So, we have been using this homemade composting toilet for 6+ years, and I’ve come to think its one of the very best decisions we made on our conversion. I think it suits our needs better than a cassette toilet would, and even better than a Natures Head composting toilet (because its so easy to empty).
We started with a half gallon pee container and this was too small, so we changed to a 1 gallon — this is just about right for us.
I would do this homemade composting toilet again on a future van conversion in a heartbeat!
Cost, Weight and Time
This took a fair bit of time as I built a prototype first to get the geometry right, and then
| Item | Cost ($) | Weight (lb) |
|---|---|---|
| Urine diverter | $55 | 1 lb? |
| Plywood and Hickory | on hand | 31lb? |
| 5 gallon bucket | free | 2 lb? |
| Toilet Seat (only part used) | $15 | 2 lb? |
| Cushion cover and filling | $12 | 1 lb? |
| Total | $82 | 37 lb (weighed) |
The urine diverter was ridiculously expensive for a simple piece of molded plastic, but I could not find anything cheaper.
Update: April 2017 — Here is another urine diverter. Its just as expensive, but it does have a classier look 🙂
The 37 lbs is the actual weight of the finished toilet.
Go back to the main camper van conversion page…
Gary
January 7, 2015, June 25, 2015, September 29, 2016
Thanks for the highly detailed and useful guide! Not sure if I missed it but does the toilet paper go in the solid section or a separate container?
Hi Nick,
Good question.
We put the toilet paper in the bucket, and by the time its time to empty it, its more toilet paper than other stuff (by quite a bit).
Some people have a separate container to collect toilet paper in, and they dispose of this separately. This would definitely extend the time for emptying the bag in the bucket.
But, for our use, we get close to 3 weeks the way we do it, and it does not seem worth the bother of having a separate container for the TP.
Gary
This small and super quiet fan:
https://www.amazon.com/gp/product/B009NQLT0M/
is installed in the toilet area. I drilled a one inch hole that draws warm air from the electrical box (most of the heat comes from the Tripplite inverter) through the toilet box and exhausts out the floor of the van.
Hey Dennis,
That is one nice looking composting toilet!
I’ll add a note to the page above on this option.
Please let us know how it works out in service.
Gary
This final photo shows the outside of the toilet and how it fits in the bench seat of the van. This will have a matching padded seat/lid that latches for travel.
The first photo is from the top down with the toilet seat in place. The second photo is the inside showing the urine and solids container.
Well after waiting 30 days in customs, the toilet parts came from Kildwick.com. Here are a few photos of the completed toilet. I haven’t install the fan yet.
Gary,
I finally got around to doing the composting toilet. I decided to go with this company in Germany. It’s a little expensive ($175), but I liked the idea that the parts work together and it fits the space I have. I bought the urine diverter, urine tank and solids tank. https://www.kildwick.com/Kildwick-camping-toilet-DIY-kit-without-casing
After I get it put together I’ll send photos.
Hey Dennis,
The kit looks really interesting — nice to be able to get a whole set of parts designed to work together.
Can’t wait to see the pictures and your experience with it.
Hopefully with the Covid thing you will have a good chance to put it to use 🙂
Gary
Gary,
Here is a toilet similar to a ours: https://www.ebay.com/itm/SmartJon-Toilet-Motorhome-Composting-Tiny-House-Off-Grid-Cabin-Boat-Marine-RV/173911068828?_mwBanner=1&ul_ref=https%3A%2F%2Frover.ebay.com%2Frover%2F0%2F0%2F0%3Fmpre%3Dhttps%253A%252F%252Fwww.ebay.com%252Fulk%252Fitm%252F173911068828%26rvr_id%3D0%26rvr_ts%3D12fa830c16c0aad327a21f7effd61de6&ul_noapp=true&pageci=94e6a669-1345-4178-bfdb-a8ca4f40f20f
Hey Dennis,
An interesting design — had not seen it before.
I like the overall design, the urine separation with a good sized urine container, and the price at 1/4 what a Natures Head costs.
A couple things I’m not sure about:
– will that relatively small diameter urine tube need cleaning pretty often due to urine crystal build up?
– I don’t see an easy way to vent the toilet to the outside. Mine has a very small 12 volt fan that pulls a little air through the toilet housing and exhausts it out the floor. Not sure how necessary this is, or if you could figure out a way to do the venting, but something to think about.
– A little put off by the lack of online reviews and that they don’t have their own website to provide more facts, videos etc. But, maybe they are new?
If you go this way, I’d really appreciate a good review and pictures. I’d put this up on my site or link to it if you put it elsewhere.
Gary
I found this as an alternative to a urine separator. 6 quid in screw fix. https://www.toolstation.com/plastic-funnel/p34741 Might be useful to someone.
Thanks Rachel
Gary
Gary, please disregard my last question about the fan. I figured it out. Thanks. P.
Finally getting around to building one similar to yours. I’m pretty clueless about fans. Can you suggest some specs, in terms of volume, and how to best pick one? Are these PC cooling fans?
Hi Paul,
The fan came out of my junk box, and is the smallest one I have — its quite a bit smaller than the typical PC cooling fan.
Its about 2 inches square.
This might be pretty close: https://www.amazon.com/dp/B000LB0M8S/ref=psdc_11036291_t3_B071FNHVXN
Please let us know how the project comes out.
Gary
Did you attach any kind of latching mechanism for your seat/toilet lid to keep it tightly enclosed. Having not tried this before, I would want to have a bucket lid to really seal that bucket when not in use. Am I overthinking this? Thanks for your response and sharing your ideas.
Hi Mike,
Don’t think a bucket lid is a good idea as it will prevent drying, which is very beneficial.
The
Latch seems like a good idea.
I don’t have one but my lid fits snugly.
You do need something that seals well enough to keep critters out – even very tiny ones.
Gary
Many composting toilets utilize a heater to maintain an optimal temperature for aerobic bacterial activity, and to increase the rate of evaporation. It might not be necessary in more temperate climates, but in the north, the good little bacteria hibernate for a good portion of the year.
◇
While on the road, a turn or two of 3/8 copper or pex tubing carrying Engine coolant could do the job, and a couple of night light bulbs for when stationary.
♤♤♤♤
Be sure that your wiring is suitable and safe for wet, corrosive environment, maintain marine grade practices. Getting zapped through your wee-wee would be a “crappy” way to go!
◇
Some sort of thermostatic temperature control would be good to avoid overheating and killing off all the beneficial bacteria.
Hi,
All interesting information.
I’m not sure how much it applies to the typical use of “composting” toilets in RV service.
We use the composting toilet in the RV in this way — and I think it is fairly typical.
– We separate urine from poo so the pee goes in a pee bottle and poo goes into the composting toilet bucket. The pee bottle gets emptied every couple days. This eliminates much of the moisture and weight.
– We don’t use the poo function a whole lot as there are usually toilet facilities of some kind in the National Forest or Provincial campgrounds we stay in. So, poo accumulates slowly. Dry sawdust is added with each poo.
– The vent fan dries out and shrinks the poo, so the volume in the poo container grows very slowly. I’m not sure how much composting is really going on. It might be more accurate to call it a urine separating desiccating toilet.
The end result of this is that we can go about three weeks or more before we need to empty the poo compartment, and since we use a plastic bag to line it, this consists of pulling the liner out of the bucket, pulling the liner tabs tight and throwing it in a dumpster. Since the poo has been dried out, three weeks worth of poo weighs very little and the liner is easily pulled out and deposited in the dumpster.
So, we have not attempted to make compost with it, which is a little less than fully satisfying, but contrast this to the popular cassette toilet where pee, poo and flush water all end up in the toilet tank along with some often nasty chemicals. In a short time you have a tank full of this not so nice mix that is difficult to dispose of in a convenient and responsible way.
I think that if you were living in an RV for an extended period, it would be possible to actually generate usable compost, and I do know of people who do this, but it usually takes some additional time to finish the compost outside the toilet.
Gary
Hi Gary, I’ve been following your build with interest a I am considering a similar rv build.
I have used a home build composting toilet in my home for over a decade, and also use a composting bucket toilet in my camper van over the last 3 years. I stay out camping for as much as 4 months at a time, so I’ve got lots of experience by now.
I recommend coconut fiber- also called coir, over peat moss. It is instantly absorbent, where peat moss is somewhat hydrophobic and absorbs moisture slowly. Coating the outside of the poo creates a biofilter so faster absorption is beneficial and I have no odors with my toilet. It travels in the van with me at close quarters with no offense. You can get coconut fiber at any large garden store or big box store. Like peat moss it is shredded. It’s more convenient to carry and use than peat moss because it comes in a compressed block about the size of a brick. I buy a package of 4 bricks and break them open as needed. I get more than 30 uses per brick. It’s also less powdery and dusty than peat moss.
When my toilet bucket is full, I look for a vault toilet to empty it in to. I am confident that my toilet contents will not cause any problems when the vault toilet is pumped.
Urine diversion is critical. With urine in the toilet I think I would get a few days Before I needed to empty.
I use a separate urine container with a funnel. I like the Freshette brand (sold at REI) because it has a tube attacked which fits nicely into my urine jug.
Hi Nancy,
Thanks for the notes on your composting toilets.
Will definitely try the coconut fiber on our next trip.
Sounds like you have quite a bit of experience with the composting toilet. If you want to put together a description with some advice and some pictures, I’d be glad to add it here.
My email address is on this page: https://www.buildagreenrv.com/contact-gary/
Gary
Great job on explaining and illustrating this project! Inspired me to design my own and take the leap. Thanks to your work in posting this I understand the basic concept and can design around that. I think I will have a nicer looking one than a Nature’s Head for about 1/10th the cost! Appreciate it.
Hi Greg,
Glad the description was helpful, and would love to get some pictures and description of what you come up with in your design. Please let us know how it goes.
Gary
Hi
Where did you get your urine divider?
Hi,
I got it on ebay: http://www.ebay.com/itm/URINE-SEPARATOR-4-Waterless-Compost-Toilet-Diverting-Seat-Insert-Outhouse-W-C-/322308154994?hash=item4b0b102672:g:tNUAAOSwB09YEiOi
There might be a cheaper place to get it as it seems ridiculously expensive for a piece of molded plastic — or you might be able to figure out how to make one.
Gary
Thanks for the work of your write up.
You have inspired me to follow your lead.
Hi Mel,
That’s great.
Please keep us posted on what you build.
Gary
Have you had a chance to evaluate your design more thoroughly? I’d be curious to know the results…It seems to me that the “mixing” feature on both Nature’s Head and C-Head are rather integral to overall operation.
I haven’t explored the homemade links you provided, but from my own searches I was turned off to homemade by the need to mix, and using my cordless drill + mud mixer handy really wasn’t something I want to do…
Hi Brad,
Have not had a chance to use the composting toilet on the RV for an extended period and with routine use every day.
I’m not sure that for our normal use of the RV we are ever going to be using the composting toilet every day for poo. It seems like there are just too many regular toilet opportunities around on most days to need the composting toilet for poo — it does get occasional poo use and frequent pee use. And, its not that we are always comping in commercial RV places — we go mostly for remote campgrounds and undeveloped Forest Service sites when we can find them.
Used in this mode, the mixing is not really much of an issue. I suppose if we had a really long trip there might be a need to give it a through mixing at some point, but it would have to be a long trip.
So, the most important thing might be how you are actually really going to use the toilet. If you plan to use the poo function regularly day in and day out for an extended period, then I think something like the NaturesHead (which looks like a really good product to me) is probably the way to go. If you are going to use the toilet more like we do, then I think the kind of toilet we did (with urine separation) makes good sense and saves some money.
I remember going through all the composting toilet designs and agonizing how each one really handled the composting of our full poo load only to find out that this just does not match the way we (and I think most people) use the toilet.
You might also want to read through the material that Gordon provided on his use of the composting toilet — this is decades worth of actual practical use.
I’d like to hear what you end up doing and how it works out for you.
Gary
Where did you purchase the urine diverter? What was the product called?
Hi Terry,
Search ebay for “urine diverter” — it will bring up a few.
All seem kind of expensive for what you get.
Gary