We are headed up to the Yukon and the Dempster highway again, and based on our last trip, we wanted to carry two spare tires.

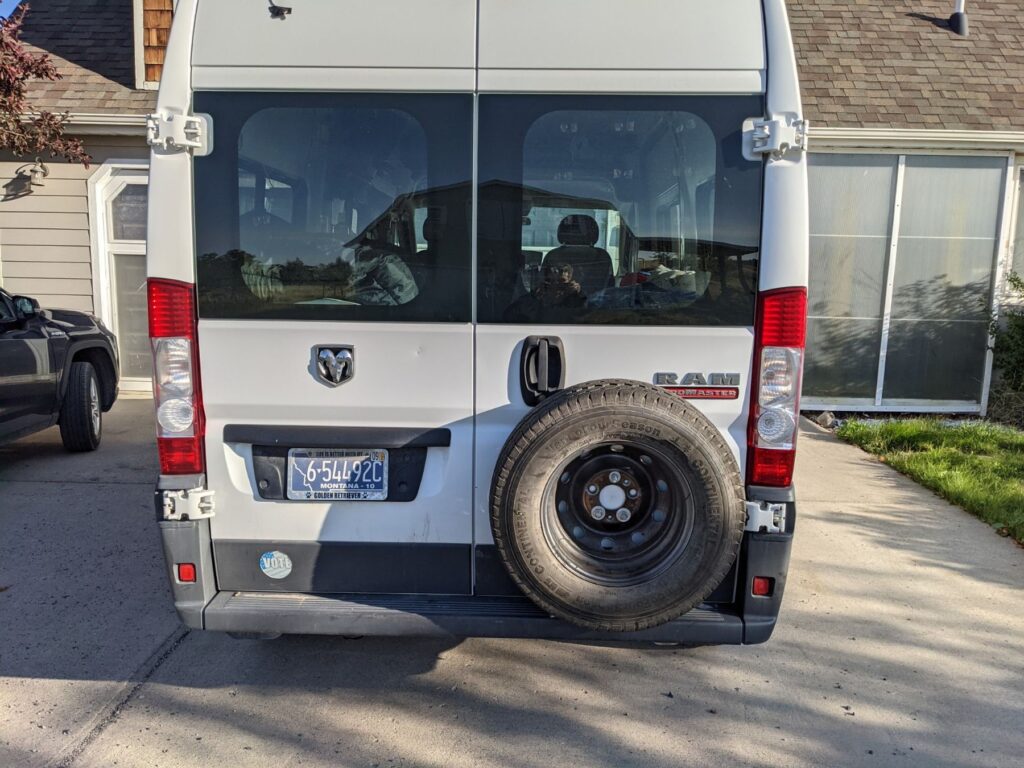
We decided to try a DIY tire carrier in which the tire is carried on the right rear door of the van.
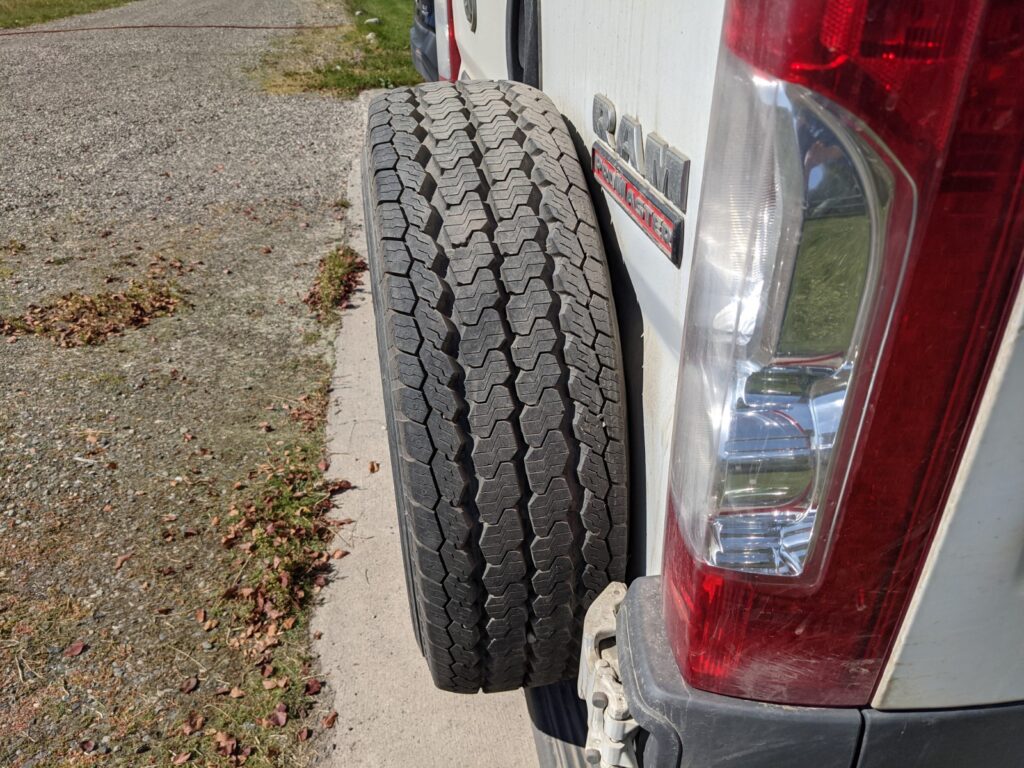
There is a concern that the weight of the spare tire on the door would damage the door. To address this the design has two features: 1) the tire is mounted such that the bottom of the tire touches the bumper, so that as you bounce over potholes the bumper takes a lot of the tire g loads, and 2) the door panel is reinforced where the tire is mounted. In addition, the tire is flipped around so the deep part of the wheel dish faces in and is only 1.5 inches from the door surface.
There is also a concern on whether once you get the spare tire loads into the door, is the door and hinge structure robust enough to stand up to the extra load. There is a nice commercial spare tire carrier design that also uses the door for support, and it has been reported in the Promaster forum that it has held up well in use. In addition, my little test was to take out the inside panel on the door, then step into door and bounce up and down on it at the far end – it seems very sturdy with no sign of distress. I guess the trip up the Dempster will be a good test of whether – I will report on how that goes.
We would have liked to put the spare tire on the left door because the right door is the one that is normally used. But, this would mean moving the license plate and its light to the right door, and for our limited use of the tire carrier it did not seem worth the effort. We are planning to use the spare tire carrier only on a few trips that we think might be hard on tires and where tire repair places are few. Most of the time, the carrier will be empty. For this reason, a license plate holder on the tire would not work for us.
The Design/Build
The design is very simple. It consists of piece of MDO plywood glued and screwed to the inside of the door and a sort of puck that the spare tire bolts to. The puck is glued to the outside of the door skin. There are three bolts that go through the inside plywood, the door skin, and the puck. The bolts stick out from the puck and match the holes in the wheel, so the wheel is pushed onto the bolts and secured with nuts.
Plywood door reinforcement: The door has a horizontal beam extending across the door. The plywood reinforcement goes from the bottom of the door up to the horizontal beam. It is glued in with polyurethane (Gorilla) glue. I chose this glue because it is waterproof, strong, and it has the ability to fill small gaps. I used six stainless steel screws from the outside of the door to pull the door skin into tight contact with the plywood while the glue is curing.
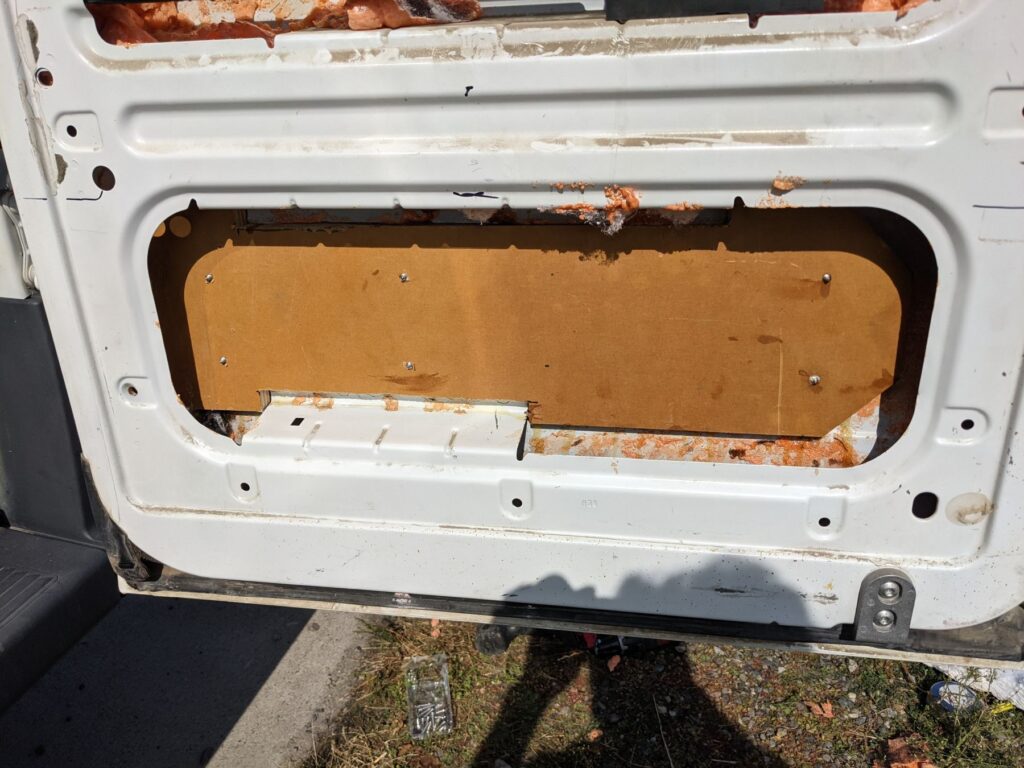
The door skin has a very slight curvature, so there is a very slight puckering of the skin at the screws – you can only see this if the light is right. This bothers me not at all, but if you want to avoid the pucker, you could slightly curve the face of the plywood using a power sander or a planer and figure out a way to apply clamping pressure while the glue is curing, and avoid using the screws at all.
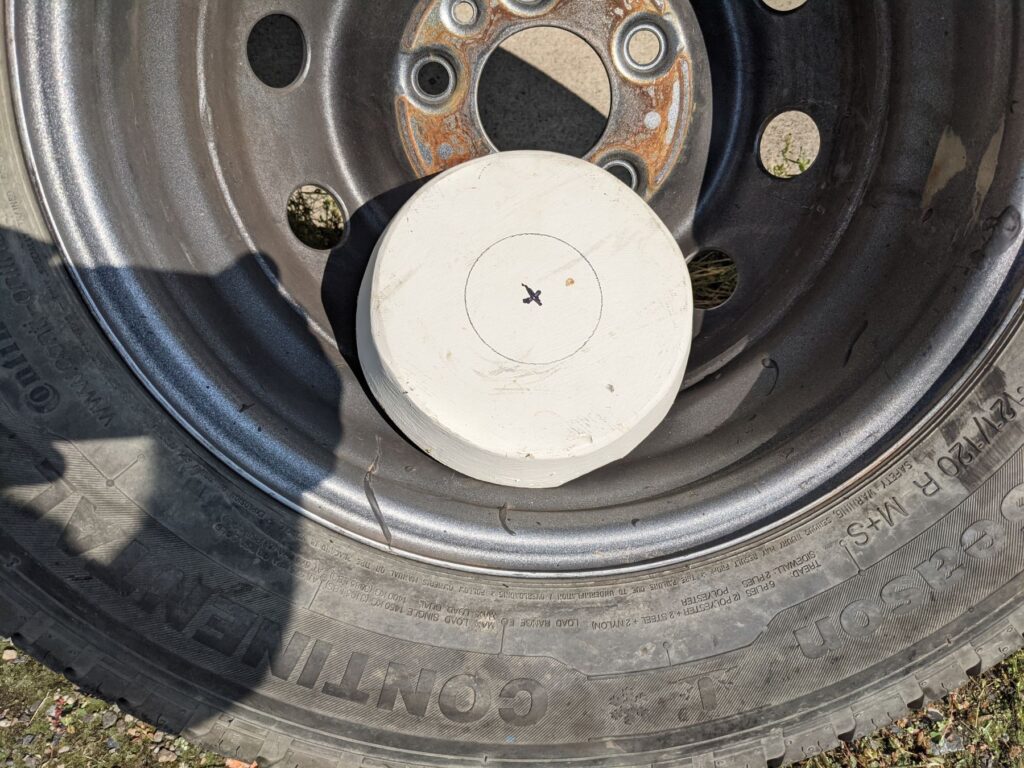
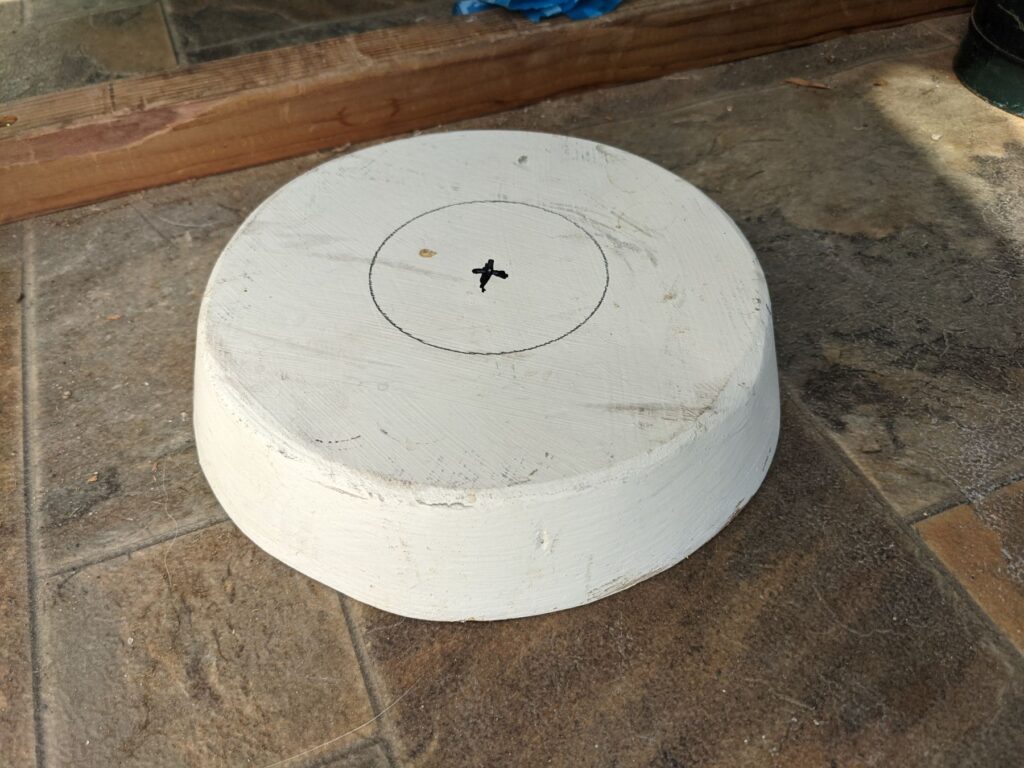
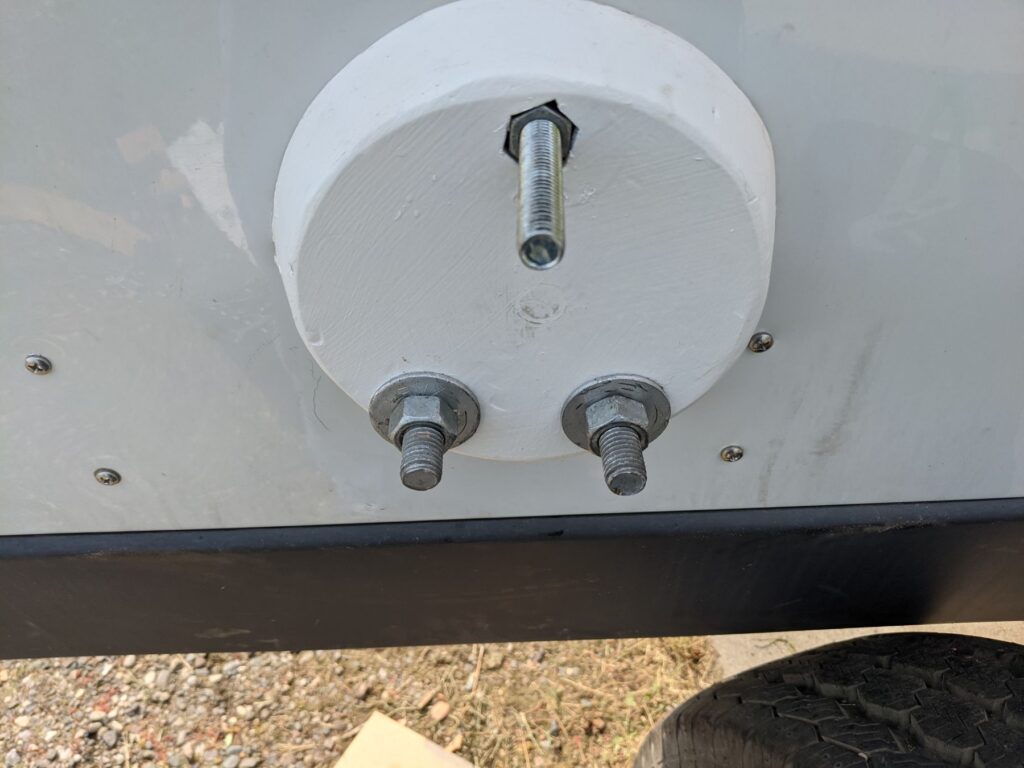
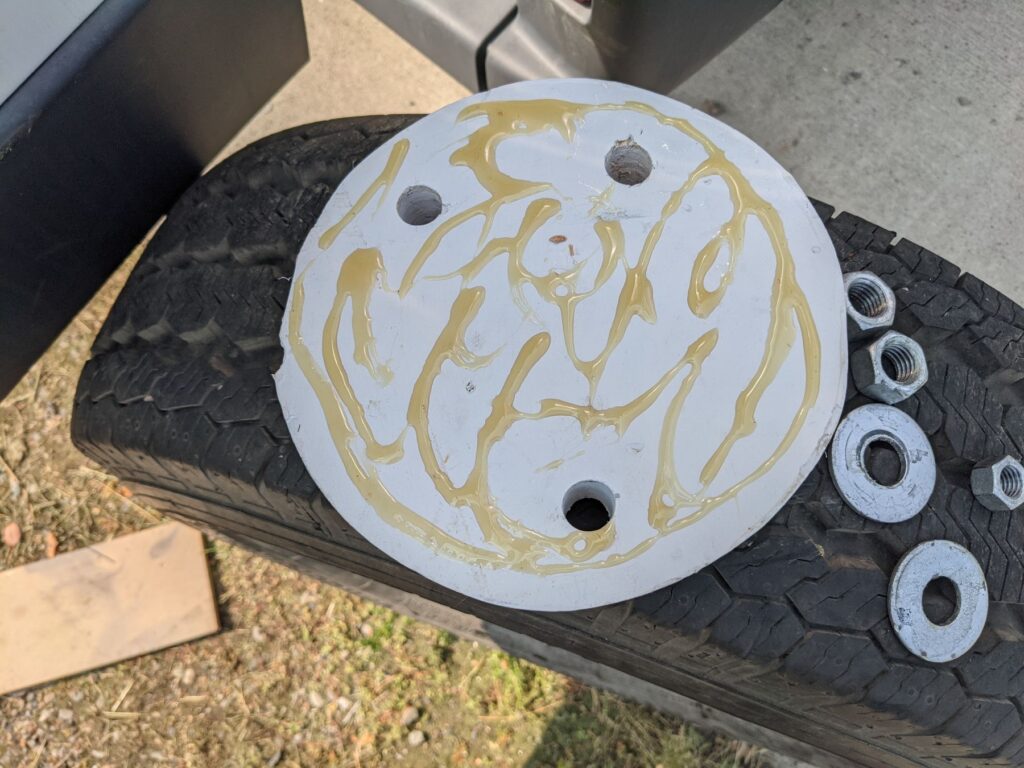
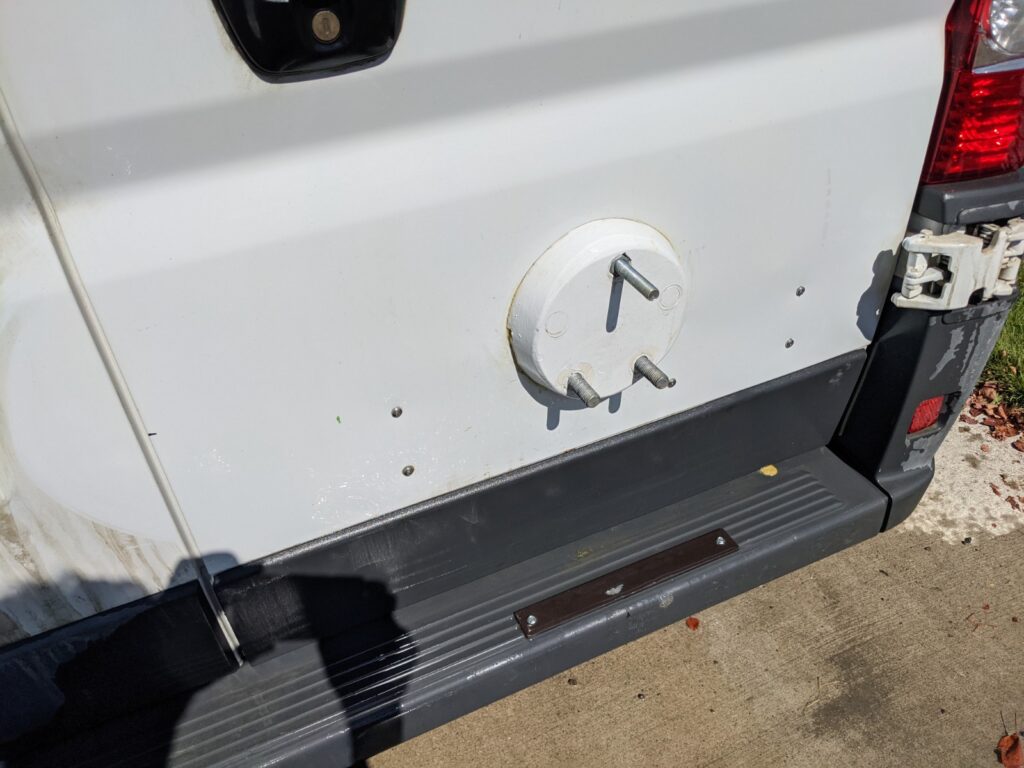
The Puck: The puck is a circular gadget a little larger in diameter than the bolt ring on the wheel. It goes on the outside of the door and is 1.5 inches thick. It supports the bolts that hold the spare tire in place.
The puck is made with two thicknesses of 3/4 inch MDO plywood that are glued together.
Probably the most important thing to get right in the build is to locate the holes for the bolts that hold the spare tire up. The holes have to exactly match the holes in the wheel, and they have to be located such that the tire is exactly the right vertical distance from the bumper so that the bumper takes some of the vertical load on the tire. The left to right positioning also needs to be done precisely in that if its too far left it will interfere with the door handle and if too far right it will interfere with the door hinge.
This is how I located the puck and bolt holes:
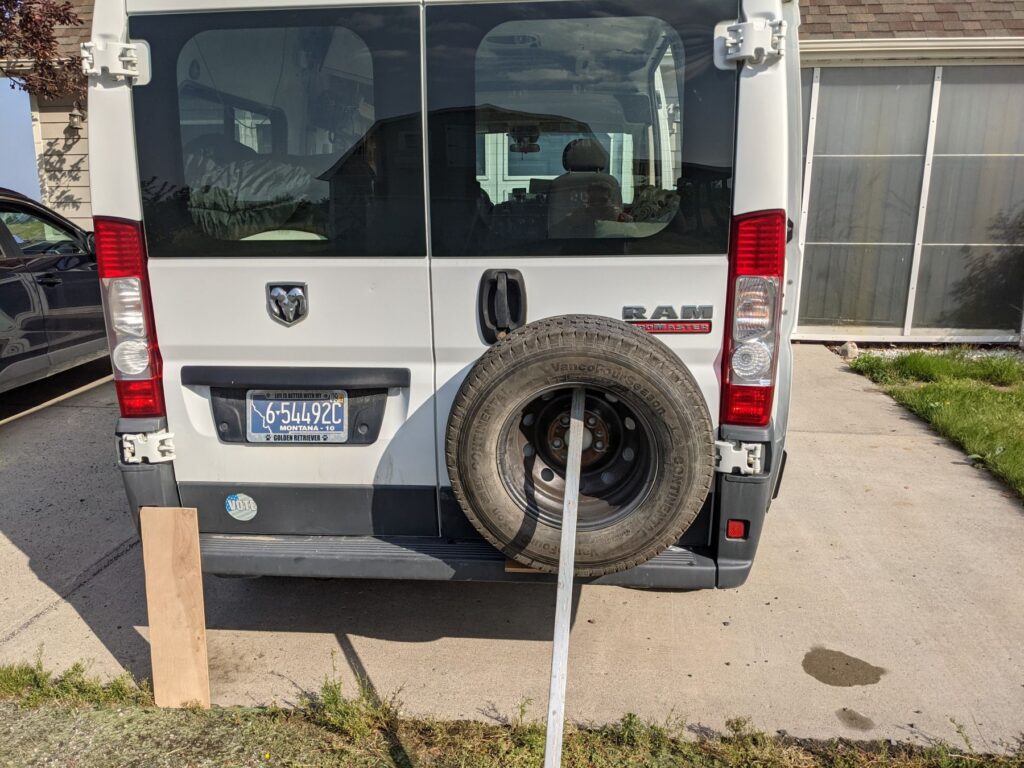
I used a 3/8 inch spacer between the bottom of the tire and the bumper. This allows for some adjustment for different tires or tread wear. The spacer thickness can be adjusted so that the door closes freely, but there is very little distance between the bottom of the spacer and the bumper.
To get the holes in the right place, I put the puck against the wheel and marked the three holes. i drilled the holes with a drill press, but careful use of a regular drill would be OK. I used two holes near the bottom of puck/wheel in order to place them lower in the reinforcing plywood on the inside of the door. The third hole is located as high as possible. The bottom two holes carry all the wheel/tire weight, and the top hole stabilizes the tire. The bottom two holes use 5/8 inch bolts and the top hole is a 1/2 inch bolt. The half inch bolt on the top also is handy when placing the wheel on the carrier – you can hang it on this bolt while lining up the two lower bolts.
With the holes drilled in the puck, I placed the puck in the wheel and then propped the wheel in its final position with the shim under the tire in place. Be careful to make sure the tire is propped in the right place vertically and horizontally. I placed one of the two 5/8th bolts through wheel and into the puck hole just to help position it. I then lined up the other lower 5/8th hole and pushed a 5/8 inch drill bit through the wheel and puck and used it to mark the center of the hole in the door metal. I then reversed the procedure to locate the center of the other lower hole and the top hole. I then took the tire down, and drilled the two 5/8 inch holes through the door skin and the reinforcing plywood on the inside of the door. The top hole actually falls right in the middle of the horizontal reinforcing beam on the inside of the door. I drilled the top hole through the door skin and through the horizontal beam in the door. I used a 5/8 ths drill for this even though the top bolt is only half inch – this allows a little room for not getting all the holes perfect.
I applied polyurethane glue to the back of the puck, and used the three bolts to clamp the puck in place while the glue cured. The two lower bolts are 4.5 inch long 5/8 inch diameter galvanized carriage bolts. I chiseled out a small square pattern in the plywood to lock the carriage bolt in place. I also used a little glue under the heads and on the shaft of the carriage bolts – hope I never have to take them out 🙂 The upper bolt is a regular hex head half inch diameter by 7 inch long galvanized bolt. I used a nut on the outside of the puck to secure the half inch bolt in place – the nut is set in a pocket in the puck so that its flush with the outer surface of the puck.
Once the glue cures, take the nuts off that have been clamping the puck in place, then hang the tire on the bolts and see how it fits – hopefully well, because its going to be really hard to change the bolt locations.
The Spacer: I have not worked out exactly how to hold the spacer that fits between the tire and bumper in place. Thinking about using aluminum of the right thickness and drilling holes in each end of the spacer with polyester twine going around the tire within a tread groove to keep the spacer in place when the door is opened. The spacer has to be mounted to the tire and not the bumper, as it would interfere with the door opening if on the bumper. If you have a better scheme, please let me know in the comments.
Final Thoughts
The end product is surprisingly robust. With the bolts pulling the tire just into contact with the door metal, the tire does not vibrate or wiggle when driving or when opening the door. I actually tried the carrier with just the two lower bolts and found that there was some tire wiggle when closing the door. The third bolt pulls the top of the tire into light contact with the door metal and definitely has a stabilizing effect. Of course, the road trip will be the real test.
The tire does not make the door particularly harder to us
It does look like the tire is close enough to the door handle that the mechanical key might not be usable.
The door still opens to about 180 degrees, and the tire rubber acts as a bumper if you try to go to far.
With the tire flipped over to place the bolts closer to the door, you lose access to the tire inflation valve. So, you can’t really check the tire pressure once the tire is in place. You can bonk it with a hammer to get a rough idea, but it has to come off if you want to check the pressure accurately or add air. For me, this is worth it for the shorter overhang and cantilever that flipping the wheel provides.
Putting part of the tire weight on the bumper does work, and I plan to use it, but it looks to me that things are robust enough that the carrier would probably be OK without the load sharing.
This setup does mean that you have to carry wrenches for the two nut sizes on the tire carrier bolts. The deep dish of the wheel makes it a little harder to use an open end wrench, but I was able to use one.
I have a tire cover on order and will see if that seems worth it or not.
Results from Trip
The trip was up to the Dempster Highway in the Yukon Territory – its a pretty good test with about 600 miles of driving over sometimes rough gravel. The good parts are good 40 MPH gravel, but the bad parts are 2 MPH heavily potholed – its gets pretty rough at points and is a pretty good test for the spare tire carrier. ,
The carrier held up well – no failures, the door still works well, no significant paint wear. No noise from the carrier while driving over smooth or rough roads – at least not any noise that could be heard above the regular van noise.
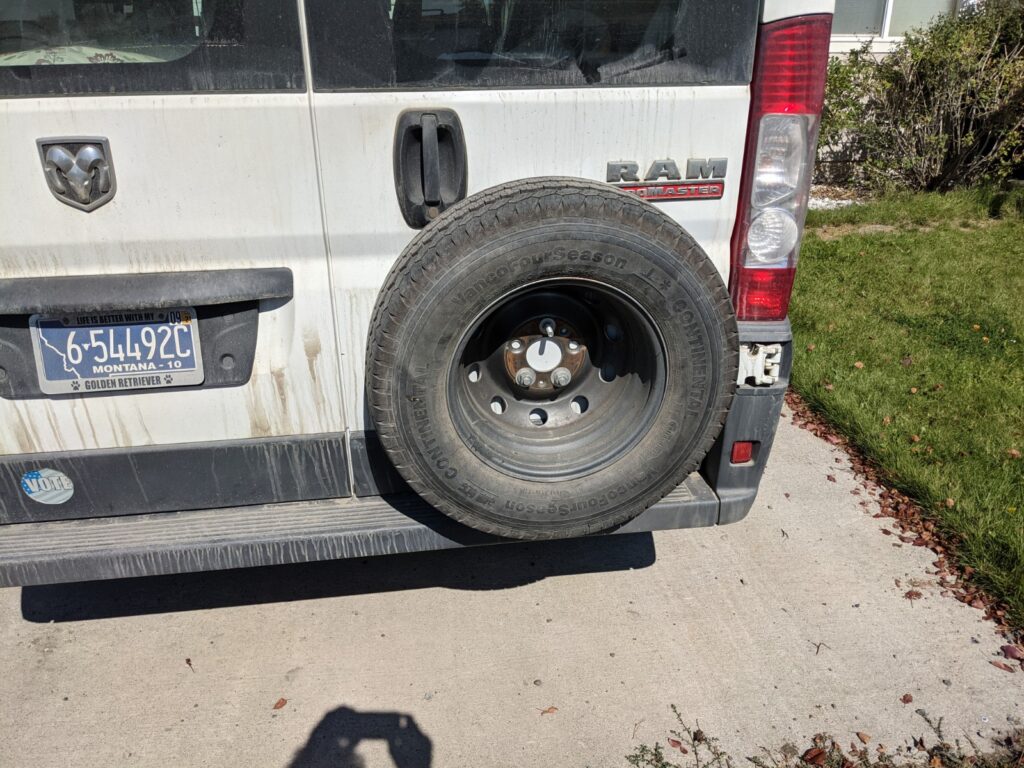
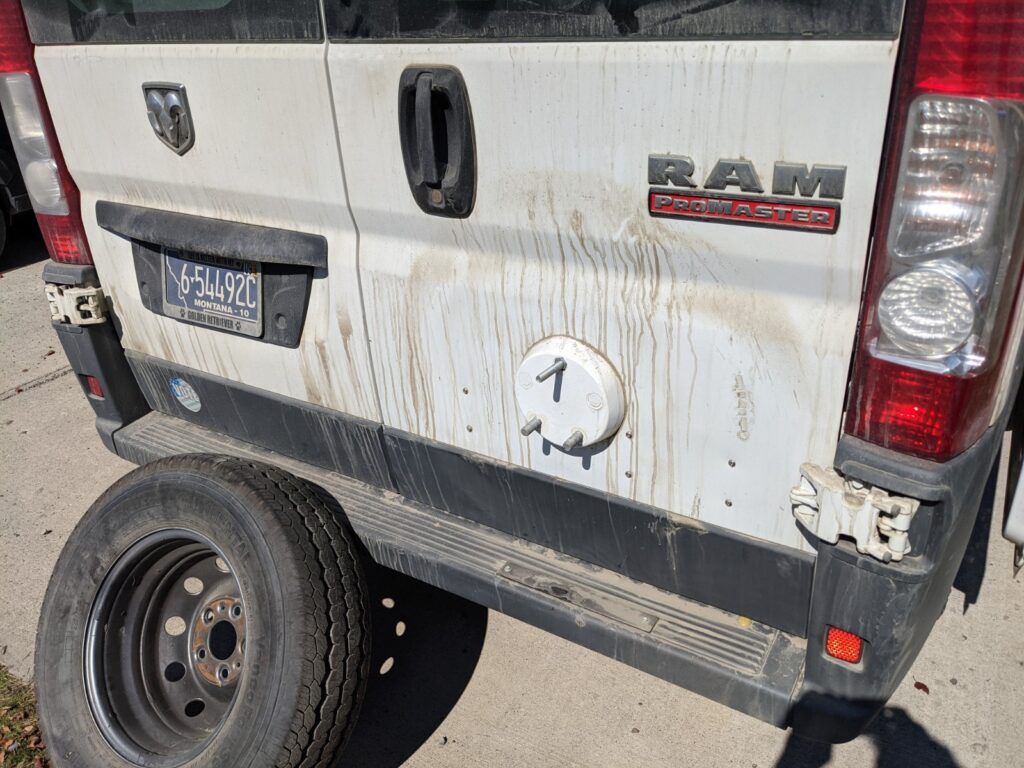
There was a small stain on the door white paint caused by the tire contact with sheet metal on right of picture above. This came out with a little soap and water scrubbing, but I would not count on the tire not leaving any marks on the door over the long haul.
The pictures below show the metal plate attached to the bumper to give the tire something bump on for hard bumps. The tire just clears this metal plate under no load. It serves to let the bumper take some of the tire vertical load on large bumps.
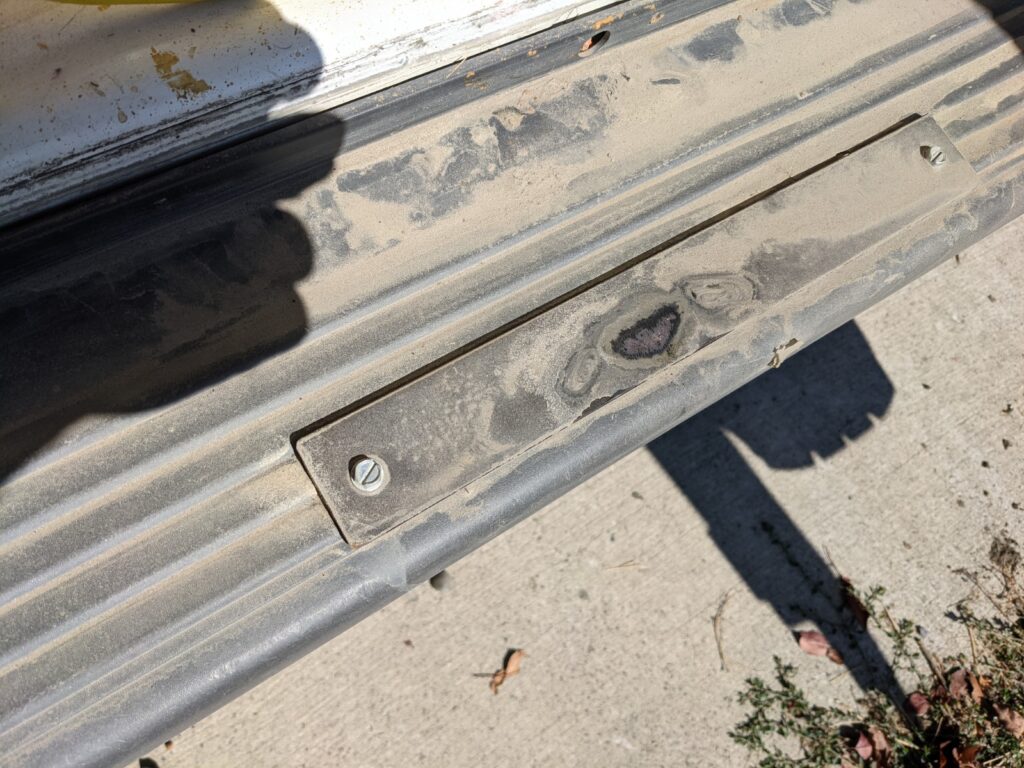
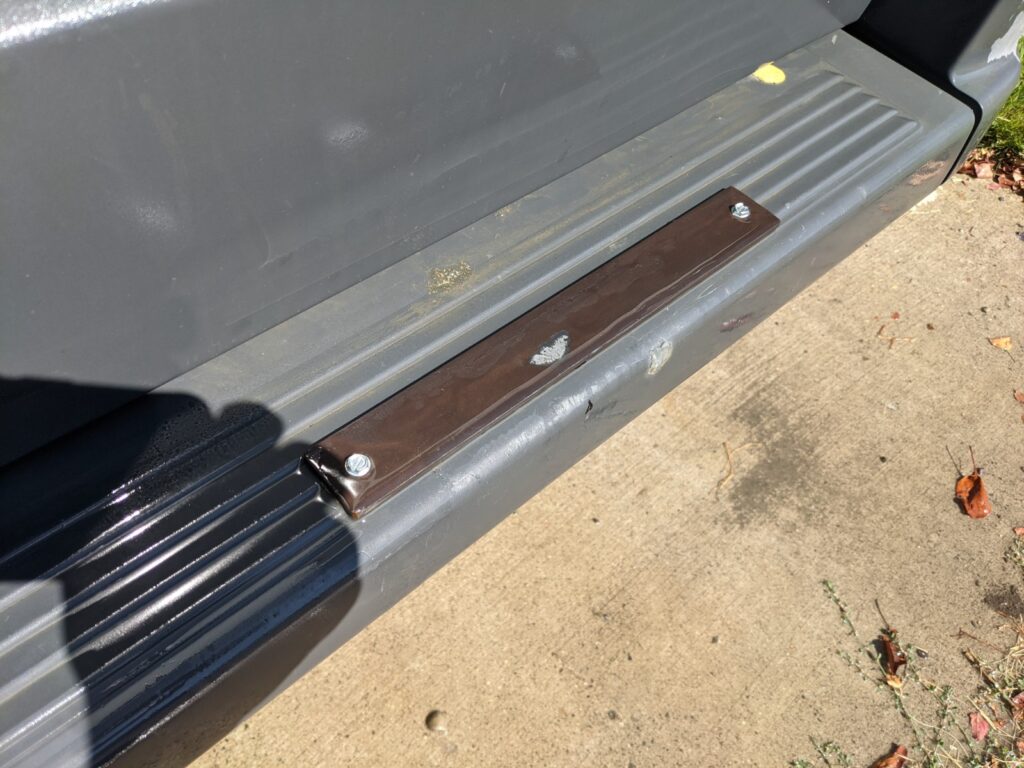
Picture above shows the metal scuff bar mounted to the bumper. The tire is mounted such that it just barely clears this bar. On large bumps, the tire contacts the scuff bar and (presumably) reduces the load on the bolts hold tire to door.
With the outer puck and the inside backer board both glued to opposite sides of the door sheet metal, there was zero tendency for the tire mounting bolts to deflect downward — there was no slip or play in the bolts that support the spare tire after this pretty rough and long trip.
The spare tire mounting puts some load on the door and I had some concern that door hinges or latch mechanism would be effected by that extra loading, but no evidence of this even after this pretty rough trip. The door appears to work and hang exactly as it did before the trip.
Any suggestions for improvements are most welcome.
Gary August 2021
CORRECTION
For the “parking aid” reversing radar, disconnecting a sensor puts the system out of order. I had to place the sensor that detected the spare tire further to the left because it was detecting it permanently and triggered the alert as soon as I put the car in reverse. This operation was a bit long (removing the bumper, drilling a cavity in the steel reinforcement behind the sensor, extending the wiring) but without any major difficulty. Everything is reassembled and works perfectly.
Hi Jean-Paul,
Glad to hear the spacer worked – might have to give that a try.
Relocating the parking sensor sounds like a pain. Just thinking about others who might want to try this, is there any way to relocate the tire a little to clear the sensor?
We just gave the spare tire mount a workout on the Dempster highway again – no problems 🙂
Gary
Hello Gary,
Back on the road after winter storage.
As previously mentioned I added a 1/2″ (12mm) plywood to the puck to move the wheel away from the door plate, and it works very well, with no problems with rigidity or play in the bolts. The cover now fits without difficulty.
For the “parking aid” reversing radar, disconnecting a sensor puts the system out of order. I had to move the sensor closest to the wheel because it was detecting it permanently and triggering the alert as soon as I put the car in reverse. This operation was a bit long (removing the bumper, drilling a cavity in the steel reinforcement behind the sensor, extending the wiring) but without any major difficulty. Everything is reassembled and works perfectly.
Thanks again for the ideas, advice and encouragement!
Jean-Paul
Hi Gary,
Thanks for the tip; so I will proceed as instructed, with the rubber shim at the bottom of the wheel.
Another question: the back-up radar beeps constantly when I put the car in reverse, because the sensor under the wheel detects it. Do you have the same problem and have you found a solution? Can you disconnect this sensor while keeping the others functional ? Any other idea?
Thanks again for your help
Hi Jean-Paul,
I don’t have the backup radar.
I’d try describing the problem on the ProMaster Forum and see if anyone has a suggestion. Lots of smart folks there.
Please let us know how the rubber shim works out.
Gary
Hi Gary,
I followed your instructions to the letter in building my spare tire carrier and am very happy with it. After 5000 km – on roads less difficult than the Dempster Highway though – I don’t notice any damage on the door or on the wheel support bolts.
So thanks a lot for your advice and engineering!
I do have one comment though: by placing the back side of the tire against the door, it becomes very difficult to place a cover over the spare tire. So I’m thinking of adding a thickness of plywood to the washer. This will give a space to slide the elastic of the cover and stretch it over the outside of the wheel. Do you think this will affect the rigidity of the system, as the tire is no longer pressed against the door plate? Will it deform the bolts?
I keep your idea of placing an aluminum plate on the bumper. This should indeed reduce the stress on the bolts.
I will post a picture.
Hi Jean-Paul,
Good to hear the tire carrier is working for you.
I think that adding adding a little thickness so the tire stands a bit away from the door probably won’t effect the bolts – I think they will be OK.
Not sure about whether extra tire motion caused by it being spaced a little ways from the door will cause a problem – you will probably get some idea when you make the change and then see how much the tire moves just by pushing it with your hands. I guess that if you think its a problem, maybe some kind of shim could be introduced between the tire cover and the door? Maybe try the shim only on the bottom? Maybe the shim could be rubber or something like that?
Here is a screwy idea – add a zipper to the spare tire cover such that you could put the spare tire cover on the tire, then install it on the bolts using the zipper access to tighten the bolts?
edit: I guess there would also have to be a hole in the back of the tire cover large enough to slip over the bolts.
Please do let us know what you learn and send some pictures.
Gary