There has been an interesting discussion going on on the ProMaster Forum on insulating camper vans and particularly the effect of the metal frames as thermal bridges and how much these bridges reduce the effectiveness of insulation. There has been some concern that the heat losses due to thermal bridging may be so large as to make it not worthwhile to insulate.
I took some pictures with my thermal (IR) camera which (I think) give some idea of the relative importance of thermal bridging losses to heat loss through the large insulated areas.
For this test:
- The van inside temperature of the van was about 70F (varying from 68F to 74F depending on location).
- The outside temperature was 23F.
- No sun on the outer surface of the van.
Update: A followup test looking at different methods for insulating thermal bridges…
IR image of drivers side wall showing wall paneling, bare metal frame, and a window
This thermal picture shows the drivers side wall of my van, and includes the large metal vertical frame that is about 4 ft behind the drivers seat. The metal frame has no paneling over it, and no insulation inside of it as its where I ran a lot of wires. The area forward and aft of the metal frame is 1/4 inch paneling with roughly one inch thick urethane spray foam insulating it. There is also a window in the picture to see how it compares in heat loss to the metal frame.
The heat loss from the inside air at 70F and the wall surface is directly proportional to the temperature difference between the wall and the inside air. So, wall areas that show up as cold are losing more heat than wall areas that show up warm. A wall area that is (say) 20F lower than the air temperature is losing roughly twice as much heat as an area that is 10F below the air temperature.
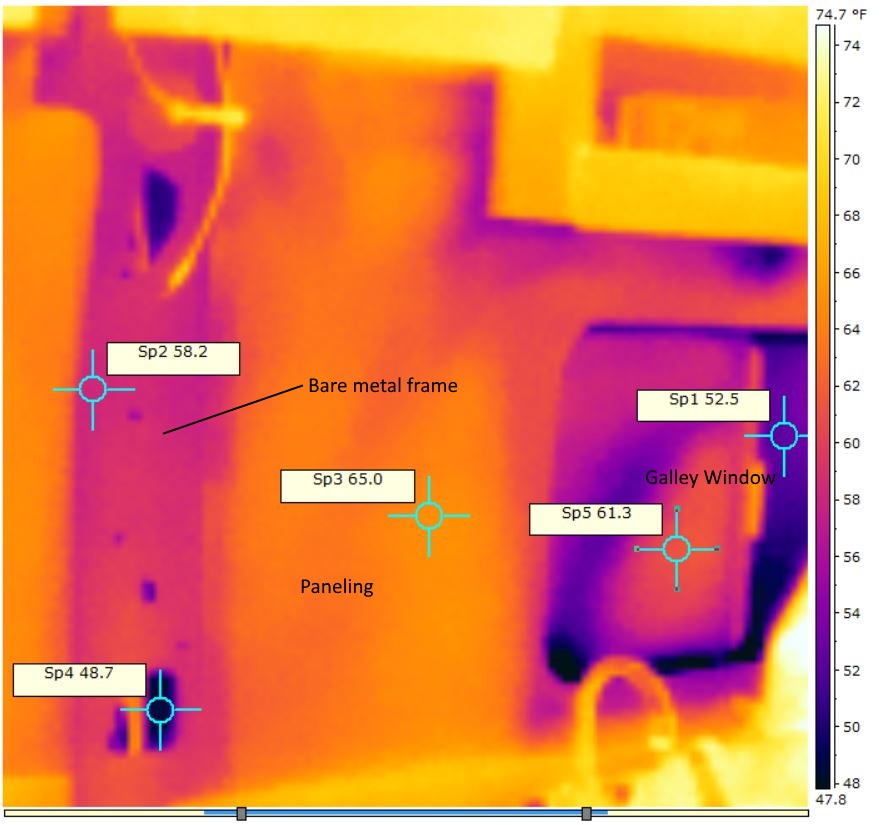
The colors and the labels show the surface temperature of the wall. So, 65F for the insulated wall panels, 58.2F for the inside surface of the bare metal frame, and 52.5F for the window surface.
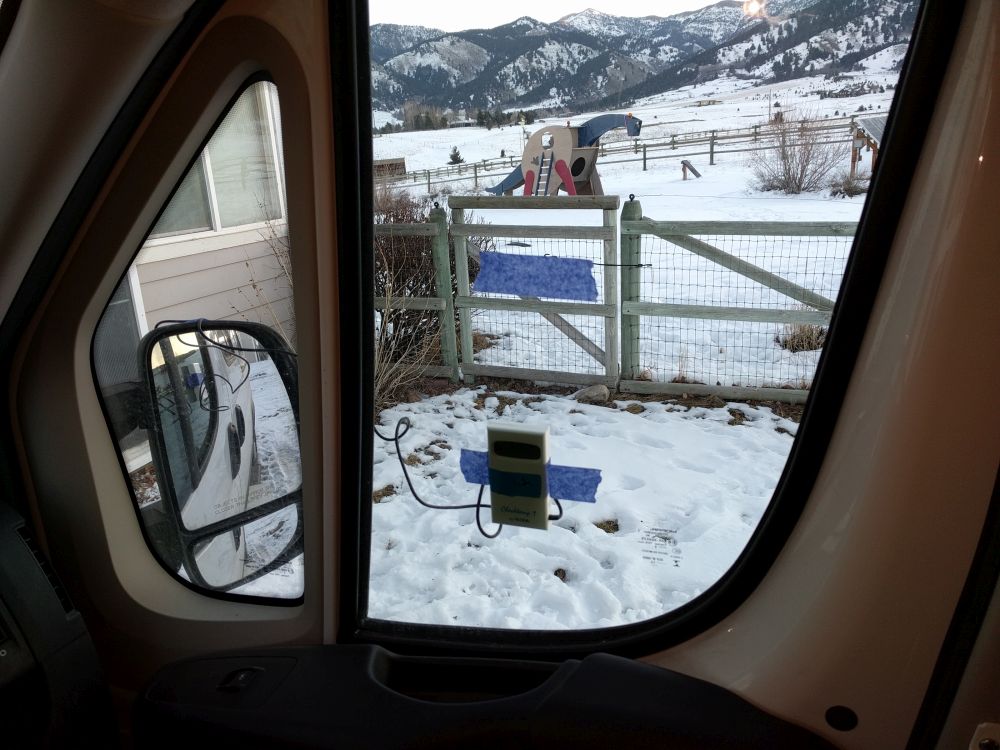
Regular picture of same area:

Some observations based on the thermal image:
- The frame is obviously not a perfect thermal bridge to the outside because if it were, its inside surface temperature would be 23F (the outside temperature). Instead it is 58.2F, which is actually much closer to the inside air temperature than the outside temperature.
- The temperature of the window glass is 52.5F, so it is more of a “thermal bridge” than the metal frame. In other words, the uninsulated window losses more heat per sq inch of area than the metal frame does.
- The heat loss from the inside air (70F) to the wall surface is directly proportional to the difference in temperature between the inside air and the wall surface. So, for the insulated paneling, the difference is (70F – 65F) = 5F, and for the metal frame it is (70F – 58.2F) = 11.8F. So, each sq inch of the metal frame loses (11.8F/5F) = 2.4 times as much heat as a sq inch of insulated wall panel. But, there is not all that much metal frame area, so even though its losing more heat per sq inch, there are not that many sq inches.
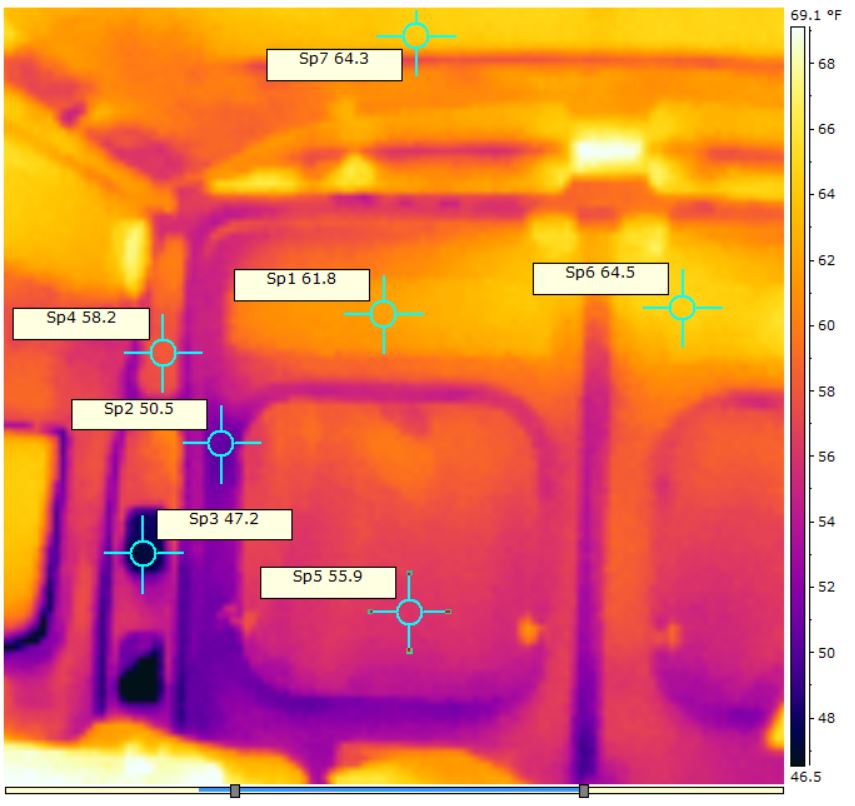
IR picture of ceiling showing ceiling paneling with one of the metal ribs
This IR picture is of the ceiling, which is paneled with 1/8 inch hardboard. The hardboard sheets are screwed directly to the metal ceiling ribs, which are about 3/4 inch deep. With the ceiling panels screwed directly to the ceiling ribs, this is a direct thermal bridge from the outside van skin to the paneling. The ceiling between the ribs is insulated with 3/4 inch of spray urethane foam.

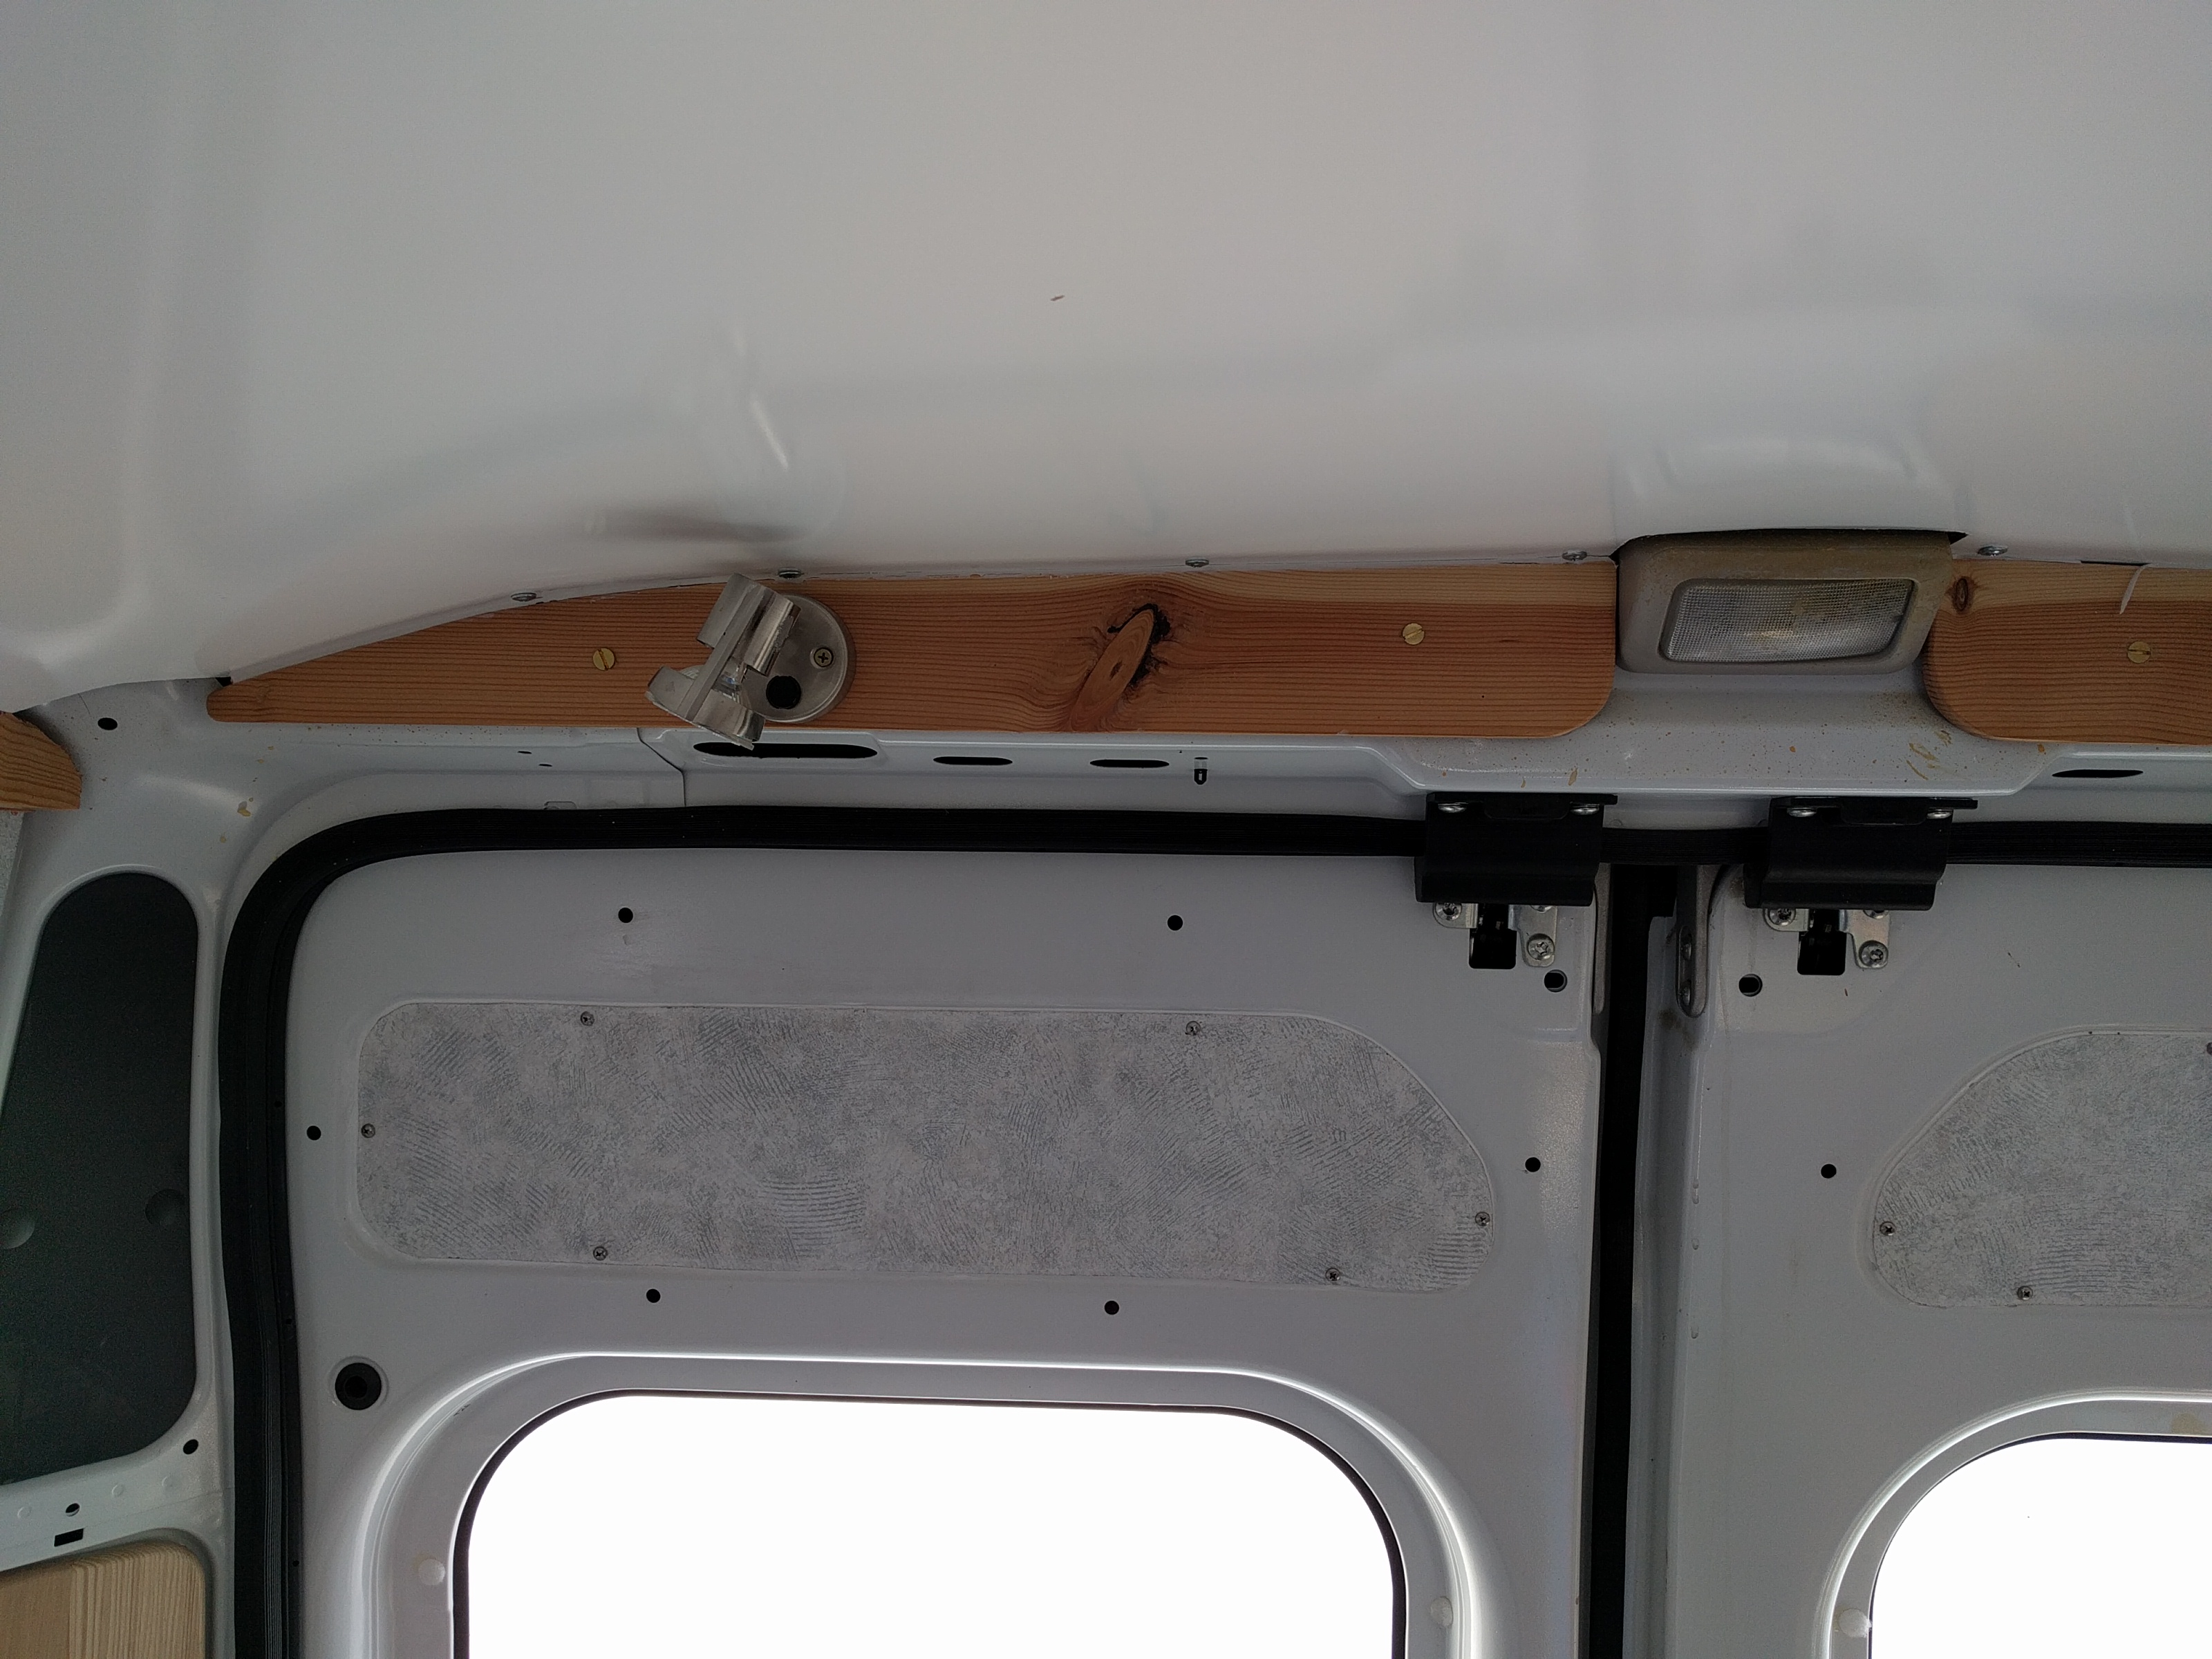
Regular picture of ceiling at a rib.

So, the ceiling paneling temperature in the ceiling rib thermal bridge area is 51.1F, and the temperature away from the thermal bridge is 64.4F. So, the ceiling ribs are a little more effective as thermal bridges than the side wall frames — maybe due to the lesser depth of the ribs than the frames.
The heat loss from the inside air to the paneling is directly proportional to the difference in temperature between the inside air and the paneling. This is (70F – 64.4F) = 5.6F for the insulated panel area, and (70F – 51.1F) = 18.9F for the area directly over the rib. So, the heat loss per unit area for the rib area is (18.9/5.6) = 3.4 times greater. But, even though the ribs lose 3.4 times as much heat for each sq inch as the insulated paneling, the total rib area is only about 10 % of the ceiling area. If you go through the math, the ceiling heat loss with the thermal bridges at the ribs is about 24% greater than it would be without the rib thermal bridges. If you left out the ceiling insulation altogether, the ceiling heat loss would be increased by about 700% — so the idea that thermal bridges are so damaging that it does not make sense to use any insulation is not even remotely true.
This rib thermal bridge heat loss could easily be eliminated by just furring down from the ribs using 3/4 inch lumber, and then attaching the ceiling to the furring strips (as many people have done). Just be sure to fill the 3/4 inch between the paneling and the ribs with insulation. If I were doing my ceiling again, this is the way I would do it — in addition to reducing heat loss, it would likely make it easier to install the ceiling panels.
Windows as Thermal Bridges
Single glazed windows are essentially thermal bridges, so this part looks at heat loss through windows without insulation and with a small amount of insulation in order to get some idea what effect putting a small amount of insulation in series with a thermal break does to reduce the heat loss. Quite a lot as it turns out.
Thermal images of an insulated window and a non-insulated window are compared below.
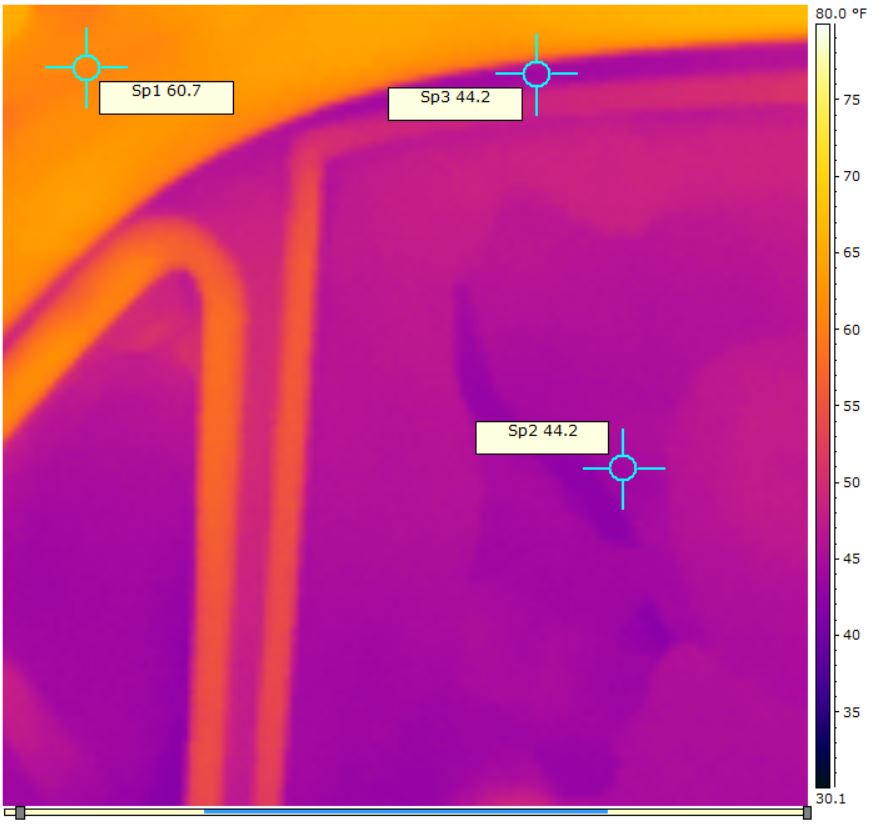
IR picture of passenger side cab window with no insulation
Regular picture of same area:
The inside temperature of the glass surface is 44.2F (21.2F above the outside air temp), and the metal door frame is also at 44.2F. The inside temperature of the headliner is 60.7F.
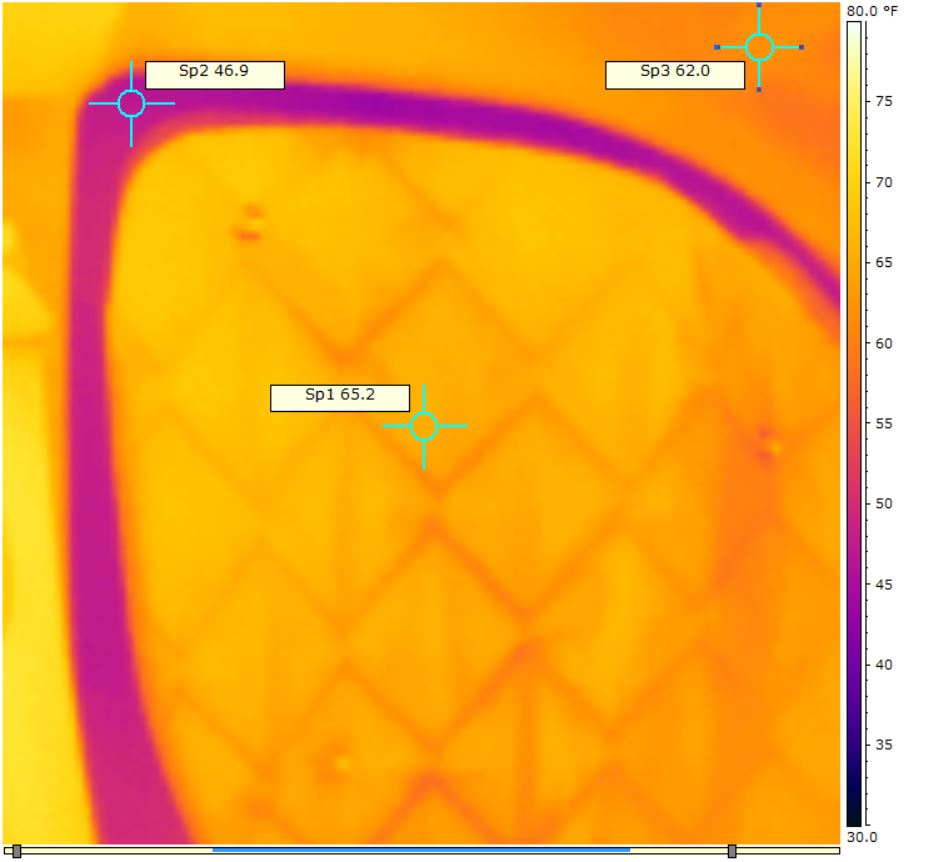
IR picture of driver side window with insulating panel in place
This is a picture of the window on the driver side of the van with its insulation panel installed. The insulation panel is only a bit over 1/4 inch thick (similar to a layer of Reflectex), but its insulating value value raises the inside surface air temperature from 44F for the bare glass to 65F for the insulated window.
Point is that placing a small thickness of insulation in series with a thermal bridge will dramatically reduce heat loss through the bridge.

Back Door
IR picture of the back door area.
The back door is insulated as best I could, but with the mechanisms and the small spaces around the window its hard to insulate well. The average temperature of the whole back door wall is kind of low.
Conclusions?
Thermal bridges do increase heat loss, but (I think) not nearly as much as some have suggested. Maybe something like 25%.
For a lot of people that camp mostly in moderate temperatures, it does seem (to me) that its not worth going through a lot of trouble to cut the thermal bridging losses through the metal frames as they are not a huge source of heat loss — just insulating the large areas between the frames is probably fine. But, if you camp a lot in cold weather where cutting heat loss is really important, you could insulate over the metal frames with something like half inch polyiso with the paneling over that — I think this would reduce the thermal bridging effect of the metal frame significantly.
But, maybe I’m missing something? If so, please leave a comment below.
Gary
Hi Gary, I really appreciate your in-depth research and the fact that you dig into these important questions. Thanks.
Hi,
My pleasure – thanks!
Gary
Thanks for a really useful article! Has this conversation been carried on elsewhere?
Thanks,
Peter
Hi Peter,
There has been some discussion on the ProMaster Forum and the Transit Forum. A search should bring them up.
I did another test here: https://www.buildagreenrv.com/insulating-thermal-bridges-due-metal-frames/
Gary
I was going to ask about cold weather condensation on the exposed metal structural elements that are nearly impossible to insulate, but it was answered for me. It’s problematic. Thanks for producing some nice data and insight into future problems I and many others will face.
Thanks for this write up. One question, since the ribs lose heat due to thermal bridging, does it make sense to insulate the small channel inside of them? That is, will an empty rib lose the same amount of heat as a rib that is stuffed with insulation?
Hi Robert,
I don’t think it would effect the heat flow through the metal web, but it would decrease the heat loss for that open airspace. I’d say its worthwhile for a well insulated van — it would also reduce condensation on the outer metal skin.
Gary
Gary is correct on both issues.
I would also add that if the “hat channels” are filled completely with 2-part expanding foam (the rigid type), it also aids structural rigidity. And if viscoelastic foam is inserted between those channels and the outer skin (replacing OEM ‘body putty’), it provides some acoustic noise reduction benefit.
Hello,
Do you have condensation forming on the exposed metal ribs or screw heads attached to the ribs? Have you actively done anything to prevent it?
I have something similar and have condensation forming on bolt heads bolted into rivnuts in the vans ribs.
Thanks,
Jonny
Hi,
We have not noticed much condensation on fasteners or even on the exposed metal frames.
If we don’t use enough ventilation, we do get condensation on the windows even with the insulating window covers.
Most of our fasteners are self tapping screws, which probably provide less of a conduction path than rivnuts.
We also use the van mostly in dry climates, so maybe that helps.
I did hear from one person who used this kind of interlocking fasteners to attach their wall panels. Seemed like it might be a good idea with some advantages, but no word yet on how well it worked for him.
https://www.amazon.com/gp/product/B00347A8EO/ref=ppx_yo_dt_b_search_asin_title?ie=UTF8&psc=1
One thing I would do if we were attaching wall paneling again is to use some form of insulating tape between the wall/ceiling panels and the metal frames.
Gary
Gary
I’ve been thinking about using this type of membrane flashing to cover the small amount of exposed metal frames in my van. Do you think it would be worth the effort? https://www.amazon.com/Roll-Black-Single-Stick-Flashing/dp/B005QODB92
Hey Dennis,
I don’t think it would be very effective at all for insulating. I had a go at estimating its R value assuming that it is 60 mils thick, and (if I did the estimate correctly) it adds nearly nothing to the R value. Its a pretty conductive material, and its thin, so insulating value is small.
People tend to think that even a thin layer of something like rubber or plastic in series with metal (which is very conductive) has to help a lot, but remember that there is a layer of slow moving air both inside and outside the van that is in series with the metal thermal brake and it results in a minimum R value of about 1 just due to the two air layers.
We use our van in cold weather a few times each year, and if I had it to do over again I would add some kind of thin insulating layer between the metal frames and the paneling. Someting like half inch polyiso would be quite effective – it would probably cut the loss through the bridged area to about 1/4 of the no insulation value. Even 1/4 inch polyiso (if there is such a thing) would be quite helpful. Even the about 1/4 inch sill seal, which I think is polyethylene foam, helped quite a bit in the tests.
https://www.buildagreenrv.com/insulating-thermal-bridges-due-metal-frames/
If you don’t plan to use the van in the cold (or very hot), then its probably not worth adding anything, but for cold (or hot) weather I do think its worth the extra work.
Gary
re: “Thermal bridges do increase heat loss, but (I think) not nearly as much as some have suggested. Maybe something like 25%.”
Yep.
In the vans I’m familiar with (all the American-made vans), almost all the structural members (main exceptions being the door pillars) are isolated from the exterior sheet metal with what auto body shops refer to as “body foam.” Unibody vans tend to have tighter gaps than older body-on-frame types (GM vans have about 3/8″ gap between the cargo area “studs” and the exterior skin).
Even if they weren’t, the thermal bridging is not as bad as some people seem to think, because of the thickness (thin-ness) of the metal (and the holes in it) that forms the pillars & the length of the path to the interior.
Speaking of pillars and structural members, if they aren’t filled with insulation (i.e.: if trying to pull thin strips of fibrous insulation into long mostly enclosed header cavities), the cavity is likely to end up with gaps that allow convective flow to bypass that insulation.
When parking overnight in cold weather, a lot more heat is lost through the windows, which is where using the best possible insulation (e.g.: Thermax) in the limited thickness available for window covers is even more important than it is inside the sheet metal.
I want to do this same type of testing pre/during/post van build.
What camera did you use? I really like the temp markers and images.
Thank you
Hi Lance,
My IR camera is a FLir I7, but I don’t think it is offered anymore. It is kind of pricey at $2000.
Here is some data on the camera and basic use of it: https://www.builditsolar.com/Experimental/IRCamera/IRCamera.htm
I would have a look at the Flir one — this is an IR camera that works with an Apple or Android cell phone and is much less expensive. I think it might do well for what you want to do. I’d say that one main thing to look for is that the software used to process the images allows you to specify the range of temperatures covered on an image — this way you can set the same range for a several pictures, and the colors on the images will represent the same temperatures. You also want to be able to place your cursor on any point on the IR picture and software gives you exact temperature at the cursor and labels the image with the temperature. Without these features, you get pretty color pictures, but they aren’t much help in estimating or comparing heat loss for two insulation/bridging setups. Flir is a good outfit, so, I’d guess the above features are included in the Flir One software, but best to check.
You will find a lot of uses for the IR camera — very handy tool.
Gary
Hey Gary, nice van set up! I haven’t tried camping in a cold-weather but this coming winter, I might use thermal bridges like you did. Thanks for sharing, I find it useful!
Thanks Katy
Gary
If you have looked at the modeling done at BSC (Building Science Corp.), heavily relied on by higher-end and extreme-climate residential builders, they warn about the “short-circuiting” effect of metal framing with insulation stuffed into it, Dr. Lstiburek calling it a “thermal obscenity” because the high conductivity overwhelms the lower portion where the insulation is located. The square area for that conductivity is certainly a factor, but the ability of that material to transfer thermal energy is the kicker. In a typical framed residential or commercial wall, it can turn R-19 insulation into R-7 in actual performance. Aluminum, which is the primary material now for RV frames, is among the worst for conductivity @ 205 W/m K. (hence all the owner complaints about how much energy they take when comfort is even possible and still freeze pex pipes near the outer walls in extreme temperatures, the ridiculous manufacturer claims notwithstanding). Only copper, silver, or gold would be worse. There are some Aerogel-impregnated tapes and fluid-applied options which I would insist on for any unit I was purchasing or building. My usage includes the northern mountains in winter. Nice IR work to see it visually.
Hi Reluctant poster — thanks for posting:)
I hear what you are saying, but in the end the only thing that effects the heat transfer out of the van is the difference in temperature between the air in the van and the inside wall surface temperature, and this is what the IR pictures show. If you have aluminum framed window, then the higher conductivity of the alum will show up as a lower surface temperature on the interior surface of the van.
For vans, most to the vans use steel framing, which is a little better than alum, and you always have the about R0.5 of the still air layers inside and outside.
Do you have a link for the Aerogel tapes? Sounds like an good way to go if not prohibitively expensive.
Gary
Great use of science! Thanks for sharing. I have two questions:
1. Is there an insulating product that could stick to the exposed parts of the frame that could increase R-value and thermal conduction – like rubber?
2. On the ribs, could a product like thinsulate/or some thin insulator be wrapped and then tucked/secured underneath the insulation panels? Prior to panels being to secured to walls/ceiling?
Hi Adam,
I used foundation sill seal foam for some of the testing. It comes in rolls and is about 1/4 inch thick and made from polyethylene foam. I think this could be glued in place with something like 3M-90 and would probably help. Once the paneling was up, it would also hold the foam in place.
Something like half inch polyiso would be more effective and is probably flexible enough to conform to the shape of the frames.
Most people foam their wall insulation panels with Great Stuff right to the edges, so not sure about tucking the Thinsulate under it.
Gary
Wow, great job Gary. I wouldn’t know enough to vet your mathematical evaluations of this, but just the fact that you put the effort into attempting to measure and quantify thermal bridging is awesome. Lots of people mention it, but you’re the first I’ve seen try to find some concrete evidence. I agree that the truth probably lies somewhere in the middle between the two camps. At the end of the day, we should mainly focus on the biggest heat loss areas and just do our best to insulate thermal bridges. Thanks for the confidence!
Thanks Jake.
Gary
This is awesome information! Thank you!