This page covers the design and build for the beds/storage compartments for our RAM ProMaster camper van conversion.
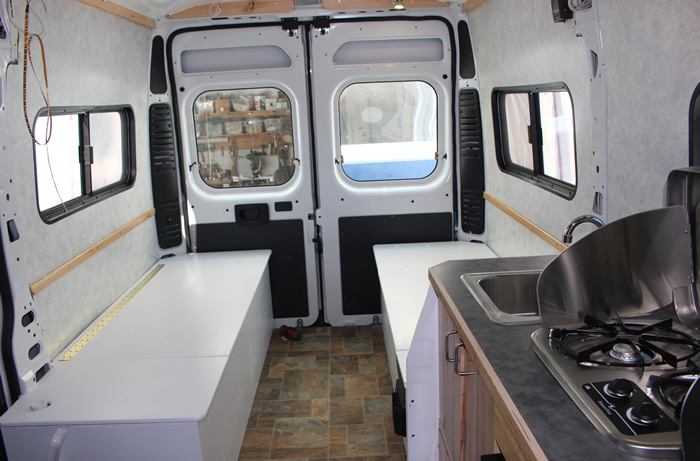
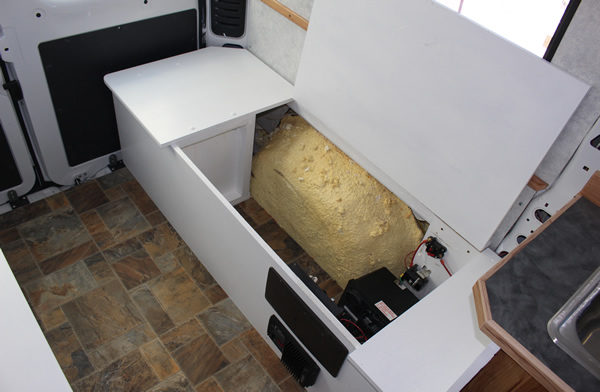
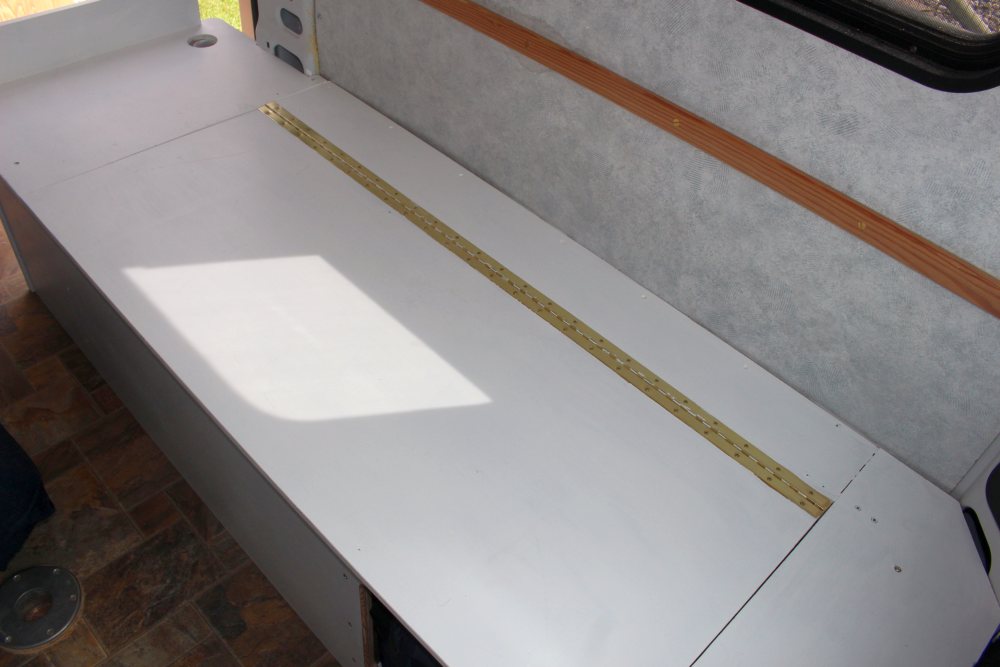
We went with a bunk on each side of the van which also provides a seating area for eating etc. The bunk platform tops hinge up to provide most of the storage fro the van and a home for the house battery/electronics and fresh water tank.
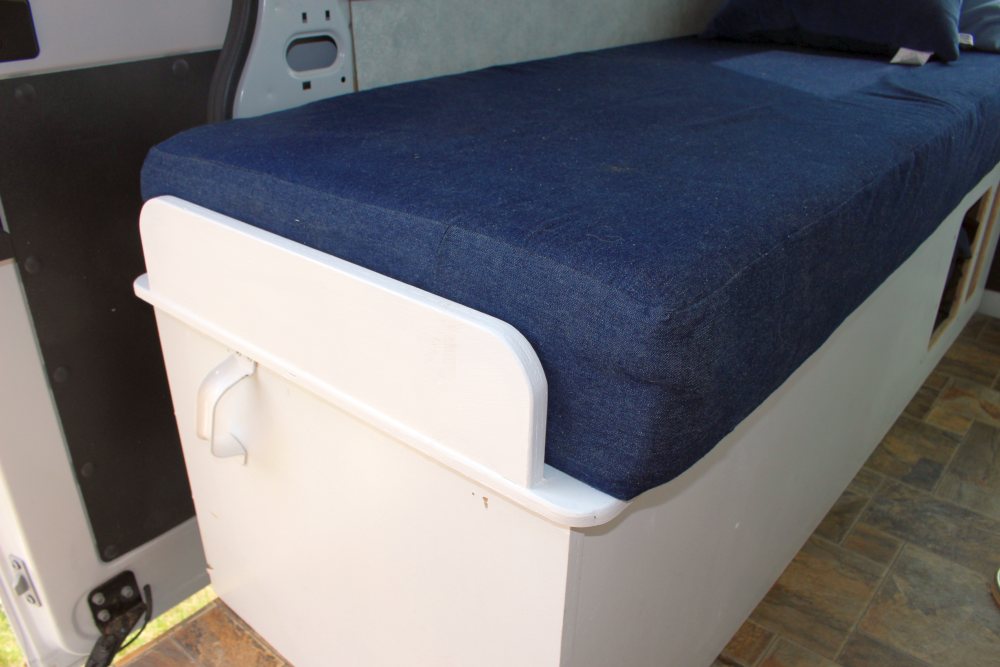
We had a double size 5 inch thick futon mattress cut into the two sizes we needed for the van, and had covers made from fabric that we ordered online by a local seamstress. The bunks are 25 inches wide with the longer one being 73 inches long.

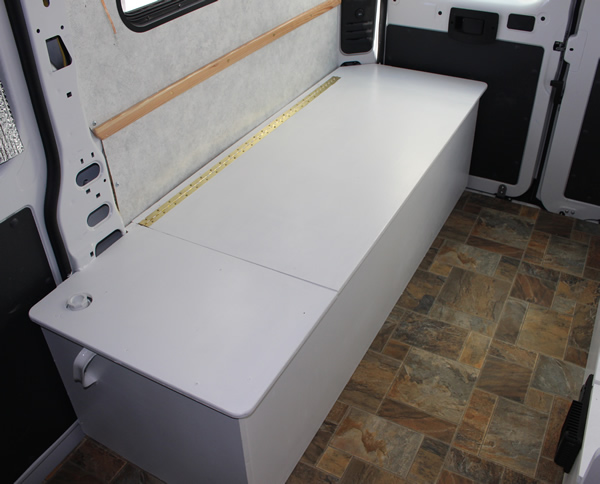
Bed platforms with mattresses.
Go back to the main camper van conversion page…
Bed Layout
After looking at a lot of potential layouts and mocking up several, we decided on a van layout with two beds at the back of the van like this:
The bed platforms each provide a flat place for a mattress and also provide most of the van storage and a place to mount water tank, batteries, and the propane tank.
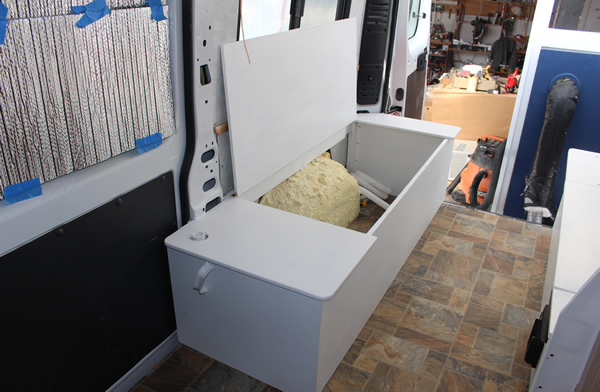
The finished bed platforms look like this:

Note that some changes were made in the beds after the first trip which don’t show in the pictures above, but are explained below.
Construction
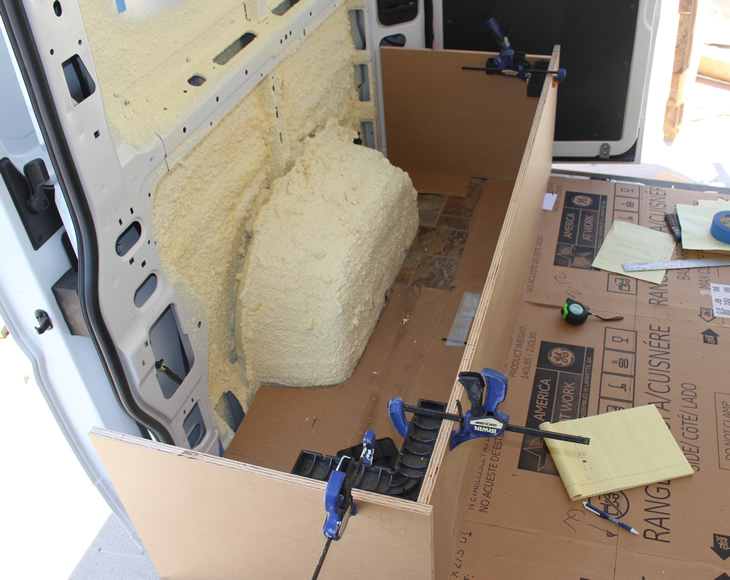
The bed platforms store heavy stuff like batteries and water tanks, and we don’t want those coming loose in the case of an accident, so they are heavily built and are well anchored through the van floor.
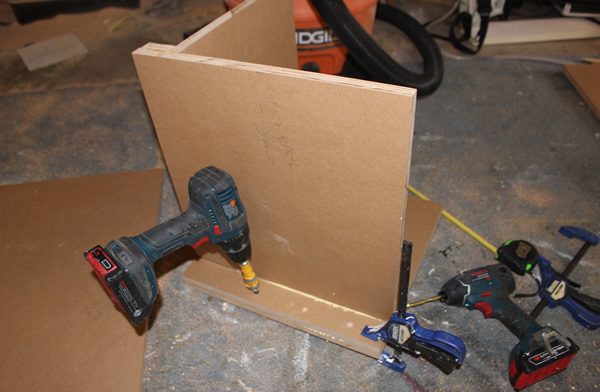
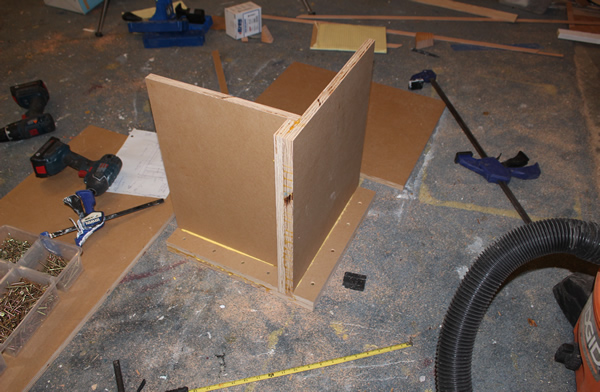
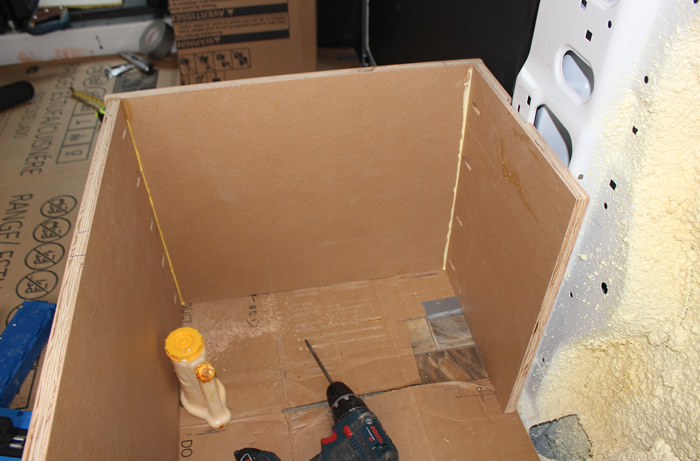
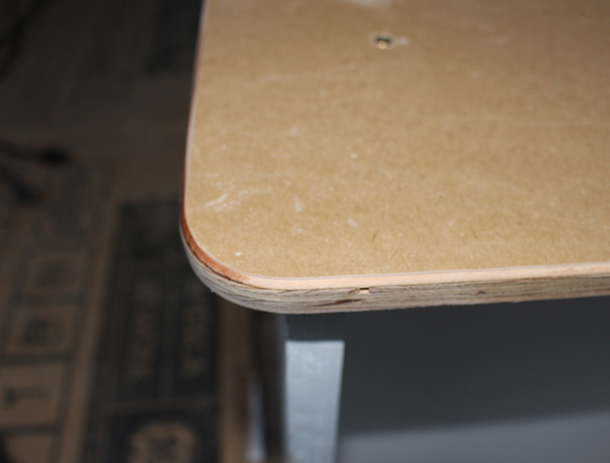
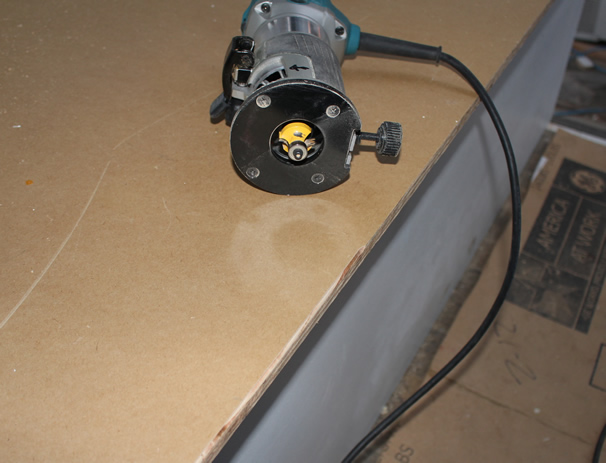
The bed platforms are constructed from Medium Density Overlay plywood (MDO) because it is strong, flat, and has nice smooth face sheets that take paint well. I’ve used this on many projects and really like it for its strength, stability, and weather resistance (its used for freeway signs). It is more expensive that most plywood, but to my mind well worth the extra expense.
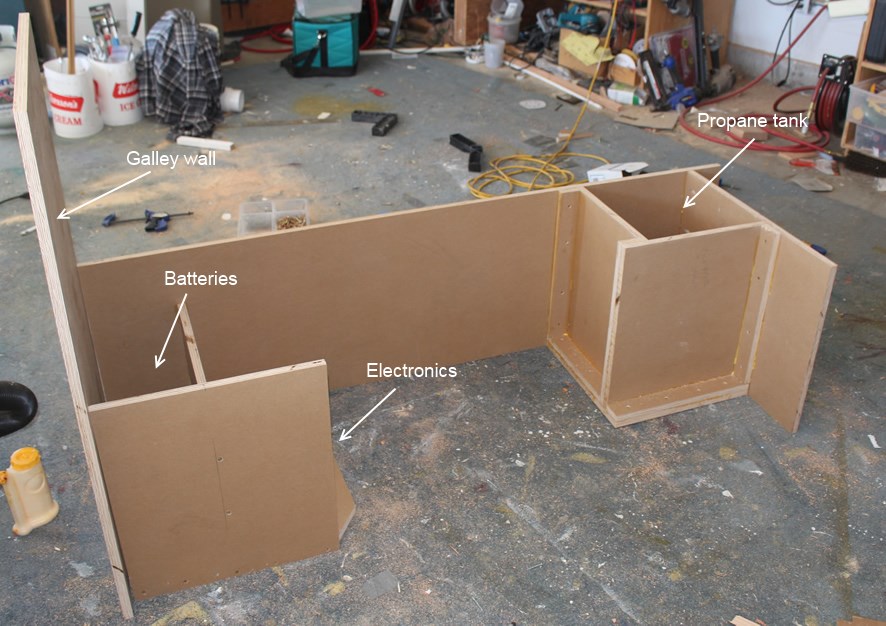
Building the Driver side bed:
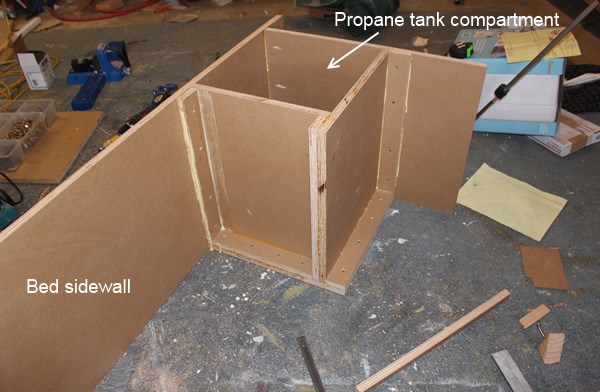
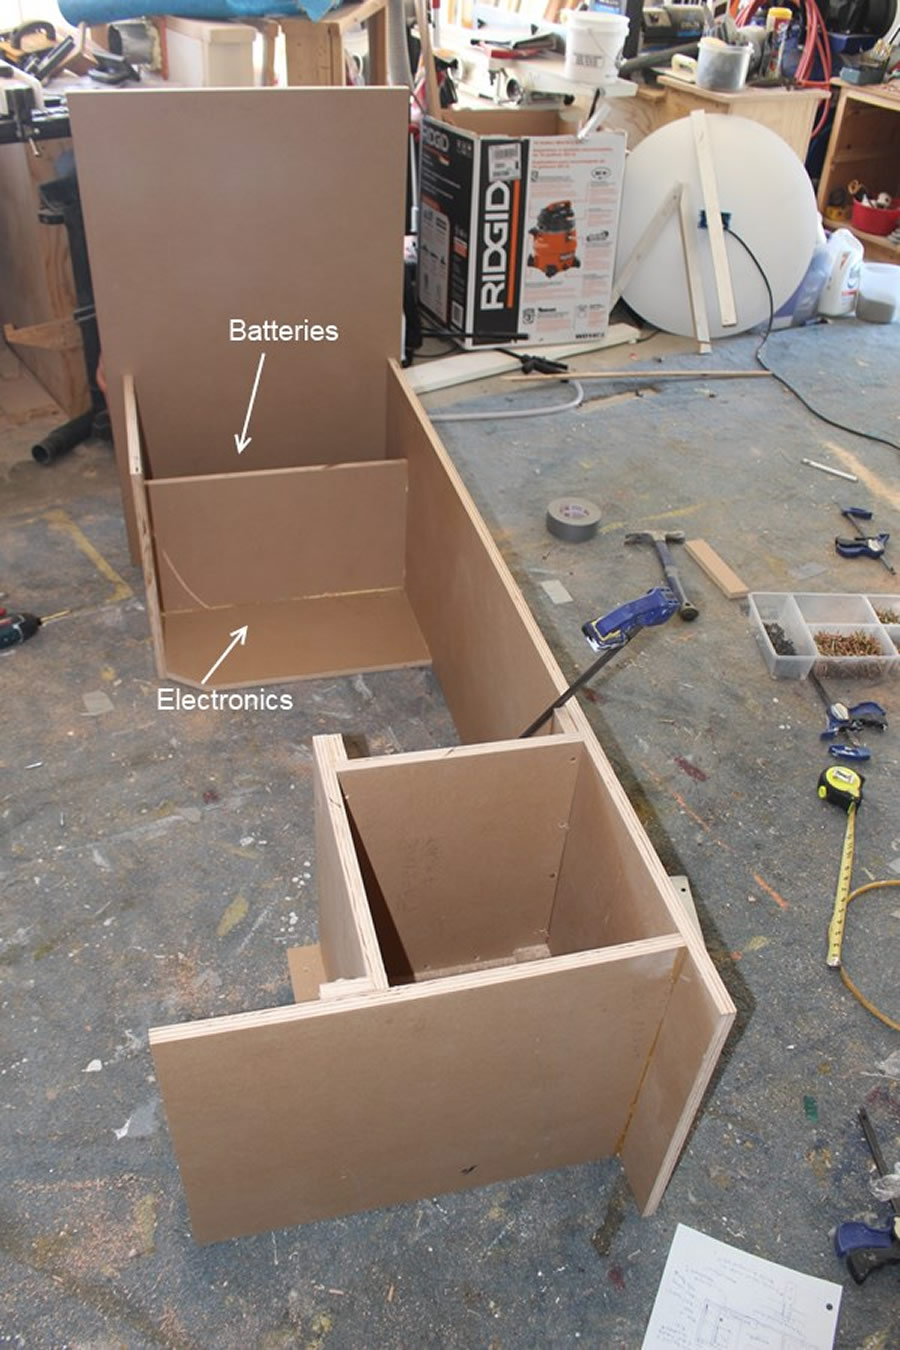
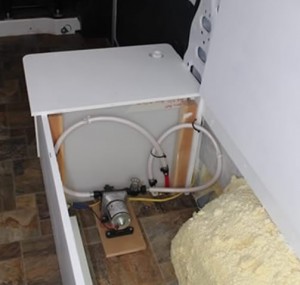
The driver side bed has the electrical system (including two golf cart batteries) stored in its forward end and the propane tank compartment in its aft end. The part between these two is storage that is accessed via a hinged lid.
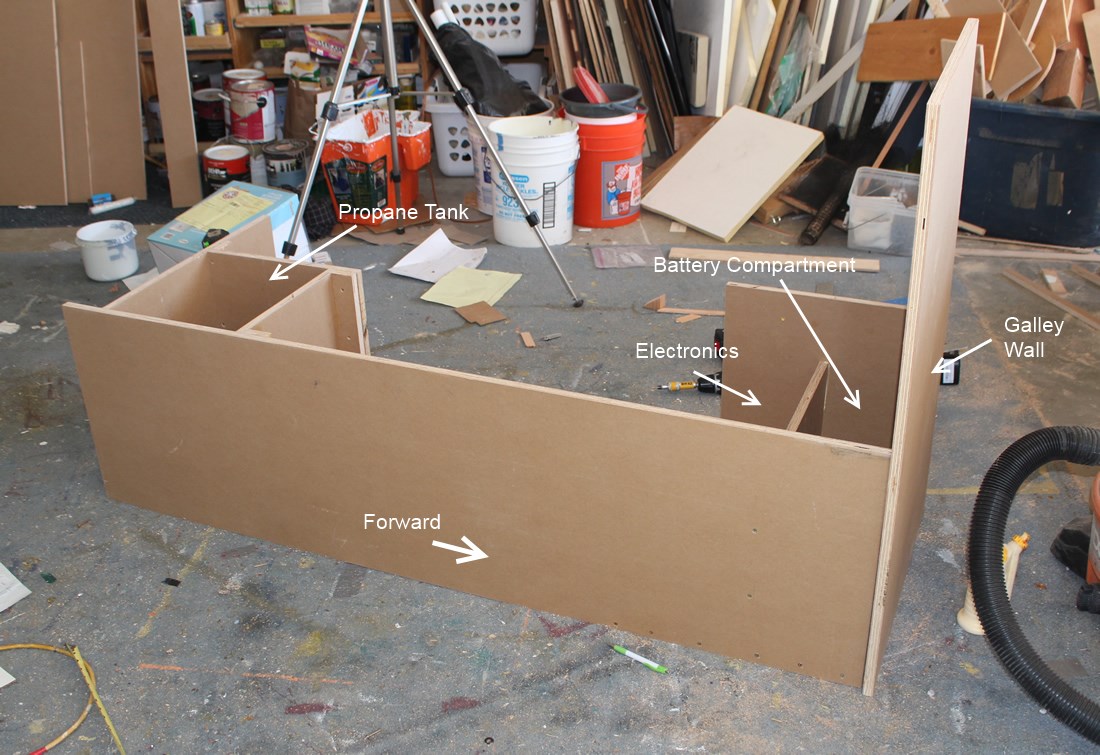
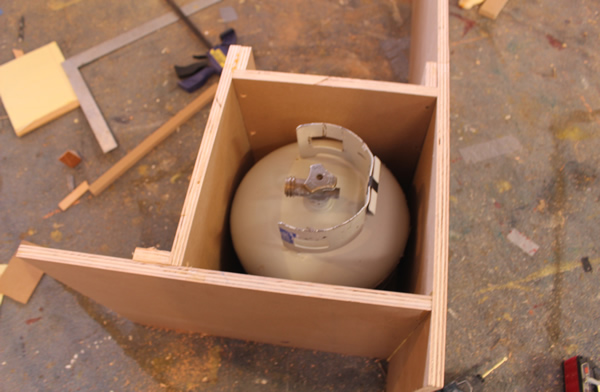
Propane tank compartment end:
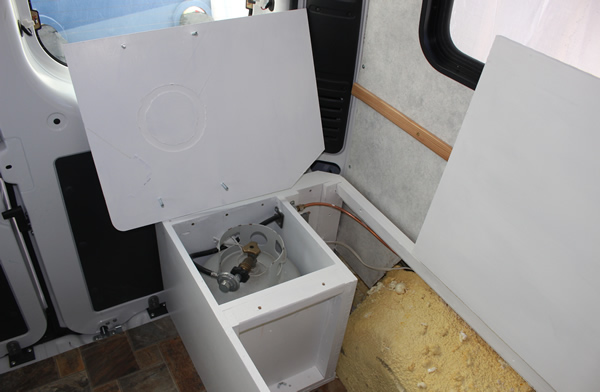
The propane tank is stored in a sealed compartment at the aft end of the driver side bunk. The compartment is sealed and is vented to the outside through the floor. Its also very sturdy so as not to come loose in a crash.
For more detail on the propane system...
Forward end with battery compartment:
The electronics and house battery are stored in the forward end of the drivers side bunk platform. The battery compartment is pretty well sealed and will be vented to the outside to vent hydrogen from the charging process outside (have not done this yet).
More details on the battery and electronics installation…
The basic bed structure was built in the shop and then moved into the van and bolted down. There are a set of through the floor bolts at the battery end, and another set at the propane tank end.
Building the Passenger Side Bed:
The passenger side bed houses the fresh water tank at its forward end. The part aft of the water tank is dedicated to storage that is accessed via a hinged lid.

Bolting beds to floor
Due to the heavy items in this bed platform, it is bolted to the floor in several locations.
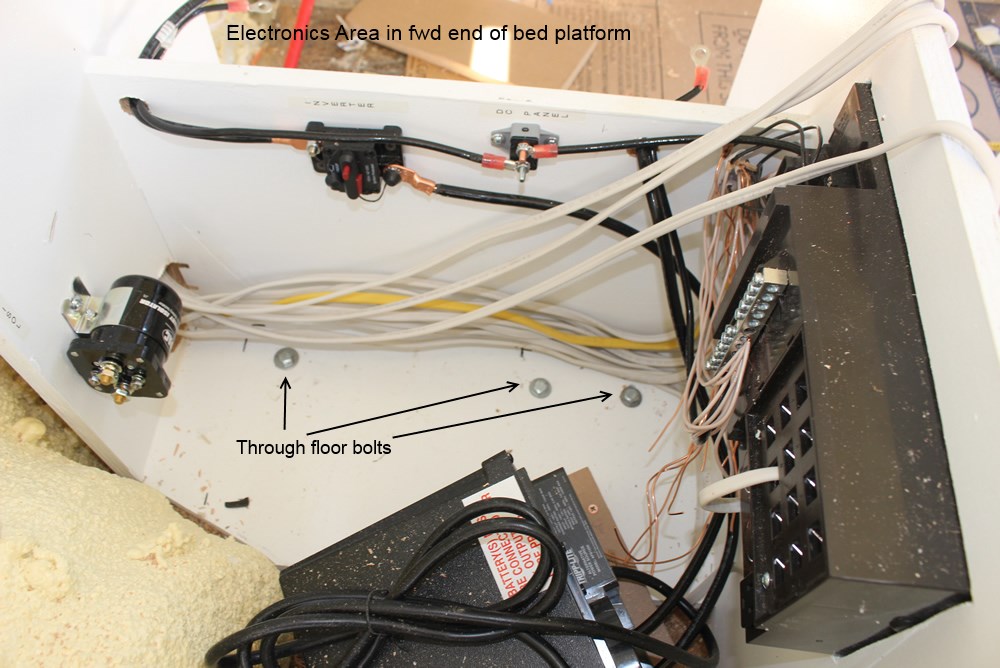
Looking down and forward at the electronics area of the bed platform. The three bolts (and a couple on the other side in the battery area) go through the floor to secure the bed platform (and batteries/electronics/propane tank) in place.
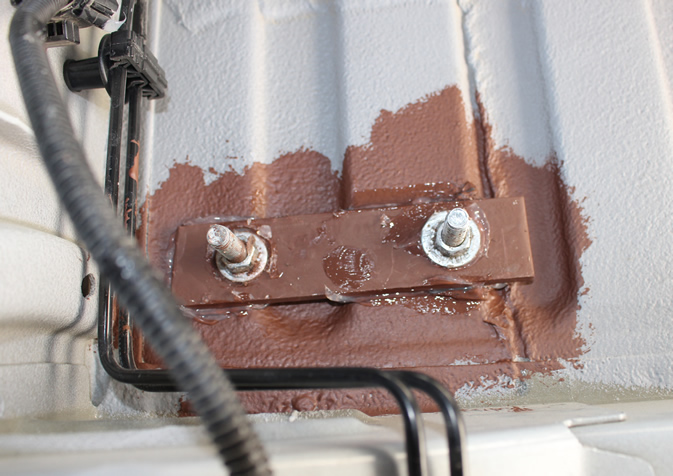
The through floor bolts from under the van (looking up at the bottom of the van floor). The added metal plate provides additional tear out resistance.
The lids:
Still working out what kind of latch to use for the storage compartment lids.
Note: see the “after first trip” changes below to the hinge location on the lids.
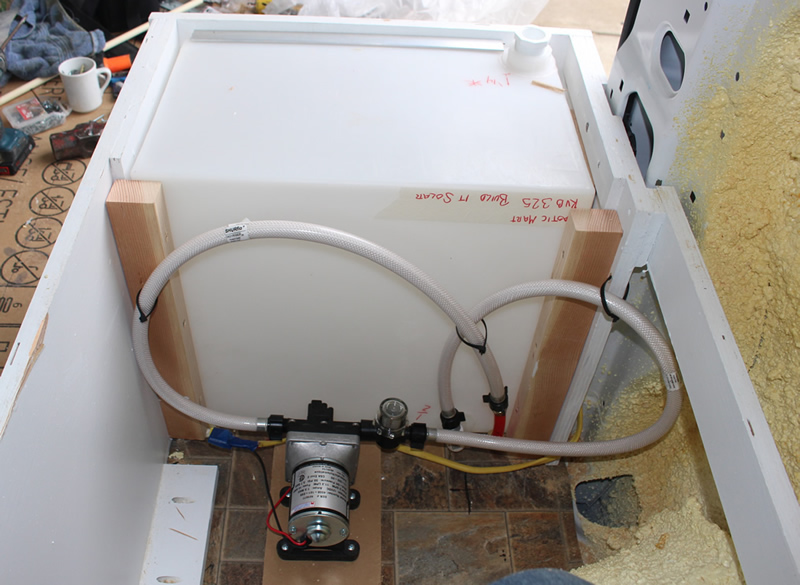
Fresh Water Tank:
The fresh water tank is located in the forward part of the passenger side bed platform. To fill the tank, the PVC cap (in picture) is removed and a short potable water rated garden hose is used to fill the tank.

More on the fresh water tank install here…
Changes After First Trip
After our first trip, we made some changes to the beds …
Stop Board:
The passenger side mattress had nothing to stop forward motion when braking the van. We added a stop board at the front to keep it in place:
Move Hinges:
I initially located the piano hinges for the lids about 3 inches from the wall. This made it hard to open the lids without removing the mattress, which is a pain. I moved the hinge out so that it was a little further from the wall than the thickness of the mattress (about 6 inches) — with this setup, the lid opens easily with the mattress in place and the mattress just sits on the ledge between the wall and the hing.
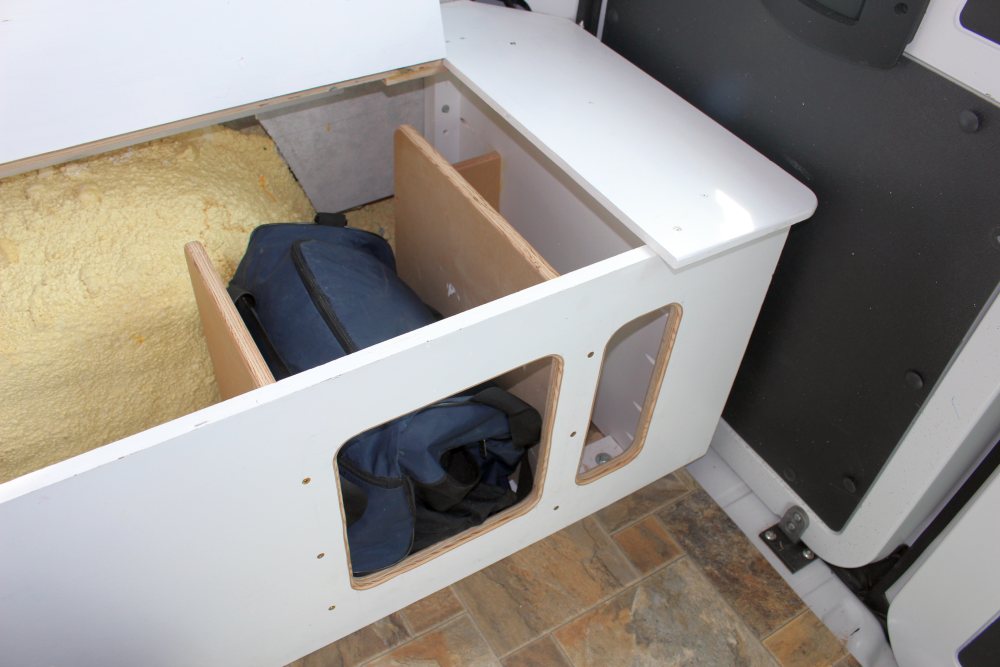
Storage Access:
We found that having to open the bed platform lids to reach nearly all of our storage was a hassle. There are usually a few thinks on the bunks that have to be removed first and this just gets to be a nuisance.
We decided to add some access hatches to part of the area in the bed platforms so that you can get at a few things that are needed frequently without having to lift the lids.
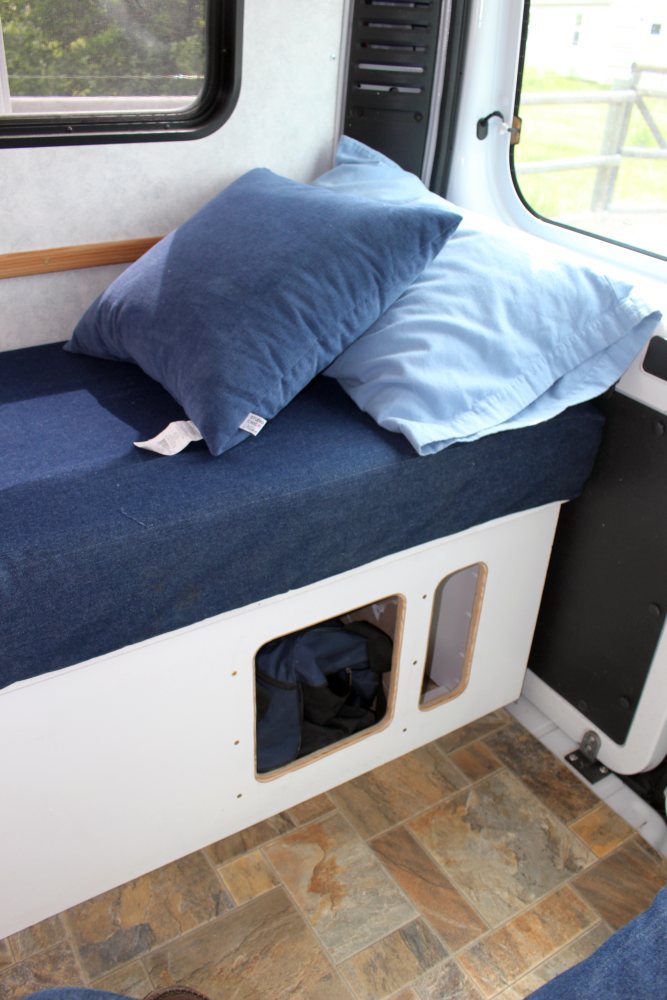

The forward opening can accommodate a carry bag and the aft one is good for a laptop and a book etc.
Galley Table
I’ll put our thoughts on the galley table here since the table fits between the two bunks — its used mostly for eating meals.
We initially tried a standard sort of RV pedestal table that fits in a socket in the floor, but can easily be removed when not in use. It looked like this:
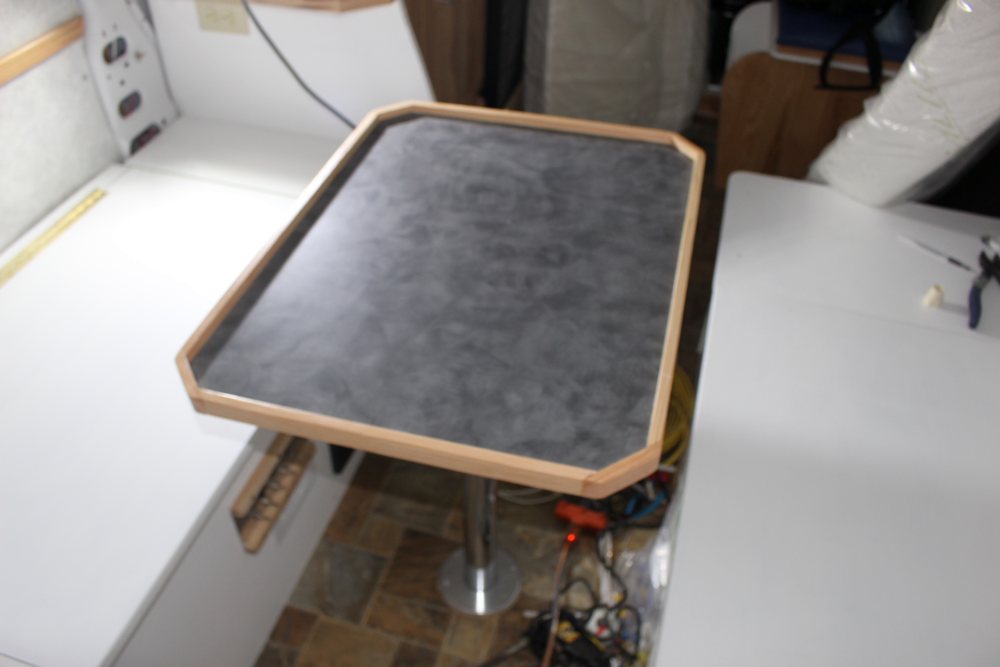
I just made it out of half inch plywood and covered the top with some of the laminate that was left over from the galley counter. It has a ledge around the edge to keep things from sliding off. Its supported by an RV pedestal and socket kit that you can buy from many of the RV supply places. When not in use, you pull the table of of the socket and stow the pole and the table top away.
This worked “OK”, but we found that when it was up, it was always in the way. In addition, stowing away the table top and pedestal uses up some storage space.
What we are going to try next trip is just to have a couple of flat trays that you can just put on your lap. The will be flat enough to just stow under the mattresses when not in use.

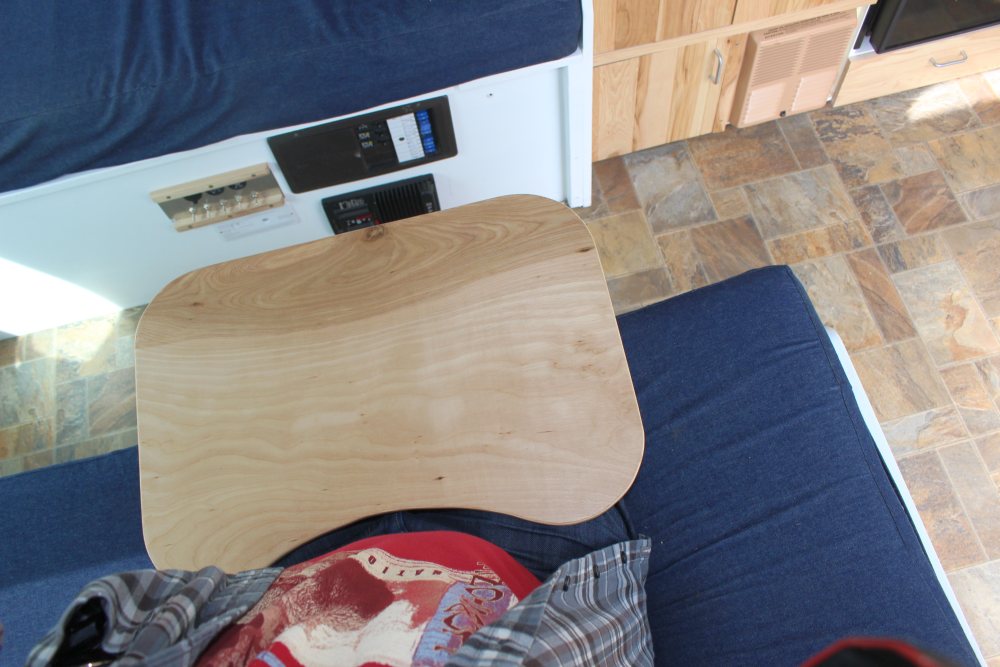
Not sure how this is going to work — it may turn out that some form of fold up legs under the tray will be needed — these legs would rest on the mattress. Will report on how it works out.
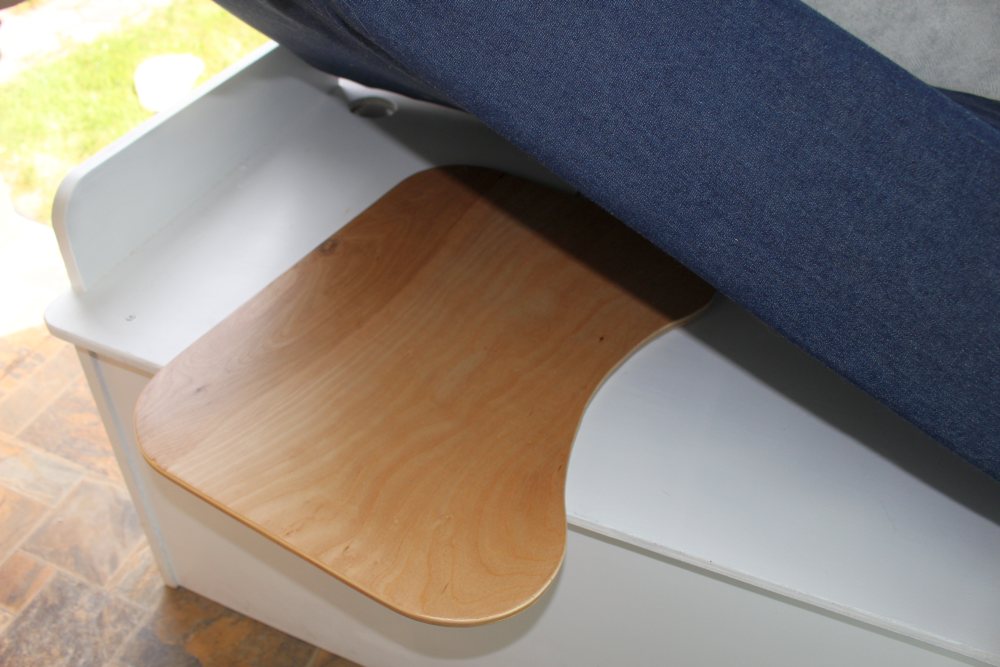
Between Bed Shelf
After a few trips, we decided to add a shelf between the beds and right in front of the back doors. This holds odds and ends at night (like a book). It also provides a space to store the dog bag and other odds and ends under the shelf.
The shelf slides in from the back (with back doors open) and can be removed in just a few seconds to allow carrying things like sheets of plywood.
Night Time Head of Bed Storage
We needed a place to store a few odds and ends like watch, glasses, flashlight, bear spray, … at the head of the beds so that they are easy to find in the middle of the night.

We ended up taking off the black plastic thing that RAM installs in the back two corners of the van just outboard of the back doors. This exposes some nice cubby holes that are just the right size for storing a few small odds and ends. We replaced the plastic with a wood panel with holes in it to access the cubby holes.
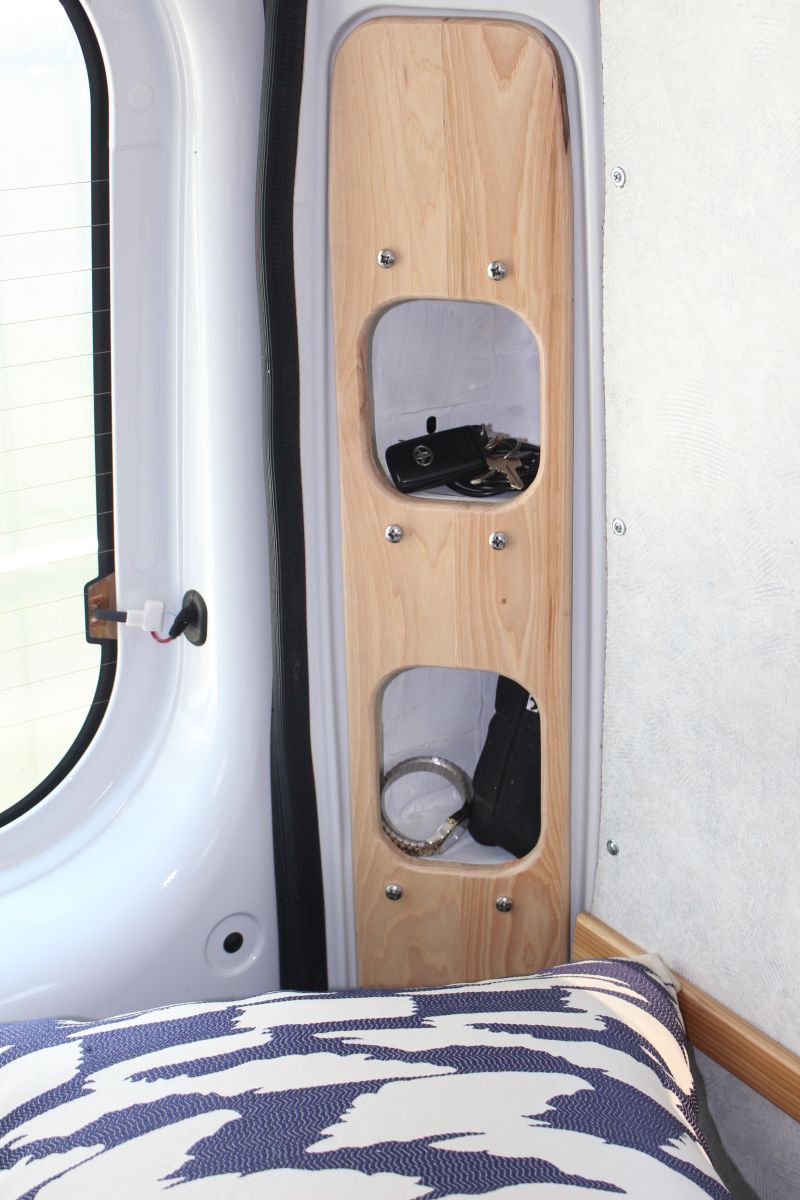
The wood panel is made from the same Hickory flooring used for the galley cabinet. It is planned down to reduce the thickness, and then a couple pieces are edge glued together to make a wide enough sheet. The edges and openings are then rounded over with a router. It is held in place with some #14 stainless steel sheet metal screws that go into the metal behind the panel. I might add a small batten across the bottom of each opening to keep stuff from falling out, although this has not been a problem so far.
Cost, Weight and Time
These are estimated cost, weight and labor for the beds.
| Item | Cost ($) | Weight (lb) |
|---|---|---|
| Bed MDO | $108 | 137 lb |
| Piano hinges (2) | $16 | 8 lbs? |
| Bolts and fasteners | $10? | 5 lbs? |
| Paint | $15 | 5 lb (aprox 1/2 gallon) |
| Mattresses | $200? | 20? |
| Total | $349 | 175 lbs |
I worked on the beds over a long time period while also working on other things, so don’t have a precise idea how much time they took — say 3 full days. If I had to make a guess:
Cutting out and gluing up the bed platform bases — 1.5 days
Installing and bolting down and detail fitting — 1 day
Installing hinged lids and fixed covers — 1 day
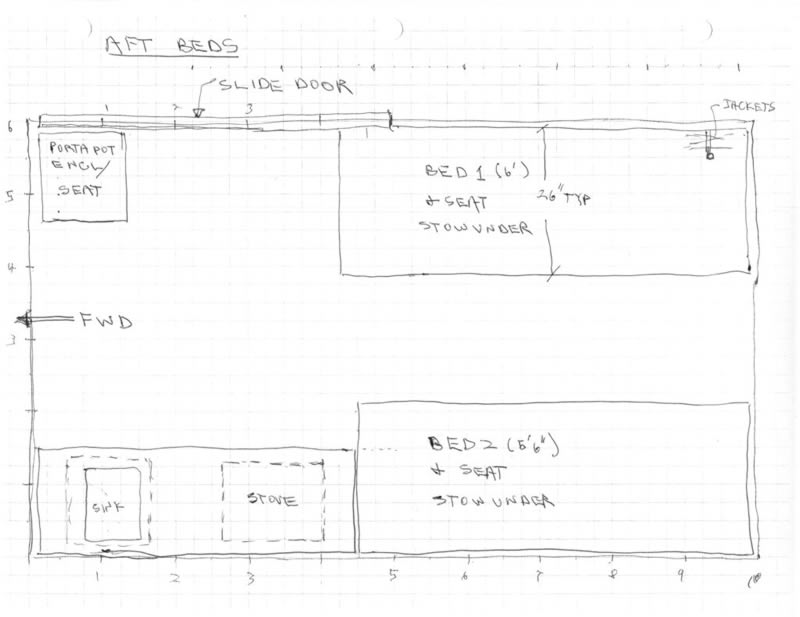
Dimensions
Here some rough dimensions for the passenger side bunk.
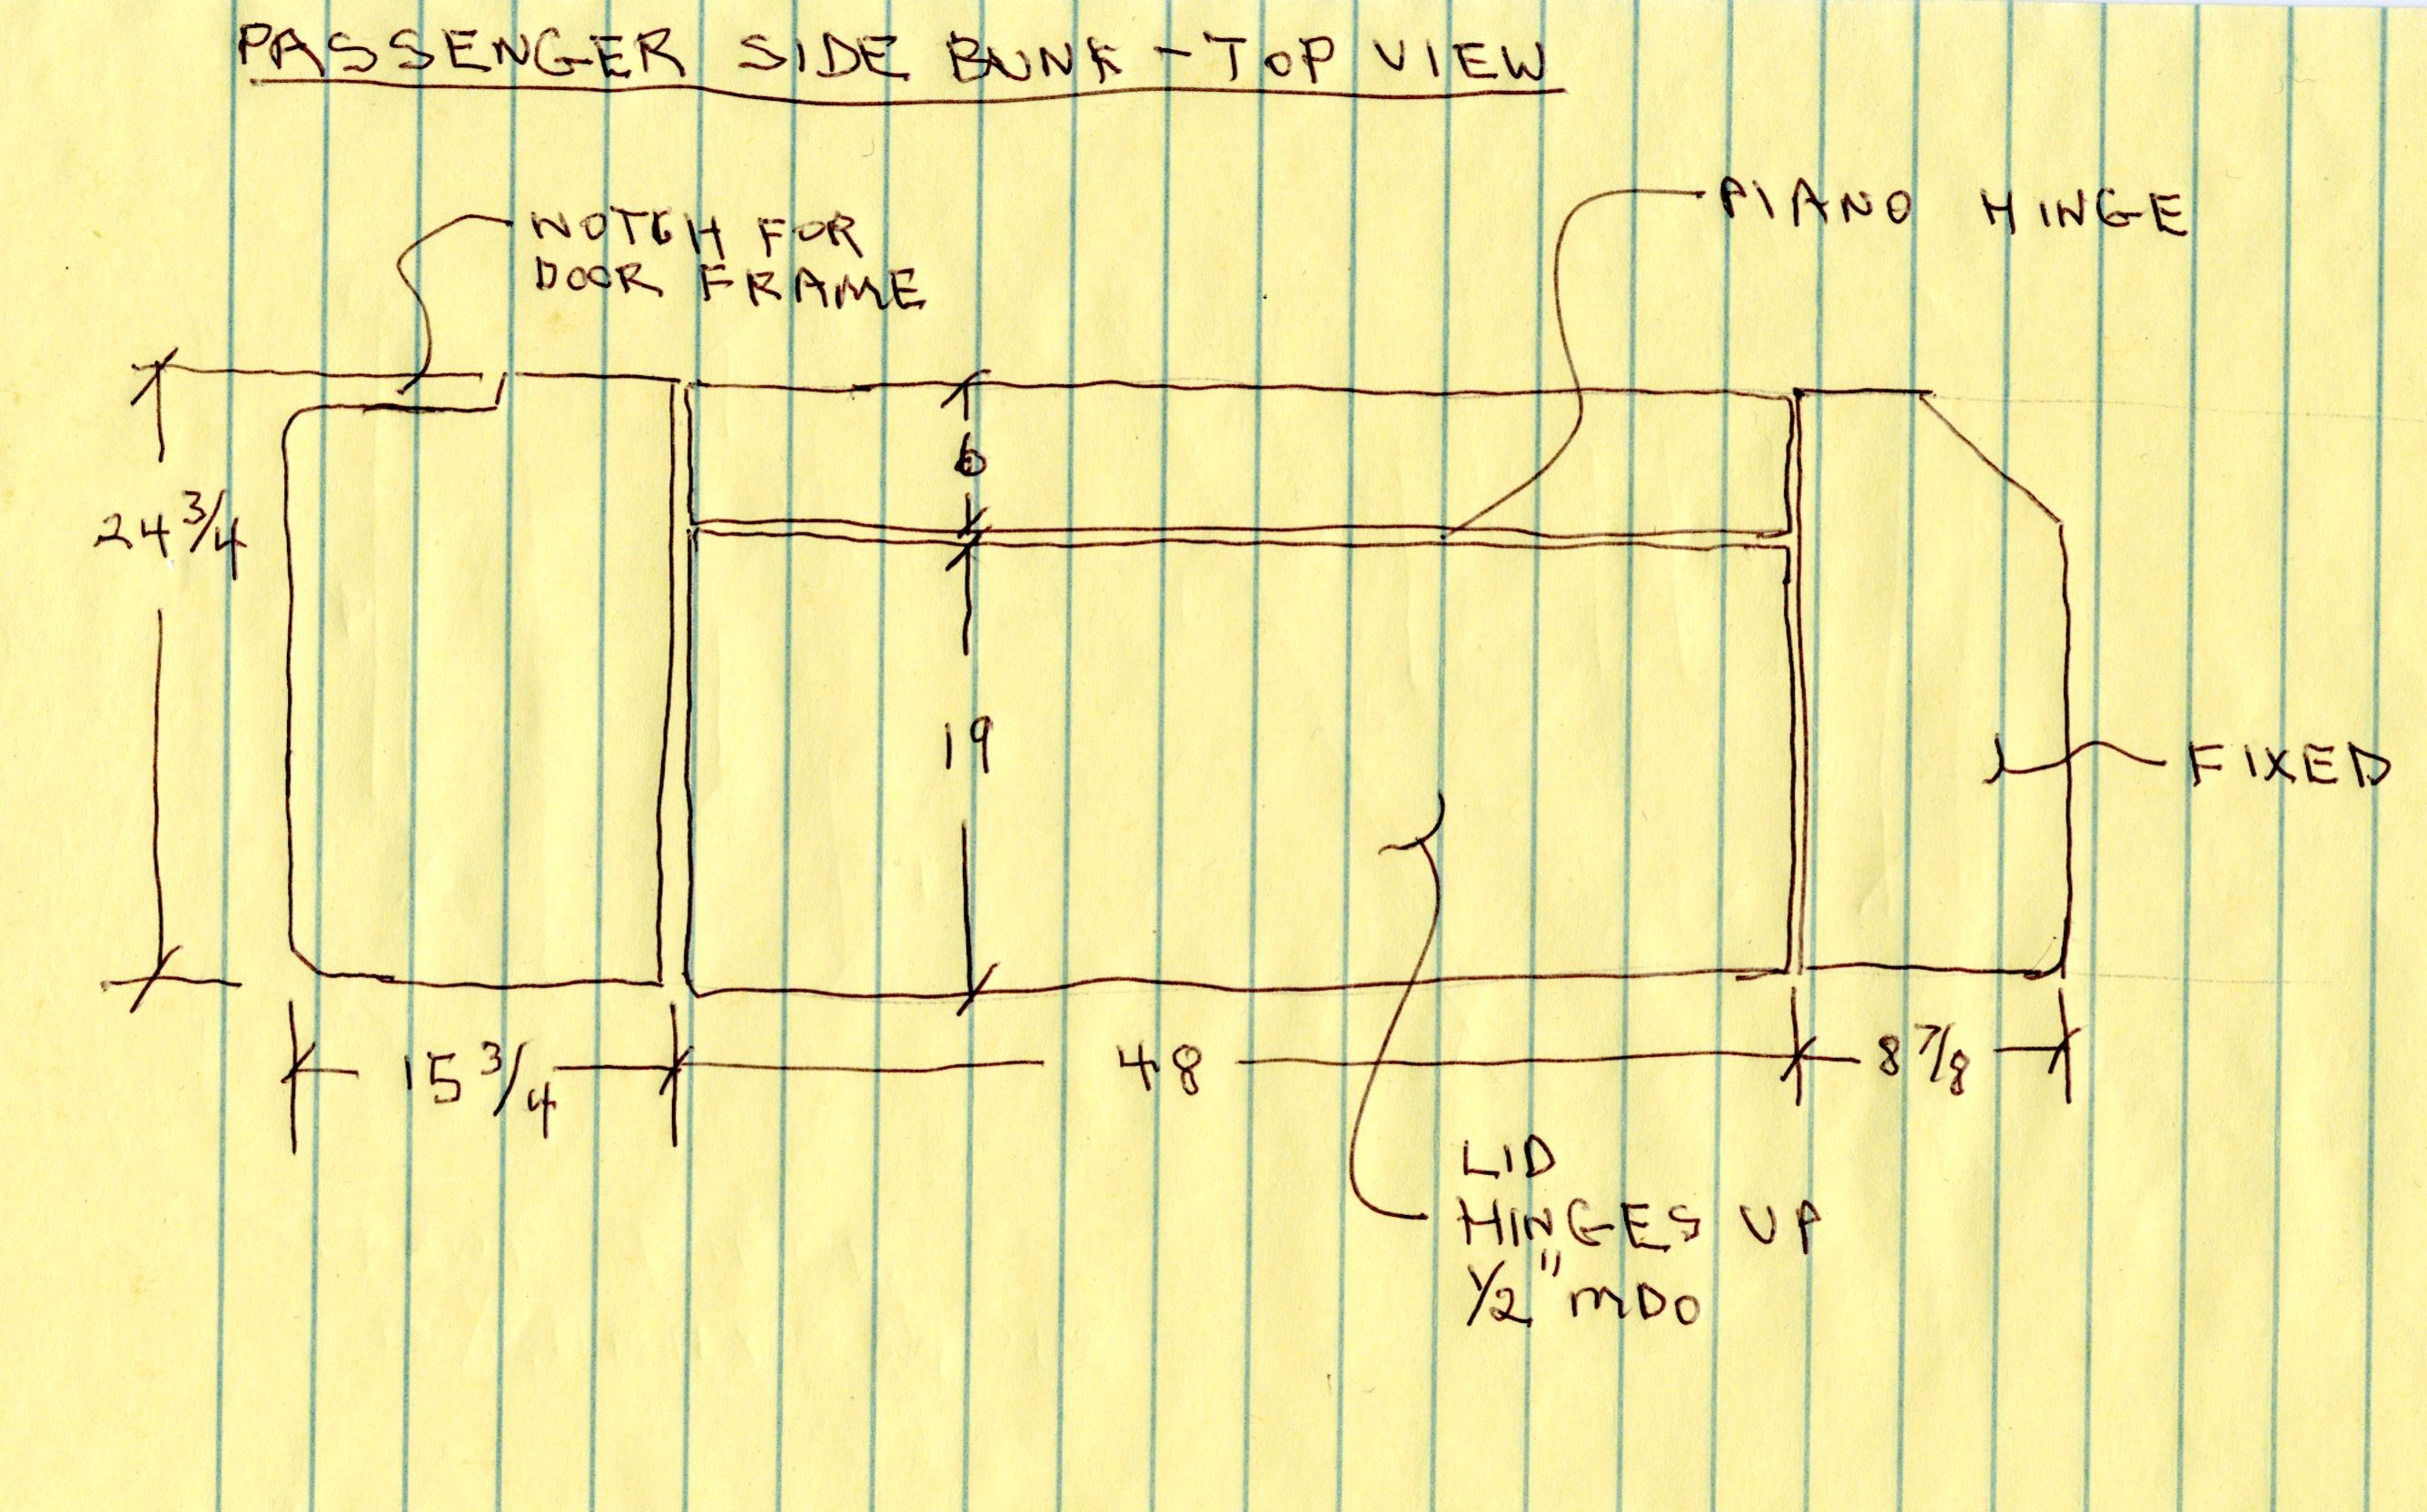
This is a view looking down on the passenger side bunk with some rough dimensions. The middle (19 inch) section hinges up at the piano hinge to provide access to storage under the bunk. The 6 inch board just above it needs to be about as wide as the mattress is thick so the mattress can fold against the wall when the lid is open. The front part of the bunk top (15 3/4 inches) covers the water tank, and the back fixed piece covers the shore power extension cord. These top of bunk pieces are 1/2 inch MDO plywood, the rest of the bunk platform is made from 3/4 inch MDO.
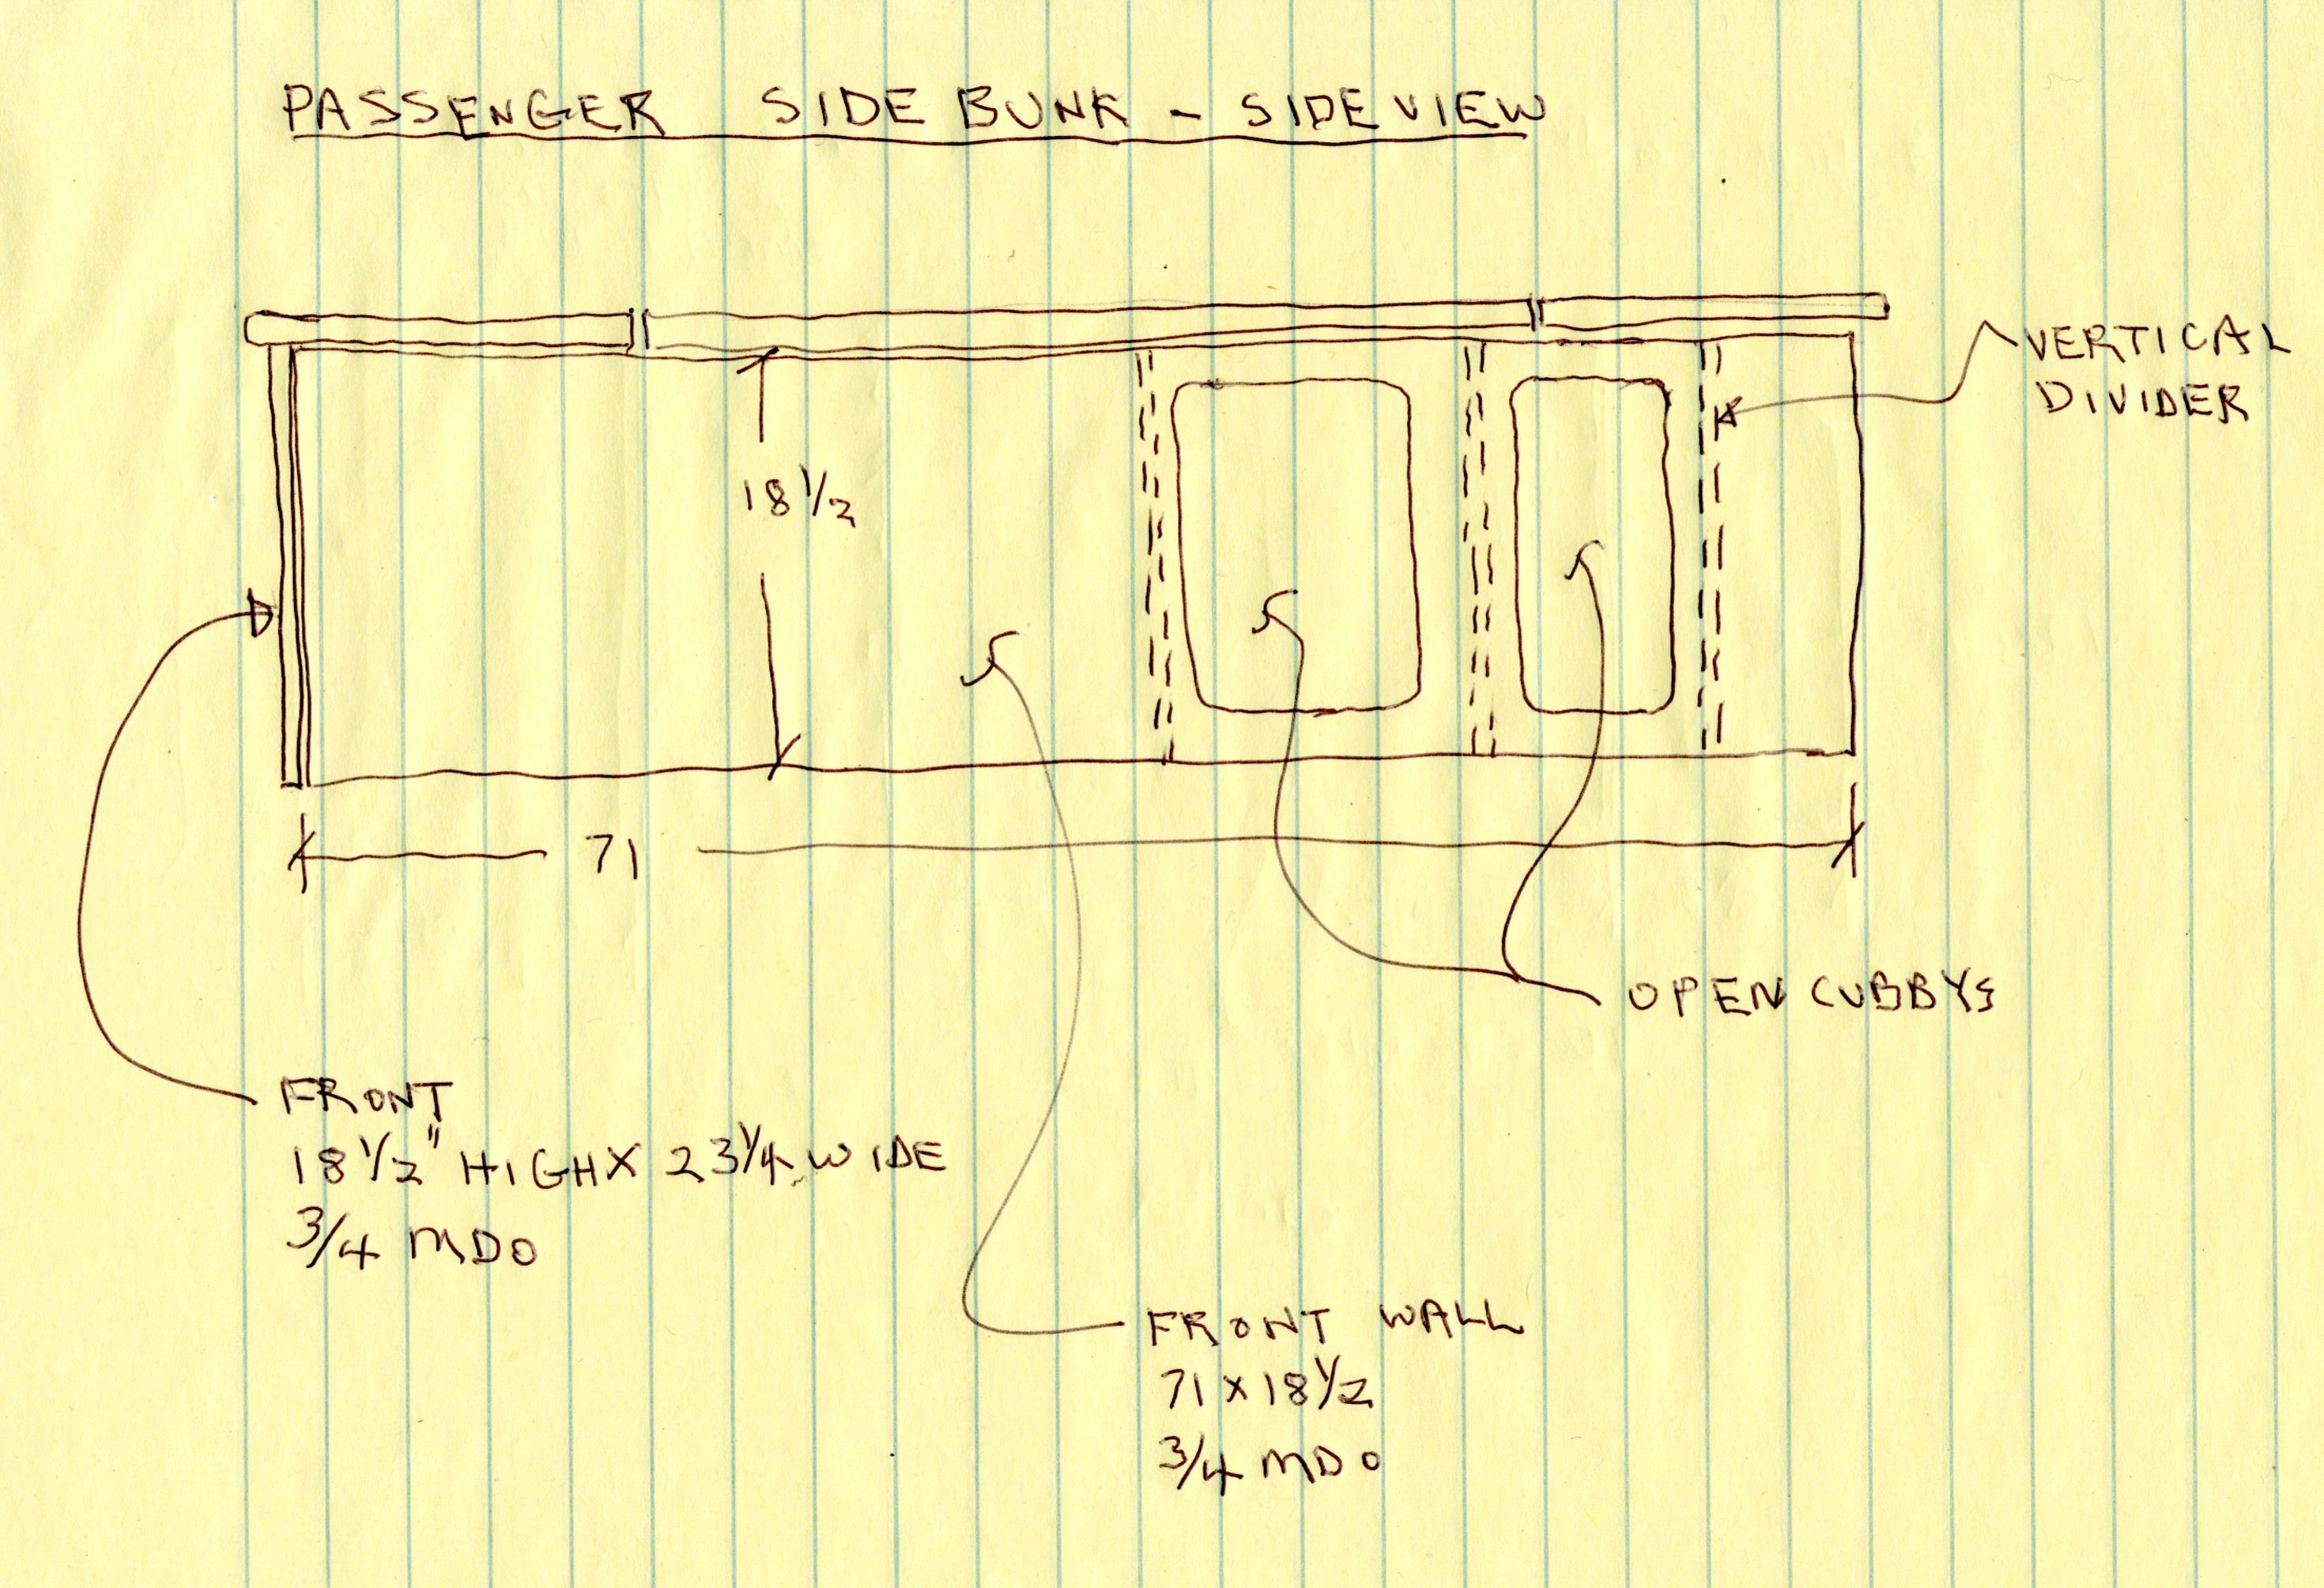
This is a view looking outboard from the aisle between the two bunks. The two “open cubbys” provide quick access to some of the space under the bunk without opening the lid. The area aft of the aft “vertical divider” holds the shore power cord.
The driver side bunk is shorter, so the dimensions are not the same (but could be if you have two tall people).
These dimensioned sketches do not show all of the parts, but just give some of the key dimensions of our setup. Building a mockup in your van is always a very good thing to do to make sure the beds will fit your needs.
Go back to the main camper van conversion page…
Gary
November 30, 2014, June 21, 2015
where do u order your windows for the pro-master?
there is a slight curve on the van panel, does the regular flat slider work, regardless of the curvature?
Hi Raymond,
Some of the more popular aftermarket windows are CRL, Motion Window, and Tern — there are probably more out there.
Some are curved to match the very shallow curve of the PM, and some are flat. CRL offer both and we used the flat ones. The sliders work fine.
This page has more detail on the whole window thing: https://www.buildagreenrv.com/our-conversion/promaster-diy-camper-van-conversion-adding-windows/
Gary
Really great info, so cool!
I found this website that will make foam mattresses to size and thickness
https://www.thefoamfactory.com/mattress/conventional.html
haven’t ordered from them yet but sounds promising
Regards
Georg
Hi Geog,
That looks look good.
Gary
Hi Master,
Amazing job!
If you can include the measurement that will be perfect.
Since I am idiot in wood work, I will need Home Depot to cut all the plywood for me.
Really enjoy your articles.
Thanks again.
Eric 🙂
Hi Eric,
There is a dimensioned sketch of the passenger side bunk most of the way down the page — I don’t have anything better than that.
The driver side bunk is the same except that its about 6 inches longer.
Gary
I am planning to use MDO for my cabinets in PM conversion because I like the smooth painted look that I can get with MDO. Did you find a specific glue that was recommended in MDO applications for the non-porous nature of the surfaces? As it stands, I am finding very little information on the topic, so am hoping that your experience might shed some light on best practices. Otherwise, I will rely more on mechanically attaching the pieces of MDO. Thank you for suggestions of what worked in your build.
Hi Alan,
I just used Titebond wood glue, as mdo is basically just good plywood with the resin paper face sheets.
I did glue all joints, which think is a must for crash resistant cabinets. The Titebond seems to work well.
I guess urethane (gorilla glue) would be a good alternative BUT, Messier to work with
Gary
Thank you Gary. I value your experience with the product and will go with Titebond and plenty of screws.
Hi Gary,
Thanks so much for all you have posted. Your website ideas, photos and instructions are inspirational and closely match the van conversion we want to do. So we bought a Promaster 1500 last week. We have never done a van conversion.
We got the low top 1500 so that we could work on it in our garage (before the ceiling fan is installed). But this does not leave enough headroom for overhead storage cabinets. So we plan to use the configuration you showed with the aft bench beds on a raised platform. This will give us storage for a screened picnic table tent, swim noodles, camp chairs, etc.
Do you have the dimensions for any of the pieces of MDO that you used to build the beds? Thanks.
Hi — I’ll try and remember to take some measurements today — Gary
Hi Carolyn,
I added a couple sketches of the passenger side bunk with dimensions to the page (see above). Not all the pieces are shown, but between the sketches and the pictures, I think you can work it out.
On our setup, the driver side bunk is shorter because my wife is a shorter and we thought we could use the extra room for the galley.
Gary
Great build. I got a lot of ideas from it. i was wondering what you used for bed cushions. my wife and i need a good bed in our camper but i would like build it from several “pieces” of foam so that i could separate it in the day. do you have a source for good bed foam? What did you use?
Thanks,Bill
i especially like your composting toilet design!
Hi Bill,
Thanks.
We found a mattress we liked at our local futon store. It has two foam layers with different densities and properties. Very comfortable. About 5 inches thick.
We bought one queen size mattress, and they cut it down into two pieces of the size we wanted for the two beds for no charge.
We found a local seamstress to make the covers from fabric we bought at Jo Ann fabric store.
Has worked out well — I like it just as well as our regular home mattress.
Gary
Thanks, Gary!
Gary,
Love what you did with the bed storage cubbies, what did you line the cubby pockets with to get discreet areas for storage? It is tough to tell from the photos whether you used little painted wood shelves, paper mache, etc. Do you find that area getting cold due to the lack of insulation?
Thanks!
Hi Mike,
The area under the beds is insulated pretty well — the floor insulation (and Vinyl floor) extend under the beds right up to the wall. The spray foam insulation goes all the way to the bottom of the walls and covers the wheel wells as well.
The passenger side bed has one vertical divider just forward of that aft cubby hole, but the drivers side has no dividers. Basically we use small cloth suitcases in the two cubbies that have the stuff we use the most.
Gary
Apologies Gary, to be clear, I meant the pillar cubbies, where the rear tail lights are located behind the long black plastic cover. It’s tough to tell from the photo how you formed the little shelves and backing that isolates the storage areas from the tail lights/wiring.
Thanks!
Hi Mike,
I get it now 🙂
The shelves are made from some scrap polyiso — just cut by trial and error. They are held in place with some Great Stuff. Not really the best system, but it works adequately.
Have not noticed any cold problem, but there is some additional heat loss there. It might be possible to apply some thin insulation to the back of the cubbies and still have some useful space.
Gary
We are starting to order the parts/pieces needed for our conversion but I’m stuck at a very simple point in the actual put-together. We’ve decided we want a platform bed–and at a certain height. How does one attach things like brackets (to hold the plywood which will hold the memory foam mattress) to the interior walls of the Promaster ??? Any link with images of the parts needed would be awesome.
Hi Robert,
It seems like you could tie into that large horizontal beam that is a couple feet (more or less) above the floor. Its quite sturdy.
If the height does not match up, maybe use a spacer.
You could also run 2 or 3 vertical members from the upper horiizontal beam down to the lower one, and then hang the bed supports off this.
Our beds are basically supported off the floor on a pedestal that is bolted through the floor. You could do this as well.
Gary
We would like to have a permanent bed running from left to right. Any reason we can’t frame it with 2×4’s? Thanks so much for your fantastic website.
Hi,
The bed running from side to side is pretty common — it works particularly well in the ProMaster as its the widest of the vans. This arrangement does allow for more floor room for the galley, cabinets, and toilet/bath.
You probably want to be able to sit on the bed during the day, so, I’d give some thought to what to used for a backrest when sitting.
Lots of room for storage underneath.
Gary
Hi Gary, What is the overall finish dimensions of the beds?
Hi John,
The short bunk (galley side) is 67 inches long by 25 inches wide.
The long bunk (passenger side) is 72 inches long by 25 inches wide.
I was a bit doubtful about making the galley side one shorter, but it did allow a bit more valuable galley space, and I figured I could always make a bit more toe space by making a cutout in the galley aft wall that the spouses feet could extend into 🙂
So far, no complaints for spouse on length.
Gary
Hi Gary, thanks so much for getting back to me. Your site is just amazing the more I look at it and I am so appreciative. 2 questions: What is the height of the beds and can you tell me what the dimensions of the 17 gallon water tank that you bought? I am trying to do the layout and install the water hose and wiring for the pump/tank so I can finish the floor before winter and it need to line up correctly. Thanks!
Hi,
This is the tank: http://www.plastic-mart.com/product/425/17-gallon-rv-water-tank-rvb325
On mine, the 18 inch dimension is the height.
You have to tell them where to put the fittings unless you can use the standard fitting pcakage.
The bed platforms are 19 inches high and the matteress adds 5.5 inches to that.
There is a tradeoff here in that more height adds storage space, but it also makes the beds less comfortable to sit on as your feet dangle (don’t get down to the floor). I put wood cleats on the face of each bunk several inches off the floor as a place to rest your feet on, but more often then not, I just rest my feet on the opposite bunk.
Gary
Gary, Couldn’t you just add a raised floor compartment between the two beds? with a removable top to access underneath which would also solve the feet touching the floor issue and add storage. Would be 5-5 1/2 inches to work with. Creating an 18 -18 1/2 inch height to top of bed. and a Laguna or Laguna swivel table post moves easily out of the way. and can be turned sideways and back and forth.
Marilyn
Hi Marilyn,
I did consider the raised floor with storage. The only downside would be that we would not be able to standup there without touching the ceiling. If we had needed storage for some long things (like skies), I probably would have gone that way.
The Luagun tables do definitely seem like a better way to go than the pedestal table we had for a while. May give that another try.
Gary
Thanks Gary. I kept looking at your pictures and thought I was losing my mind. The lids looked like 1/2″ and the rest 3/4″. Thanks again!
Gary, Couldn’t you just add a raised floor compartment between the two beds? with a removable top to access underneath which would also solve the feet touching the floor issue and add storage. Would be 5-5 1/2 inches to work with. Creating an 18 -18 1/2 inch height to top of bed. and a Laguna or Laguna swivel table post moves easily out of the way. and can be turned sideways and back and forth.
Marilyn
hi John,
I used 3/4 for the sides, front, and back and 1/2 for the opening lids.
I used the 3/4 for the sides so that the attachment of the bed to the van floor could be strong in case of crashes. That is, you have all that stuff stored in the bed compartment and you don’t want it joining you in the cab if you run into something.
Gary
Hi,
Thanks for a great website. Did you use 1/2″ or 3/4″ MDO?