This page covers the installation of the furnace on our ProMaster camper van conversion.
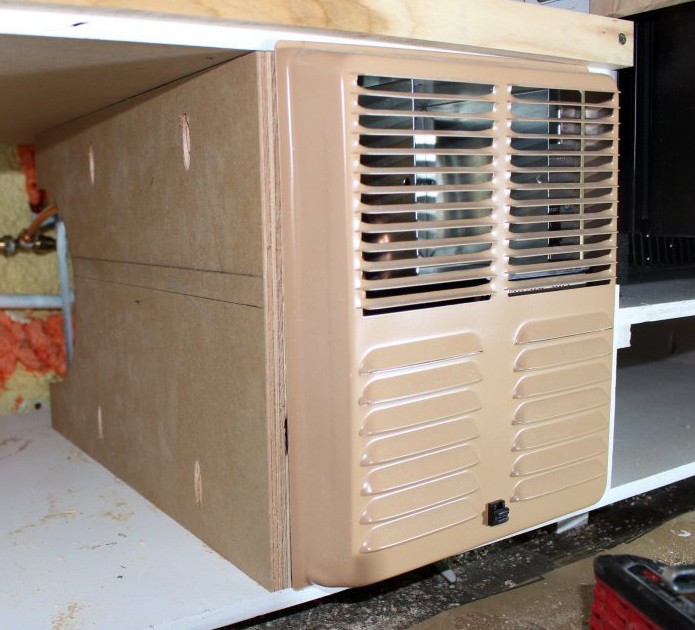
The furnace installed in the galley cabinet. This seemed like a little better a location noise wise than having in one of the bed bases.
We decided to use a small Atwood propane powered furnace to heat the van.
There are a number of other heating options, including other brands and models of propane furnaces, unvented propane space heaters, Webasco and other brands of furnaces that use diesel or kerosene or gasoline. All of these approaches have their own set of pros and cons, and its worth doing the research to determine what is best for you.
Go back to the main camper van conversion page…
Furnace
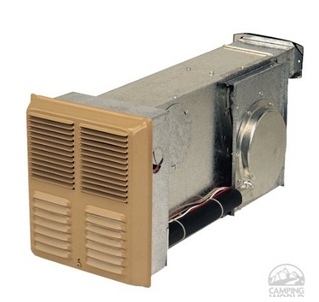
This the Atwood furnace that we have installed:
Atwood model 8012
Fuel: Propane
Heating capacity: 12,000 BTU/hr input, with 9100 BTU/hr output.
Uses about 0.13 gallons of propane per hour when on 100% of the time.Size: Front grill is 8 inches wide by 12 inches high — the depth of the furnace is 21 inches not including the exhaust vent.
Combustion air and combustion products are vented to the outside.
It basically works the same way that a home furnace works with a heat exchanger and combustion products vent to outside.The cool room air is pulled into the bottom half of front grill, passes over the heat exchanger, and the heated air is pushed out the top half of the front grill.
There are no heat distribution ducts.It is basically zero clearance on all sides, so it can be embedded in a wood cabinet.
The flue that expels combustion products is coaxial with and inside the duct that brings combustion air into the burner. Both come out the rear of the furnace, which must be fairly close to the side of the van.
Control is via a conventional low voltage, wall mounted thermostat.
The furnace draws about 1.8 amps at 12 volts DC to run the blower. If the furnace were to run full time over a very cold night, it would use 18 amp-hrs from the house battery.
In our case, this would be about 11% of the usable capacity of our 200AH batteries.Cost $430 from American RV Company
This is the smallest furnace in the Atwood line. The larger versions generally require a simple duct system to distribute the heat.
Furnace Installation
The installation was straight forward.
I planned the galley cabinet with a cubby hole to fit the furnace.
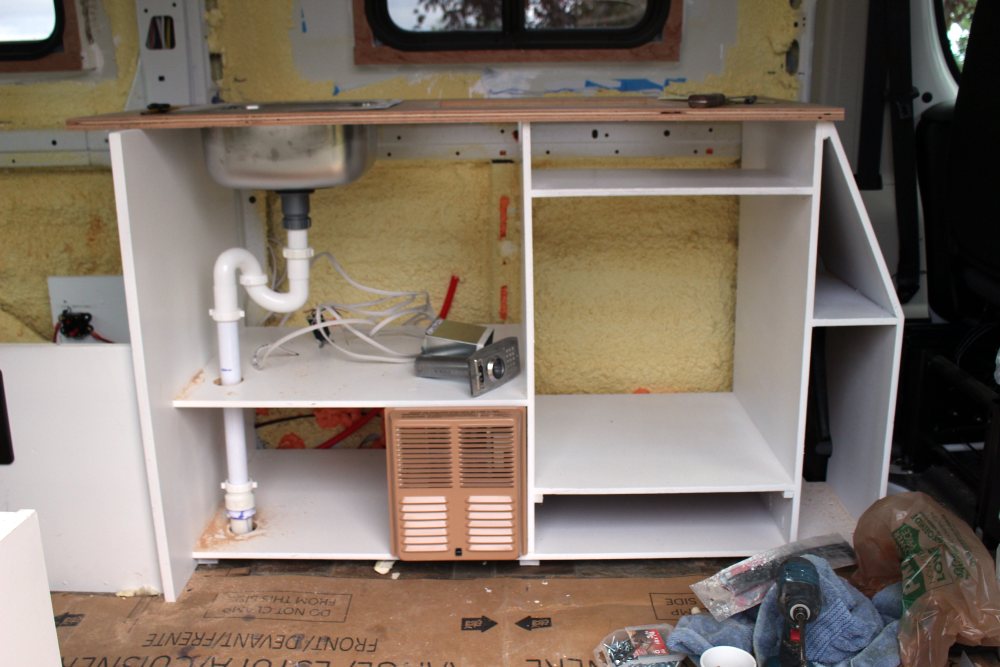
The flue vent and combustion air vents are sitting on the shelf just above the furnace — they will exit the back of the furnace when connected.
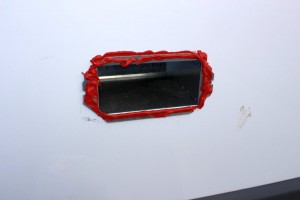
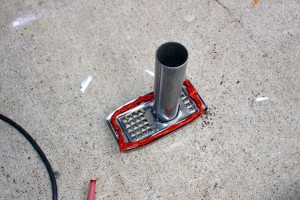
Sidewall Vent
The flue vent and duct carry combustion air into the furnace, and exhaust combustion products. The combustion products vent is coaxial with the combustion air vent, with the combustion air on the outside.
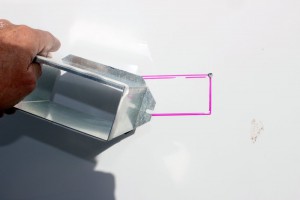
To get the placement of the vent cutout in the sidewall correct, I put the furnace and duct in place and traced the outline of the duct on the sidewall.
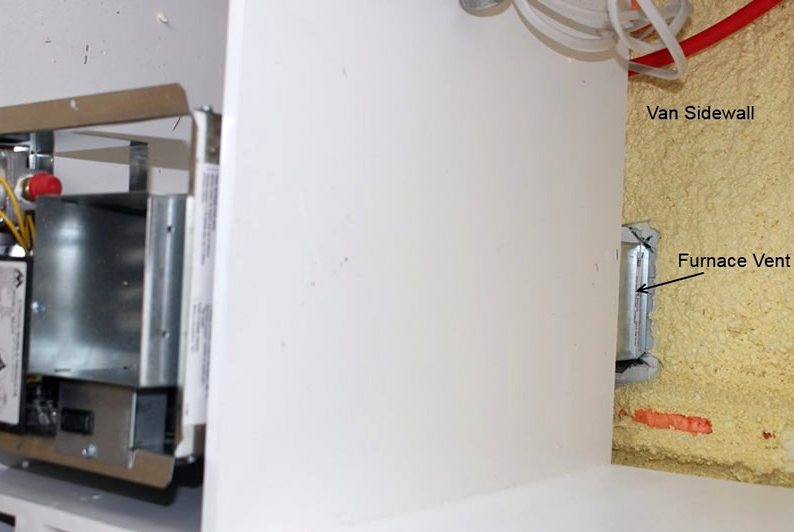
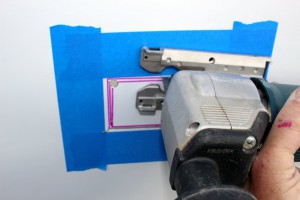
After tracing around the vent on the inside of van, I drilled small holes through the van sidewall to transfer the location to the outside of the van and then used the vent to trace the hole location on the outside so that it could be cut out from the outside.
My van sidewall has spray foam insulation on the inside, and this had to be cut away in the vent area.
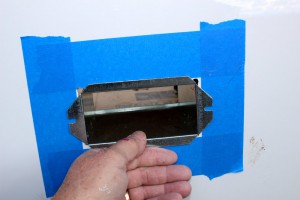
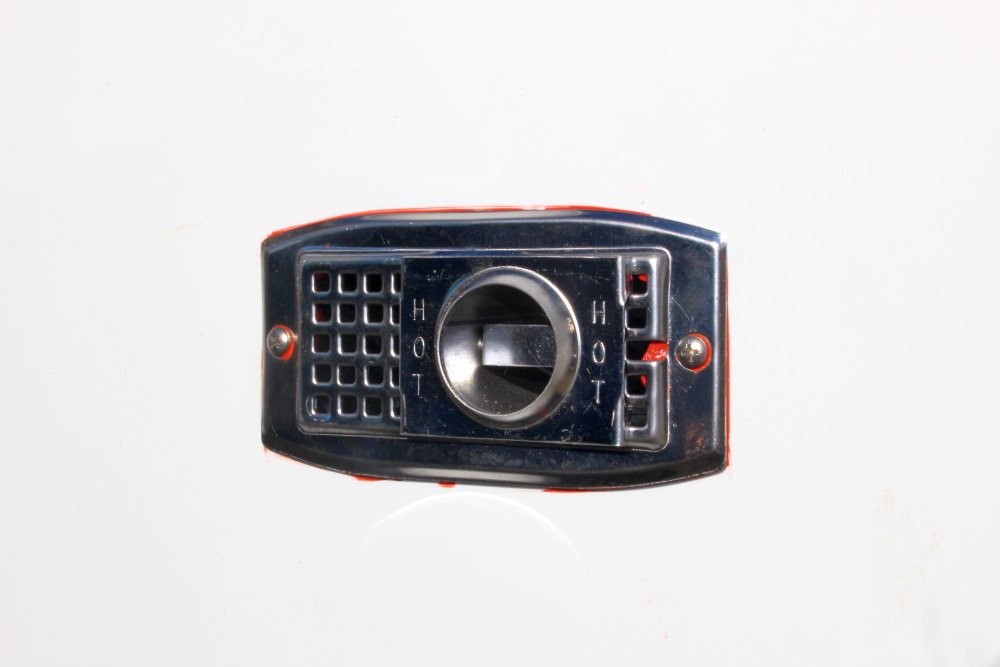
The stainless steel vent cover installed and connected to the furnace.
Wiring and Plumbing
The furnace has to be wired to a 12 volt DC circuit to power the furnace blower and electronics. On this model furnace, the current draw is only 1.8 amps.
Even though the amperage is low, I dedicated a separate fuse to the furnace.
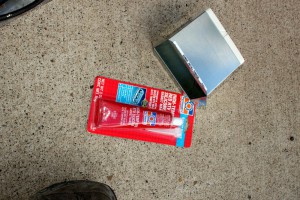
The furnace is connected to the propane tank using 3/8 inch flexible copper tubing with flare fittings used to make the connections. For us, the propane tank is near the back of the van, and a single 3/8 propane line runs up the driver side where a Tee is installed with one branch going to the furnace and the other to the stove. More on this in the Propane section.
I thought about putting shutoff valves in for the furnace and for the stove, but decided the valve on the propane cylinder was enough.
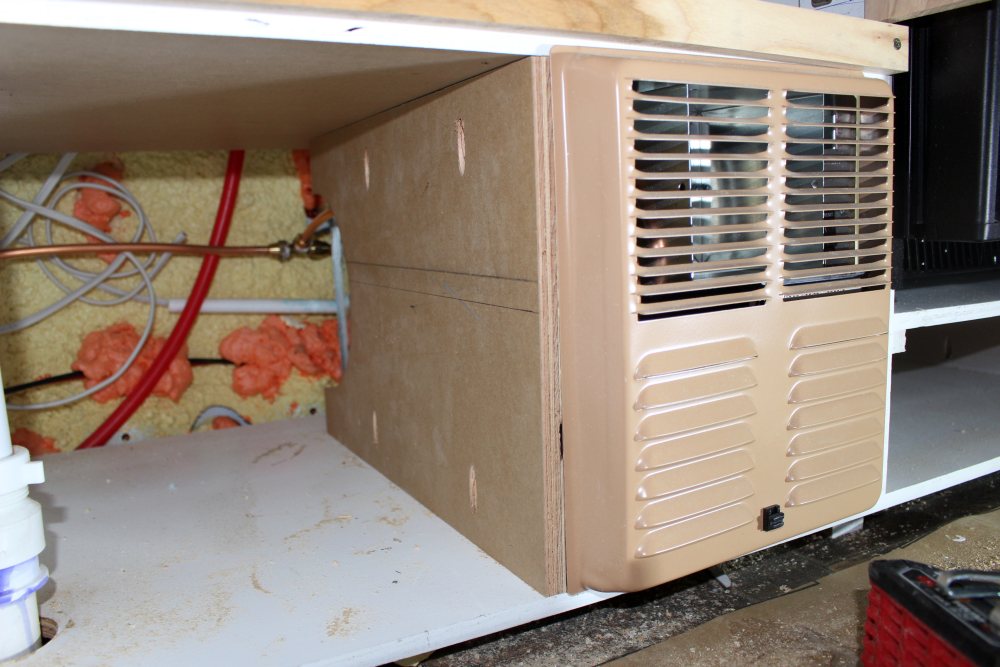
The finished install.
The furnace is held in place with screws to the plywood cabinet. The copper propane supply line can be seen at the back of furnace against the van sidewall. The vertical plywood on the left side of the furnace separates it from the pots and pans storage area in the galley cabinet — I cutout an opening at the back of the plywood to match the inlet grill on the furnace.
Also installed a 1 inch thick polyiso insulation panel on the right side of the furnace where it shares a wall with the fridge compartment to prevent to keep the furnace from making life hard for the fridge.
Other Install Data
Here is another detailed description of installing this furnace in a Volkswagon Westfalia…
Performance
While our van conversion is not done at this point and we have not had a chance to test our little Atwood furnace on a real trip, I have been using it to heat the ProMaster while working on it. So far, I have been happy with it. Its reliable, heats the space well, and is relatively quiet.
Most of the noise is the fan, which is relatively quiet. There is a bit more noise when fan and burner are on, but not much.
At some point, I’ll run some tests to estimate what the lowest temperature the furnace can heat the van to is. As a rough guide, with 19F air outside and 68F inside, the furnace runs a bit more than half the time. This would indicate that it should be good to well below zero when running all the time.
The furnace burns about 0.13 gallons per hour when on all the time — this would be 1.3 gallons over a 10 hour night. At (say) 32F, I would estimate that it would run about 35% of the time, and burn about half a gallon of propane overnight.
This is with pretty good insulation on walls, roof, and floor, but no insulation (yet) on sliding or back doors, and no insulating shades on windows.
Update on actual performance in this trip report…
Cost, Weight and Time
| Item | Cost ($) | Weight (lb) |
|---|---|---|
| Atwood 8012 furnace | $430 | 23 |
| 3/8 inch copper line and fittings (in propane section) | in propane section | |
| Total | $430 | 23 |
As far as I can remember, it took about 3 hours to install the furnace and hook it up.
Go back to the main camper van conversion page…
Important Update — Summer 2018
Our original Atwood furnace worked well for a couple years, but for the last couple trips it has had reliability problems. Mostly, not wanting to startup reliably. I took it apart and cleaned it up, and then replaced the sail switch and the high limit temperature sensor. While all this did help some, the furnace still had reliability problems. Since we do a fair bit of camping in cold weather, I really did not want to deal with an unreliable furnace, so decided to replace it. The 12K BTU Atwood that we had is no longer made, and I was not really so sure I wanted to go with another Atwood anyway.
In the end, we replaced it with a Suburban NT-16SEQ. This is a 16,000 BTU input (about 12,500 BTU output) furnace that fits in pretty much the same space as the Atwood did. We were able to install it in the same space, but becausethe intake/exhaust vent comes out of a different part of the back of the furnace, there was some hassle in getting the vent to exit the side of the van. It cost $360, so a bit less than the original Atwood. Prices seem to be all over the map, so shop carefully. The current draw when it is running (to run the blower) is a little higher than the old Atwood, but not enough to really make much difference in the state of the battery in the morning, as it draws more current when running, but runs less.
The “Q” in the model number stands for quiet, and it is fairly quiet — about the same as the Atwood it replaced. One informal noise measurement put the noise level at 35 db, which would be very good indeed. The 12.5K BTU output is somewhat higher than I would really like, but on the plus side, it does warm the van up quickly when you are coming back to a cold soaked van after doing away from the van activities all day. The high output also works well in the kind of weather where its not cold enough to run the furnace at night, but you want a shot of heat in the morning to take the chill off. So far, it has been 100% reliable — you just turn the thermostat up, and it comes to life — no fuss at all.
The installation procedure to install the Suburban is very much like the Atwood procedure described above, so most of what is provided above is applications.
I’ll just mention in passing that we have had three RV’s before this one, all with propane furnaces. This is the first time we have had any problem with an RV propane furnace. Generally, propane is an easy fuel for furnaces to burn and the furnaces are simple and reliable.
We did consider replacing the Atwood with a Wabasco (or the like) heater that could have used fuel from the van gasoline tank, but all the reports of hard installation, reliability problems, altitude problems and carbon buildup that was hard to clean out put us off on these nice compact units. We really want a furnace that runs everytime and all the time with no tinkering. Also considered a Propex propane heater, but the much higher cost and slightly mixed reviews decided us against this option.
Update March 2024: The Suburban has been the picture of reliability over the 6 years its been in. Zero problems, zero maintenance.
But, if we were doing another conversion now, we would consider an alternative that is now more practical than it was 10 years ago. We would consider dropping the propane, going to a somewhat larger LiFePo4 battery pack (maybe 300 amp-hrs), replacing the gas cooktop with and electric inductive cooktop, and replacing the propane furnace with a gasoline furnace that would draw from the van fuel tank.
Over the last 10 years, Li batteries have become a lot cheaper and more common, and small inductive cooktops are readily available. There are more gasoline furnace offerings, but a gasoline furnace that is reliable, low maintenance, and works at high altitudes still seems to be not quite there – but, maybe close. If you are trying to decide this issue, I’d check what the current experiences are with people on the ProMaster, Transit and Sprinter forums.
The convenience of only having one fuel to deal with and the convenience of an inductive cooktop are big pros, but an unreliable furnace is the last thing anyone who camps in cold weather wants to deal with.
Gary
November 15, 2014, June 24, 2015, Feb 4, 2019
I wondered if you have any update on how this suburban propane heater has been doing for your trips?
In particular I am interested in how well it does with elevation changes for people going to the mountains to ski?
Thank you.
Harry
Hi Harry,
Its been very solid – no problems at all.
We used it in the fall at the Island Lake CG on the Beartooth Hwy, which is at about 10,000 ft, so no altitude problems either.
Gary
Thank you. Appreciate the update.
So many heaters seem to have elevation challenges.
Gary,
I decided to change the analog thermostat to this digital version. It had good reviews and is often used in RV’s with the Suburban propane furnace. I especially like how you have more accuracy to set the lower temperature for those cold nights. If you want to, it will go down as low as 45 F. Here is the link: https://www.amazon.com/gp/product/B00204WWGE/
Dennis
Hi Dennis,
That looks good — probably going to give it a try.
Do you know if it has any way to adjust how long the furnace cycles on? That is, adjust for how many degrees the temp drops below the set point before it turns the furnace back on? I think this is sometimes called the “span” setting.
Gary
I don’t believe this thermostat can have the “span” adjusted. When you set the temperature it warms to 1 degree above the setting and then cools to 1 degree below the setting. I was sleeping in the van the other night and it got down to 35 degrees outside. I set the temperature in the van to 58 degrees and the heater seemed to cycle off about 25 minutes before coming on again.
Thanks Dennis — that sounds about right for us.
Gary
Great write up!! Vaughn here from The Tiny Home truck! I am getting ready to install the same suburban furnace in the truck and you gave me an idea of the specs to do it. The installation manual it comes with isn’t very concise (which I understand) but I really wanted to break it down to the “here’s what you should do”.
Thanks for this!
Hey guys just looking to van building as june 2020 is when I start getting her done, ive been researching and it is not very clear I live in Calgary ab Canada it gets about minus 45 to 50 worsecase scenario can I use art wood furance in Canada ? or would you guys recommend something eles? like I said very early stages of design and such so tons of time to figure things out
thanks again brady
Hi Brady,
Do you have a link to the woodburner you are thinking about?
Some people do use small wood burners to heat their RVs, and I don’t think the cold temperatures around Calgary would prevent using a wood burner. I live in SW Montana, and the small propane furnace I have does a good job — so, I’d guess there are wood furnaces that would put out enough heat.
Good insulation of course.
The wood burner may end up taking up more space than a regular RV furnace.
Gary
Challenge with a wood stove is that people tend to call the fire dept when they see smoke coming out, it would happen to my friend in Vancouver almost every time he started it, finally the fire dept told him if they got called again he would get a fine,. There is a company that makes a tiny low smoke (clean burning) wood stove called Kimberly , expensive though. If living full time and using propane I would recommend getting your van professionally spray foamed. I built one out of a cube truck with spray foam, it was a lot of work, I had to install studs and do the wiring in the walls first. It worked great, warm inside when it is over -18 C outside. My friend lived in a motorhome in Calgary for the winter, I think he used over $100 a week of propane in the winter
Thanks for the information! This is the only detailed resource I have found about installing this type of heater instead of the pricey Propex models.
I am alarmed by one thing though. As I build my galley around this unit (the same Suburban model you have) I read in the fine print that it is only rated to 4500 feet above sea level! Have you have any issues using yours at high elevation?
Hi Chris,
Have had no issues at all with altitude. Just got back from trip down south with a couple cold camp stops at 7000 ft elevation — it ran just fine.
We actually live at 5000 ft and I run it quite often when working on the van.
Some of the RV diesel furnaces can have issues with running at high altitudes, but have never heard of altitude problems with propane furnaces.
Very pleased with it overall.
Gary
I just installed the Suburban NT-16SEQ Furnace. I used the following regulator which was not a two stage regulator, but it does reduce the pressure to 1/2 psi.
I use a similar regulator on our Suburban (and Atwood before) furnace and it works fine.
Its not a two stage.
Gary
Notice to all who get the Suburban RV furnances. You will need a secondary propane pressure regulator to step down propane pressures dramatically. These are designed to work on a pressure of 11 to 14 water-column inches (about 1/2 of one psi). Connecting it directly to your primary propane regulator (14 to 20 psi) will blow the seals. Same with the suburban stove line as well. Learned this the hard way.
If you use a standard LPG two stage RV Regulator you are fine, as they are 11 to 14 Water column. Ideally you don’t want to have 2 separate units, as there are additional fittings to buy and more potential for leaks. Where I live the gas code says you are not allowed to use any regulators inside the vehicle, all connections and T’s need to be connected underneath the truck, one hose enters per for each appliance. Every RV I have seen is built this way. Picture of 2 stage attached!
Euro connectors are awesome, any electronics store should have them. you can reuse them many times, and unlike wire nuts + tape, they will not fall apart. wires can easily start fires when they fall apart. 12VDC requires good connections, otherwise voltage drop will occur and furnace will draw extra power from battery. The bigger the draw, the more important good connections are. Propane furnaces are close to 5 amps, which is a typically one of the bigger loads in a camper van.
Hi Gary,
I like your idea of the wirenuts, I’ll use them and tape the hell out of ’em. Sometimes I overthink things… (paralysis by analysis) Anyway, bought a 2017 159 high roof. Going to put one bed across the back, wife’s bed behind drivers seat and the galley on passenger side. Working around the wheel wells will be interesting. As my wife refuses to sit on a box out in the open, went with a natures head toilet (boy are they pricey…) that I will build an enclosure for behind the bed on the drivers side. If I was single I would build my own like you did. Married men don’t actually live longer, it just seems longer :>) The ceiling will also be a challenge, thinking of using the 1 inch foamboard covered by 1/4 or thinner beadboard, just concerned abut the weight, probably use some decorative screws into the ribs as insurance instead of just liquid nail. anyway one thing at a time.
Regards
Georg
I usually solder and shrink wrap. But “Euro style wire connectors” are a really good way to go, It’s a nice touch to get a red and black sharpie and color code the ends of the nylon connector. They come in blocks, and you can easily cut apart to use in two’s or three’s etc. Dc connections will have less voltage drop if you have good connections, and it the more amps, the more important good connections are.
thanks, never heard of euro style wire connector but found this link
http://www.armacostlighting.com/store/shop/euro-style-wire-connectors/
will read up on them but sounds promising as they handle 14 gauge wire
thanks again
Georg
hi,
thanks for the info, never head of eurostyle wire connecotrs but foundthis link http://www.armacostlighting.com/store/shop/euro-style-wire-connectors/
looks promising
regards
Georg
darn double post, wasn’t sure the first one went thru
Hi,
Looks like a descent way to go, and you could screw the connector block to the furnace sheet metal to anchor it.
Gary
Quick question on wiring the furnace, as it comes with leads, how did you connect them to the 14 gauge wire? junction box or splice using a compression sleeve? or something different. showing my DC ignorance… look forward to your reply as I have just started a promaster conversion and will be installing several dc devices. Also have to say, I feel fortunate to have found your site- what a wealth of information and ideas! Really looking forward to this challenge, so far just have the floor done, used 1 inch foamboard, underlayment and pergo laminate, looks great but that was probably the easiest part of the conversion….
Hi Georg,
On my furnace, there was a small box that the furnace wires come out of. I just wire nutted the incoming #14 wires to the furnace wires and then pushed the wire nuts into the box. It seems OK to me, but I’m not an electrician.
I understand that Atwood no longer offers the 8012 furnace that I got but there should be some alternate models from Atwood or Suburban or Propex.
I don’t think you will find anything much tougher than the floor — pretty easy if you just take it one job at a time. The ceiling was probably the toughest thing for me, but not that bad.
Keep us posted.
Gary
Hi Dennis, a potential disadvantage of buying a furnace that has too many btu’s, is it is easy to get too hot and then it shuts off and before long you are too cold. One solution to this is to install ducts so the heat comes out in far corners of the van. I had really bad experience with the Propex. It cost a lot of money Paid $946 CAD with shipping. and it never worked properly. The manufacture would not do anything to help except reply to my emails. Telling me my regulator was not working, and my propane Water column needs to be checked. Spent money replacing the regulator and having the Water Column tested. My Propex was a dud. I am still using it for winter camping, but It needs to have the power cycled on and off every hour or it won’t run. I might eventually build a relay to reset the power automatically, when it is not firing. Propex is an easier install, I installed it in my promaster by cutting two holes in the floor with a hole saw. The intake and exhaust tubes are 1″ I believe. That 2438ABK is cheap!
Gary,
After doing some research, it looks like this is the only small propane heater available with a direct vent. https://www.amazon.com/Suburban-2438ABK-Nt-16Seq-Furnace-Black/dp/B00B2ATA1M/ref=pd_lutyp_wish_2_1?_encoding=UTF8&pd_rd_i=B00B2ATA1M&pd_rd_r=c0bca79e-d930-4a36-8f8d-e75caa2facf8&pd_rd_w=OD4oK&pd_rd_wg=Dhxyc&psc=1&refRID=B97HD6DG47K8KWYVNH6E
If we use the thermostat to control the unit, it seems it should work ok to heat the van, even though it is 16,000 BTU versus the 12,000 BTU in your Atwood 8012 model. What do you think?
Hi Dennis,
Suburban is a good brand that has been making those furnaces for years, so seems like it should be fine.
As far as 12K vs 16K BTU, I don’t think its a big deal. Our 12K in cold weather (20F ish) runs about half the time, so, it cycles off and on all night. The 16K would stay on for about 25% less time to bring the temp back up to the thermostat setting, so there would be a few more cycles over the night. This is for a well insulated van. It won’t burn any more fuel. The 16K will also allow you to operate in really, really, really cold weather 🙂
A while back, I sent an email to Atwood asking if the 8012 is still available, and they said it was not but gave me two new models that that replace the 8012, but I was unable to find these new models anywhere — so, not sure what’s going on with Atwood. It might be worth a call to their customer service to see if you can get the straight story. Please let me know if you get a straight answer out of them.
There is also the Propex furnace, but it is quite a bit pricier and is more time consuming to install — but, it does gain you a little space as it usually installs below the floor.
Gary
The Everest Star 7900 II seems to be the successor to yours, but the cheapest one I found online was $710! And there’s hardly anyone that sells these. Odd.
Hi Paul,
Not sure what’s going on.
Atwood still lists a 7900 on their site:
http://www.atwoodmobile.com/furnaces/everest-star-7900-ii-series.asp
I think that I have the 8012 12K BTU model — one here for $470:
https://www.vintagetrailersupply.com/Hydro-Flame-Furnace-p/vts-349.htm
This one is interesting one from Atwood:
https://www.pplmotorhomes.com/parts/rv-appliances/furnaces/rv-furnaces/atwood-small-furn-12k_15.7051
It says that it replaces the 7900 series, but don’t think this is true based on what’s on the Atwood site.
There is this Suburban one — I believe that it does not require ducting, but its 16K BTU output is a bit high for a well insulated van:
https://www.pplmotorhomes.com/parts/rv-appliances/furnaces/rv-furnaces/nt-16seq-16-000-suburban_08-0497?jt=1&jap=1o2&js=1&jsid=36859&jcpid=8a8ae4cd48005458014820e2e0170ec4&jkId=gcp:se_36859:pp_55180278984:ag_15211804824:cp_194253624:n_g:d_c:cr_52737673584&gclid=CjwKCAiAlL_UBRBoEiwAXKgW55dLdZh4Bxsa-4PNycLqZ3AWzmd3cYTZTaeJLmOMmAABfdM-FRwEYBoCXj8QAvD_BwE
It might be worth calling Atwood and seeing what they have to say and what model they recommend for small spaces.
I’d like to hear what they say.
I think if you look around you can find one of the Atwood or Suburban models for less than $500 — I’d not pay that $700+ price!
Gary
I have installed a few hydro flames over the years and although they aren’t perfect, they are ok, I now have a Propex. I would not recommend a Propex. The Pros, are the install is a bit easier, but my Propex arrived with major issues. It would not fire when brand new just blew cold air and after 44 emails with the company, they told me to take it to a RV dealer as they thought I did not know what I was doing. After emailing someone of a forum that had one and looking closely at the install we realized that my wiring harness was wired backwards by the manufacturer. I had to cut, solder and splice every single wire to get it to work. It fired and heated the van perfectly after fixing their wiring error but to this day will not run continuously , it constantly goes into error mode after running for a while, and the manufacture doesn’t know why (although they talked me through many things, spark gap, overheating, blocked tubes, gas pressure problem) it keeps shutting off and they refuse to do anything for me. I bought it online from a Canadian distributor who refuses to take it back, and the manufacture refuses to take it back. Hydroflames have a small list of problems, but all of them are known issues and easy to troubleshoot and parts are everywhere too. The circuit boards go, and sometimes the sail switch turns the ignition power off so the furnace will only blow cold air do to debris preventing the switch to turn on.
Are you still using this atwood furnace? How do you like it? Is it quite? I noticed they have a newer model that’s supposed to be a little more efficient and quieter. I’m deciding between this or propex heatsource. Propane efficiency and noise are my two main concerns (and obviously that is reliable). I could also mount the propex underneath the van. Have any wisdom for me? Thanks!
Hi Clayton,
Yes — still using the Atwood, and its working fine.
We have done some cold weather camping, so its had a bit of a workout.
https://www.buildagreenrv.com/trip-reports-experiences-and-lessons/banff-trip/
For most camping, we only run it a while in the morning to warm things up.
I would call it reasonably quiet inside the van. If you are a light sleeper, it might wake you up when it cycles on. I usually sleep right through it. You hear the blower noise, and you can just barely tell when the burner kicks in from the burner noise.
From the outside of the van it is quite quiet — you can’t really hear it from the next campsite. I mention this because some RV furnaces have a problem with outside noise.
I did notice that they appear to have discontinued the model I got and now offer another new model in the same size. They do say its quieter, and that would be a plus.
I don’t have any experience with the propex unit, and have not read any accounts, so can’t help there. The underneath mounting would be a plus — I lose a space that is about 6 or 7 inches wide by about 10 or 12 inches high in the galley cabinet. I do wonder about exposing the furnace to the mud, rocks and weather under the van.
Please let us know how it works out.
Gary
Awesome thanks Gary! Will do.
The page on heating options didn’t appear to have a comments section, so I popped over here.
I have a heat-exchanger that used to be powered by engine coolant – just an automotive-style radiator about 4″x12″ with a dual squirrel-cage blower on it – inlet and outlet. I’ve been thinking of modifying an on-demand water heater to heat the water for this. I’ve also considered in-floor radiant heat powered by the same kind of on-demand heater…
Any thoughts?
BTW – this site is EXCELLENT in its thoroughness and clarity of explanation. Thanks a bunch!
Hi Keith,
Sorry I missed your question earlier.
It seems like that should work. If you want to use the same on-demand heater to heat water for the van (dishes, shower,…) and for the heater, the plumbing might get kind of tricky as you would want the heater to circulate the water in a closed circuit, whereas the other uses just have the water pass through the demand heater, and then to a sink or whatever.
Not sure if it would be worth the effort to do the radiant floor, but it probably would be nice heat. You would have to think about how to protect from freezing.
Gary
Hi Tanya,
To my recollection, I did not cut a vent on the fan blower side.
On mine, the furnace draws air into the fan from one half of the front grill and expels the heated air from the other half of the grill. The combustion air comes in from the outside via the outer half of the exhaust vent while the combustion products are vented out the inner half of the exhaust vent.
I’ll try to remember to look at the furnace install and manual again next time I’m out there, but I don’t remember anything in there requiring the other 4 by 4 vent — but, I’d not go against what the manual says.
Gary
In my readings I thought that I needed to cut a 4×4 hole on the fan blower side if there is no clearance between the furnace and the cabinet. This is written in my installation manual for my 8000 series furnace. My furnace is mounted at the bottom of a closet and I want to maximize space by using the open space beside the furnace for more storage by building out a cabinet around the furnace. I am wondering if you did this but there is just no picture. Thanks tanya