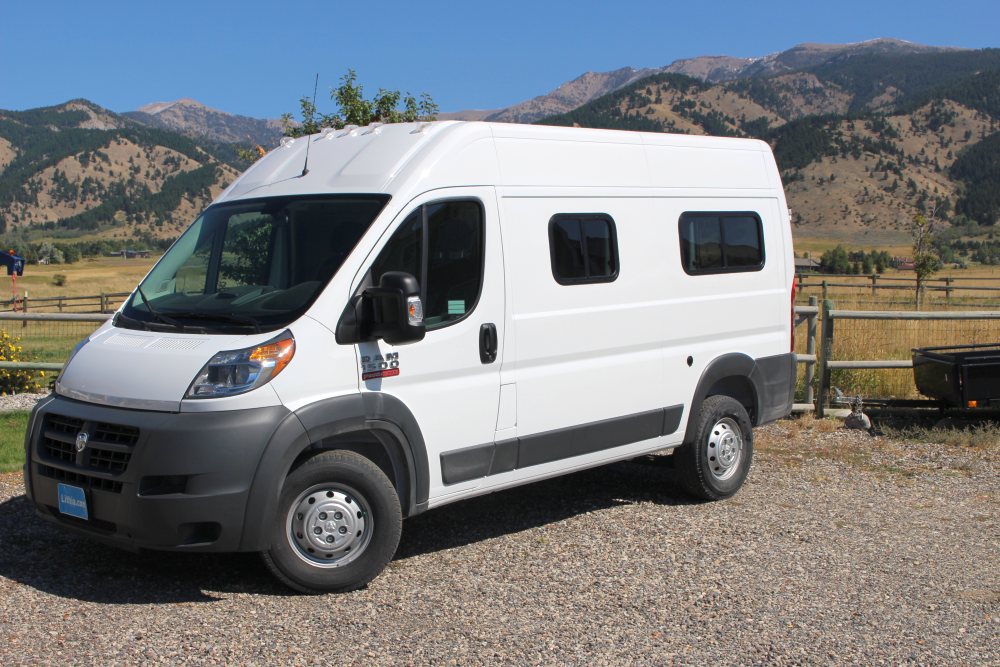
We decided to go with windows on each side of the van toward the back in the beds/dinette area, plus a third window in the galley area behind the driver seat. We might eventually add a window in the sliding door, but want to try a trip or two to see if the added window in the door would be a plus or minus.
This section goes over the selection and install of the windows.

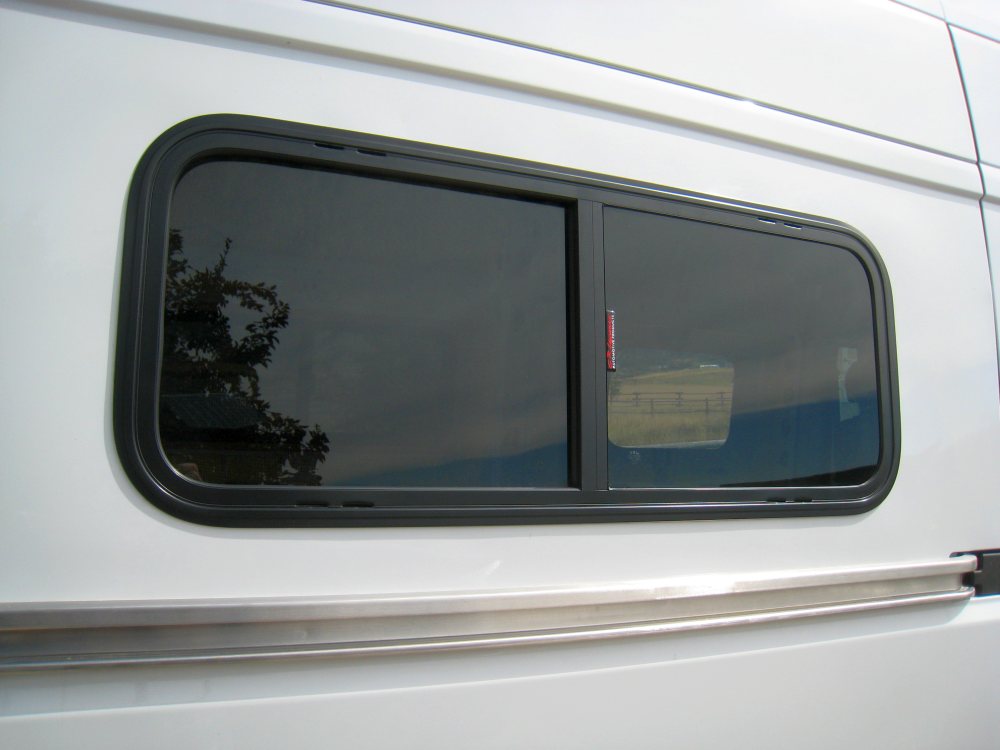
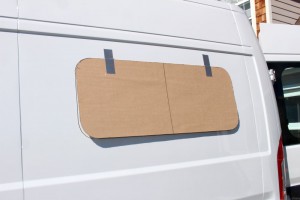
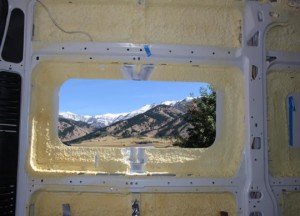
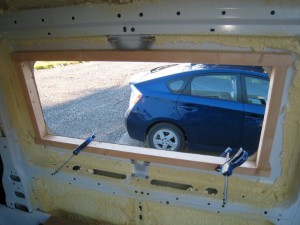
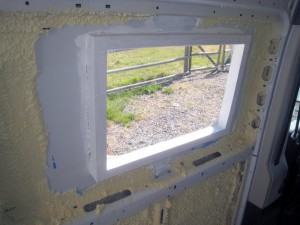
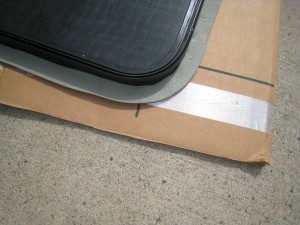
The new windows on the driver side.
Go back to the main camper van conversion page…
Choosing the Windows to Use
Our main requirements were:
- Big enough for a descent view
- Opening for ventilation
- Tinted to reduce heat gain and glare
- With screens
On our first go at adding windows, we did two windows on the side near the back (over the bed area), and a smaller window over the galley on the drivers side. In the 2nd go, we added a window in the sliding door. We should have done the window in the sliding door right away as it eliminates a serious blind spot that the van has at some kinds of intersections. In my view, the window in the sliding door is a safety must.
There are a limited number of windows (so far) made specifically for the ProMaster — these are typically curved to match the van side panels exactly and tend to have the same frameless look as the original ProMaster windows. Some examples of the custom PM windows from CR Laurence… For our purposes, these tended to be not the sizes we wanted and are pretty pricey.
KeepOnVanning at the ProMaster Forum found that you can use a non-curved (flat) window on the ProMaster, and the results are good. This greatly expands the possibilities in available. There are RV and trailer replacement and custom windows as well as flat windows made for vans. Ebay and several companies offer quite a large selection of these RV windows. Motion Windows is an example of one company that will make windows to the exact size you want.
The curvature of the side panels is small and flattening this out with a flat window frame does not result in any significant effects — picture show curvature:

In the end, we selected these non-contoured (flat) windows from CR Lawrence… The two back windows are the 41 by 17 inch and the galley window is the 25 by 17 inch. We ordered them through DK Hardware from about $180 each.
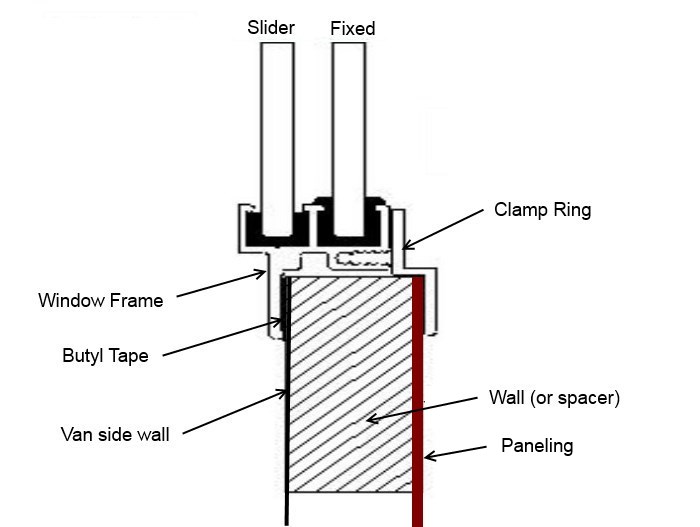
These windows use a clamp ring on the inside to hold the window in place so there are no external screws.
How the Clamp Ring Windows Work
The sketch below shows how the windows that used a clamp ring to hold the window in place work.
The Window frame goes into the opening you cut in the van wall from the outside. The clamp ring goes on the inside and screws to the frame. The clamp ring screws are tightened to pull the window frame tightly against the van sheet metal.
The the clamp ring is supported by and pushes against the wall (or spacer), and the clamp ring depth has to be matched to the wall (spacer) thickness. Our wall thickness will end up being a bit over 2 inches, so we chose the 2 1/4 inch clamp ring as it was closest to our planned wall thickness.
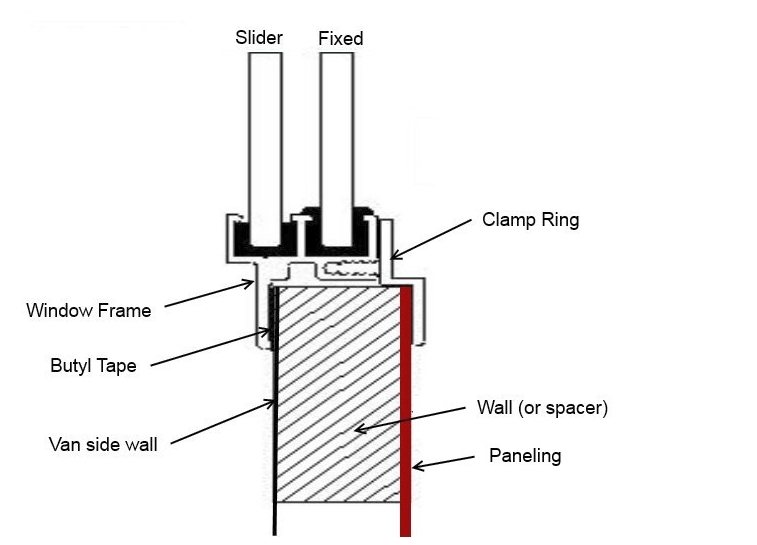
Thanks to Motion Windows for the diagram.
Butyl glazing tape is used between the Window Frame and the van side wall to weather seal the window frame to the van.
The clamp ring design allows the window to be mounted to the van without any screws being visible from the outside.
Installing the Windows
Please read this before you start…
The steps in installing the window are:
- Make a template for cutting the window opening in the van sidewalls.
- Align the template on the side of the van and mark the cutout.
- Remove the van wall stiffeners from the window area.
- Cut out the hole for the window.
- Make the clamp ring support frame.
- Glue the clamp ring support frame to the inside of window opening
- Apply Butyl tape to the window frame
- Place the window in opening and clamp in place using the window clamp ring.
These are covered in excruciating detail below.
The CR Lawrence windows come with no instructions at all, and they have very little on their site in the way of instruction. So, the technique below is puzzled out from some of the other companies (eg Motion Windows) and the experiences posted on the ProMaster and Sprinter forums. Not sure this is the best way, but it does work.
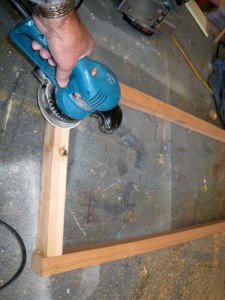
Making the Cutout Template
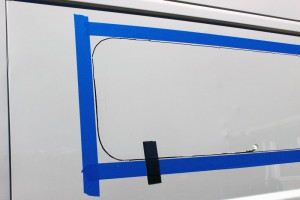
I made the template for cutting the holes in the van by laying the window frame (without clampring) down on the template material and tracing around the outer edge of the frame. Then I offset the lines inward by the width of the flange on the window frame. The window opening should be a bit larger than the frame — I aimed for a gap of a bit less than 1/8 inch all the way around.
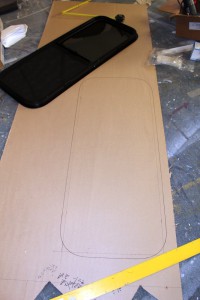
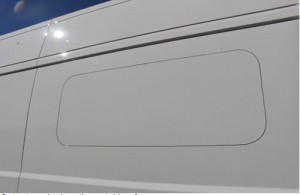
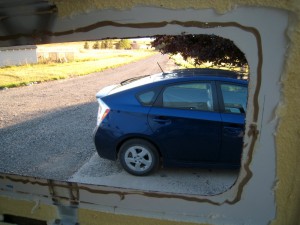
Mark the Window Cutout
You can tape the cutout template up to the wall on the inside and move it around until you think its in the right place. Consider where you will be sitting or laying when you want a view out the window and also any cabinets that you might have to work around. The PM has vertical metal stiffeners that are right in the middle of the largest panels that you might want to put a window in — it is OK to just remove these stiffeners (see below). I would not cut the main vertical frame that is in line with the back of the sliding door opening, or any of the main horizontal longerons.
Once you get the template in position, drill a small hole through the van sidewall at the center top of the template. This allows you to position the template precisely on the outside of the van where the cutting is done from.
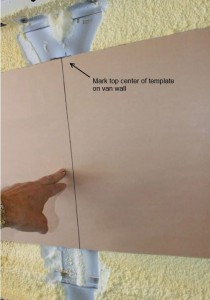
Using the hole you drilled, position and tape the template to the outside of the van. Align the top center of the template with the hole, and make sure that the template is parallel to the horizontal crease in the van sidewall just above the window area (don’t use a level to do this as the van may be on a slope).
This is a good time to triple check everything — BEFORE you cut the big hole.
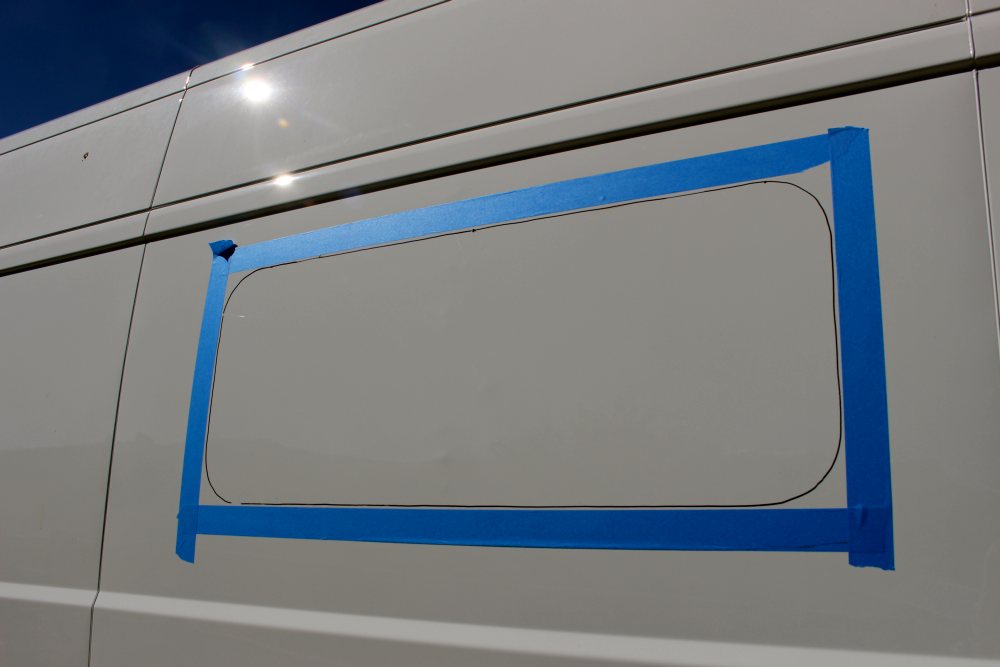
Apply masking tape around the cutout lines to protect the sheet metal from scratches from the Sabre saw.
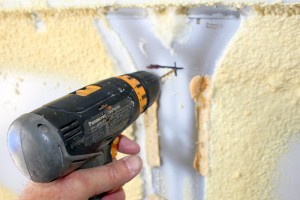
Remove the Wall Stiffeners
The PM has some light weight vertical stiffeners that will likely be right where you want to place your window. I believe that it is OK to remove these, and I took out three of t
hem to install my windows.
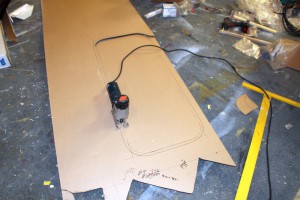
Cut the Window Opening
This is the moment of truth, so make sure to go back and double check all of your measurements before you start cutting.
An electric sabre saw with a fine metal cutting blade works well for cutting the holes.
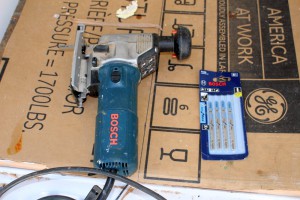
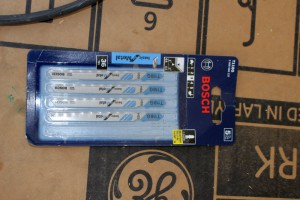
These blades do a great job — the cutting is easy and vibration free.
I also tried a air powered metal nibbler, but I think the Sabre saw is just as fast and easier to get a good accurate cut.
Before you start the cut, set up something inside to catch the metal filings that the cutting produces.
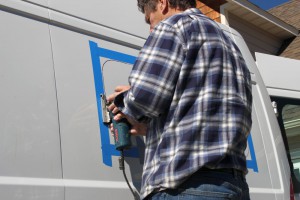
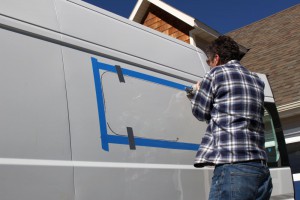
After starting the top of the cutout from each side, I put some duct tape across the cut area to steady the metal and keep it from falling out.When the panel started to vibrate a bit, I put some duct tape across the cut section to steady it.
I was thinking that the cutting out process was going to be difficult and time consuming, but it went quite easily and pretty fast — I think having the right blade and a descent saw makes it pretty easy.
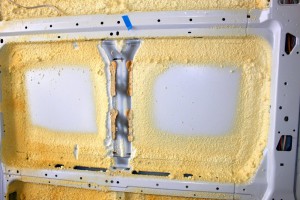
Make the Wall Spacer Frame
The clamp ring that comes with the window pulls the window frame tightly against the van wall and holds it in place. The clamp rings are made for a specific wall thickness — in the case of our windows, they offer clamp rings for 2 1/4 inch walls and 1 1/2 inch walls. Our finished wall will be quite close to 2 1/4 thick, so use selected that clamp ring.
In order to give the clamp ring something to clamp against, it necessary to build a set of spacers around the inside of the window opening that is the same depth as the clamp ring and the finished wall.
If the wall paneling is going to fit under the clamp ring, then the spacer thickness plus the paneling thickness should equal the a bit more than the clamp ring depth. I say a bit more than the clamp ring depth because if its a bit less, the clamp ring will stop out against the window frame before the butyl tape has been compressed.
Thanks to Motion Windows for the diagram.
Our spacer frame is 2 inches thick is is made from 2 by 4’s ripped down to 2 inches — so they are 2 inches deep and 1.5 inches wide.
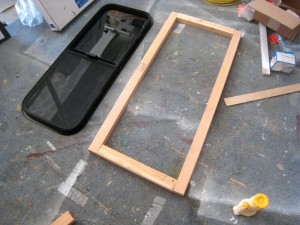
The clamp ring is made for a 2 1/4 inch thick wall. In our case, the 2 1/4 is made up the 2 inch thick inner frame (above) and the 1/4 inch thick wall paneling.
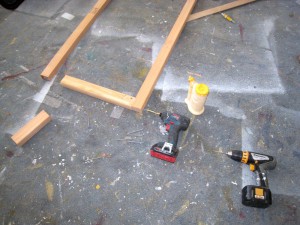
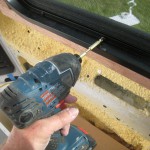
Glue the Spacer Frame to the Van Wall
I used a polyurethane caulk/adhesive from the hardware store
At this point, check the fit of the window frame from the outside and the crimp ring from the inside. I had to use a mini grinder with a very rough sandpaper disk to take down a couple high spots on the spacer frame.
If the van paneling is to fit under the clamp ring, then add spacers the same thickness as the paneling will be to the inside of the spacer frame. When the paneling is added later, the clamp ring is removed, the spacers representing the paneling are removed, the actual paneling is added, and the clamp ring is put back in place.
The picture above shows the paneling spacers stapled in place and a trial fit of the window frame and clamp ring.
Apply Butyl Tape to Window Frame
Butyl tape is used to weather seal the window frame to the van sidewall. Its easy to work with, and (hopefully) provides a good and long lasting seal.
To apply the butyl tape, lay the frame down on something soft with the outside facing down. Then just go around the edge as the pictures show with the butyl tape. Press it down with your fingers as you go. Its easier to go around the corners if you peel the paper tape off before going around the corners.
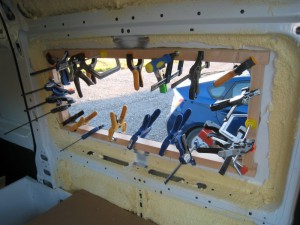
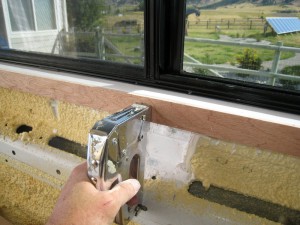
Place Window in Opening and Secure with Clamp Ring
Place the window frame in the opening and center it up. Then push it in hard so that the butyl tape holds the frame in place. The butyl tape has enough stick to hold it in place while you go inside the van to place the crimp ring. A larger window (or cold weather?) might require a 2nd person to hold the window in place from the outside while the clamp ring is screwed in place.
Then go inside the van, and place the clamp ring and start a screw or two on top and a screw or two on the bottom Be careful not to put too much outward force on the window frame as you might push it right out of the opening.
Then start all the clamp ring screws and tighten them up until you have taken all the slack out. Then start tightening each screw a bit more so that it just starts to squeeze the butyl tape out a little. Check outside frequently as you do this to make sure that the frame is being pulled in uniformly. Once you have a little bit of butyl tape squeeze out all the way around you are don.
Clean Up Butyl Tape
There will be excess butyl tape extending beyond the frame. You can remove this with a plastic putty knife.
Be careful not to scratch the paint.
You might have to do this again after a day or so as more of the butyl continues to squeeze out.
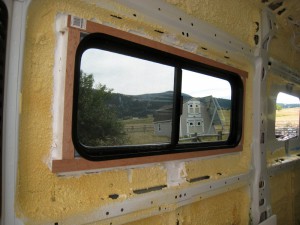
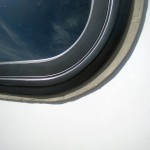
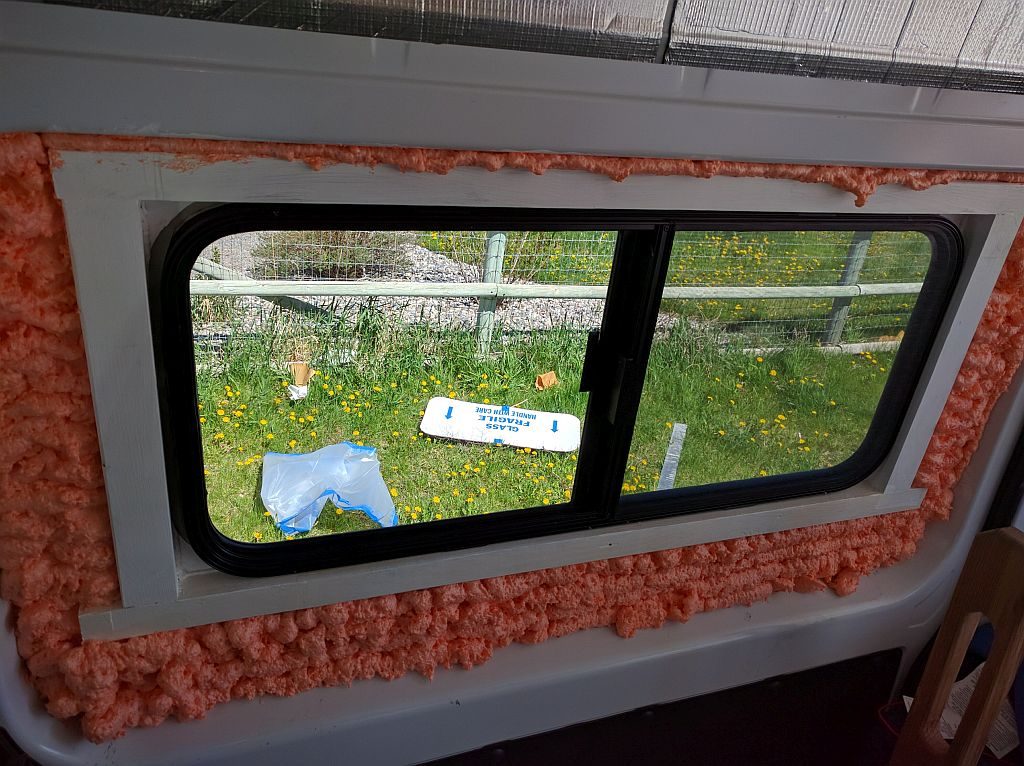
Finished Windows
I’m happy with the finished product.
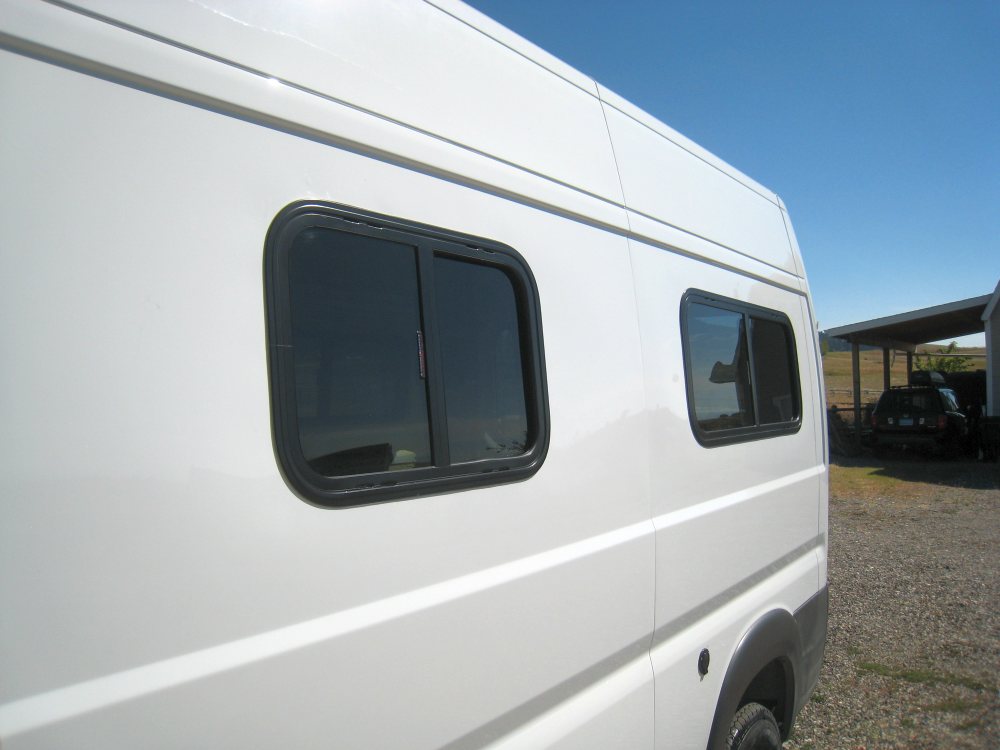
If you get the light just right, you can see the change in curvature that the flat windows cause, but its very subtle and not at all objectionable to me.
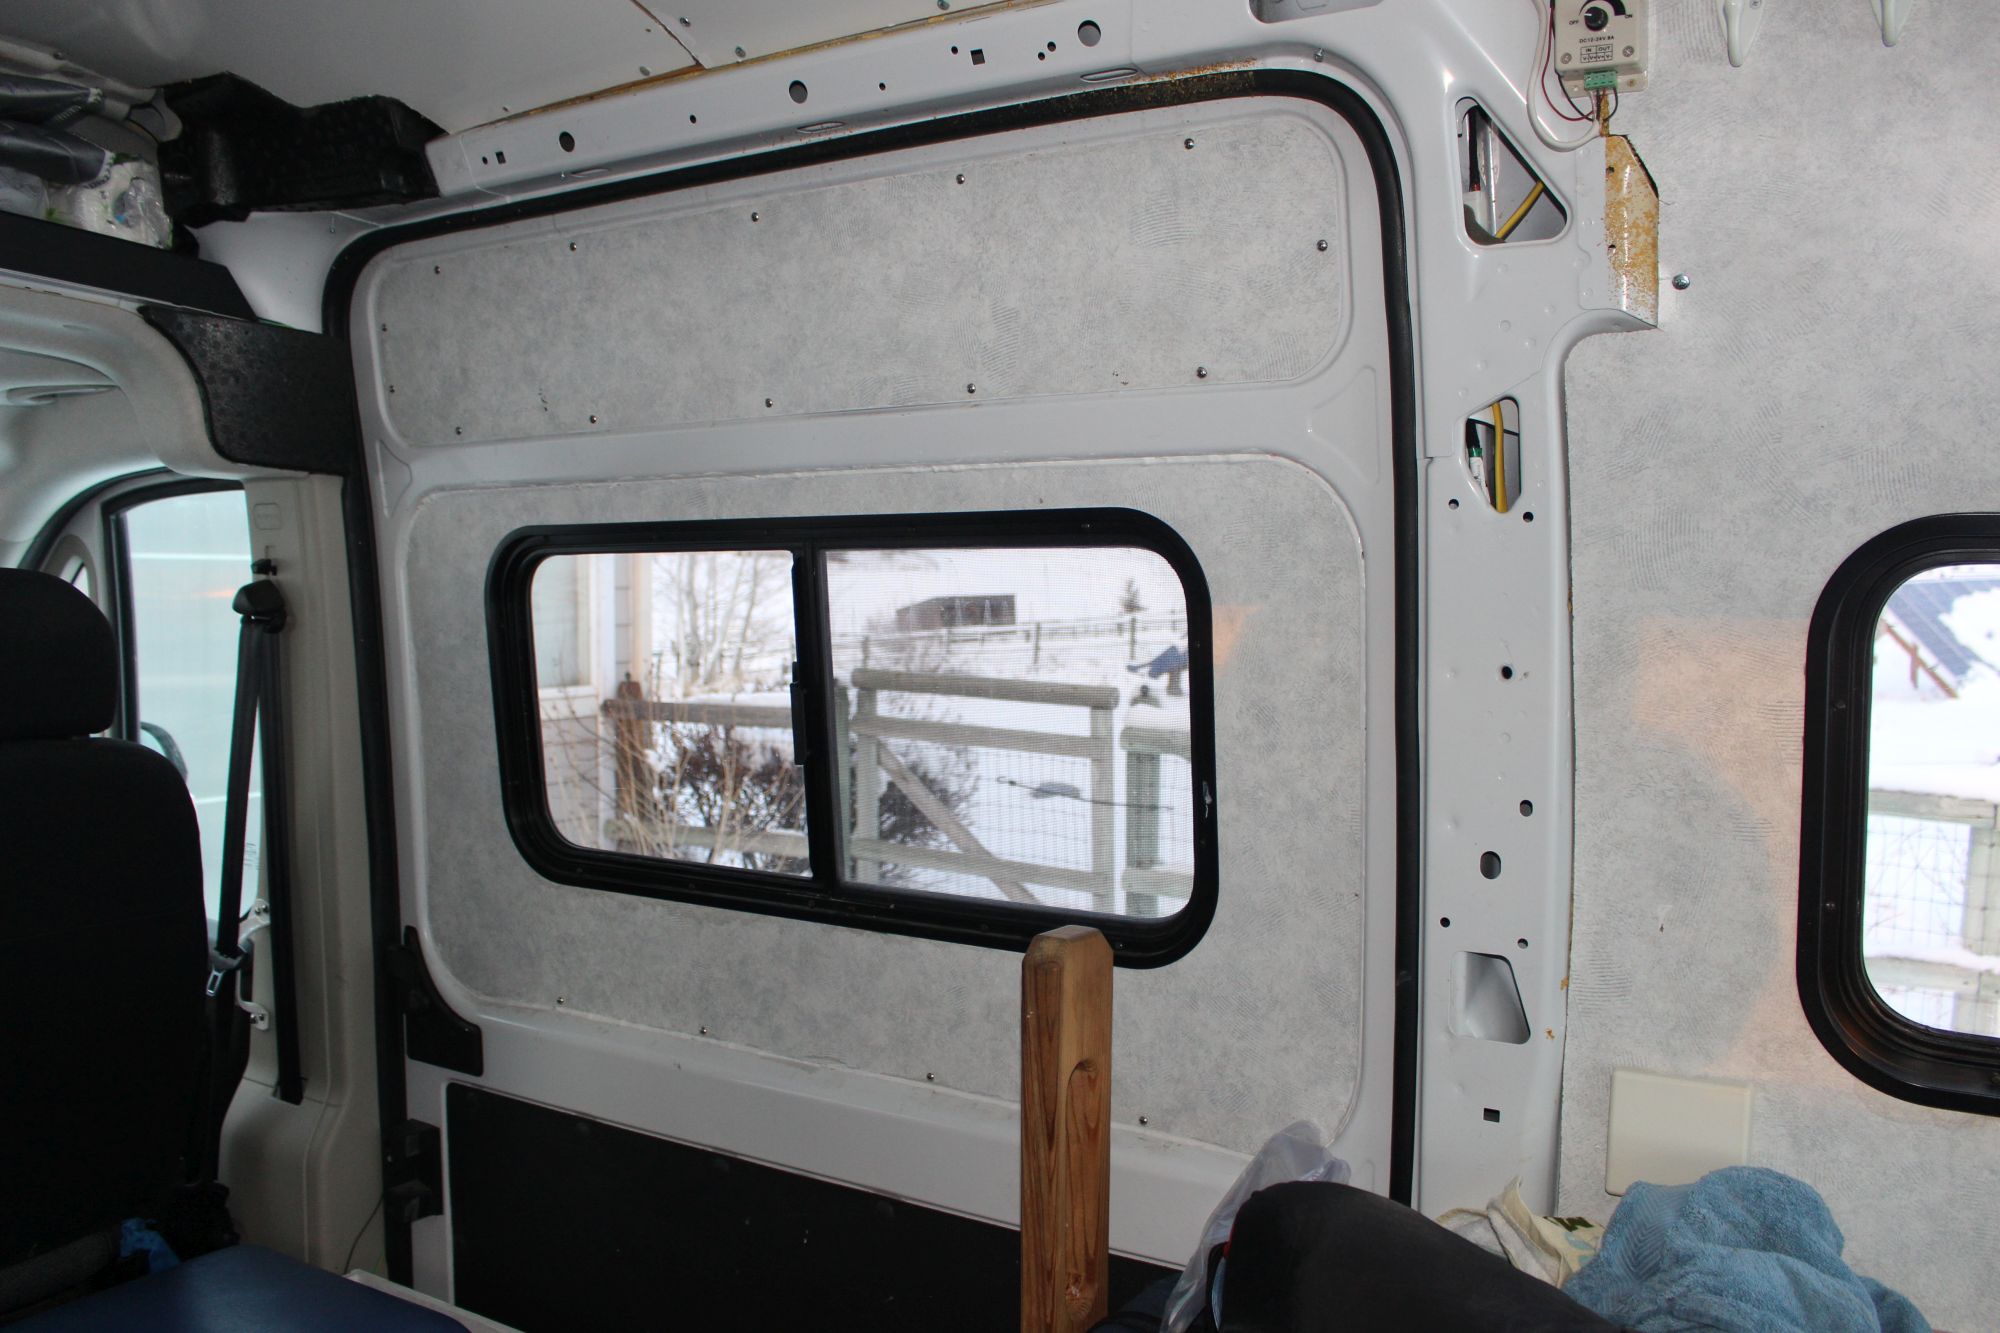
Update – Add Window in Sliding Door
After using the ProMaster on a couple trips it became clear that there was a serious blind spot at certain kinds of intersections and when trying to see to the right and back a bit when backing out. We decided to add a window to the sliding door to eliminate this blind spot. I’d recommend it to anyone doing a conversion.
We used the same kind of CRL windows and installed it pretty much the same way.
The wood frame is painted white, and it is not as thick as the wood frames for the other windows because the slider is not as deep as the van walls.
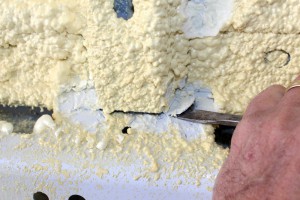
As the pictures show, we also added insulation inside the sliding door and filled the large holes on the inside of the door with wall paneling.
Cost, Weight and Time
Time to do the windows was in the 12 man hour area — spread over 2 1/2 days.
| Item | Cost($) | Weight(lb) |
|---|---|---|
| 3 Windows | 555 | 34 |
| 2 by frame/spacer | 10 | 18 |
| metal removed | 0 | -16 (removed) |
| Caulking etc | 5 | 0 |
| Total | 570 | 36 |
Note costs above do not include the sliding door window, which was added later.
Gary July 2015, June 23 2015
Comments? Questions?
Hello! I just installed a window in my Transit kitchen and this was suuupppppper helpful. I used the foam tape that is sold with my CRL window but the rest of the process was largely the same. I did end up using shears for the support bars so that I could fit the wooden frame in but that is just due to a manufacturing difference between our vans. Must be awesome to know you’re still helping people years later! Thank you so much!!!!
Looks Great!
Gary
Hi Gary,
First off, I love how you present your information in a thorough no nonsense manner.
I am planning on using the same windows in my build(pro master 159). I’m planning on 1 inch insulation on the walls and our bed will be width wise. To maximize cabin width do you think a 1 1/2 “ trim ring will work? In theory it should with 1 inch insulation and 1/4 inch paneling……I’m yet to pick up my van but want to get all my ducks in a row before I begin.
Thanks again,
Cathal
Hi Cathal,
With the bed going across the width of the van, I can see that its important to maximize the width and 1.5 inch trim ring would help. And, the 1 inch insulation with 1/4 inch paneling would be fine in the immediate window area. The challenge would be the thickness of the frames just above, below and fore and aft of the window — these are thicker than 1.5 inches, and even with the 2.25 inch trim ring, I had to push the paneling in with a fair bit of force to get it to fit under the 2.25 inch trim ring — that is, the paneling is dished in a bit around the window.
I think that if your paneling is about as stiff as 1/4 inch plywood, it would be really hard to get it to dish enough to both fit inside the 1.5 inch trim ring and then bend out to fit over the frames near the window. You might be able to use the 1.5 trim ring if you had a piece of paneling right around the window, and then used a spacer to space out to paneling that goes over the frames — this would basically leave a recessed area around the windows for wider sleeping.
If you have some of the paneling on hand, you might try cutting out the piece of paneling that will fit over the window area. Place it over the frames surrounding the window and see if you can push it in enough to fit the 1.5 inch trim ring.
Just for reference, with the 2.25 inch spacer, the width at top of mattress level is 73.5 inches.
If you work out a way to use the 1.5 inch trim ring, please send a picture or three on how it works.
Gary
Gary
Gary,
Thanks for all the info. WHY did you not need the wood frame when you added the window on the sliding door? Is it because the insulation was already in place?
Hi Elise,
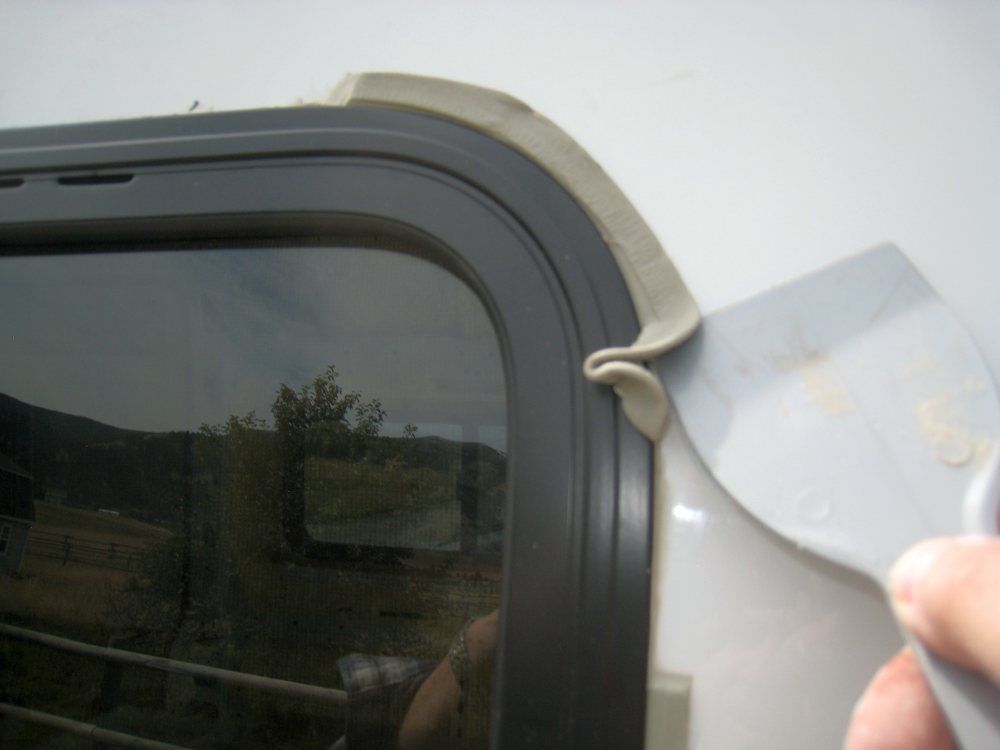
Sorry, did not make that clear. There is a wood frame similar to the other windows, but not as thick because the sliding door is not as thick as the van walls.
I added a picture that shows the wood frame.
Gary
Hi Gary,
First off your site has been invaluable. Thank you! Is there a reason you decided to do the 2 1/4″ vs. the 1 1/2″ mount? Looks like you can also reverse the 2 1/4″ for an 1/8″ skin mount. I’m leaning towards this method right now to avoid having to build up such a big frame. Thoughts on advantages of a skin mount vs. the other mounts?
Hi Owen,
I used the thick frame to line up the inside of the frame with the plane of the inside paneling. You might be able to use a thinner frame, but would have to figure out how to fair it with the inside paneling.
Not sure what you mean by “skin mount”?
Would like to hear what you work out.
Gary
Hi!
I love your site it has been very helpful in installing my own windows. However, I thought I did everything perfect and I am having leaks from what is coming from the upper vent holes? Did you plug those up? My window came with no instructions so any info you have would be very helpful. Thanks!
Hi Owen,
I did put silicone caulk in the unused drain holes. Not sure how much difference that made, but worth a try.
The windows are made so that they can be used on either side of the van, so they end up having unused drain holes.
I’ve noticed on my windows that I have just a little water staining on the paneling above and below the windows. I think this is due to condensation on the window frames (not leaking) — I may take the paneling out and see if I can get the insulation right up to the window frame itself to reduce condensation.
Gary
Awsome information here. Thanks for all this. One question: Do you know if I want to install windows that open, can I buy a 2018 (new) Promaster that already has the factory windows in the right side sliding doot and the rear doors. Can I replace these (non-opening) factory windows with windows that open or should I try to find a van that has no factory windows?
I just bought a Promaster and I’m starting the windows now. I found out when I backed out of the space at the dealership that there is absolutely no visibility on the sliding door side so I’m putting that one in first, but you say you didn’t need to put a frame around that one. Why is that side different?
I’m ordering this window https://tinyurl.com/yc6bajm3
Hi Chris,
The way I put the inside wall panels in results in a thinner wall for the sliding door than for the other windows.
You can look at the page on how I did the wall paneling to see if you want to do the same thing: https://www.buildagreenrv.com/our-conversion/our-conversion-paneling/
If you install your inside wall paneling in a different way than I did, than the depth of your window frame will be different as well.
Very much agree that adding the window in the sliding door is very important.
Gary
Hi Gary, Thanks for your initial response I’ll try not to be too needy. What did we do before the internet ??
How does the straight window handle the curvature of the van? Does it reshape the metal or is there a larger gap at top and/or bottom of window?
I’m just beginning a new build. Very nervous about cutting a hole in my new van !!
Hi Jim,
For the ProMaster, the curvature of the van skin where the windows go is very shallow. You can see it in the picture above with the 2 by 2 held up against the van skin.
I think that he window frame pulls the van skin flat instead of the other way around, but there may be a little of both.
On our white van, I do not notice any van skin deformation unless the lighting is just rite — even then, its very minor and not objectionable to me. I think that it may show a little more with other colors?
They do make windows that are curved to fit the PM exactly, but kind of pricey. I believe that CRL and Motion Window make such curved windows.
Know what you mean about the Internet — hard to imagine how we got along without it — I think there were books made from paper?
Gary
It look like the post i’m reading is a couple years old. How are the windows working in 2018?
Hi Jim,
Its been about 3 years and the windows are doing fine.
The van now has 51K miles on it — no problems with the windows (or much of anything else)
Gary
Well I have my first CRL window in – grayish brown van – and I see all kinds of dips and ripples and what not around the window on the van skin. Did I screw up? Possible it’s easier to see on a dark van? I’ve got the clamp ring screwed tight and the butyl tape protruding around all the edges. I think it will be waterproof but not very attractive!
I suppose some of the ripples are from when I clamped the spacer – probably should have used some thin board to distribute the points of contact on the outside. Oh well!
Hi Luca,
I have to look pretty hard and have just the right lighting to see any distortion on mine, but, as you say, your color show more.
If you can send a picture in, I could tell you if it looks more wrinkled than mine.
https://www.buildagreenrv.com/contact-gary/
Gary
Hi Gary,
Were your CRL windows like mine with a minimum of holes drilled for the clamp ring and just a few screws already in – I guess for shipping? Did you just drill the additional holes in the window frame to match up to those in the clamp ring?
BTW, I am thinking of a wacky idea – the CRL window just as yours for front driver side and one of the new Tern Overland awning style for the rear area – same side = would that be just a bit too bizarre? I had already bought the CRL (2) before I stumbled on the Tern. I like the idea of one window able to be open during a rain storm.
Luca
Hi Luca,
As far as I can remember, the holes were all predrilled in both the clamp ring and window frame. But, I don’t see any problem with carefully drilling more holes through the two.
The Tern windows and the CRL windows have frames that look pretty similar from the outside. I think it would probably work OK to mix them.
Agree that it would be nice to have both the awning style and the integrated shade that the Tern offers.
Gary
Hi Gary!
Thanks for all your insight as well as trials and tribulations in regards to your PM build. I am at the window purchasing phase and I really like your idea of the C.R. Laurence Non Contoured windows. How are they holding up? If you were to do it all over again would you do anything different or use different windows? Any leaks? I live in the Northwest and rain is a constant factor. After reading the comments from a prior post I want to be sure I am purchasing the right windows the first time before cutting holes in my NEW PM. Any further insight would be greatly appriciated.
Cheers!
Hi Todd,
The windows are doing fine — no problems so far.
We get about half as much rain as Seattle (where used to live), so probably not the best place to evaluate the windows for leaks, but we have not had any leaks.
If I were doing it all over again, I’d probably take a closer look at the CRL windows that are made for the PM — the “all glass” look windows. I like the look of them a little better, but you sure pay for the look both in initial price and in shipping (truck vs UPS). I think I’d probably still go for the ones I used — they look nice and function well.
Gary
Hi! What are your thoughts about installing a 41×17 window in a Sprinter van?
Hi Bianca,
The 41 by 17 we installed is a flat (non-contoured) window which fits fine on the PM because the sides on the PM are pretty flat.
I’m not sure about the curvature of the Sprinter van walls where the windows go — it may be too curved to use a flat window.
CRL and (I think) Motion Windows (maybe others) make windows that are curved to fit the Sprinter — so, that would be one option — probably a bit pricey.
I’d ask on the Sprinter forum what kind of windows people have been using and whether a flat window would work.
Gary
Thank you Gary! Yes, that’s my concern, the walls are maybe too curved for this window. I better stick with the horse trailer windows as they are only 15-1/4″ high.
Hi,
Maybe you already know that a 15 inch will be OK?
But, if not I guess I’d still check with the Sprinter forum to make sure people have been able to use flat 15 inch windows OK.
Gary
Hi Gary! I just wanted to let you know that I ended up installing the 41×17 (VW8409) in my Sprinter van. I didn’t like the horse trailer window I had first ordered and decided to take the risk and it worked out fine.
Good to know that the flat window works on the Sprinter.
Gary
Did you get the 1.5 trim ring or the 2.25? on your windows?
I used the 2.25 inch clamp ring.
Gary
Good work!!
Hey can you put a slider window on the sliding door, or does it need to be fixed ?
thanks for all you do, Micah
Hi Micah,
I put a sliding CRL window in the sliding door just before our last trip — works fine.
The window in the slider is a big help for driving visibility in some cases when backing out of a space or coming into another road at an angle.
Gary
Hello Gary,
I bought one of these CRL slider windows and was hoping to install it this weekend. However, today when I took it out of the box and inspected it, I noticed that the locking mechanism is not really functional. The plastic handle seems very cheap/flimsy and with a bit of force you can easily pop it over the little edge that is supposed to lock it in the closed position. I have to admit, this is a bit concerning as it seems that the window could be opened from outside once it is installed with relatively little effort.
I was wondering if you had similar observations on the windows you installed, and if so, is there anything you would recommend as a back-up lock? For instance, I considered the potential for something like this (https://www.amazon.com/dp/B00K7IGKV8/_encoding=UTF8?coliid=I3E1VNNMLLJ44N&colid=2548Q15IKSBP9), but I’m not sure it would be compatible with this style of window. I’m happy with the product otherwise and am hoping to keep the build progress moving along steadily, but don’t want to overlook a safety issue.
Thanks in advance for your input and all the great information you’ve made available to us through this blog!
Cheers,
HD
Hi HD,
I had not even noticed that the catches were plastic, but I’ve played around with a couple of my windows and they seem pretty secure to me.
You have to give the sliding pane a good push into the closed position to get the plastic catch to fully engage the stop, but once in the fully locked position, it seems pretty secure to me. Its also kind of hard to get enough of a grip on the outside sliding pane to exert a lot of force on the latch. I guess a bad guy could used something like one of those suction cup window handles, but I’d just they would just break the window pane before going to that much trouble. I think it would be hard to break the plastic even with one of the suction cup handles.
I guess one thing is that I don’t think we have been pushing our windows hard enough into the closed position to have the plastic latch actually get fully engaged with the slot — will have to be more careful about that.
Gary
Hey Gary,
Hopefully my last question on windows!
installed a 41″ slider, leaked pretty decently during a rainstorm. Noticed the screws that hold the center support beam on the window itself are not sealed, and it’s sealed with a black sealant on my other window that I have yet to install.
Do you recall whether your screws were sealed? They are silver in color.
I noticed water gets in through the small cracks in the center support, and I imagine it made it’s way through the screw hole that wasn’t water tight. I have since tried sealing around the screw (though I couldn’t pull the window out from the butyl tape being to sticky.) And I also sealed the center support cracks from the outside.
This is turning out to be a disappointing window install for sure!
Any tips for removing the window after it’s been taped with the butyl as well? I tried warming it up and gave my full effort.
Have you experienced any sources for leaking other than the perimeter?
Once again thanks so much.
Hi Mike,
Was not able to see the screws to see if they were sealed, and I don’t remember from the install.
I’ve not really had any leakage problems, but we just don’t get a lot of rain here and where we have used the RV. Based on what you say, I’m going to see if I can do anymore sealing.
The Butyl tape is hard to separated — guess that’s it works well 🙂
When I’ve had to remove something that is Butyl taped on, I get a thin putty knife and push it in through the Butyl tape one putty knife blade width at a time. Takes a long time, but does not damage anything.
Please keep us posted on how the window performs with the sealing.
Have to agree that CR Lawrence windos option is not that greatest, but not a lot of options that I know of. Although the Motion Windows look pretty nice.
Gary
Hey Gary,
I did a rear window install exactly as you laid out here. Looks pretty good just had a few questions:
1. With the 1/4″ spacer, does your clamp ring bottom out on the window at all? I cut my frame to 2 1/8″ and didn’t use a spacer, it bottoms out but there’s hardly any gap outside.
2. The butyl tape I used didn’t manage to squeeze out everywhere. I think it was too thin in spots from squishing or stretching. I guess I could have doubled up? I was thinking of running a bead of construction sealant around the perimeter just to be sure, decent solution as reassurance? I also sealed the top weeping holes.
3. I noticed (even uninstalled) the slider is a bit sticky on the cr Laurence windows. (Also from dk hardware), you experience anything similar? Is there a good lubricant for the rails that won’t collect dirt?
Thanks so much!
Mike
Hi Mike,
I don’t remember the ring bottoming out anywhere — not sure how close it got.
I got a pretty uniform squeeze out of the butyl around the whole window. I think that all you need is just a bit of squeeze out to show that there is good contact betwen window frame, van skin, and butyl.
The butyl stays flexible for a long time, so if want to be sure you got good contact all around you could put a spacer under the inner ring in those areas where you got no squeeze and see if you can then get a little squeeze out on the butyl. Something as simple as a penny tucked under the inner ring might work. If you decide that a little more thickness is needed, you could add a thin spacer to the inside of the wood frame.
I think a little sealant around the periphery would be fine. I think I’d wait for a while before doing it to give the butyl time to do all the squeezing out it is going to do, otherwise the butyl might push the sealant out. I’m not familiar with construction sealant, so don’t know if its the best for this. I think silicone caulk would work fine– the Dicor stuff might also work well.
The sliders on my windows could operate a little more soothly, and I think some kind of lubricant would be good. I have some Teflon spray I might try for this.
Please let me know if find something that works well.
Gary
Hey Gary,
Did you just use the paint for the wooden frame to touch up the raw metal edge where you cut?
Thanks!
Hi Mike,
I can’t remember for sure, but I probably use some of the Rustoleum rust primer to paint the edge of the cut metal. I usually use the Rustoleum for bare metal.
Gary
Hi!
First off, GREAT BLOG!
You’ve shared so much great info and I’m getting super psyched to begin my conversion.
2014 Promaster High.
Question:
Would you recommend beginning with spray foam insulation. I have not yet completed my designs, but I assume that I’ll want to insulate everywhere anyhow.
Can I cut through the foam as necessary? I’m thinking I’ll put a vent/skylight, a drain for a sink and simple wiring for solar, cabin lighting and fridge.
Thanks!
Hi,
Really glad to hear the info on the site has been helpful.
I insulated pretty much as the first step. Its not hard to cut the foam out for things like the roof vent/fan.
I did leave some areas open where I planned to run wires (eg inside the main pillars). So, probably worthwhile to work out where you plan to run the wires and either leave them free of spray foam, or run the wires first.
If you wait until more stuff is in before insulating, it makes the masking for the insulation more difficult. And, if you use the spray foam, the masking is important and time consuming.
One thing that I mentioned on the insulation page is that if I were doing it again I’d probably go with the rigid polyiso sheets gluing them in place with Great Stuff foam. I think that it does just as good a job as the spray foam and is cheaper and takes away some of the stress that is involved in using the spray foam. But, I’ve only read about the experiences of others with this method and have no direct experience. A description of the polyiso sheet method on this page:
https://www.buildagreenrv.com/design-and-build-information-for-camper-vans/install-insulation/
See the section on “Rigid Foam Panel Insulation”.
Gary
Hi Gary,
Great sight! I’ve been studying for months and now ready to start my build. What do you suggest when using the CRL windows that are set at the high or low extremes on the panel? Going with Luan ply from beam to beam creates the need for about a 3″ clamp ring or something else?? How can I make this work?
Hi Greg,
I used a wood spacer frame to fill the gap between the window and the wall paneling. This has been fine. If the window is positioned so it needs a deeper spacer that I used, maybe try to get a deeper clamp ring, or allow a gap between the clamp ring and the window (which would require longer clamp ring screws).
I guess another possibility would be to build a spacer as deep as it needs to be to match the paneling, and then rout out a rabit on the inside edge of the spacer that drops the spacer thickness down to a value that matches the clamp ring?
There are some pictures on this page: https://www.buildagreenrv.com/our-conversion/promaster-diy-camper-van-conversion-adding-windows/
Greg,
Did you have any tips for installation with the 3″ depth? I was planning on the paneling to go from the support beams as well and was curious of how you address the clamp ring issue.
vr,
Manda
Hi Gary!
I went with Bed-It Butyl Tape…..it’s supposed to be the best!
I regards to you prying off the wall supports to put in the windows, I have the 159 wheel base, should I reattach them? It looks like I have plenty of room.
Thanks
Hi Lance — Sounds like a good find on the Buytl Tape.
I guess if you can leave the braces in or replace them its probably a good idea. Most people seem believe that they are in there just to keep those big sheet meetal panels from bowing or deforming, and don’t serve any structural purpose, but it can’t hurt to have them in place.
Gary
Hi!
I just purchased the same exact windows for my 2015 Promaster 159 High Roof Gas van…..What diameter and type of Butyl tape did you use for the seal? Would 3M VHB double sided adhesive work? Thanks in advance!!
Hi Lance,
The Butyl tape I used is about 1/8 inch thick by about 3/4 inch wide. It worked well. You get some squeeze out and this can be taken off with a plastic putty knife. I think that I bought the tape on Amazon.
Not sure about the VHB. It certainly has the adhesive power — it would actually probably be difficult to get the window off if you ever wanted to do that, and your initial placement of the window on the VHB would have to be spot on.
Not sure how well it does in weather resistance?
I’d try the 3M site — they have pretty good tech support.
Maybe you can tell us what they say.
Gary