This page covers some testing of the insulation types commonly used to insulate van conversions. It seems like there are so many claims and opinions on the best type of insulation to use in van conversions, that some actual data might be helpful to people trying to decide (the other factor is that I’m Covid bored and really needed a project to work on).
This is a follow on to the first test… the main changes from the first test were: 1) Added Aercel insulation, 2) did multiple humidity levels, and 3) ran the test for two full days to see if moisture retained in insulation increased.
Van Moisture Situation
Some thoughts on the moisture situation in camper vans…
People generate moisture through breathing and perspiration — from about 40 grams per hour sleeping up to 90 grams per hour doing light work. So, two people might add 3000 grams of water to the van in a full day/night. A dog would add some more. Cooking or even making coffee or tea contributes moisture, this can be up to 3000 grams per day, but likely less in most van settings. Other sources include showers (if so equipped) and drying out wet cloths. Non-vented propane heaters also add moisture if used.
So, how much moisture does it take to get the van relative humidity up to (say) 70%? Only about 240 grams. That is, 240 grams of water evaporated into a typical van interior at 70F will raise the relative humidity to 70%.
How do you control the humidity in the van?
Vans have a metal outer skin that is a near perfect vapor barrier, so none of the moisture gets out via that route. The only real way to control humidity other than a dehumidifier is to warm the van air so that the air can absorb moisture and then provide ventilation via windows and/or fans to get rid of the moisture laden air, and bring in dryer air from outside.
So, it seems like with people etc. generating several thousand grams of moisture per day and it only taking 240 grams of water weight to get the van up to 70% humidity, that: 1) there needs to be good ventilation in the van to get rid of the excess water, and 2) that even with good ventilation there are likely to be extended periods when the relative humidity in the van will be high.
In this test, all four insulation samples are tested at 50%, 60% and 70% relative humidity. And the 60% and 70% tests are run for two full days.
This makes the van a challenging environment for moisture management, and condensation control.
When will condensation occur?
Condensation occurs when the moist air in the van gets cooled below its dew point temperature — this normally happens when the air contacts a cool window or the van skin, and in the outer (cooler) layers of insulation.
The tables below show the relationship between the van inside temperature, the relative humidity in the van, and the dew point temperature. For example, with the van temp at 70F, and with 60% humidity, the dew point temp is 55F — this means that if the outside temperature drops below 55F, condensation will start to form on windows and on the van skin and in the outer layers of permeable insulation.
The higher the humidity in the van and the lower the outside ambient temperature, the faster condensation will form.
| Temp Inside (F) | RH inside (%) | Dew Point (F) |
| 70 | 90% | 67 |
| 80% | 64 | |
| 70% | 60 | |
| 60% | 55 | |
| 50% | 50 | |
| 40% | 45 | |
| 30% | 37 | |
| 20% | 28 | |
| 10% | 13 |
| Temp inside (F) | RH inside (%) | Dew Point (F) |
| 60 | 90% | 57 |
| 80% | 54 | |
| 70% | 50 | |
| 60% | 46 | |
| 50% | 41 | |
| 40% | 35 | |
| 30% | 29 | |
| 20% | 20 | |
| 10% | 9 |
The greater the difference between the dew point temperature and the outside ambient temperature the faster the condensation will form. For “normal” inside the van temps and humidity, it does not take very low outside temperatures to start getting condensation.
Setup
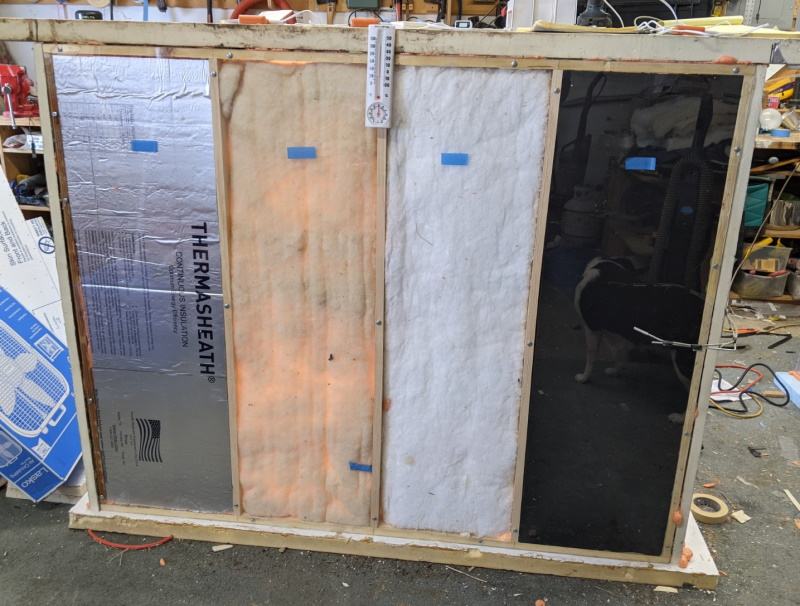
The test setup consists of a box that is about 4ft high by 5 ft wide by 3 ft deep. The front face of the box is glazed with 1/8 inch plexiglass and the rest of box is constructed with rigid insulation board. The Plexiglass is used in place of the van sheet metal so that any condensation can be directly observed. The plexiglass face is divided into four bays, each of which can accommodate an insulation sample. In addition, there is a Plexiglass window on the side of the enclosure so that condensation level on a “window” can be compared to condensation for the insulation samples.
The box has a heater (light bulbs) and a humidifier which are run by a controller so that humidity and temperature inside the box can be controlled. The box is located in my garage/shop and the temperature is roughly regulated by opening doors to cool or turning on the heater if it gets too cold. The entire back of the chamber is easily removable, so that during the daytime drying periods the back can be partially opened to provide more ventilation for drying. I generally tried to aim for temperatures in the 30’sF for the night (wet) part of test and somewhat warmer for the day (drying) part of test.
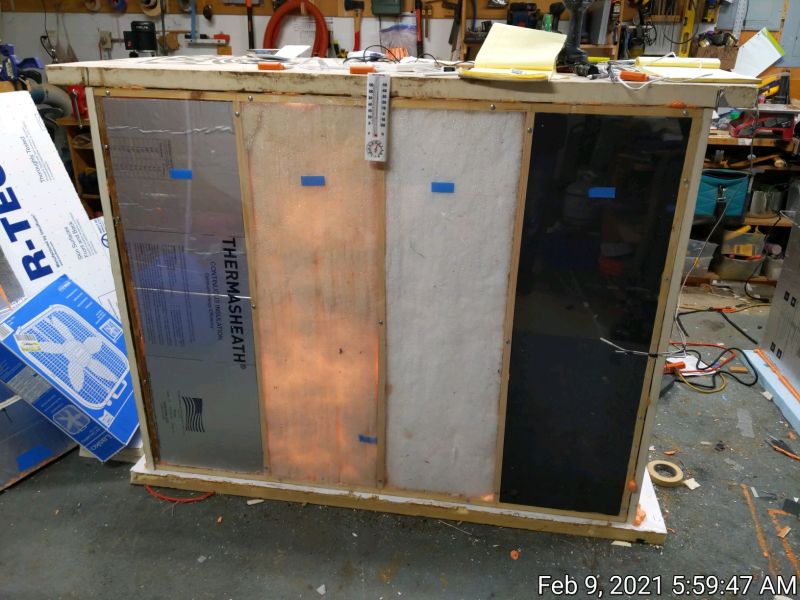
Front view test chamber 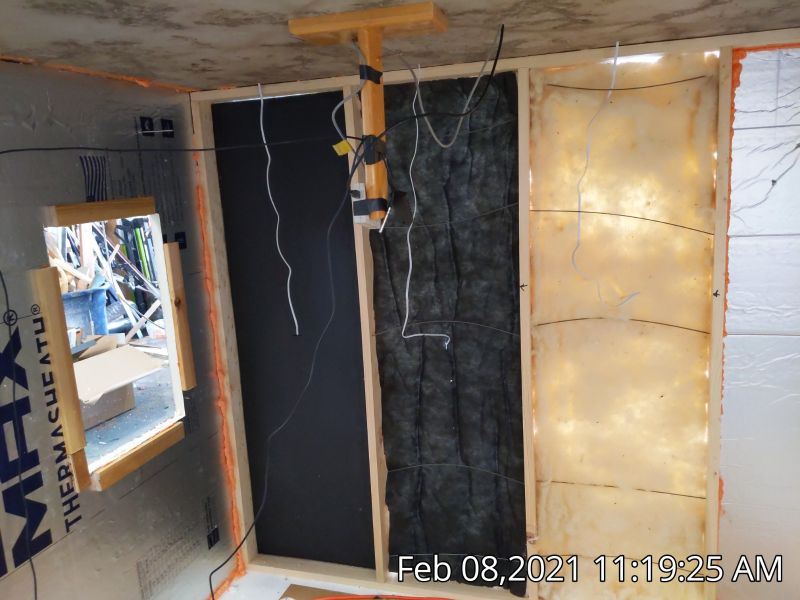
Inside test chamber
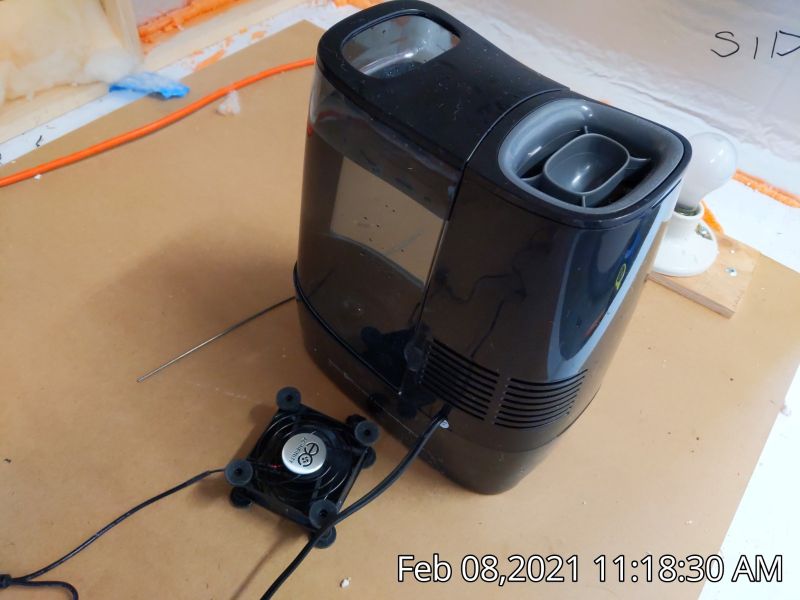
Humidifier 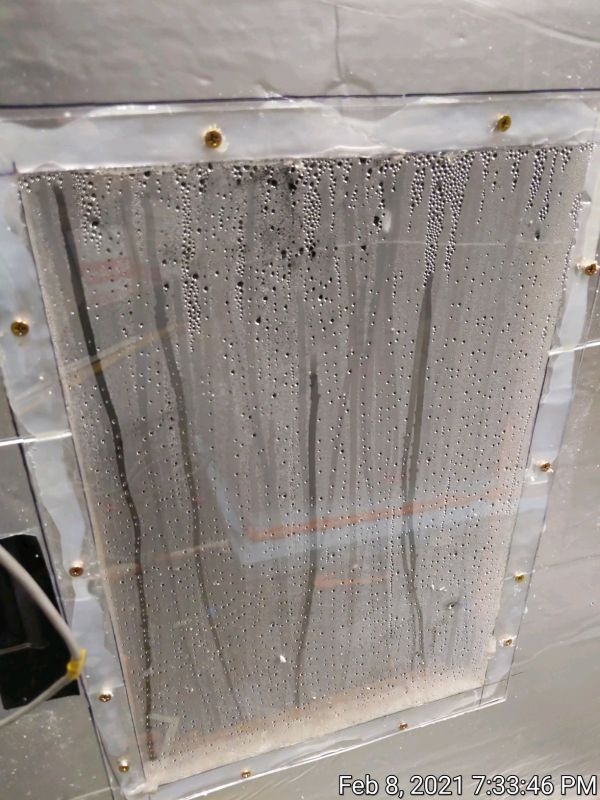
Plexiglass “window”
The Polyiso panel (left) is sealed around the edges with Great Stuff urethane foam to keep water vapor from migrating to Plexiglass side of the panel. The center part of the Polyiso panel is removable so that it can be weighed for moisture pickup during the test.
The AeroCel panel (right) is sealed around the edges with a thin bead of silicone seal to prevent moist air from getting behind it.
The Thinsulate and Wool samples are held in place with spring wire to keep them snug (but not compressed) to the Plexiglass. This allows them to be quickly removed for weighing.
The parameters that are measured and logged during the test are:
- Temperature and relative humidity inside the box
- Temperature and humidity outside the box
- Humidity in the middle of each insulation sample
- Initial and final weights of each insulation sample (to measure moisture accumulation)
- Thermal camera pictures for rough assessment of thermal performance
Generally, a test run starts by weighing each sample and then installing each insulation sample in its own bay. Then two days in the van are simulated. The night periods are 14 hours long during which time, the temperature is kept at 70F and the relative humidity is kept at 50%, 60% or 70% depending on the test. The day periods are 10 hours long and are used to show how well the insulation dries out – during the day periods the chamber is maintained at 70F and the humidifier is turned off and humidity drops down to around 25% and the back of chamber is partially opened for ventilation.
In this test, the Polyiso sample was not weighed in that it showed zero moisture pickup on the previous test.
Insulation sample (left to right):
- Polyiso rigid foam – 1 inch thick
- Havelock Wool – about 2 inches thick
- Thinsulate fiber insulation – about 1 7/8 inch thick
- AeroFlex EPDM foam – 1 ½ inches thick
The Polyiso was cut from an ordinary hardware store 4 by 8 by 1 inch thick sheet. It has alum foil layers on each face. It is a rigid closed cell urethane foam that is used a lot in van insulation. A thin bead of Great Stuff urethane foam in a can was applied around the edges to prevent moist air from getting behind the foam. For this test, the Polyiso sample was not weighed before and after as it showed zero moisture pickup on a previous test.
The Thinsulate SM600L insulation is made by 3M. It is made from a mix of polypropylene and polyester fibers attached to a polypropylene scrim cloth. It has been used a lot in van insulation – many examples on YouTube.
The sample for this test was provided by Hein – Thanks!
The Aerocel AeroFlex may not be familiar to you – it is a closed cell foam made from EPDM. It is non-permeable to water vapor and has a very wide operating temperature range. It is very flexible and easily curved to follow the contours of the van sheet metal. In this case the 1.5 inch thickness was made up of a layer of 1 inch plus a layer of half inch. AeroFlex is not commonly used for van insulation, but it does look very promising – especially for curved areas. See Orton’s van build for one example.
The sample for this test was provided by Orton on the Transit Van Forum – Thanks!
The HaveLock wool sample is actual sheep’s wool from New Zealand that has been cleaned and then formed into batts. It has a nominal thickness of 2 inches. It is an all “natural” product, but is treated with boric acid for insect resistance. There are several YouTube videos too show how it is used as van insulation.
The sample for this test was provided by HarryN from the ProMaster and Transit Forums – Thanks!
From the Havelock website…
“Wool is entirely renewable and sustainable in its creation. Sheep eat grass that is fueled by rainfall. We use 60 year old repurposed carding machines that run on VFD motors. There are no glues or bonding agents in our process, therefore no high-heat, as our batts are needle punched.
Wool inherently manages moisture against 65% rh and the amino acids in wool will irreversibly bond with formaldehyde, NOx and SO2. So, rather than off gas unknown chemicals wool offers passive air filtration. Finally, should you ever repurpose the structure you can either reuse wool or compost it. There is no other form of insulation you can buy that offers these (inherent) characteristics. So you know, we add 8% boric acid as an insect repellent. It is natural, non-toxic and comes from the earth. There is nothing else in our products as we’ve nothing to hide in our process.”
This is among many claims that Havelock makes, all with no test data to support the claims.
What you have to report:
Condensation results for the 50, 60 and 70% test – side by side pictures
Weight pickup for the 50, 60, 70% tests – side by side (single table) – should discuss dry out time for each insulation.
Thermal performance from IR pics – Maybe two sets of pictures – one showing dry performance, 2nd showing worst case condensation performance.
The relationship between van temp, van humidity, dew point and rate of condensation.
Fromat
Condensation:
Show cond pics at end of 50, 60, 70 — 4 pics each in std format (maybe show plex as well)
Weights:
Have one table that shows all the weights for 50, 60, 70 for: start full dry, end first wet, end dry, end 2nd wet, end 2nd dry
Thermal:
Show a typical dry photo of all 4 samples – list rect avg temp.
Show a most wet photo of all 4 samples – list rect avg temps.
Results – Condensation
Insulation Characteristics
I had a chance to work with all of these insulation samples during the test, and also watched a number of YouTube videos and other descriptions of people installing insulation in their vans. So, here is a quick summary of the characteristics of each insulation. Some of this is just my personal opinion.
Wool
The wool sample I used was from Havelock wool. I think they are the most commonly used brand of wool for vans, and they do market their wool for use as van insulation.
It is real sheep’s wool from New Zealand. It is cleaned and treated with boric acid to discourage insects. Havelock promotes it as an all natural insulation for vans. They also make many claims for it it, such as automatic moisture management, that it absorbs some undesirable gases, that it does not out gas bad stuff, that is mold proof, that it is fire resistant. They offer no test results to support any of the claims, so, I’d be a bit skeptical. But, if you are looking for an all natural material, this is it.
Thermal:
The wool batts are nominally 2 inches thick and have a claimed R value of 3.6 per inch, so a 2 inch batt would be R 7.2. Many people double up the batts, which should give R14.2. The test results would say that the actual R values are somewhat lower.
The batt samples that I got were a bit irregular in thickness with some thin spots — you can see this in the pictures when there is light behind the batts, and also on the IR pictures. This might be a good reason to try to use two thicknesses of the batts.
Compared to the other insulation samples in the IR pictures, the wool …
Installation:
On the good side, this is lovely stuff to work with. You can bury your face in it and it just feels nice. Some say it has a slight sheep or lanolin odor, but I did not detect this on the samples I had.
The batts come apart easily with just hand pressure, and this is nice for stuffing frame cavities and ribs with wool. On the other hand this property of coming apart so easily makes it harder to do the larger open areas.
On the larger open areas, most people appear to use strings strung through holes in the surrounding metal to secure the wool in place. Apparently most people having chosen a natural insulation don’t want to use a spray adhesive to hold it to the van sheet metal. This seems to often result in using two thicknesses of batts because one thickness does not fill the space between the strings and the van sheet metal. Ideally, the wool would be held tightly enough between the strings and the van sheet metal that it would stay put, but I am doubtful on this. It seems to me that if you bounce the van around on a few thousand miles of road, the wool is going to slip down some and leave an uninsulated gap at the top. This seems like a significant disadvantage to me — maybe someone with a few thousand miles on their wool job can do an inspection and report.
People installing the wool overhead say that you need to wear some eye protection as the batts rain down a lot of small particles.
Overall, my thought is that wool is lovely to work with, but the most difficult and time consuming of all the samples to install. But, if you want a natural product its definitely doable.
Cost:
A little hard to say as people seem to vary on how much thickness they use. I think it can be hard to keep the wool in place behind the strings with only one thickness of batt.
Each bag of batts costs $135.
If you use 4 bags, cost is $520 plus about $100 shipping, or about $640 total.
Polyiso
Polyiso stands for Polyisocyanurate – it is a rigid, closed cell urethane foam. It normally comes with an aluminum foil face sheet on each face that acts as a vapor barrier as it is very slightly permeable to water vapor without the foil. It is available in most of the big box hardware stores in 1/2, 1, and 2 inch thicknesses.
Thermal:
it has a claimed R value of R6 per inch. Most people use the 1 inch thick version, so this is good for R6. If you want more, you can use the 2 inch, but because the 2 inch is pretty rigid, its usually better to use 2 layers of 1 inch to give about R12.
You will see negative comments to the effect that it loses some R value as temperatures drop. This is true, but for any temperature you are likely to have your van in, and using the mean temperature of the insulation stackup, its not really a problem.
Installation:
Polyiso cuts easily with a razor blade knife. You can also cut it with a saw, but this produces a very fine dust that can be irritating.
Most people glue the Polyiso to the van sheet metal using Great Stuff urethane foam in a can. A grid of lines of Great Stuff is applied to the back of the panel as well as a bead of Great Stuff around the periphery of the panel. The panel is then pushed against the van wall and held in place with spring sticks until the foam cures. Last step is to apply a bead of Great Stuff around the edge of the insulation panel to prevent water vapor from getting behind the panel. When installed in this way, water vapor will have no way to get behind the panel and no condensation will form behind the panel.
Great Stuff Pro with the pro applicator is highly recommended rather than the more commonly available regular Great Stuff cans. The Great Stuff is a very good adhesive, and once cured the Polyiso boards are not going anywhere. If for some reason you later decide you want to remove the insulation from the van, you are in for a chore.
While the 1 inch thick Polyiso will easily conform to most of the wall and ceiling slightly curved surfaces, there are some surfaces that it is too rigid to form to, and some other means must be used to insulate these places. It is also no suitable for insulating inside of frame cavities, so if you want to do this, some form of loose fill insulation or Great Stuff must be used. This is a disadvantage compared to the other insulation types covered in this test.
Polyiso can also be used to insulate the van floor. It has a high enough bearing strength when covered with half inch plywood to not be dented by foot traffic. Its the only one of the insulation types tested here to be able to be sensibly used to insulate floors.
My personal opinion is that in ease of installation, Polyiso is midway on the scale. Having to use the spring sticks to hold the insulation in place while the foam is curing is a bit of a pain, but most people find it OK. Having to use another type of insulation for highly curved areas is also a negative.
Cost:
Poliso in 1 inch thick sells fro $0.72 per sqft.
In most places, it will be available locally, so no shipping charges.
Great Stuff Pro is $17 per can and a van will likely require a couple cans.
The cost to do the walls and ceiling of a mid wheelbase van is about $160.
Thinsulate:
The Thinsulate SM600L insulation is made by 3M. It is made from a mix of polypropylene and polyester fibers attached to a polypropylene scrim cloth. The SM600L product is 1.65 inches thick and has a claimed R value of 5.2 (R3.2 per inch). It has been used a lot in van insulation – many examples on YouTube.
The sample for this test was provided by Hein – Thanks!
The fibers of Thinsulate do not absorb water, but the insulation blanket is highly permeable to water vapor.
Installation:
Thinsulate can be cut with sharp scissors and easily conforms to the van curved surfaces. Most people use 3M 90 spray adhesive to glue the Thinsulate to the sheet metal.
Overall, Thinsulate is probably the easiest of the insulations to install.
Thermal:
The claimed R value is R3.2 per inch, or R5.2 for the 1.65 inch thick SM600 product.
In the thermal images, it performed …
Cost:
Thinsulate comes 60 inches wide, and it takes about 50 lineal feet to do a mid wheelbase van.
From DIYvan.com, 50 ft comes to $495 with free shipping.
Aerocel:
The Aerocel AeroFlex is a closed cell foam made from EPDM. It is non-permeable to water vapor and has a very wide operating temperature range. It is very flexible and easily curved to follow the contours of the van sheet metal. In this case the 1.5 inch thickness was made up of a layer of 1 inch plus a layer of half inch. AeroFlex is not commonly used for van insulation, but it does look very promising – especially for curved areas. See Orton’s van build for one example.
Installation:
Aerocel cuts with sharp scissors. It easily conforms to curved surfaces. 3M 90 spray adhesive can be used to glue it in place. It also comes in a form with adhesive already applied to one side, which is protected with a pull off layer until installation time.
There is not a lot of data to go by on how easy it is to install, but I would guess that its tied with Thinsulate for being the easiest to install of the insulations tested here.
Thermal:
The claimed R value is about R4 per inch.
On the thermal images, it appears to do about the same as Polyiso, so tied for first place — but, this is for 1.5 inches thick where the Polyiso is only 1 inch thick.
Cost:
This is not a widely sold material and price is a bit hard to nail down, but for the 1 inch thick version about $4 per sqft. This would put the total cost for a mid wheelbase van around $720 (approximate). KFlex appears to be a different brand for the same kind of material.
On his van, Orton used the Aerocel for only the highly curved areas, with Polyiso used for the flatter parts. This is probably a more cost effective way to take advantage of the Aerocel.
Here’s a couple more examples of foil-faced insulation that comes on rolls and can be cut with scissors:
https://www.jm.com/en/mechanical/board-and-blanket-insulation/800-series-spin-glas/
(although this type is called “rigid” it does not break when bent like Polyiso or XPS)
https://www.jm.com/en/hvac/external-duct-insulation/microlite-fsk-duct-wrap/
Both types are normally used for external duct insulation.
These are more rigid:
https://www.jm.com/en/hvac/duct-board/
and are used build ducts for residential & commercial HVAC systems which should allay any concern over whether they are safe or not.
All of these are available with foil faced moisture barriers on at least one side. I cited the J-M products above, but there are many different brands, and any metro area that has an HVAC supply warehouse should stock at least whatever brands/versions are popular with HVAC contractors in that area.
Rigid foam is not as easy to install in difficult locations as flexible materials, but with that comes the advantage of providing support for whatever covering or upholstery is used on the walls & ceiling, especially if another layer of rigid foam is added inboard of the metal structure (analogous sheetrock on studs). A sheet of 1/2″ thick rigid foam covered with decent upholstery is enough for a ceiling, and with a stiffer covering (like sheets of 0.09″ thick FRP), even on walls.
I’ve seen many DIY upfits where pine (~11x the density of foam) was used for walls and sometimes ceilings, and that adds a lot of unnecessary weight.
Hi Elvis,
Yes – you discovered a page in work – I probably should have waited on publishing it, but thought it would be done in a day or two.
Its a somewhat more rigorous version of the earlier insulation test and with the addition of the Aeroflex.
No dramatic new findings except that Aeroflex works well, and does not allow condensation on the van skin as its impermeable to water vapor.
Seems like in the end, Polyiso has a higher R value per inch, does not allow water vapor to get to the van skin, and is cheaper, while Thinsulate is easier to install (and remove if it comes to that).
Maybe a combination of Polyiso for the large, low curvature areas and Thinsulate or Aerflex for the tightly curved areas is a good approach.
Not sure you are going to convince to many people that Polyiso with a fabric cover is going to do it — a lot of personal aesthetics involved in the surfaces you see.
I did find the Thinsulate fairly easy to pull through the empty frames pretty easy — the scrim give it enough strength that you can pull it through with a wire.
Gary
re: “Not sure you are going to convince to many people that Polyiso with a fabric cover is going to do it ”
The advantage of the stiffness of an inch of two of faced polyiso is independent of the aesthetics of whatever covering is applied over it.
Fabric coverings like upholstery are typically used for ceilings, resulting in something that’s very similar to an OEM headliner.
FRP (or thin wood veneer if that’s the desired aesthetic) is used for walls. Most people don’t seem to consider how much weight they’re adding by using the same materials they’d use for home remodeling.
As for convincing people, I’d say that the results of carefully controlled tests are not going to convince many people of anything that conflicts with the well-established “dogma” of the DIY forums they frequent!
FWIW, the 2-part PU foam from US Composites is the only moldable foam I know of that is close to regular grade Polyiso sheathing (Super Tuff-R or J-M AP Foil) in terms of R-value per inch thickness and cost per cubic foot (or board foot). All of these are around $7 per cubic foot, or ~$0.60 per square foot @ 1″ thick (local costs vary, of course).
Thermax is about 60% higher at my local source (~$32 for 1″ thick 4×8 sheet), partly because they don’t sell for “big box” store pricing. But Thermax has thicker, stiffer fiberglass reinforced foil facers.
Any of the EPDM or PVC/NBR foams are much, much more expensive, but the right versions of those (e.g.: Armacell Monarch 6931) also provide much, much better vibration dampening, than rigid foam.
edit: should have said, “the easiest way to fill most voids… *with FOAM*…”
Bulk fill polyester batting is probably the easiest of all, and provides about R-3 per inch, depending on the batting.
Looks like a work in progress. I will look forward to seeing the blanks filled in.
$4/Sq.Ft. is about right for any of the commonly available Aeroflex or K-Flex Closed Cell EPDM or PVC/NBR rubber foams. Zoro.com is a good source for both.
People can also use readily available polyester batting (normally used for quilting) for bulk fill in difficult-to-access cavities. Like Thinsulate’s polyolefin fibers, polyester fibers don’t absorb water either, although condensation can occur in the air spaces between the fibers, just like Thinsulate.
Actually, the easiest way to fill most voids is HandiFoam Channel Fill gun-applied pour foam, or the cheaper bulk equivalents that you have to mix & pour yourself. Using plastic bags makes it easier to segment off each cavity to be filled, and makes the resulting foam “bun” easier to remove if need be.