This section covers insulating your camper van conversion. It is aimed mostly at conversions of cargo vans like the RAM Promaster, Ford Transit, or Mercedes Sprinter, but if you are converting another type of vehicle or a trailer, most of the material will probably apply.
Surprisingly, there is no area of camper conversions that is more controversial than insulation. Many schemes have been proposed and used, and they differ greatly from each other, and there is little solid in service test data to say which work and which don’t. I’m going to give my 2 cents on what’s important and give a description of two methods that I like, but you probably want to look around and see all the other schemes.
Insulation — What’s Important?
The things that you typically want out of the insulation you install:
- Good thermal insulator (high R value)
- Able to control water vapor to prevent condensation on the van metal – i.e. don’t harm the van.
- Does not absorb water.
- Able to hold up to the relatively high temperatures and vibration over the long term.
- Not squeaky.
- Not toxic.
- Easy to remove.
Good Insulator: The value of high R value per inch is obvious as there is limited space to install the insulation, but any value from about R3 per inch up is probably workable. If you are going to use the van under really cold conditions, then you want pick one of the insulating materials with high R value per inch — e.g. polyiso sheets or polyurethane spray foam.
Condensation: The control of water vapor and condensation seems important to me. There are sources of water vapor in the van (like cooking and people), and when the outside temperature is cold or even cool, water vapor that makes its way out to the van skin will condense, and this may cause rust or corrosion problems over the years.
While there may be other ways to do it, it seems to me that the most straight forward way to greatly reduce condensation is to use an insulating material that is impervious to water vapor and to cover as close to 100% of the van wall/ceiling surface as possible with it. The idea being that water vapor that cannot get to the van skin cannot condense on it. In addition if the insulation has a sufficiently high R value that the temperature of the inside surface of the insulation remains above the dew point, then you won’t get condensation on the inside surface of the insulation either.
Water Absorption: You do not want insulating materials that absorb and hold water — e.g. no cotton batting or denim.
Vibration and Temperature: The van is a fairly hostile environment for insulation it that there is a lot of vibration, twisting motions, and high temperatures. For example, I would not use Styrofoam (polystyrene) or XPS (extruded polystyrene) near the van skin in that it is only good up to 165F.
Squeaking: Some of the insulating materials are subject to squeaking as the van deforms as you drive it. For example, if rigid foam board is not well adhered to the van skin it can squeak.
Non-Toxic: On the “Not Toxic” front, you want a material that is safe to install and safe to live with over the years bearing in mind that it will be subject to fairly high temperatures and road vibrations. Be careful about materials that might out gas at the fairly high temperatures that the van skin will get to. Fiberglass sheds fibers that are likely not good for you — it will do this during the install, but also during the life of the van as you drive it and shake things up.
Easy Removal: The “Easy to Remove” is a nice feature, but most of the better insulating schemes are going to violate this one. They are more like removable, but with some difficulty.
Vapor Barriers:
Vapor barriers are discussed a lot in conjunction with insulating vans. The van sheet metal itself is a vapor barrier that you have on the outside of the insulation whether you want it or not. I suppose the main question is should you add a vapor barrier on the inside of the insulation? The argument for doing this is that it prevents water vapor generated from cooking etc inside the van from getting into the wall and condensing. I think this makes sense IF the inside vapor barrier can really prevent water vapor from getting into the wall and if there are no rain leaks into the wall cavity. But, on the negative side, if water vapor does get into the wall and condenses, the inside vapor barrier prevents the water from drying out quickly because its trapped between two vapor barriers. The references on home building say that it takes a surprisingly small flaw in the vapor barrier to allow significant water vapor to get through — this makes me think that its going to be very hard to do an inside vapor barrier that is tight enough to keep water vapor from getting into the wall. My 2 cents would be not to use the inside vapor barrier so that moisture that gets into the wall has a way to dry out — but, I’m sure, some would disagree.
Drain Path:
The vans provide drain holes at the bottom of the walls that allow any liquid moisture that drains down the wall to drain out of the van. I think that it makes sense whatever insulating method you use to keep these drain paths open.
Inspection:
I think it makes sense to provide for removal of at least some of the wall/ceiling panels so that a year or ten down the line you can remove the panel and see what’s going on inside the wall and at the van skin.
How Much Insulation Do You Need?
The main reasons for adding insulation include: 1) reduce heat loss in the winter to allow a smaller heater or furnace and less heating fuel usage, and 2) reduce heat gain in the summer so that the van is easier to cool.
If you want to get into the details of how much heat loss reduction you get for a given amount of insulation, try our calculator you can download here… It allows you to put in various levels of insulation on the floors, walls, ceiling, and also for the windows. It gives an estimate of heat loss you will get for a given combination of insulation and for a given outside temperature. It can be helpful in estimating what size furnace you need and how much fuel its likely to use.
It also provides a chart that shows how much heat is lost through each component (roof, walls, windows, …) so you can see which areas need more attention.
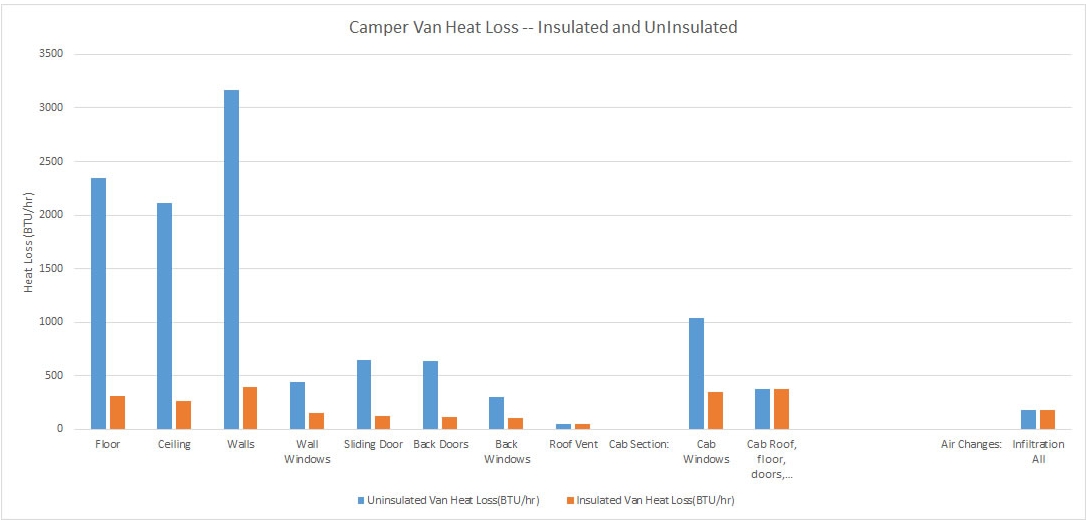
Using this calculator for my van, with 1 inch polyurethane foam insulation all around and Reflectex style window treatments, the calculator estimates that heat loss is reduced by 79% compared to a bare van, and propane consumption for a 32F outside temperature is reduced from 0.18 gallons per hour down to 0.04 gallons per hour.
If you don’t want to use the calculator, as a very rough rule of thumb, you probably won’t end up going too far wrong if you aim for an insulation level around R6 for the walls, roof, and floor.
Insulating Materials
The table below lists the properties of the common insulating materials used in van conversions. There is a lot to be learned by just looking through this table.
| Name | Type | R per Inch | Thickness for R6 | Cost/sqft for R6(10) | Max Temperature | Vapor Barrier? | Absorbs Water? |
|---|---|---|---|---|---|---|---|
| polyisocyanurate (1) | Rigid sheet | 6.5 | 0.92 inch | $0.60 | 270 F | Yes | No |
| Spray closed cell Polyurethane (2) | Spray in place | 6.5 | 0.92 inch | $1.80 (11) | 270 F | Yes | No |
| XPS polystyrene (3) | Rigid sheet | 5 | 1.2 inch | $0.80 | 165 F | Yes | No |
| EPS polystyrene (4) | Rigid sheet | 3.85 | 1.6 inch | $0.55 | 165 F | Yes | No |
| Thinsulate (5) Polyester and olefin | Flexible sheet | 3.3 (12) | 1.8 inch | $2.13 | 200F(?) | No | No |
| EZcool (6) | Thin flexible sheet | ? | ? | ? | 200 F? | Yes | No |
| Aerogel (7) | Flexible sheet is common | 8.3? | 0.72 | $11.50 | 390 F | No | No |
Notes:
(1) Polyisocyanurate: rigid polyurethane insulation, comes in various thicknesses from 0.5 to 2 inch — example…
(2) Spray polyurethane: two bottle DIY kits available, or pro install. Spray to desired thickness. — example…
(3) XPS polystyrene: extruded polystyrene sheets, typically pink or blue, various thicknesses — example…
(4) EPS polystyrene: expanded polystyrene, typically white, various thicknesses — example…
(5) Thinsulate: Polester and olefin fibers with scrim, various thicknesses up to 1 inch ish? — example …
(6) EZcool: 3/16ths thick closed cell polyethylene foam with thin aluminum face sheets on each side — example…, and…
(7) Aerogel: A very low density porous matrix left over after drying out from a gel — example…, and …
(10) Cost — this is the cost per square foot for the exact thickness needed to achieve R6 insulating value. For example, XPS foam sheet costs $21.47 for a 4 by 8 sheet 1 inch thick with an R value of 5. So, Cost = [$21.47) /(32 sqft)]*[R6/R5] = $0.80 $/sqft for R6. The thickness of this (mythical) R6 sheet would be (R6/R5)(1 inch)= 1.2 inches.
(11) The $1.80 per sqft assumes that you actually get the coverage and thickness shown on the packaging. Most people (including me) have found that even with great care to follow the instructions the coverage/thickness comes up short — maybe 20% short in my case.
(12) R value for Thinsulate is based on this page — 0.8 inch Thinsulate is listed as R2.64, so R per inch would be (2.64)(1.0/0.8) = 3.3 per inch. If you have a better source, please let me know. The 3M SM600L that is used in a lot van insulation projects is said to have an R value of 5.2 and is 1.75 inches thick, so R value per inch would be 3.0.
Polyiso sheets and polyurethane spray foam seem well suited to van conversion insulation, especially if the vapor barrier property is desired. They have a high R per inch, hold up to high temperatures, don’t absorb water, act as a vapor barrier. The big difference between these two is the cost and the application technique — the thermal performance is about the same. See below for details on how to install.
XPS polystyrene has many of the same properties as polyiso sheet, but is limited to 165F, which seems a bit low to me for a van in a hot climate right next to the outer skin. EPS is similar, but lower R value, less mechanical strength and somewhat lower cost.
Thinsulate has a relatively high R value per inch, comes in sheets that are flexible and easy to glue in place. It is not a vapor barrier, but does not absorb or hold water. It is said to have good noise absorbing properties, but I don’t know how it compares to (say) spray in foam for noise?
Aerogel is a fascinating material with some very nice properties — it provides a way to get high R values when limited thickness is available, and it holds up to high temperatures. But, it seems (to me) that for van conversions, where there is typically more than an inch of thickness available, that some of the other insulations are more cost effective.
EZcool is a 3/16ths inch thick closed cell polyethylene foam that is covered on both sides with thin alum face sheets. Since the 3/16ths inch of foam core would only have an R value around 0.5, most of the value of this product from an insulation point of view has to come from the reflective face sheets reducing radiant heat transfer. For the reflective face sheets to work on reducing radiant heat transfer, they have to face an airspace — so, you would want to plan your stackup to include an airspace at least on one side of the EZcool. The reflective surface also has to stay reflective over the years if its going to keep its R value. If you can install the EZcool with an airspace and it stays clean, then an R value of about 3.7 might be achieved. It seems to me that a layer of EZcool just inside the van skin with an air layer between the EZcool and the next layer of insulation might be be effective is reducing the radiant heat transfer from the hot van skin inward.
Insulating Schemes
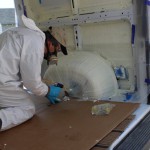
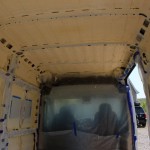
Spray Foam Insulation
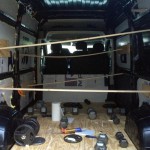
Spray polyurethane foam is the method I used on our conversion, so I have the most first hand knowledge of this method.
I picked this method based on its combination of good R value (R6.5 per inch) and the fact that the cured foam is impermeable to water vapor. That is, water vapor originating on the inside of the van from people or cooking or washing cannot penetrate the spray on insulation to get to the van outer skin where it will condense and potentially cause rust. If the insulation has enough R value that the temperature of the inside surface of the insulation is above the dew point, there also will not be condensation on the inside surface of the insulation — this reduces the chance of mold.
On the negative side, the spray foam insulation is more expensive than most (about $400 DIY), and there is a chance (particularly if not done carefully) that the van walls will be distorted as the insulation cures. Also, using the foam can be a bit intimidating if you have never done it before.
There were places that I could not (or did not want to) spray with the spray foaming from the two large bottles of foam. I went back afterword and got some of these areas with Great Stuff canned foam, but there are a few areas that I could not get to or areas with lots of wire runs I did not want to spray. So, this method does not protect 100% of the van skin from condensation.
You may find that there is a commercial spray foam outfit in your area that can spray the van at a reasonable price, but I would make sure that they have had experience in spraying vans successfully and are well aware of how to avoid any distortion of the van walls.
If you decide to do it yourself, this job really puts a premium on doing your homework ahead of time, very good masking of areas you don’t want sprayed, and getting all your ducks in line before you start the spray job as stopping in mid spray is awkward.
There is a very detailed description of how I did the foaming on my van here…
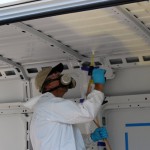
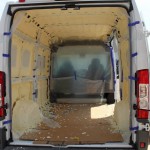

I’m quite satisfied with the results of the spray foaming on my van. The insulation is very well adhered to itself and to the van walls, it insulates well, and there was no problem at all with distortion of the body panels. All that said, if I were doing the job over again, I’d seriously consider the Rigid Foam Panel method described just below. I’ve not had any direct experience with this method, but it looks like it has the same advantages as the spray foam method at a somewhat lower cost and the work required is probably of the same order.
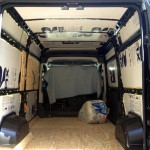
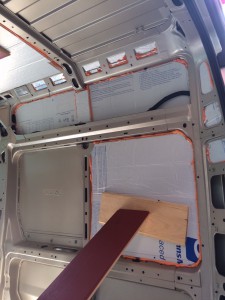
Rigid Foam Panel Insulation
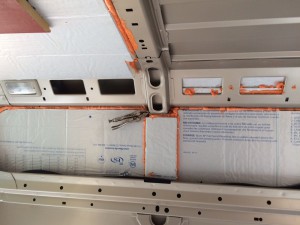
The rigid foam board method that I like uses rigid foam board sheets that are adhered to the walls and ceiling with polyurethane foam in a can (Great Stuff). The sheets of foam board can be cut to cover the larger areas, and then the Great Stuff glues the boards to the wall and is also used to foam the areas around the edges of the foam boards and in the places where there are no foam boards. The foam boards should be foamed carefully around the edges so that water vapor cannot get under the edges and condense on the van walls.
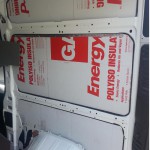
I think its best to use polyisocyanurate foam board insulation. The polyisocyanurate (polyiso for short) insulation board typically has aluminum foil face sheets on each side. The foam itself is usually tan in color. The sheets will say “polyisocyanurate” somewhere on the sheet. A lot of lumber yards carry the polyiso, but they often don’t know it by that name, so ask to see what they do have and look for the polyisocyanurate label. The good things about polyiso insulation are: 1) it holds up to high temperatures (270F or so), 2) it has a high R value (R6.5 per inch), and 3) it is water vapor impermeable.
This is the brand Home Depot carries in some stores.
Here is a very detailed rundown on installing Polyiso rigid foam board on a Ford Transit…
I think that its important to use Polyisocyanurate rigid foam board and not any of the polystyrene based rigid foam boards (eg the EPS and XPS). The reason being that the polyiso insulation is good for higher temperatures.
The 1 inch thick polyiso might be the best choice. It is flexible enough that it can be bent to the curve of the walls and it provides about R6.5. If you need more than R6.5, then two layers of 3/4 or 1 inch is probably the way to go rather than trying to bend or score 2 inch polyiso.

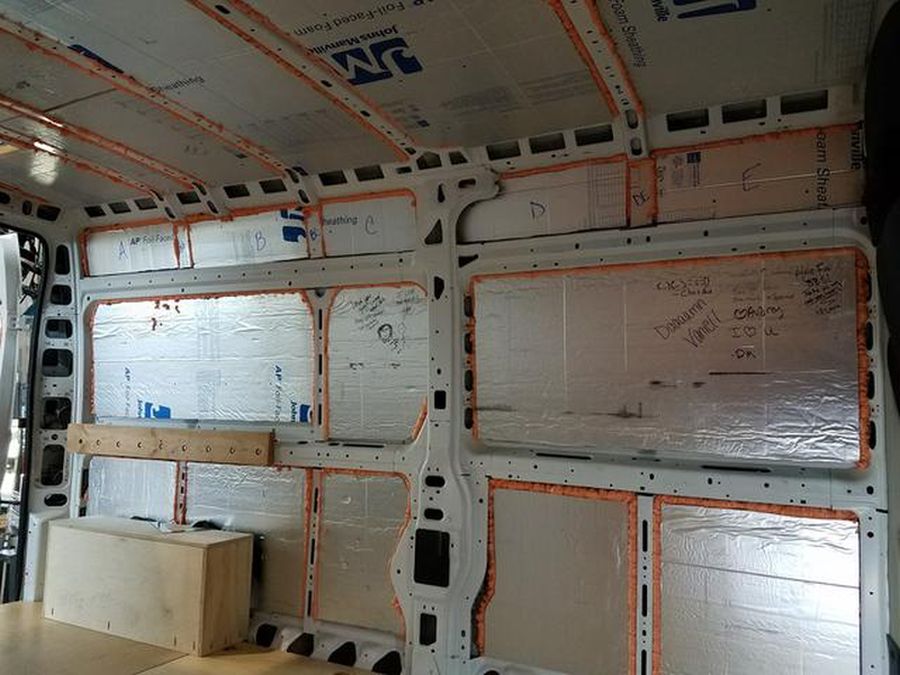
More pictures above from the RD Build on the ProMaster forum. The more I see this method, the more I like it. Another polyiso isulation project from the Promaster Forum.

Also from the ProMaster Forum, here is an example of what I would call a good pattern of GreatStuff on the back of a Polyiso panel. I think that this pattern would insure that you will never get any moisture behind the Polyiso.
If you use the Great Stuff foam to adhere the polyiso to the walls, you will want to have props that you can wedge in to keep the foam board in contact with the wall while the Great Stuff is curing. Once the Great Stuff has cured the the foam board will be VERY well stuck to the wall. You may want to invest in the “Pro” version of the Great Stuff foam applicator — its much nicer to work with than the Great Stuff cans with the plastic straw applicator.
I want to be clear that I’ve not used this polyiso rigid foam board to insulate a van myself — I’ve just reviewed what others have written about it and passed it on here.
If you have used this method to insulate your van and can provide some pictures and description that would be great Contact Gary..
Update: I think that it makes sense to use XPS (extruded polystyrene) for the floor. It is the most resistant to water, and the floor is an area where water from plumbing leaks or van skin leaks or water tank leaks can end up. Its R value is not as good as Polyiso, but it is good and for the floor, the higher water damage resistance is worth taking the small hit on R value. And, the 165F max service temperature is not an issue for the floor.
Thinsulate
Thinsulate is an insulating material developed by 3M that was initially developed for use in clothing. It is composed of very small fibers of polyester and olefin. It normally has a scrim layer on one or both sides to protect the fibers. These fibers do not absorb water, so any water that gets in the wall will not be absorbed by the insulation. But, Thinsulate is not a vapor barrier — that is, it allows water vapor to pass through it. It comes in various thicknesses and weights. It is flexible and can readily be bonded to the walls with something like 3M 90 spray adhesive.
As near as I can tell from the Rockywoods.com data on Thinsulate and the 3M datasheet, it has an R value of about R3.0 to R3.3 per inch.
It was found by the auto manufacturers that Thinsulate has both good insulation and good acoustic properties, and special versions of it are now made for this purpose — e.g. SM600L and here…
Hein on the Sprinter Forum has used Thinsulate in combination with EZ-Cool and Reflectex to insulate his van. EZcool is a thin layer (3/16 inch) of closed cell polyethyene foam with a layer of aluminum on each side. In Hein’s method the EZcool goes in first near the van wall, but not glued to it, then the Thinsulate goes in as the next layer, and then a layer of Reflectex is installed as the inside layer. This post on the Sprinter forum has some details on the installation. Hein also offers a good price on Thinsulate that is well suited to vans — about $1.78 per sqft for 1.5 inch, 600 gm/sm material.
A lot of people seem to be enthused about Thinsulate and this 3 layer method. I’m probably just being obtuse, but its not clear to me why this three layer arrangement is better than a single thick layer of polyiso or polyurethane foam, or how it controls water vapor? I’d be happy to be wrong in my skepticism, so please put a comment in below on why this is a good way to go. I guess that one advantage would be that the EZcool installed at the van skin can act as a radiant barrier to reduce radiant heat transfer into the van — as long as there is a air gap between the EZcool and the Thinsulate. This could be helpful especially for dark colored vans in hot climates.
Other Insulation Schemes
A lot of other schemes for insulating van have been used and proposed. I’m not going to say much about them as, I really don’t have any way to know if they are good or bad.
Fiberglass:
Batt style fiberglass is used quite a bit for conversion van insulation (even by commercial converters). On the plus side, it’s very available and cheap, and fairly easy to install, and its also easy to remove. On the negative side, it readily allows water vapor to pass through it and this promotes condensation on the cold van walls and potentially leads to rust and corrosion. It is also not viewed as a particularly healthy product to install, or to live with long term — all the bouncing around that a camper van does may lead to fibers in the air for a long time.
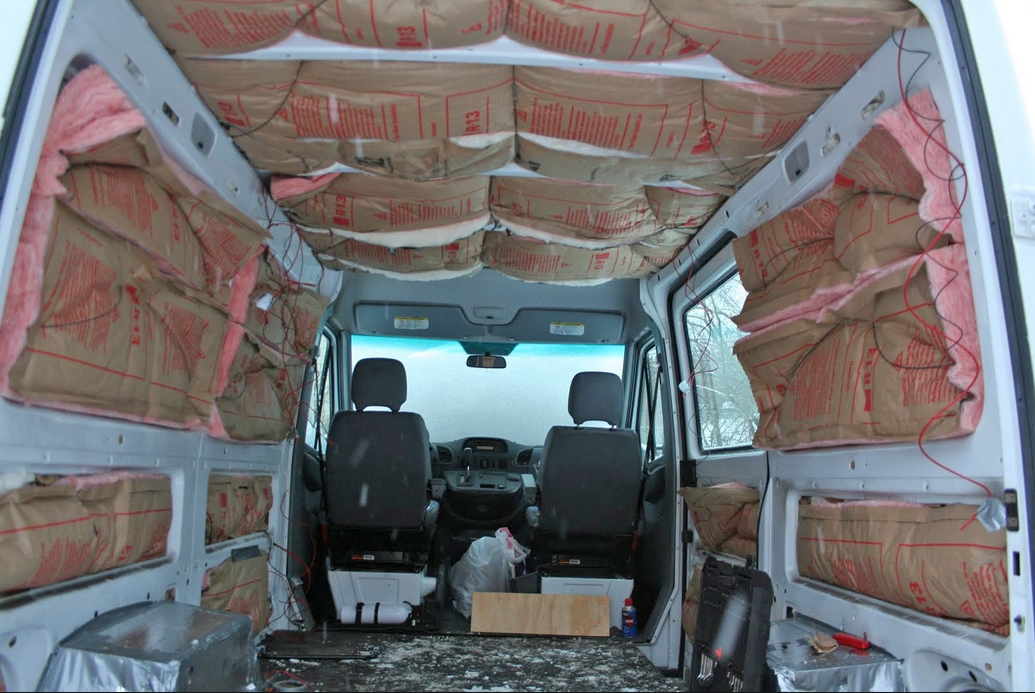
I have also read stories by people updating a conversion done on an older van in which they removed old fiberglass insulation to find quite a bit of rust on the van sidewalls. I don’t think that this is common, but it does happen.
Most people who have looked into insulation for vans reject fiberglass as a choice, and I agree — I’d go with something else.
Polystyrene (Styrofoam):
I would personally avoid using any of the insulation products that use Polystyrene as the insulating material — this includes the Styrofoam, EPS expanded polystyrene (the coffee cup stuff), and XPS extruded polystyrene foam (the pink and blue stuff at the hardware). The reason is that the maximum service temperature for this material is only 165F, and I think that its possible to get to these temperatures for insulation near the van skin. I found out by unintended experiment that its fairly easy to melt polystyrene based insulation…
Multi-Layer Approaches:
I’ve seen a few descriptions of insulating schemes that use a number of layers of different or similar insulating products on the theory that multiple thin layers achieve a better result and a single thick layer. I have to admit that I don’t see the advantage and it just seems (to me) to add to the work and cost.
If you have a multi-layer scheme that you like and a good line of reasoning for using it, please leave a comment below explaining why you think its better.
Update: This is a report on some testing I did on the most common insulation types used in camper vans…
Update: Sheep’s wool has in the last couple years become a more popular choice. Havlock Wool is probably the biggest promoter of wool. The Havlock site lists a number of advantages for wool. Things like its being all natural, the way it handles moisture, … Unfortunately they don’t provide any test data at all to back up these claims. I have to admit to being a skeptic.
I’ve worked with wool a little during the insulation test mentioned above, and one thing I will say for it is that its so easy on your skin – you can push your face into a bat of it, and feels like a nice wool sweater. On the other side, its difficult to install and I worry that with some of the Youtube installations I’ve seen that there will be significant settling.
If you have a lot of experience with wool, I’d like to hear about it.
Noise Reduction
In addition to lowering heat loss, insulation also provides some noise reduction. There are again a lot of proposals on how to come up with an optimal combination of layers that do a good job of both insulating and reducing noise.
Update: after a few long trips in the van, if I were doing this all over again, I’d probably put more emphasis on noise reduction. Its not that the van is all that loud, but a bit quieter would be nice. I will probably take some time to see what can be on mine at this point — things lie the doors have not been treated and it seems like some of the noise originates from the headliner area.
Figuring Out What Really Works?
Its a bit discouraging that people have been insulating camper vans for decades, and we still don’t seem to have the data that would tell people now starting their conversions what methods are proven to really work well, and which have failed.
It would be nice if we could collect data from people who insulated their vans some time back and are in a position to inspect and take a few pictures of how things are going inside the wall and at the van skin. If you have or are willing to collect such data, please leave a comment or email me so we can arrange to get your story up on the site. This goes for solutions that worked well as well as ones that failed.
Update
November 2020: I did some testing of three common insulations used in van conversions (Polyiso, Thinsulate and Wool). The testing is for a side by side comparison of how these insulation handle moisture and condensation buildup. Have a look!
Gary
July 3, 2015
Thanks for all your help Gary. Very cool insulation test and data, thanks for that!
I’m trying not to overthink things as I begin work on my Sprinter build. My use case will be primarily Colorado or other mountain camping, not a lot of time in the humid midwest or eastern US.
However, I bought the van August 2020 and quickly realized we love it as a ski vehicle as well, which makes me consider drying ski gear on winter trips and the increased vapor issues that may raise.
Still though, in the end I think that between Colorado’s relatively low humidity and remaining vigilant during and after ski trips (keeping the van empty but warm for a day after returning home to drive out residual moisture), I’m probably good as far as moisture/rust issues.
I like your findings regarding polyiso, but I’m inclined to use Thinsulate SM600 for two reasons. One, 🙂 I’ve already purchased 150 square feet of it. Two, I’m just a slight bit concerned about it squeaking with all the rough mountain roads I’m on in the summer.
Thanks for reading this far. My question is this: I already want to use noise dampening in certain areas – the headliner above the cab, wheel wells, etc. So if I put the Kilmat directly on those surfaces, would I then spray the Thinsulate and adhere it directly to the back of the Kilmat?
Thanks,
Chuck J
2017 MB 144 Passenger
Hi Chuck,
I’m pretty sure the Thinsulate will do fine for CO and ski trips – even with some wet gear. I’ve not heard of anyone having a problem with Thinsulate with this kind of use. There will likely be some condensation on the inside of the van skin under the Thinsulate on some nights, but it will dry out when conditions change.
I believe that people are just using the 3M spray adhesive to bond the Thinsulate to both the van skin and the back of the sound treatment.
Hope we get a good ski year!
Gary
re: “I already want to use noise dampening in certain areas – the headliner above the cab, wheel wells, etc. So if I put the Kilmat directly on those surfaces…”
It is worth noting that materials like “Kilmat” attenuate over a fairly narrow frequency range, and almost always down around 100Hz. These materials are not very effective at acoustic noise reduction much above that frequency range. The frequency range of typical “objectionable noise” (e.g.: a diesel engine idling) is more like 250Hz – 500Hz. Typically, a limp mass barrier is the one of the effective ways to reduce transmission of these noises.
Chris Purdue has done extensive testing of many different dampening materials. You can find some of his test results posted on his Facebook group, which is: “The Deadening”
Thanks Elvis,
It would sure be nice to get some real data on what treatments or combinations of treatments actually work for van noise reduction rather than all the conjecture.
Chris’s group looks interesting – will have to spend some time digesting what he has there. Looks like he is also starting a youtube channel.
Gary
(I inadvertently posted this reply in the wrong place below).
I totally agree. I have noticed many times in DIY forums that some people go way overboard with adding heavy low-frequency dampeners to areas where they won’t have much effect. I recall seeing one build thread where a guy added over 600 lbs. of a butyl mat (like Kilmat) to his van!
There is a LOOOOOT of hype and obfuscation (mainly by vendors whose sales are driven by relentless promotion in DIY forums). Thinsulate is an example of that, because although it is effective at acoustic noise reduction in higher frequency range (like wind noise), its ANR drops off drastically at the problematical 250Hz – 500Hz range I mentioned before.
The only real way to get real info is to do the type of controlled testing (for general noise reduction in vans) that only you and I seem interested in doing.
Chris got started with this project several years ago in a ‘DIY mobile audio’ forum. The testing he does is mainly oriented toward reducing bass resonance in powerful car audio systems. He mostly tests ‘Constrained Layer Dampeners’ which are ideal for that purpose, but only have any significant NR effect in that narrow, lower frequency range I mentioned previously. He has posted some of his charts on his Facebook group.
As it turns out, Chris Purdue has tested Killmat.
I captured his chart:
https://i.imgur.com/ZrWTFi3.jpeg
(red line is untreated; blue line is treated)
which shows that it is basically ineffective outside a narrow range of 125Hz-150Hz. On top of that, Killmat is not one of the better performers Chris has tested.
ResoNix is an example of one of the best. Here’s what that chart looks like:
https://i.imgur.com/ai0Dfpi.jpeg
But even Resonix does very little for the typical problem noise range (idling diesel engines, generators, lawn mowers, leaf blowers, etc).
It’s good to learn that you should look for a thermal insulator that has a high R-value. My wife and I are wanting to renovate our home in preparation for the winter and we were wondering how we could insulate our house better. I’ll be sure to tell her that we should look for a thermal insulator with a high R-value.
Hi,
Lots of good resources out there on home insulation. One good good is:
Insulate and Weatherize,
Bruce Harley
More resources listed here: https://www.builditsolar.com/Projects/Conservation/conservation.htm
Gary
I totally agree. I have noticed many times in DIY forums that some people go way overboard with adding heavy low-frequency dampeners to areas where they won’t have much effect. I recall seeing one build thread where a guy added over 600 lbs. of a butyl mat (like Kilmat) to his van!
There is a LOOOOOT of hype and obfuscation (mainly by vendors whose sales are driven by relentless promotion in DIY forums). Thinsulate is an example of that, because although it is effective at acoustic noise reduction in higher frequency range (like wind noise), its ANR drops off drastically at the problematical range I mentioned before.
The only real way to get real info is to do the type of controlled testing (for general noise reduction in vans) that only you and I seem interested in doing.
Chris got started with this project several years ago in a ‘DIY mobile audio’ forum. The testing he does is mainly oriented toward reducing bass resonance in powerful car audio systems. He mostly tests ‘Constrained Layer Dampeners’ which are ideal for that purpose, but only have any significant NR effect in that narrow, lower frequency range I mentioned previously. He has posted some of his charts on his Facebook group.
Gary – FYI:
I ran across this recently while checking updates in the CRRC product directory. https://coolroofs.org/directory
It’s a field applied coating, but is more like paint than acrylic or silicone roof coatings (which are actually liquid-applied membranes). At 8-10 mils nominal desired coating thickness, the coverage per gallon is about five times greater too.
Yet the 3-year SRI is one of the very highest available, mainly because dirt doesn’t stick as easily as it does to conventional roof membranes.
Here’s some info:
https://www.texcote.com/reflect-tec/
https://www.texcote.com/wp-content/uploads/2016/12/aia.pdf
Hi Elvis,
That does look like a good choice for painting roof of van conversions.
Have not been able to find a place that sells it, and it does not appear to be in the Tex-Cote online store. I dropped them an email to ask where it can be bought.
Gary
Based on Tex-Cote’s initial response to my email last week, some of their products may not be easy to buy. But their followup sounded more promising. I’ll let you know.
Reflec-tec has one of the highest long-term SRIs of any “thin” coating in the CRRC directory. But there are many other highly solar-reflective coatings designed for metal roofs and siding, e.g.:
GAF/United Coatings KyMAX
Nutech NXT Cool Coat (Australian company, with US distribution).
Factory-applied Kynar500 coatings for metal roofing/siding have been around for decades, but the field-appliable version was first available almost 10 years ago, ref.:
http://www.kynaraquatec.com/en/product-info/characteristics/
Because the Kynar-based resins are more expensive than acrylic, they tend to be used on higher-end commercial buildings, which may mean large minimum quantities. I’ll let you know when I find sources in the 5-gallon range.
BTW, even Behr has a paint with a high long-term SRI (104): Behr # 4175.
https://i.imgur.com/ChOm1qa.png
It must be a new product though, because that long-term rating has an * (meaning it’s provisional).
Only problem is, I can’t find any info on #4175, and the Behr rep has not yet returned my call.
There is a Behr “Roof Paint”:
https://www.behr.com/consumer/products/specialty-paint/roof-paint/behr-multi-surface-roof-paint
sold at Home Depot:
https://www.homedepot.com/p/BEHR-1-gal-White-Reflective-Flat-Multi-Surface-Exterior-Roof-Paint-06501/100164524
seems is a different model number (#6501, which is not in the CRRC directory). My guess is, this paint has a fairly high SRI, but almost certainly not exceptionally high.
In comparison, even a typical OEM automotive white paint *should* have an SRI of somewhere around 80-85. So on a white van, there are limited gains available with even the highest performing coatings (but every bit helps).
With most “regular” paints (not specifically designed to have high SRI), a flat finish will have higher SRI than gloss, because gloss usually has lower thermal emittance than flat.
Hi Gary, regarding a multi-layer scheme you asked about, I might be a source for you.
Installing polyiso boards on all surfaces except back and slider door.
I allowed room for 1.5″ Thinsulate covering all surfaces except floor. The plan is to take advantage of Thinsulate’s excellent sound absorbing qualities. It helps that it offers additional insulation as well.
All doors and vertical door framing have Thinsulate. Quite a bit over the cab area between steel roof and one piece molded lining being careful to allow easy access to the front roof light I wish were not there. In that same area added Thinsulate to the left and right wall pockets next to the upper cab shelf. Surprisingly it swallowed a lot of Thinsulate.
Floor will be 1.5″ Polyiso + 1/2″ horse stable/gym rubber then 1/2″ plywood. The horse stable rubber sheets come in 1/2″ and 3/4″ from Tractor Supply.
I did not do a before noise measurement but remember how painful it was for wife and I to have a conversation or even hear the radio prior to adding anything. Goal is to be as quiet as a quality minivan.
Will let you know.
Santiago
Hi Gary,
Question on polyiso board SIDES when installing using Great Stuff foam as adhesive.
Gluing 1″ and 2″ boards and sealing around edges – no issues.
Board SIDES not fully covered by Great Stuff foam – bad practice ?
The foil faces are practically impermeable but the foam sides not so much ?
While most board SIDES are immersed when beading, thicker ones, 2″, not easily immersed. How critical is having partial SIDE exposed to vans’ interior moisture. I imagine that can be a pathway to the interior especially if not foiled faced on both sides.
Thank you.
Santiago
Hi Santiago,
Polyurethane foam spray foam (closed cell) is used a lot in home construction with no vapor barrier in that (even without a foil face) it has a low water vapor permanence. The Polyiso sheets are the same kind of foam, so I’d guess that having the sides of the ridid polyiso sheets just foamed with Great Stuff (also polyurethane foam) is probably OK from a water vapor point of view.
Open cell foam is much more permeable to water vapor, but don’t think its used in vans much.
It does seem important if you want a really good insulation job, that carefully foaming in the areas around the rigid polyiso panels with Great Stuff is important both from a condensation point of view and from the point of view of reducing high thermal conductivity areas that are not insulated.
But, I’m not an insulation physics guy — so, I guess, ask around.
Gary
Thank you Gary. Am installing polyiso as we speak but wanted to better understand its’ use when subjected to a typical moisture laden van interior.
A little more research told me that what gives a polyiso foam board extremely low permanence is the foil facing. Both sides faced is ideal.
With foil facing the permanence is 0.03 perms – this is Class 1 (impermeable vapor retarder).
The polyiso itself without facing is 2.8 to 4.5 perms – this is Class 3 (permeable vapor retarder). Thank goodness the board edging surface area is quite small compared to the board surface covered with foil.
It would not be good idea to use a board with just one surface covered with foil, nor eliminating the foil facing itself.
Thanks again,
Santiago
Overall, this site is a terrific resource for DIY’ers considering upfitting a van.
But you omitted any mention of 2-part pourable cavity-fill foam, which is available in both rigid and flexible types. This type of foam is the closest thing to the foams used by auto manufacturers and also sold in small kits to collision repair shops.
Also, I thought I saw a mention somewhere that mono-component spray foams like ‘Great Stuff’ are closed cell. That’s not actually correct, because ‘Great Stuff’ has a relatively low percentage of cells that are closed (typically not much over 50%-60%). Some other brands of mono-component spay foam (e.g.: Loctite, DAP) are better, but only 2-component field-applied foams exceed the 90%-95% threshold. In comparison, manufactured foams like Tuff-R or Thermax are more than 99% closed cell… basically only the edges have some open cells.
BTW, the concern about polyiso foams having reduced R-value at low temperatures is a concern that isn’t applicable to polyiso sheathing like Thermax, Tuff-R or AP-Foil.
FWIW, most (if not all) of the fiberglass batt insulation sold in home improvement stores is formaldehyde-free. And there is a big difference between the handling/cutting/fitting characteristics of traditional fiberglass batts compared to the commonly available semi-rigid mineral wool sheets/slabs. But a few years ago, Owens-Corning introduced a new type of batt, “Pure Safety” that has the thermal & acoustic performance and safety of mineral wool, with the flexible handling characteristics of fiberglass batts. It’s sort of the best of both, and an excellent choice to fill the deep structural cavities that are mostly open/accessible.
Just some minor issues… but keep up the good work.
Hi Elvis,
Thanks for the comments.
I’ve not seen the 2 part liquid foams used for RV or van insulation — it seems like it would be awkward to use in that you would have to provide a cavity for the foam to fill? I did use the 2 part urethane foam to insulate my van, and found it to be a good way to go.
https://www.buildagreenrv.com/our-conversion/our-conversion-insulation/
I’ve always heard the Great Stuff foam being described as closed cell, and that is also what the manufacturer says. Do you have a reference that shows the percentage of closed cells for the various foams you mention. I kind of like the Great Stuff Pro as its fairly cheap and available in lots of places.
The Building Science Site has a good article on testing of the polyiso rigid sheet foam that shows a degradation in R value per inch for cold conditions for all the rigid foam sheets they tested. They don’t mention any of the brands being immune from the R value loss in cold temperatures.
https://www.buildingscience.com/documents/information-sheets/info-502-temperature-dependent-r-value.
If you go through the test results, for a van situation, its not really a problem for van insulation. The cross over point where XPS gets better than polyiso is about -20F. Polyiso also has the advantage of a high service temperature, which can be important for hot van skins in hot sunny weather.
Gary
The 2-part liquid cavity fill foams are not awkward to use to fill structural boxes down near the floor, which both the Transit and Sprinter have. It can also be used to fill the vertical channels that otherwise require stuffing (for those who insist on using Thinsulate). Of course the openings below the pour point have to be closed off with tape. etc. The easiest way to ensure no excess foam spreads outside the intended area is to use plastic containment bags… which also prevents it from sticking (a concern for some people). The bags can be simply trash bags, but there are other alternatives that have higher acoustic absorption.
People may refer to Great Stuff as being “closed cell” but AFAIK the manufacturer does not. They do list the closed cell percentages for the pro versions in the TDS (available at Homedepot.com or greatstuff.dupont.com):
GREAT STUFF PRO Gaps & Cracks Insulating Foam Sealant – Closed Cell Content, ASTM D2856, 80%
Great stuff Pro Window & door insulating foam sealant – Open Cell content, ASTM D6226, <88.00%
The stuff coming out of the older-style straw dispensers is not at that level… something to do with the physics of how the foam forms in a tube downstream after the flow valve, vs. how it forms when exposed to air only when it comes straight out of a flow valve. Hard to express, but I'm pretty sure the manufacturer's engineer wasn't BS-ing me.
Most true closed cell foam is much higher than that. While any of this stuff will work fairly well, there are better alternatives, namely, Loctite TiteFoam and DAP Draftstop 812.
Building Science Thermal Metric Study
https://www.buildingscience.com/documents/special/thermal-metric
did not originally measure the same type of Polyiso as Thermax. There are many different 'flavors' or polyiso and PU foam, with properties that vary depending on the exact chemisty. Thermax is a top-of-the-line product.
Only Thermax is specifically rated by the manufacturer to have higher R-value at low temperatures. Here's a chart:
https://i.imgur.com/xyzIfRC.png
You can find this in a manufacturer publication on Thermax applications. I'll look for the title/link later.
My *assumption* (which the manufacturer rep will not confirm) is that Tuff-R is the same, because Tuff-R is basically Thermax without the Class A fire rating.
I mis-spoke about J-M AP-Foil not having the drop-off in R-value. I honestly have no idea about that, but I wouldn't use that as long as either Thermax or Tuff-R is available locally. I would avoid the R-Max foam sold in Home Depot stores west of Ohio… it's a second-tier product.
Here’s the publication that has the Thermax low-temp R-value chart referenced above:
“Tech Solution 538.0: Understanding Mean Temperature Phenomenon for Polyisocyanurate Insulations”
A similar chart also appears in
“Tech Solution 127.0: Understanding Roof Insulation Performance in Cold Storage Buildings”
Seems the PDF upload ikn my previous post did not work?
So here’s a link:
https://www.pdfhost.net/index.php?Action=DownloadFile&id=5840c11595ac4c0a7cba00e9a2a36e73
The bottom line is, all Polyiso is not anywhere close to the same. Field-applied spray foams are about the worst, because it’s more difficult to consistently get exactly the right mix. My belief is that 2-part pourable cavity fill foams tend to be better than 2-part spray foams *IF* the user is very careful about measuring & mixing the two parts. Manufactured foams tend to be the best, because they have much better control over both the mix and the environmental factors.
Hi Elvis,
Well that’s certainly interesting on the Thermax.
I always read manufacturers data with a grain of salt — there is a tendency to not exactly lie, but to tell the story from a limited point of view that favors their product.
They talk about an actual test they did using a wall that was a combination of Thermax and rock wool, and while I can see the point they are trying to make, its not a very straight forward way to do the testing. Then they talk about the new facility aimed at testing insulation under real world conditions (developed with assistance from the Building Science site people), but don’t say that their data on Thermax is actually based on testing in that facility. I looked on the Building Science Site for info or test results on Thermax, but could not find anything. I would think that if the Thermax performed as well as they show at low temperatures that they would brag about it more.
I guess I would now lean toward using Thermax, but I wish their data could be confirmed by an unbiased third party.
The other very interesting thing in the same article is the performance they show for SPF (spray polyurethane)in Figure 2 shows it having highest R value per inch and the R value does not drop for low temperature — it actually goes up.
If this is a universal trait for SPFs, it seems like an advantage to SPF.
I looked for R value vs mean temperature data for CorBond spray PU foam (they have a big presence here), and could not find anything. Again, it seems odd that if it has this characteristic that they would want to brag about it.
I used a two large bottle kit from HomeDepot on my van and I’m wondering how closely it matches their SPF graph.
Anyway, interesting stuff.
Gary
From that PDF, here’s the gist of it:
…some polyiso insulations that “contain an insulating gas that enhances the R-Value of the material are known to exhibit the ‘mean temperature phenomena.’ When the gas condenses to a liquid within the insulation at lower temperatures, the R-Value is slightly reduced as the condensed gas can no longer influence the R-Value of the insulation.”
and…
“…the type of polyisocyanurate foam insulation in the BSL Thermal Metric Project is only roofing Polyiso insulation, which is significantly different
from THERMAX…polyisocyanurate foams have a wide range of property variations as a result of varying/different proprietary formulations used by each manufacturer and for different grades of foam.”
This is the relatively new GREAT STUFF “Smart Dispenser”
https://www.greatstuff.dupont.com/products/smart-dispenser.html
https://www.lowes.com/pd/GREAT-STUFF-Smart-Dispenser-Gaps-And-Cracks-12-oz-Spray-Foam-Insulation/1000673769
This basically mimics the functionality of the metal “pro-grade” guns (plunger valve is at the outlet of the tube). It also cost quite a bit more than the cans sold at Home Depot that have a more conventional ‘straw’ dispenser.
On Lowes.com, this version of GREAT STUFF is listed as R-3.7 per inch.
The GREAT STUFF PRO (gun grade) TDS lists K-factor: 0.26, which equates to R-3.85 per inch. ref.:
http://msdssearch.dow.com/PublishedLiteratureDOWCOM/dh_0943/0901b80380943321.pdf?filepath=styrofoam/pdfs/noreg/179-07323.pdf
DAP Draftstop 812 is rated at R-5 per inch, making it the highest of any mono-component spray foam. (AFAIK). ref.:
https://www.dapspecline.com/media/1071/dap-812-sellsheet-2017.pdf
Draftstop 812 also has considerably lower water absorption than Great Stuff too, probably due to the higher closed cell content.
Another option for filling smaller voids (especially overhead) that can be problematical for 2-part pourable foam:
HandiFoam E84 II-16
“HandiFoam E84 II-16 is a two-component low-pressure spray polyurethane foam (SPF) specifically designed to provide an easy and reliable touch-up and repair product. Other applications include, but are not limited to, sealing and insulating small voids and areas, bath and hot tub insulation and refrigeration truck and trailer repair. ”
https://www.handifoam.com/product/handi-foam-e84-ii-16/
https://www.handifoam.com/wp-content/uploads/A16542-HandiFoam-E84-II-16-4.2018-1.pdf
Gary – another way to look at this is which type of foam predominates in of recreational coolers (especially the high-end brands), reefer vans & trailers, and walk-in coolers. It’s sure not XPS foam. PU injection foam owns this.
I think the solution to the puzzle is that he BSL study that showed polyiso had lower R-value at cold temps is an old study, and according to the white papers, pertained to the type of polyiso used in built-up roofs, not foil-faced Polyiso sheathing.
I am about 75% sure that Tuff-R is essentially the same as Thermax, but without the fire-resistance rating. Home Depots in most of the eastern US stock Tuff-R, but you can buy Thermax just about anywhere from building supply warehouses that mainly sell to contractors.
BTW: Here are three examples of the type of pourable foam (in pressurized cannisters) can be gun-applied:
https://www.handifoam.com/product/handi-foam-slow-rise-low-pressure-pour-place-polyurethane-foam-pip/
https://www.handifoam.com/product/handi-foam-channel-fill-low-pressure-pour-place-polyurethane-foam-pip/
https://www.handifoam.com/product/handi-foam-channel-fill-ef-low-pressure-pour-place-polyurethane-foam-pip/
But all of these cost a lot more than the pour foam that comes in jugs that you have to mix & pour yourself. In fact, only the 2-part pour foam from US Composites in Florida is in the same price range per cubic foot as Tuff-R from Home Depot (which also has foil facers on both sides). I use solid blocks of manufactured foam like Tuff-R in any large cavity where it’s feasible, especially for any of the large openings in the front.
Tradeoffs.
re: “CorBond spray PU foam”
I had not checked the specs on that lately.
J-M’s polyiso/PU foams always seemed to lag a bit below Dow in the past, but Corbond’s specs:
https://www.jm.com/content/dam/jm/global/en/building-insulation/Files/BI%20Data%20Sheets/Resi%20and%20Commercial/JMCorbondIII-ds.pdf
…might make me a believer.
They state that Corbond is R 7 per inch, which is nothing new, a lot of others claim that, but if you read their fine print, it’s usually the *initial* R-value.
But J-M rates Corbond R7/in using ASTM C518 (the *aged* R-value), the same standard Dow uses for Thermax (R 6.5 per inch… with facers!).
It’s *really* hard for me to believe they’d achieve that in most real-world applications (because there’s just no way to make sprayed-on foam as uniform as sheets produced in the controlled conditions of a factory), but it’s still impressive, and certainly a step above the 2-part spray foam kits (e.g.: Touch-n-Foam, Frothpak, about R5.5/in max) sold in Lowes/Home Depot!
And its purple too 🙂
Gary
Gary
Here’s one of the most recent (3/2015) articles I found about polyiso R-values being lower than the product manufacturers’ published values.
http://docserver.nrca.net/technical/9992.pdf
It describes a test of six 2-inch-thick, permeable-facer-sheet-faced polyiso-cyanurate insulation obtained from NRCA contractor members.
That’s not the same polyiso as foil-faced sheathing; it is higher density (usually about 4-lb./CF) and has a fiber facing. I actually have a stack of this stuff (4-inch thick) in my garage. Most of this type of foam is rated less than R-6 at 75°F.
The decrease in R-value is a result of condensation of the gas in the cells of the foam insulation, which is dependent on the ‘blowing agent’ used to manufacture the foam. These blowing agents possess different thermal and condensing/boiling points. Depending on the temperature in the foam cells some blowing agent may partially or completely condense out leaving only air as the insulating “gas” in the cells.
This and other less recent articles are by Mark S. Graham, Vice President of Technical Services at NRCA (Nat’l Roofing Contractors Assoc.).
So, when Dow states this:
“Not all polyisocyanurate foam insulations exhibit the same R-value relationship with temperature. DOW THERMAX™brand polyisocyanurate Insulation gains R-Value at all lower mean temperatures, unlike roofing polyisocyanurate insulations that have been reported to lose significant R-Value in third party studies. This is because THERMAX™ Brand Insulation is different from other polyisocyanurate foam insulations in both the core properties and the facers.”
…I think it’s credible, given that the insulation properties of any given foam depend greatly on how small (or fine) the cellular structure is, and the characteristics of the gas inside those cells.
…and it’s also good to know that polyiso’s close counterpart – 2-part polyurethane foam – evidently does not have reduced R-values at lower temps either.
Hi Elvis,
I’m sort of inclinded to believe the DOW story on Thermax — at least to some extent, but it would be nice to see some third party test data.
Just out of curiosity, I called some places here to see if I could get Thermax. Did not find anyone who stocked it. The place in town that is best about ordering in special products thought they might be able to get it, but only in “unit” quantities (which I think is about 40 sheets).
One thing I’d point out to anyone following this is that they are showing R value results for the mean temperature of the insulation. When you see a decreased R value for 25F, there is a tendency to think that 25F is not really that cold, but the 25F is the mean temp — if the inside temp is 75 F and the mean insulation temp is 25F, then the outside temp is likely -25F — even in very cold Montana, we have years when we never get a temperature that low — not even for an hour.
Gary
As one example, Thermax is available in St. Louis at Negwer Materials. Maybe you are in one of the parts of the country that’s far from one of the plants where Thermax is manufactured?
It really depends on the part of the country. Several years ago, Dow shut down the plant in Missouri that manufactured Thermax & Tuff-R, and that’s when local Home Depots switched to the cheaper R-max brand.
Thermax is also sold online, https://www.awarehousefull.com/dow-thermax-sheathing/
but of course shipping 4×8 sheets isn’t exactly feasible. Also, even the sheets in the stores tend to get banged up, so I;d want to pick my own.
Super-Tuff-R is stocked at Home Depots in Ohio and points east.
https://www.homedepot.com/p/Super-TUFF-R-1-2-in-x-4-ft-x-8-ft-R-3-3-Foam-Insulation-268413/100322369
My *guess* is that J-M AP-Foil probably does not have the low temperature R-value fall-off, but unless J-M confirms it, it’s just a hunch.
I’m getting ready to purchase my van; in the meantime I’ve been trying to decide what things are better.
Any thoughts on sheep wool (such as what Havelock is selling) for insulating?
Hi Brenda,
I guess you could say that van insulation could be divided into 3 classes:
1- Insulation that is not permeable to water vapor — eg Polyiso sheets or sprayed urethane foam.
2- Insulation that is permeable to water vapor, but where the insulating material does not itself does not absorb water — eg Thinsulate
3- Insulation that is permeable to water vapor and also capable of absorbing water vapor — eg Wool, recycled bluejeans.
I favor the 1st category on the basis that if you have an insulation layer that does not let water vapor pass through it, then the water vapor cannot pass through the insulation and condense (or freeze) on the cold van skin. An additional big advantage is that the inside surface of the insulation stays warm and does not normally go below the dew point of the van air, so no condensation anywhere. Given all the bad effects of condensation (rust, mold, …) I thing this is important.
My 2nd choice would be category 2 (permeable, but not water absorbing – eg thinsulate). This is just based on the idea that
insulation that does not absorb water from the air and does not provide a place for water to accumulate seems like a good thing. The proponents of Thinsulate type materials is that the insulation will not absorb water and that if there is sufficient air flowing through the insulation the air (when its dry) will pull any accumulated moisture out of the wall.
Category 3 would be my least favorite for the reasons stated above.
People who have used wool have reported a low level wool smell over time. Maybe not a big deal.
I’m not an expert on insulation physics, but just reading the tons of insulation opinions out there, I’ve come down to using Polyiso sheets (as described above) or the spray polyurethan foam insulation.
Thinsulate has a lot of followers, and I’ve not heard any disaster stories about it.
Sorry to not be much help — its a tough subject to navigate through.
Gary
Hi Gary,
Thanks for all the great info. I’m just getting started and would like your thoughts regarding the ventilation ports at the rear of each wheel well. Did you somehow seal off these vent holes or leave them in place?
Hi Teresa,
As far as I can recall, I left them open and functioning.
I think they are vents that make it easier to close the sliding door by preventing an air pressure bump as the door closes.
I think most people leave them open.
Also, make sure not to block any of the drain holes at the bottom of the walls.
Gary
Insulating your van is the best way to keep warm in cold weather. There are many types of insulation options available so, before you begin the work, keep in mind, that starting with the roof is best. RV Roof Magic is the obvious choice as it is highly reflective which reduces surface temperature and cooling costs.
Lauren is associated with the RV Roof Magic. Normally I would remove comments companies marketing their products, but I do think its worth considering these kinds of roof coatings — just be sure to do your homework on whether such a coating will help in your circumstances.
Admin
I checked this out a few months ago. The comments on Amazon were very detailed and enlightening – and very critical. The product has since been de-listed. Many complaints about being lumpy and semi-solid in pail after just being stored three months or less. Lots of complaints about uneven application. Failure to adhere to some roof types. Primers are required some of the time. And must be of the right type and properly applied. Intrinsically this is likely a good product. My guess it is best applied by a professional under the ideal conditions. Yet, professionals don’t use the product that I talked to or just a cheaper generic version. I find their website very simplistic and over hyped.
Thanks Bob
Gary
Going to have my van sprayed with insulation. Do you think applying a thin layer of foil backed bubble insulation with 3M spray to the van walls with help keep the van walls from rippling when the foam cures?
Hi Jenny,
I’d say no as long as the spray outfit has done vehicle spraying and knows the precautions to take to avoid distortion of the walls.
I’m not sure that adding the layer of the bubble insulation would be risk free. Will it stay well adhered to the van skin over time? It can get over 160F at the van skin, will the bubble stuff hold up to that? I think you are better off finding a spray foam place that can do it right.
Another option, if you are concerned about the possibility of distortion, would be to use rigid polyiso insulation adhered to the van skin with Great Stuff urethane foam. Its explained a bit on this page https://www.buildagreenrv.com/design-and-build-information-for-camper-vans/install-insulation/ under the heading Rigid Foam Panel Insulation.
Gary
Gary
Hi Gary, do you think a silicone mat such as what is used for baking or something like this might be useful as a 1st layer for preventing conduction of heat into a van or even a silicone roof type paint? https://www.amazon.com/Silicone-Rubber-Sheets-Medium-Hardness/product-reviews/B078Z22PCR/ref=cm_cr_dp_d_hist_5?ie=UTF8&filterByStar=five_star&reviewerType=all_reviews#reviews-filter-bar
Hi Steven,
Silicone has about the same thermal conductivity as wood, so, it would help a bit thermally, but not nearly as much as the same thickness of insulation.
Thermal conductivity of materials: https://www.engineeringtoolbox.com/thermal-conductivity-d_429.html
Gary
Gary – that chart in the link you posted is beyond my non scientific brain but I did notice that it included silicon but not silicone. Hot pot trivets 1/16″ thick and oven gloves are now made from silicone because they allow picking up very hot pots, up to over 400 degrees without getting burned. https://www.taychem.com/2018/07/03/why-silicone-is-heat-resistant/
Hi,
The numbers in the table are just thermal conductivity — the higher the number, the more heat they conduct and the worse they are as insulators. So, the silicone rubber is about 0.2 and a good insulator is about 0.02 or about 10 times better as an insulator.
The silicon cast resin in the table is same as silicone rubber.
If you did not have an insulation layer in your floor stack up (the polyiso), then I’d say a layer of the silicone rubber would help as a thermal break, but since you do have the layer of actual insulation, adding a thin layer of silicone rubber would have very little effect on heat transfer through the floor.
Gary
I get it now. Thanks for the explanation.
I saw a Youtube video the other day on van insulation with the recommendation not to insulate if you plan to be in very hot weather primarily, the reason being that no matter what you do, the van will get hot and the insulation will keep the van hot long after the air cools down. ( 17:14 https://www.youtube.com/watch?v=FVk8csC6OiM – This sounds ridiculous to me unless the insulation itself holds onto heat. Unlike a stucco house the metal van body should cool off very quickly and the hot interior air can be quickly vented outside with a fan allowing cool air to replace it. What do you guys think?
Hi Steve,
I agree with you — it sounds ridiculous.
Its important to have some form of forced ventilation in the van — like a MaxxAir or Fantasic fan in the ceiling. This will quickly cool the van once the outside air temperature drops. And, during the day, the insulation plus some forced ventilation will keep the van temperature close to the outside air temperature. Without insulation, the temperature inside the van will be well above the outside air temperature if the van is in the sun.
If its a hot climate where air conditioning is necessary, the insulation will greatly reduce the load on the AC and allow a smaller AC unit to cool the van.
Insulation also reduces the noise level in the van to a reasonable level — without it, the van noise level will be very high.
Gary
Auralex Tubetak Pro Liquid Adhesive sold by Home Depot is made to attach PolyIso sheets.
Just a thought…
Hi,
Don’t have any experience with this adhesive, but one negative is that its max service temperature is listed as 158F. On a hot sunny day with the van in the sun, the van metal temperature will exceed this.
A lot of people have used Great Stuff urethane foam to attach Polyiso successfully, and I’d be inclined to stick to this method until there are some reports from people who have used the Tubetak successfully.
Gary
Dear Gary,
FIRST: BIG THANKS for your website, knowledge, and willingness to share your extensive experience. I’ve been studying (and nerding out on) your methods and links for almost 2 years as I’ve planned our van, which we now have and are starting the build.
My question concerns insulation, especially Great Stuff.
I’ve read quite a bit on car repair and modification blogs/sites–and seen some scary pictures–about how GREAT STUFF corrodes and rusts metal from the inside out in the long run.
So, for insulation we are planning maxing on polyiso where we can, and filling gaps, ribs, and hard to reach place with Thinsulate.
“DeepRed”(http://deepredmotorhome.com/insulation.php) used SIKAFLEX 221 to attach his polyiso panels.
It’s made for autos, is non-corrosive, & temperature stable. So I’m thinking about using that.
Do you have any experience/knowledge with the Sikaflex 221 or info about corrosion with Great Stuff?
I’ve used GS plenty in home reno applications, so I’m comfortable working with it. But, I do plan on keeping the van for a looong time, so I don’t want to have rust issues.
Thanks in advance,
Janet aka “JansVans” on Promaster forum.
Hi Janet,
I’ve not heard of any problems with GS causing metal corrosion, and not seen any on my 4 year old conversion. I would like to see the links you mention if you can find them again.
I used Sikaflex in a couple places on the conversion, and it worked well. But, not sure is was the 221. They do certainly have a good reputation.
How well it would work for securing insulation panels, I just don’t know. It does seem like you would have to use a lot of it to insure that water vapor does not have a path into the area behind the panels.
I like the GS as the adhesive because you can put generous beads of it over the back of the insulation panel in a grid pattern, and when you place it against the van wall it expands enough to completely seal the back of the insulation panel so that water vapor cannot get behind the panel and condense there — potentially causing rust or corrosion over time.
I like using GS around the edges of the insulation panels for the same reasons. GS is also a very good adhesive, so no worries about it coming loose over time or squeaking.
As you have no doubt noticed there are a lot of insulation schemes out there, all with there strong supporters. Not a lot of hard data out there to support any of the methods. I do keep an eye out for people reporting rust or corrosion problems with insulation on vans, and there really are not that many horror stories — I’ve found a couple stories on problems with fiberglass insulation (which would probably apply to any water vapor permeable insulation), but that’s about it.
Gary
Thanks for the speedy reply. I’m back in the Great Stuff camp. Sorry to throw a fly in the contentious insulation ointment.
I spoke today with a technical assist guy at Dow re: GS. He said: 1)GS is not corrosive once it cures; 2) but, it does absorb water. I think the car blogs I saw that used GS and had rust issues, used it where it was exposed to water, hence the rusting.
Dow says the “window and door” product is a softer and white version of the “multipurpose black”, which is advertised as appropriate for RV and marine uses. All the GS products are essentially the same formulation, with variances in expandability and softness (in the case of window and door) or color (multipurpose black).
Unfortunately, it appears that “window and door” and “Multipurpose” are not available in the PRO sizes which fit on the ProGun. I ordered a Pro Gun and pro cans of Gaps n’ Cracks (and some gun cleaner.).
I’m planning to use 1″ polyiso boards, doubled up where possible on the walls and doors. 1″ on ceiling, 1″ under factory floor.
Thanks again for all your help.
I would suggest using 2” polyiso on the sides. Fits perfectly and requires no doubling up and double cutting
Hi Janet,
Good to hear that Great Stuff answers the phone and has some technical support — seems rare these days.
The Pro is available in the Window and Door version — Amazon has it.
I believe that while urethane foam (which is what GS is) has a low permeability to water vapor — much lower than fiberglass or thinsulate, so while its not vapor impermeable, it will let a lot less water vapor through to the van skin that other insulations (I think:)
You will want to use the spring strips of wood to push the Polyiso against the wall until the GS cures.
Gary
My question might fit better on the more-recent posts about thermal bridging, but it looks like comments aren’t enabled there.
You tested two options for insulating ribs: Thinsulate pulled into them, and foam on top of them. What about spray foam, such as Great Stuff, inside of them rather than Thinsulate? Would you be worried about the foam deforming the outside? Couldn’t you avoid that problem by leaving enough holes open so the foam could expand out of them somewhat? I know Great Stuff says it’s not for filling closed cavities, so maybe this is a dumb idea. But it seems like it would work. Thoughts?
Hi Brian,
I think you could use Great Stuff to fill the frame cavities. I would use the low expansion stuff they make for windows and doors. Don’t think you would see any deformation of the sheet metal. Great Stuff cures from moisture in the air, so the cure time for foam sprayed into the frame cavities might be quite long — you could mist into the frame cavity with water before foaming to get a faster cure.
I don’t think that the heat loss difference between foam and Thinsulate would be much for this case. I think the frame webs are responsible for a lot of the heat loss and no matter what kind of insulation you use in the cavities, there will still be the thermal bridging caused by the metal frame webs.
Insulating over the top of the frames with (say) a thin layer of Polyiso is likely to work better in that you won’t get the thermal bridging. But, understand that not all are going to want to mess with insulation over the frames.
I do think that Thinsulate is a good choice for the frame cavities in that its pretty easy to install, it does do some good, and its easy to take out if you later want to run a wire through the frame cavity. But, kind of a pain to just order a little of it for the frame cavities.
I enabled comments on the bridging page (just forgot to check the box earlier), but might as well leave these here.
Gary
Hi there, thank you for the wealth of information you provide on your site. My question is this, I had some LPDE plastic lying around and I figured, why not use it up to insulate some of the ribs of the van…? Then realized that its upper temp is 176 degrees F and maybe that wasn’t such a smart idea. Do you think that it will withstand the summer heat levels my van is commonly subjected to, around 90 to 100 degrees F ambient…? What would happen to it at temps higher than 176 degrees? Will it melt, combust, what? I’m trying to decide if it’s worthwhile pulling it all out. Appreciate any advice you can give.
Hi Beth,
Good question – not sure I have a good answer 🙂
My first thought was that LDPE might not be a very good insulator, but one place lists it as R3 per inch, which is not bad.
At least one place lists the max service temp as 90 to 100C (194F to 212F), so maybe the 176F is on the conservative side?
You could use one of those IR temperature guns to actually measure the temperature of the van metal skin. If you don’t have one already, they are cheap and useful for a lot things. https://www.amazon.com/Etekcity-Lasergrip-774-Non-contact-Thermometer/dp/B00837ZGRY/ref=sr_1_4?ie=UTF8&qid=1524066462&sr=8-4&keywords=ir+temperature+gun&dpID=41xO8jWPMwL&preST=_SY300_QL70_&dpSrc=srch
The surface temperature will depend a fair bit if your van is white or a darker color — dark running hotter.
Not sure what happens if the LDPE gets to hot, or whether it produces anything toxic.
I guess if it were me, I’d measure the surface temps on a hot day in the sun and go from there — I’m guessing its probably OK.
Please let us know!
Gary
Thanks Gary!! Well my van is white. It seems like that makes a big difference from all what I’ve read. I’m sure that melting LPDE would not be entirely benign but I’m going to wing it and hope that surface temps don’t get that high. Unfortunately I can’t wait for the summer to take readings as I’m going to cover up this whole mess with ply and carpet hopefully well before then. I found a website where someone tested surface metal temps of darker vs. lighter Camrys (here if you’re interested http://www.tom-morrow-land.com/tests/cartemp/) and none of the surface metal temps were higher than 150 F (and that was for the black/dark cars). I also didn’t use it throughout the van just in a couple spots where I was being impatient/miserly.
Gary,
Thank you for such a great blog and write ups. I have a 159″ PM and have installed the floor with 1″ polyiso w/ 1/2″ ply following your lead (but not filling in the valleys).
Going to go with rigid 2″ polyiso boards for the sides and 1″ for the ceiling. Just wondering what you think is the best way to do the ribs? Run wires first? Thinsulate after?
Thanks,
Kevin
Hi Kevin,
I think you would be better off to work out where your main wire run areas are going to be and not insulate them at all, or wait until after the wires are run.
On mine, most of the wires that need to go up from the electronics area to get to the ceiling or other side of van go up the main frame just behind the galley, and I’ve not insulated that frame at all.
For the ribs that you do insulate, I think I would lean towards the Thinsulate. It pulls through the ribs pretty easily. The only down side I see for the Thinsulate is that it lets water vapor through to the van skin, but maybe OK for these limited areas.
Another approach for the ribs would be if you could get even some thin insulation adhered to the inside surface of the frames/ribs. The insulation is more effective if applied on the inside of the frames as it does not allow the metal frame to conduct heat around the insulation. A half inch of polyiso inside the frames would be very effective, but even a 1/4 inch of insulation inside the frames would be quite helpful.
https://www.buildagreenrv.com/insulating-thermal-bridges-due-metal-frames/
For the 2 inch thick wall insulation, you might have to experiment a bit figure out how to get it tight against the wall. With 1 inch thick, you can use the spring sticks to hold tight against the wall while the Great Stuff cures, but the 2 inch may be too stiff for that to work. Maybe 2 layers of 1 inch? or, cut some saw kerfs part way through the 2 inch polyiso on the outboard side? Or, maybe its not a problem at all 🙂
I’d like to hear how the 2 inch polyiso comes out.
Gary
Gary,
Thanks for the quick response. I also don’t see much downside to Thinsulate except that it is outrageously expensive. And that is a huge downside.
As far as the 2″ polyiso I glued 2 panels to the van with Loctite. Seems to work well. I plan to cover the edges of the insulation with Great Stuff to keep moisture from getting behind.
I don’t know what spring sticks are and I plan on just using Great Stuff to adhere the rest of the polyiso. Is there an issue if the polyiso isn’t touching the wall and only the great stuff is? It seems like that would be the case with 1″ or 2″ either way?
Thanks again
Hi Kevin,
By spring sticks I mean the sticks used to hold the polyiso against the van skin while the Great Stuff is curing — you can see some of them in the pictures above.
I do think its good to have the polyiso held against the van skin while the Great Stuff is curing just to make sure there is a good bond and to minimize any chance of water vapor getting behind the polyiso. I like the idea of using enough Great Stuff so that it completely fills any narrow gaps between the polyios and van skin. The photo above that shows the polyiso with a full grid of Great Stuff applied looks good to me.
Gary
Hey Gary, just wanted to drop a line and say thank you for being such a great resource! I ended up going the polyiso route. I used 3M adhesive spray on the back to hold it in place and great stuff pro around the edges. Thanks!
https://cascadelines.com/2017/10/03/ram-promaster-floor-insulation/
Hi Erik,
Nice job on the website — hope you keep adding to it.
Gary
Thanks Gary, that’s the plan! Hoping it can be an informative resource for others, like yours is.
Erik
Appreciation to my father who told me regarding this blog, this
weblog is truly awesome.
Thanks!
Gary
Hi Gary, I am leaning towards polyiso boards. Still waiting for van delivery so detailed measurements not yet possible to better know what board thicknesses to plan on.
My question is on reflective surfaces in a limited wall assembly. Insulation is simple, it works in either direction, heat travelling outward (winter) and inward (summer). However, implementing a reflective surface seems to work best in one direction. I have decided to reflect radiant light back towards van wall (summer mode) as I rather keep van cool without air conditioning. This is similar to what people do in their attics, bouncing radiant light back to the roof keeping the attic cooler. Am I missing something when applied to a van?
Assuming you agree with my plan, I will need to glue the polyiso boards say 3/4″ away from bare van wall with spacers? or ? With this system the van wall is wide open to condensation when weather cools down. When this happens I expect condensate to run down headed to weep holes and/or evaporate. I will not top this assembly with a vapor barrier by the way.
Speaking of condensation running down to weep holes, from photos I can not see a clear path for that to occur, specially from the ceiling. Where would ceiling condensate run to ?
Thanks Gary
Santiago
Hi Santiago,
Recognize you from the PM forum.
I’ll pass on my thoughts on the way I would go, and you can compare it to what you have suggested — I’m not sure which is better.
I would glue the Poliso directly to the van skin using a generous amount of Great Stuff and spring sticks to keep the polyiso pretty tight to the van skin. Then try to leave an air gap between the inside of the polyiso and the paneling — ie have the reflective layer that is on the polyiso face an air layer to the inside.
The thinking for this is:
– It will keep water vapor from getting to the van skin and condensing there, because the polyiso is non-permeable and their is no path for the vapor to get around the sides of the polyiso and behind it.
– The polyiso is very well adhered to the van skin, so no chance for squeaks.
– The reflective layer on the inside will help in the summer. The idea is that the reflective layer has both a high reflectivity and a low emissivity — these two go together for reflective surfaces. So, when heat from outside works its way to the inside reflective layer, this layer will do a poor job of radiating the heat into the van due to the low emissivity. For example, a reflective material with an emissivity of (say) 0.1 will radiate 1/10th of the heat that a layer with an emissivity of 1.0. I’m not sure if its as effective as having the reflective layer facing outward or not, but it should be pretty helpful.
– Its easy to install this way (that is – easier than trying to keep the polyiso spaced off the van skin).
So, I don’t know which of the two methods would work the best — they both have their pros/cons and while both methods (I think) are based on sound physics, its hard to say if our understanding of the physics actually holds true.
If you do have a go at the spacing the polyiso off the van skin method, it would be great to get some pictures and a report.
Gary
Thanks for great info Gary. I like your plan better for two reasons, easier and more robust installation and think letting emissivity on insulation’s surface do its thing is sound. I might want to improve on the polyiso board’s surface emissivity’s value.
My original concept with air gap between van wall and radiant barrier will likely need a way to vent that hot airspace similar to a house attic with barrier. Not great especially with so little wall assembly space in a van. I like your way more and more.
Two photos on this site showing polyiso board installation confuses me. See photo above with caption “Another nice Polyiso installation from the ProMaster forum” then the photo right below with the young lady adding a large grid of foam on the back of a board.
Obviously, her over done grid will mash into a solid layer of foam leaving no way for any condensate to run out. The other photo of a fully covered wall shows what I have read RD and others mention many times, leave a gap to allow condensate to run out. In fact when adding foam behind board to foam a few vertical runs to allow condensate to flow out !
I see that all boards on that photo including ceiling ones have one side not foamed up. I have read others on the forum state they left 1/2″ gaps. I see both camp’s reasoning but this leaves me wondering.
A minor point is the use of orange “crack & fill” vs yellow “door and window” Great Stuff foam. I use both with a Pro gun when remodeling but no experience with a van that has the potential to squeak.
Hi Santiago,
I’m in the camp that says put enough Great Stuff on the back of the polyiso to completely seal the back of the polyiso to the van skin. To me, this basically achieves the same effect as spray in urethane insulation.
I realize that some advocate using vertical lines of Great Stuff that allow drainage channels between and I understand the logic of it. I just feel that if you do a good enough job of sealing the polyiso to the van skin, there will be no way for water vapor to get to the van skin and no condensation.
I can’t say for sure which approach is best, and they may both work fine.
Gary
I live in FL but expect to travel north even in winter. I ordered a Promaster with rubber floor mats and interior walls (have not seen the walls on any local vans yet so fingers are crossed). I plan to remove the walls, use great stuff to glue ¾ or 1 inch polyiso to the van’s skin, then reinstall the interior walls. It seems that the most likely place for rust to start is where the steel walls meet the steel floor, so I plan to stop the polyiso or great stuff a couple of inches before it hits the floor and leave slots for air flow. My two questions are: should I spray something like Rust oleum bed liner or Flex Seal along the floor-wall as extra protection? Is there a better product?
Hi Bill,
That makes sense to me.
There is plenty of room for 1 inch polyiso, so I’d use that instead of the 3/4.
I like the idea of protecting the floor to wall area.
As for best product, I don’t know. In addition to the ones you name, you might look at POR15.
Chromate containing primers/paints are very good for rust prevention. I had thought they were not available any longer in the US, but Rust Oleum appears to offer this one: https://www.rustoleum.com/en/rustoleum/product-catalog/industrial-brands/high-performance/alkyd-coatings/7400-system-zinc-chromate-primers
Its probably not easy to paint that area — if it looks like it would be a real pain to get it with a regular paint, you might look at spraying with LPS3. Or, this similar Rust Oleum product: https://www.rustoleum.com/product-catalog/consumer-brands/stops-rust/rust-inhibitor/
Gary
I have lately been thinking about getting a van to convert and have been looking at youtube videos etc to learn and to psych me up. A couple of questions regarding insulation. If using polyiso is there any advantage to using Great Stuff to glue it down rather than double sided tape?
Another insulation method I’m wondering about is if you have a spare 2 or 3 inches is to avoid glueing anything to the walls and simply surround the inside with curtains made out of Thinsulate or even polyester fleece scraps free from clothing manufacturers and hang them from a track. Does this sound feasible or am I nuts?
Hi Steve,
I think that gluing the polyiso to the van skin with Great Stuff Pro is a good way to go. Its a very good adhesive and it basically bonds the polyiso and the van skin into a single unit and prevents water vapor in the inside air from getting the the van skin and condensing. It is also a bond that holds up well over time and will not develop squeaks over time.
I’ve not heard of anyone using your 2nd method as most people are wanting to get every inch of inside space they can. The curvature of the wall might make hanging the curtains difficult? I’m inclined to think that it would be better to have the insulation adhered to the wall in some way.
Gary
Hi Gary,
We have a 159″ promaster that we are just starting to convert. We’ve decided on spray foam insulation and have found a local company that has done vans before and are charging a reasonable price. For the walls, we are planning on drilling wooden vertical studs on to the metal frame and then attaching cedar panelling to the wood. Do you think the best idea would be to put the wood studs in first, and then flush fill the spray foam to these? It seems like a thick layer of foam, however we are worried about having a layer of cold air between the panelling and the walls if we don’t flush fill. Any thoughts you have on this would be greatly appreciated!
Many thanks.
Hi Abby
Sorry about slow response.
Not sure if it would be better to install the studs first – it’s an unusual way to do it. You might ask for some opinions on the van forums (sprinter, transit, and promaster) just to get some ideas on pros and cons of studs.
I’d not worry about an air gap between insulation and wall – the inside surface of insulation will run at nearly same temperature as the wall paneling.
Gary
Gary,
Thanks for getting back to me. Would you recommend we tape off the areas where we’ll install the windows and fan before we go ahead with the spray foam? Thanks
Hi Abby,
You might want to do a tape outline for the windows so the spray guy knows that those areas don’t need to be sprayed. I sprayed the fan and window areas before doing the fan and window installs — I just went easy on the foam where I knew the windows would be. Did not have any trouble scraping away the foam around the edge of the windows where needed for the window install.
Any areas that you don’t want sprayed should be carefully masked. If the foam gets on the lights or seats etc. it is very hard to get off. I’d cover the floor with cardboard.
Gary
Thanks for all of your help! I think I have decided to go with as much POLYISO as I can fit on the walls and ceiling of the van with XPS in the floor. Would you recommend Great stuff or Great Stuff pro for the adhesive?
My final question on this is that I have the factory option of the “wood floor” It’s basically a solid piece of fiberboard attached above the ribs in the floor. The actual board is 1cm thick but measuring from the metal floor to the top of wood is 1.5cm. Should I just lay insulation on top of this or should I remove it? I don’t know how this is attached to floor other than the six hex bolts I can see.
Hi Matt,
I’d strongly recommend the Great Stuff Pro — its not so much that the Pro foam is that much better as that the gun is much easier to use, and you will be using it quite a bit.
you’ve probably worked with Great Stuff already, but if not, its very tenacious – if you get it on your skin, you will be wearing it for a week. Acetone will take it off before it cures, but once cured its tough to remove. The Pro applicator makes it quite a bit easier to control and avoid mishaps.
Recently on the ProMaster forum there were a couple discussions on whether to remove the factory floor or not. Opinions varied and I don’t remember all of it, but sounded like the factory floor can be removed, insulation added, and then reinstalled. You can probably find the posts with a search — worth reading I think.
If I am remembering correctly the factory floor is attached with some dabs of adhesive.
Gary
Thanks! I’ve already ordered the pro applicator. I’ve read that the Pro foam isn’t as good as the regular for the adhesive? This true?
I’ve decided to remove the floor and not reinstall it as it takes up about 1/2 inch of space that I want back. I read that thread on the forum and it seems like most are taking it out. That way I can do 1 inch poly all the way around. and 3/4 ply.
It has been my impression that the regular Great Stuff is just a little “stickier” than the pro foam, but the difference (if any) is small.
The Pro stuff is rated for some type fire blocking applications (don’t know the details) and that may be why it behaves a little differently than the regular GS. Both very good adhesives with a good high service temperature rating.
Gary
Great stuff(no pun intended). Polyiso is what I will do. Did I miss the section on floor insulation? Did you do a floating wood frame with insulation between framing?
Gary this is great stuff(no pun intended). Polyiso is what I will do. Did I miss the section on floor insulation? Did you do a floating wood frame with insulation between framing?
Hi Andy
The floor insulation is on the floor page for our conversion.
Basically 1 inch polyiso glued to floor and covered with 1/4 inch plywood.
Gary
Polyiso looses its R value rapidly at lower temps (where it would matter most) whereas XPS actually INCREASES its R value. Im going with XPS and then spray glueing sheetws of heavy duty aluminium foil to create a vapor barrier. Neither XPS or EPS are proper vapour barriers, only vapour retarders.
http://www.greenbuildingadvisor.com/blogs/dept/musings/vapor-retarders-and-vapor-barriers
http://www.owenscorning.com/NetworkShare/EIS/10019950-FOAMULAR-XPS-vs-Poly-FAQ.pdf
Tim,
Good articles. I am just trying to weigh the benefits vs drawbacks of one vs the other. I wonder how much degradation XPS gets after touching exterior walls that reach temps close to 160F. How does that affect performance of the insulation. PolyIso is good above 200F so it will likely not degradate over time when vehicle is left in the sun.
I wonder if you did a small layer of Polyiso near the van walls and ceiling, then sandwiched xps on the inside of it that would be the best situation for cold weather. Gary what are your thoughts here. The article time attached has quite a good amount of research and facts.
Hi Tim,
The actual loss in R value is small when you consider the temperatures for the full thickness of the insulation. The outer most part of the polyiso does lose some R value, but most of the polyiso sheet is at warmer temps and maintains it R value. The actual tests of polyiso sheets with cold exterior and normal interior temps show very little degradation.
See figure 3 in this test report from Building Science:
https://buildingscience.com/documents/information-sheets/info-502-temperature-dependent-r-value
Down to 5F outside temperature, the drop in R value is essentially negligible, and even below 5F its small.
I personally would not use XPS or EPS for van insulation except on the floor in that the van skin temperatures are likely to go above the max service temperature of 160 F with the van parked in the sun on a hot day.
Here is a “thermal sculpture” I created with some XPS when I accidentally left a piece of EPDM lying on the XPS.
http://www.builditsolar.com/Experimental/pinkfoam.htm
If the temperature of the van sheet metal gets over 160F it will degrade the XPS and it will probably also degrade the bond between the XPS and the van sheet metal, which might lead to squeaking.
Gary
SO if you were to do it all over again (I have a new Promaster 2500 159) would you do 1 inch of polyiso board on the walls adhered with great stuff pro. Then 3/4 inch polyiso on the floor. Metal>ribs>Polyiso w/great stuff>plywood>vinyl flooring. Cieling 1 inch polyiso with great stuff pro?
I plan on being in cold climates 20F 4 months of the year and a few months of the year in the desert up to 115F.
Thanks,
TahoeMatt
Hi Matt,
I’d do 1 inch polyiso all around, but if have a reason to do only 3/4 on the floor and 1 inch on the rest, its almost the same.
Don’t forget other big heat loss areas like the windows.
Also, there is a fair bit of area of sliding doors and back doors that can be effectively insulated — I just got around to that a couple months ago.
The fairly extreme temperatures you are going to be seeing would probably argue for somewhat thicker polyiso. There are lots of places in the walls where 1.5 inch would fit easily. And, if you don’t mind losing a little headroom, could probably use thicker in floor and ceiling, but ceiling would likely requred furring the ceiling ribs down a bit to get more than an inch.
The insulation calculator would let you estimate the drop in heat loss for more insulation and fuel burn.
I guess you saw the report on our Banff trip that gives some furnace use and propane use in weather that got down toward 20F at night — its in the Trips section if you did not see it.
Gary
Gary,
Thanks for the quick response. I’ll do some calculations to see if I’ll be able to fit 1 inch on the floor and ceiling. I’ll def do as much in the walls as possible. Do you have any write ups on insulating your sliding door? were you able to use polyiso board? or was it all too tight? I’ve heard of people losing the door mechanism with too much foam in there. You’re probably right on that front that I will need more than 3/4 if possible. What do you put on the outside of the Poly Iso? Any sound absorber or just straight to wood paneling?
wouldn’t XPS/EPS be a good choice for the floor insulation? Or is heat from the exhaust getting the floor hot?
Hi Sally,
I think EPS or XPS would be OK for the floor. I guess I’ve never checked the floor temperature over the areas where the exhaust system parts go. That would probably be a good idea. XPS and EPS are OK to about 160F, so anything around or over that would be a vote for Polyiso.
The polyiso has a better R value per inch even when you include the fact that the R value goes down a bit as it gets colder.
Gary
Gary, you might not be reading my foam layer correctly. I am thinking of installing the polyiso in between my furring strips that will be attached to the pillars and ceiling ribs. This would leave a decent air space between the polyiso and the interior surface of the van skin and that is what led me to think that it would alleviate the concerns about moisture on the interior metal.
I’m not really sure how much to be concerned about it as my wife currently has a 2002 Econoline van that is outfitted for grooming. The interior has hardboard and FRP panels covering the walls and ceiling, with fiberglass batts behind them. I had gutted the van just over a year ago to replace the flooring and there was no rust observed in any of the wall areas. The floor was a different story though with a lot of rust. The original floor had 2×2 nailers attached with screws through the van floor for plywood sheeting, and all of the rust occurred around the screw penetrations. It was a mess and hence the need to replace that van with the Transit that is being outfitted now.
Hi Mike,
Yes, I missed that — thought you were putting the polyiso right against the van inner skin.
I think you could find people who would like that arrangement, particularly if there was a path for air to circulate between the back of the polyiso and the van skin. I’m a bit hesitant about it because it seems like water vapor laden air from the inside of the van could circulate between the van skin and the polyiso, and condense water on the cold van skin. But, its good that this condensation has a good path to dry out.
Not saying your scheme might not work fine, but I prefer to have the polyiso well adhered to the van skin with Great Stuff Pro polyurethane foam. I like this because the polyiso is not permeable to water vapor (basically it acts as a vapor barrier), so, with the polyiso sealed against the van skin, water vapor cannot get to the van skin through the poliso and condense on the cold van skin. Another nice feature of this system is that the air temperature on the inside of the polyiso is normally above the dew point temperature of the inside air, so you don’t get condensation on the inside surface of the polyiso either.
As you have probably noticed, there a ton of different theories about how best to insulate a van — its tough to wade through them all and pick the best one. If you go ahead with your method, I’d like to hear how it works out.
Gary
Gary, Thank you for this great forum. I’ll be doing a build of a Transit van to turn it into a mobile grooming van for my wife. I really like the spray foam concept but the cost and labor are more than I am looking to add to the project. I was thinking of furring out the walls and ceiling with 1″ strips and then installing 1″ polyiso in between those and I would like to get your thoughts on that. We have already installed side windows that slide open and a Maxxair vent to try and move the moisture out but there will still be plenty and I am thinking that by doing it this way the interior voids between the polyiso and interior of the skin will be able to dry out if/when moisture gets there. Definitely not maximizing the available space in the van but there will still be plenty for the build that we are planning.
Hi Mike,
I think that with or without the furring strips that using the polyiso rigid insulation board that is adhered to the van skin with Great Stuff Pro urethane foam in a can is a good way to go. If I were doing my van again, that is what I’d do.
Some description and links using that method on this page:
https://www.buildagreenrv.com/design-and-build-information-for-camper-vans/install-insulation/
Down the page a ways.
if you don’t need the space you would lose with the furring strips, they might make it easier to do the walls and ceiling. I’d get a test furring strip and try it out on the walls. The main wall frames don’t line up in a straight line in the forward/aft direction — so, it will probably take a bit of head scratching to work out how the furring strips would run.
On the ceiling, the furring strips would likely work fine, but toward the left and right edges of the ceiling, the curvature tightens quite a bit and you might have to fur down the furring strips to ease the curvature enough to get regular paneling to conform to it — see the page on my conversion on the ceiling. Having the continuous furring strips would definitely make it easier to place and fasten the ceiling panels.
My gut says that the increase in airspace you would get between the polyiso and the furred in wall/ceiling panels would not make a lot of difference in dry out time — but, that’s just my gut.
I’d like to hear how this works out — maybe take some pictures?
Gary
Hi
Thank you for all of the info..It is very valuable. We are considering hiring out spray foam and have been reading about thermal and ignition barriers. Are you familiar with either of these and did you do one? Thanks Tracy
Hi Tracy,
I had not heard of thermal and ignition barriers.
Found this:
http://www.icc-es.org/News/Articles/AY126ThermalBarriersSPF2011-51811.pdf
It looks like by their definitions the paneling in most RVs and camper vans would meet the ignition barrier requirements. But, I’m not aware of any RVs that would meet the thermal barrier requirements.
I would guess that RVs are not required to to meet the requirement for a thermal barrier plus ignition barrier. The requirements appear to be aimed at homes.
I guess given that the the RV space is small and are equiped with fire/smoke detectors that you would quickly be alerted to the presence of a fire and be able to safely evacuate. And, that the paneling would serve as an ignition barrier to reduce the chances of a fire starting.
So, I guess I’m pretty comfortable with RVs as they are — are you?
Anyone else have any thoughts on this?
Gary
Hi again,
Perhaps a product like one of the ones on the page link below could provide some additional fire protection — maybe not that of a full thermal barrier, but enough to be useful?
https://www.grainger.com/product/40PM51&AL!2966!3!166590821508!!!g!104636343717!?gclid=Cj0KCQjwqvvLBRDIARIsAMYuvBEXjTge6BuNq_8z78R5GhgqacqzR33l0TzZoU_028sow07YZDtbwRkaAuAzEALw_wcB&cm_mmc=PPC:+Google+PLA?campaignid=719343253&s_kwcid=AL!2966!3!166590821508!!!!104636343717!&ef_id=WLneHgAABIx74mZy:20170801020225:s
Gary
Quality articles is the main to attract the people to pay
a visit the site, that’s what this website is providing.
Very detailed article. Thanks for collecting all those information.
We used rigid foam panels and it went well. We used 50mm on the walls and 25mm on the ceiling. It was fairly easy to install and not messy at all.
On top, as a vapour barrier, we used some double sided insulated aluminium foil. Just make sure to use the right aluminium tape.
http://van-derlust.com/insulation/
Insulation was one of our favourite parts within our van conversion! http://van-derlust.com/insulation/
Hi Van Derlust,
Thanks — nice website.
Gary
The ambulance I’m working with is built with 2″ aluminum studs – which are tremendous thermal bridges regardless of what I stick between them. I’m thinking some of this “home slicker” product (https://www.amazon.com/Home-Slicker-Rain-Screen-150/dp/B007D0IKNE/ref=sr_1_1_a_it?ie=UTF8&qid=1494427486&sr=8-1&keywords=home+slicker) next to the aluminum walls between studs with Thinsulate 600L on top followed by a half inch sheet of polyiso across all the studs.
That leaves condensation/drying space next to the walls, fills the 2″ gap and gives some protection from the thermal bridge studs…
Thoughts?
Hi Keith,
Personally, I favor using polyio or urethane spray foam for the insulation. I like this approach because it prevents water vapor from getting to the cold van skin and condensing on it. That is, its vapor impermeable.
But, lots of people use Thinsulate (which is highly vapor permeable). If you use the Thinsulate against the van skin, it seems to me that it would allow condensation to drain downward and/or dry out, and I’m not sure what the home slicker would actually gain you? The Thinsulate is very open, and I think it would allow water to drain down through it and air to flow through it for drying. But, I would say not to put a vapor barrier to the inside of the Thinsulate as it will keep it from drying out.
If you can get something like half an inch of polyio over the alum studs, it would greatly reduce the heat loss through the studs — it would increase the R value in the stud area from about R1 to about R4, cutting the heat flow out in the stud area down to about 25% of what it would be without the polyiso.
One way to think about the stud heat loss: Before you do any insulating, both the van skin area between the studs and the studs are about R1 (the metal is near R0, but the air layers on the inside and outside of van add about R1). If you have (say) 100 sqft of wall area, and 10 sqft of that is studs, then the heat loss before insulating with 70F inside and 30F outside is (9 sqft)(70F-30F)/R1 = 360 BTU/hr for walls and (1 sqft)(70F – 30F)/ R1 = 40 BTU/hr for studs for a total of 400 BTU/hr. If you insulate the walls to R10, but leave the studs uninsulated, then the wall heat loss is about (9 sqft)(70F-30F)/R10 = 36 BTU/hr and stud heat loss is (1 sqft)(70F-30F)/R1 = 40 BTU/hr for a total of 76 BTU/hr. So, even if you don’t insulate the stud areas at all, your total heat loss drops from 400 BTU/hr down to 76 BTU/hr. Its actually likely somewhat better than that in that the inside wall material will provide some added R value over the studs.
Gary
Just a comment on fiberglass insulation. I just bought a 2006 campervan that original owner bought new in 2006. He installed mostly fiberglass insulation, used the van 18 months, had a stroke and never used van again. It sat covered on a hot FL carport, covered, for 9 yrs. I purchased said van 8 weeks ago (11K miles on it) and have recently gutted the van. Zero, zero signs of rust, any type of moisture intrusion. Looks like it came off the Detroit assembly line yesterday
Hi Dale,
Thanks for the data point.
That pretty much agrees with what I’ve been able to determine — the FG insulation in most vans does not lead to a condensation problem, but some have reported finding serious rust to the point of making the van useless. I gather it depends on how often the air in the van gets to high humidity levels (maybe from cooking) and the van skin is cool or cold.
Some also feel that the vibration of the van as you drive will continue to release FG particles into the air and that this is a health issue.
Personally, I don’t feel like its worth taking the chance with FG for van insulation — lots of better choices.
Thanks — Gary
Very informative site Gary, thanks.
Regarding layering of the Reflectix type products, while obviously a sales pitch, these materials used correctly may have the potential to control convection as well as functioning as a radiant barrier.
Your thoughts on this?
Steve
Hi Steve,
I’m a bit of a skeptic on Reflectix. It has a very low inherient R value, and depends on the reflective surfaces to provide useful R values. But, to be effective the reflective surfaces must face an airspace. It seems hard in a van insulatioon install to provide these air layers and to keep them intact over time. Loss of reflectivity over time due to dust etc. is also a concern for me.
That’s my 2 cents 🙂
Gary
I have a 1988 Dodge ram van B250 conversion with a fiberglass pop top. I’m just over 6’2 and without floor insulation I just barely have to tilt my head to stand up. I plan to insulate the floor this weekend. Now this may be crazy but instead of insulating inside the fiberglass pop top, I want to build a box around the outside and spray foam the whole thing. Any advice?
Hello guys. I’ve read this whole forum and feel far better informed. The polysi seems to be the only way to go considering is ability to withstand up to 270° when attached to the van skin.
I can’t help but wonder about the lizard skin heat retardant and sound proofing. I am very concerned with good sound proofing so that I may be undetected by passers by. As long as these items don’t detach from the wall, they seem the very logical first layer as they would add heat retardant and sound dampening qualities to the vans outer shell.
Now with that I want my van to be very comfortable and extreme temperatures. Both cold and hot, far below 30° Celsius for Canada traveling and well above 90 for visiting Texas and new Mexico.
Now I wonder if the great stuff we use to adhere the polysi, will hold up to those extreme temperatures of i go that route and with the seemingly good water resistance of Roxel and it’s great R rating at extreme temperatures (baring allergies and price concerns) does this seem to be the best solution for a hot and cold extreme travel van.
Hi Jake,
I don’t have any first hand experience with Lizard Skin. It looks like from their site it can be effective for noise damping. They say its good to 300F, which would be good. I am very skeptical of their insulation claims for it — I think that if you use it as the first layer, you will definitely want insulation inside of it.
The Polyiso directly on the van skin also provides some noise damping, but it may not be as much as the Lizard Skin — just don’t know.
The Great Stuff is polyurethane, so its basically the same stuff as the polyiso insulation and should be good for about the same temperature. I’ve used a ton of it over the years for various projects, some of which exposed it to high temperatures (eg inside of solar thermal collectors) and it has always done fine.
It really is Great Stuff 🙂
If you go with the Roxul inside of the Lizard Skin, you may get some condensation on the inside surface of the Lizard Skin because the Roxul will not stop water vapor from getting through it to the LS. This seems better than having condensation directly on the van metal skin. So, this may be a good way to go. You could probably also use the polyiso rigid sheet inside the LS as long as the LS provided a good bonding surface.
You might want to try a small test area for which ever solution you decide to try.
Please keep us posted on how it goes.
Gary
All these tradeoffs with the existing rolled steel shell just push me to looking at the getting the cutaway model and constructing a real expedition camper cube out of tyvek and aluminum . . . how much would a DIY shell like:
https://winnebagoind.com/products/class-c/2016/trend/exterior/structure
cost is the question.
Hi Troy,
Interesting idea.
It would make for a more squared off shape, which would be nice for doing the interior, but would be less aerodynamic.
I don’t think there would be any weight reduction, but one would have to do the weight calcs to be sure.
Gary
I bought an E350 7.3 diesel cargo van new in 98 and promptly decided it was too noisy. My experience with noise reduction comes from ships. The first step is to reduce the resonate frequency of as much of the sheet metal as you can. This is done by increasing the weight and reducing the acoustic stiffness of the composite sheet. Adding something like Dynamat to a door panel will reduce its stiffness and increase its weight (at a ridicules price). What I used was Snow and ice guard available at a roofing supply, it is a peal and stick material that is kind of rubbery and tarlike. I sprayed over that with rubberized undercoating. On the floor boards fire wall and other thick metal areas I used torch down (also called roll roofing) applied with a small propane torch (avoid thin large sheet metal as the heat will warp them) The peal and stick and torch down does not have to in one large piece, it is the amount of area covered that counts. Inside the doors where my hands don’t fit I used a lot of the small scraps left over from the finders. After the roofing material was laid down I sprayed everything with the undercoating.
The next step in noise reduction is absorption which is accomplished with soft open cell material. I used carpet pad inside the closed area of the doors, walls and headliner. If I had known about the spray in insulation I would have used that. The interior panels are made of wooden door skins with peal and stick on facing out side and carpet glued to the inside (Damping and absorption). The areas treated front doghouse, and fenders (fenders removed to apply material), doors, walls roof, and floor (seats and floor liner removed).
The above treatment knocked a little more than 65 db. off the noise level at 60 MPH according to a RadioShack sound level meter. I still drive the van every day and you can still have a conversation in it with shouting. I hope this helps someone. JH
Hi Jerry,
Interesting stuff.
I guess I would worry a bit about odor and outgassing from some of those materials?
I’m guessing the 65 db is what the noise level is now? Not that you took 65 db off the noise level?
Gary
I spent the last month researching my upcoming conversion. The insulation part was troubling me so I did some research. I spoke to two “experts” to get a feel for what I needed to do. First was a van refrigeration conversion company as I’d figure they knew exactly what to do. Basically, they just do a straight 3 inch XPS with GPS lining but he did say some companies also lay a thin layer of closed cell foam before the XPS. Most camper conversion companies also use foam with XPS as their main insulation. Then I spoke to a civil engineer acquaintance who suggested I use multi layers (including foils) instead because you can achieve the same insulation in half the space but make sure:
1. any foil must faces an air cavity (otherwise they are useless)
2. one of the nonbreathable layers has to become an “air tight cocoon”. Inside the cocoon, you will need to put some sort of ventilation and a 10W high efficiency srhrv unit in the kitchen will do (unless you can run an a/c)
3. the first and last layers need to be breathable because condensation also occurs on the inside of the van metal skin in summer whereas in winter it will form inside the cocoon
4. have more insulation on the roof and less on the floor
So I basically came up with the following layers:
1. outer van metal skin
2. breathable sheepwool (9mm) 21db sound insulation glued to van metal
3. airtec foil (4 mm) glued to sheepwool
4. air gap (10+ mm) using spacers
5. ecoquilt multifoil (15 mm)
6. air gap (10+ mm) using spacers
7. thermalwrap radiator foil (2mm) (maybe glued to plywood lining)
8. plywood lining
Some other things I learnt:
– make sure no foil or vapor barrier touches the van metal as it will rust.
– I came across the sheepwool by accident when looking for the outer breathable membrane and I was impressed with the 21db sound proofing so decided to use it.
– don’t compress things in. Insulation should cover everything but be loose otherwise moisture can’t move and you close off the air gaps.
– don’t cover the water drainage holes at the bottom of walls
– avoid stiff boards as they will squeak
– the refrigeration guys used the old way of insulating – thick packed materials with no air cavities. The new way is to use air cavities, multifoils and loose breathable/nonbreathable layers.
– one of the nonbreathable layers will have to be an “air tight cocoon”. I’m not sure if it will be the ecoquilt or the thermawrap as yet.
Dave
Hi Dave,
I’m not quite clear on whether you have already done the insulating or are asking for comments on a potential way of doing the insulation?
In case its the 2nd I’ll pass on a few comments — which only represent my personal point of view. As you’ve no doubt already discovered, if you ask 5 people about the best insulation scheme you will get 7 opinions. A tough area to sort through.
– Reflective insulation facing airspaces is not at all new. My 1980’s handbooks give tables of added R value based on the way the reflective layer faces. Its not used a whole lot — probably because of the difficulty of creating the airspace.
– Adding a reflective layer facing an airspace for heat flow though a vertical wall adds about R1.7 (US). This is nice, but its only equivalent to about a quarter inch of polyiso insulation — a lot of people find it simpler to just add the quarter inch of polyiso (or other insulation).
– In order to be effective, the reflective layer must remain shiny (clean) over the years and the airspace must be maintained and remain open over the years. This is going to take some real care in a van environment where everything gets shaken up regularly.
– Rigid polyiso insulation sheets usually come with a reflective foil face, and usually there will be an airspace between the inside of a polyiso insulated van and the inside wall paneling, so you get this reflective layer and airspace (and the added R1.7) essentially for free.
– I would not use XPS next to the van skin as it has a maximum service temperature of 160F. The van skin can easily exceed this on a hot sunny day, and this will degrade and even melt the XPS. This seems particularly bad in a van where if the insulation is not well bonded to the van skin you may get squeaking. Polyiso has a service temperature of 270F and is OK to use in a van.
If a stackup of materials is used, then I think XPS is OK for layers closer to the inside of the van.
– I don’t like the idea of having a vapor barrier to the inside. On a van, the van skin (sheet metal) is a vapor barrier, and by adding a vapor barrier to the inside, the insulation space is trapped between two vapor barriers. In house construction, this is viewed as a serious no-no as any moisture that gets into the space between the two vapor barriers has no way to get out. At least in the house world, wall insulation spaces have to have a way to get rid of moisture.
I like the idea of spraying urethane against the van skin and to the depth you need for your chosen R value. The urethane is closed cell and does not permit water vapor to penetrate it, so the van skin never sees any water vapor and you don’t get condensation on the cold van skin. I think you can achieve the same effect by bonding rigid polyiso sheets to the van skin with Great Stuff.
– Overall, the scheme seems over complex to me. It will be quite labor intensive to install, and I’d be concerned about whether all the layers and airspaces will keep their integrity over the years. Note how simple the example you gave for the refrigeration truck is — my guess is that this is something they have learned over the years works well and retains its integrity and performance over the long haul. Again — just my personal opinion.
If you go ahead with insulating the van this way, I’d really like to hear how it works out (pictures?). It would be particularly useful if you could measure the noise level before and after the insulation job as discussed here:
https://www.buildagreenrv.com/our-conversion/our-promaster-camper-van-conversion-measuring-noise-levels/
Gary
Hi Gary. I’ve not started insulating and I was looking for comments. Thanks for your reply.
– Vapor barrier. Yes the metal skin is a vapor barrier so I agree you don’t want another vapor barrier inside and originally I was advised to just go for one layer of aerogel (then plywood lining) but that is way too expensive. Unfortunately, everything else that’s decent like polyiso is also a barrier so I don’t think I have a choice but to create another barrier inside. My previous design used Celotex (polyiso) instead of the Ecoquilt and I didn’t have the second air gap+thermalwrap so I just had two layers.
– Too complex design/too many layers. Yes I am uncomfortable with this complex design and may go back to that previous design with just the two layers. I only made three because the van has three convenient levels to attach things to (skin, small joists, main joists) so it’s actually easy to use those to get three air gapped layers.
I’m still looking for a high R breathable one that I can just use on it’s own but haven’t found a decent one. I’ll carry on looking.
– Air cavity R value with foil. Where did you get the R1.7 from? I read it was more like 600% better than the value of the air gap which makes it twice as good as polyiso. But as you say, the foil will get dusty over time.
– Number of gaps. Read somewhere that foil reflective performance isn’t linear and gets less effective as the distance increases. So it’s better to have 2 gaps of 10mm than 1 gap of 20mm.
Thanks for you help. I’ll post further thoughts as I find out more.
Dave
Hi Dave,
The R 1.7 comes from the Reflectex website: http://www.reflectixinc.com/basepage.asp?Page=Performance+Information&pageIndex=730
This is a excerpt:
Interior Air Films Vary With the Surface Finish of the Product (Reflective or White) and the Heat Flow Direction. The Values Utilized in Reflectix® R-value Calculations for Interior “Air Films” are as Follows:
Reflective Side of Product:
• R-4.55 Down
• R-1.32 Up
• R-1.70 Horizontal
I just used the wall value of 1.7 because you have more wall area than ceiling area. The R 1.32 would be appropriate for the ceiling in the winter (heat flow up).
My passive solar handbook has a more complicated table in which they give R values for airspaces with and without reflective layers on one or both sides. These values vary by season (not sure why), but the winter season and a 3/4 inch airgap with horizontal heat flow they give R 1.01 for non reflective surfaces, R 2.36 for one reflective surface, and R3.48 for both surfaces reflective.
The values for a 4 inch airspace are nearly the same.
Interesting that you get a pretty good boost for having the surface on each side of the air gap being reflective.
So, thinking about the breathable layer near the van skin:
I don’t see the need or benefit from this if the insulation layer bonded to the van skin is not permeable to water vapor.
If you have permeable insulation, and its warm with some humidity inside and cold or cool outside, then water vapor flows through the permeable insulation, and when it reaches the van skin, it condenses to liquid water. The liquid water may cause rust over the long haul.
If the insulation is non-permeable to water vapor the water vapor cannot get to the van skin and there is no condensation on the metal. This is why I like the spray urethane — it bonds tightly to the metal van skin and prevents water vapor from ever reaching the van skin and condensing.
There is no need for the spray urethane to be breathable because water vapor cannot get into it or behind it.
The spray urethane is common in house insulation and one of the reasons is that it eliminates the condensation in walls problem that fiberglass type insulations can have.
I think that using rigid polyiso bonded to the van skin can have the same advantages if the bond is good enough to prevent water vapor from getting between the van skin and the back side of the polyiso.
I’m not saying that the rust due to water vapor permeable insulation is common, but I have heard stories of vans a few years after the conversion showing serious rust problems. There is one report of this here: http://rampromaster.weebly.com/insulation.html
Multiple gaps:
There is definitely a benefit from more than one gap.
There used to be a thermal shade made for windows that consisted of only several layers of reflective film with air gaps and achieved R15 (US)– kind of amazing for windows.
Gary
Hi Gary
I read that passive solar one (MILRvalue) as well. The 1.7 is for the air gap inside the material. i.e. the bubble wrap which they call air film.
The second part of the table is for air space and it says at the bottom that one side of the air space isn’t reflective. The fairly/highly reflective is whether the foil is dull or really shiny.
I’ll investigate the closed foam spray and bonded PIR to the skin options more. Initially I was worried that with the expansion/contraction of the skin over time, it would come apart and then you’d definitely get rust.
BTW, my conversion would be used 5 days a week for work. I’d actually work in the van during the day because it will have some monitoring/measuring equipment in it. I’d be sent all over the place so it could be really cold or really hot outside. I’d also have to live in it during those 5 days because I could be in remote places.
Dave
Hi Dave,
Agree that the interpretation of the R 1.7 is not very clear, but I think they are reffering to the the R value of the air space adjoining the reflective surface and including the effect of the reflective surface. But, not very clear exactly what they mean.
Looking at more of their site, there is this page on using Reflectex as duct insulation: http://www.reflectixinc.com/images/uploads/2014%20new%20pdf%20files/f62%20submittal%20revised%201114%20lr.pdf
They claim a total R value of 6 for a layer of Reflectex spaced 3/4 inch off the duct surface. So, for a total stackup of 1 inch (3/4 airspace + 5/16 Reflectex) they achieve R6 — this the same as if an inch of polyiso were used.
I do think the spray urethane insulation would be a good choice for your application where the van will be used a lot and possibly be subject to a lot of road vibration and frequently to humidity sources (you and cooking?).
Its more severe service than a typical RV gets in that the RV is parked most of the time.
The spray urethane is a very strong adhesive and I’ve not heard of any cases of the bond between the van skin and urethane deteriorating. The people who have had to remove the spray foam from small areas always comment on how tenacious the bond is.
If you decide on the spray foam and decide to have someone else do it, be sure they are experienced in spraying vans. It needs to be done in several layers rather than all in one thick layer, or you run the risk of deforming the van sheet metal in a way that is visible.
Please let us know what you decide to go with.
Gary
Hi Gary
Just curious if anyone has ever used spray foam poly underneath a van. I’m thinking using a bed lift and I’d like to get enough headroom to walk underneath when the bed is up. I’m very short and will design a very compact structure to support the bed but things will quickly get challenging and every bits helps. Spraying underneath will give me an inch of extra inch headroom but wondering if it can cause issues with corrosion in our harsh canadian climate.
Regards.
Hi Eric,
I’ve never heard of anyone spraying under the floor. But, the foam does stick well, and it holds up to weather pretty well, but, like you, I wonder about corrosion or rust is water gets under the foam.
They sell the polyiso foam board insulation in half inch thick, so that would be one way to save a half inch in the stackup. Half inch would still give you about R3, which is not so bad.
Do you not worry about the flammability of polyurethane. I would certainly hate to set my van on fire because a welding torch got to close to my insulation.
Hi Dale,
My take on this is that nearly everything that goes into van conversions and RVs is flammable, so the polyiso or urethane just adds one more flammable ingredient.
You could take some steps that would reduce the risk. For example, cover the insulation with a non-flamable layer — in homes, flammable insulation is often covered with a layer of sheetrock. While sheetrock is not a very good material for van conversions, there might be other things. But, you would also want to avoid using other flammable materials in the conversions, which would be challenging.
There are also forms of polyiso that have a fiber cover on each face (Atlas RBoard is one example) Just an informal test with a propane torch tells me these covers are pretty resistant to fire, but the material is still not approved for use in homes without a cover like sheetrock.
You could also choose a material like rock wool or some kinds of fiberglass, but these materials have their own list of negatives.
Gary
Hi Gary,
Do you have any thoughts about applying something like dynamat or rattletrap https://www.amazon.com/FatMat-Self-Adhesive-RattleTrap-Deadener-Install/dp/B00DYAF9FY/ref=sr_1_11?ie=UTF8&qid=1478384236&sr=8-11&keywords=dynamat+sound+deadener to the van skin for sound dampening properties, followed by great stuff then polyiso? I read through most of the comments and was surprised no one has mentioned that idea yet (if so, I’m sorry I missed it).
Like so many others have stated, your website has been incredibly useful for my entire van build/planning. I haven’t found a better resource and am incredibly grateful.
Thanks!
Braden
Hi Bradin,
On the “do no harm” front, I personally don’t think that applying the polysio/Great Stuff over the sound damping material would have any adverse effects. I guess there is the possibility that the sound damping adhesive would not be good enough and would loosen over time and cause some squeaking? But, the sound damping stuff I used a little of appeared to have a pretty good adhesive.
I’m not sure about the effectiveness the noise damping material in reducing noise levels — just don’t know that much about noise reduction fundamentals.
I will say that if I had it to do over on my van, I’d study up on noise treatment and include more of it. Its not that our van is that noisy, but it could be a bit better.
If you want to contribute to the science of noise treatment in camper vans yourself, here is a way: https://www.buildagreenrv.com/our-conversion/our-promaster-camper-van-conversion-measuring-noise-levels/
You would have to take the initial measurements before you put in the noise treatment, and then repeat the measurements after treating to be most useful.
Glad to hear the site has been useful — any things you would like to see added?
Maybe more on noise treatment 🙂
Gary
I’d like to hear thoughts on this post about foil-backed jute.
http://www.camperize.com/foil-backed-jute.html
Thanks.
Hi,
Some thoughts…
– I’m a bit hesitant about anything that absorbs water — seems like things that don’t absorb water are less likely to be troublesome.
– For the reflective layer to be effective as a radiant barrier, it has to face an airspace, so you would have to mount the insulation with the foil facing inward to get any thermal benefit from it. But, this means you have a vapor barrier on both sides of the insulation (van skin on one side and alum foil on other) — this is not a good thing as it will tend to prevent any moisture that gets into the wall from drying out.
– The R values quoted for the ultra touch are due mostly to the alum foil as a radiant barrier, and to get them the foil must face an airspace and the alum foil must stay shiny over the years. The insulation value of the jute or cotton itself is low for such a thin layer — probably less than 0.5?
– It may be effective as a noise reducer, but I don’t really know much about that area.
I have read stories (although not many) about people buying used camper vans and opening the walls and finding a soggy mess along with rust damage to the van skin — it seems to me that this material has that kind of potential – especially if the foil side is to the inside of the van.
Just my 2 cents and probably overpriced at that:)
Gary
Thinsulate(TM) is the most effective, safe and easy to install insulation for vans and is the only product engineered for vehicles. It passes all Federal Motor Vehicle Safety Standards.
Please call or email for more information and to request a sample.
All the best
Hein
Impact, Inc.
Hood River, OR
54l 49O 5O98
I usually remove sales pitches, but Hein has done a lot of good conversion work on vans, so I’m leaving it up.
I don’t agree that Thinsulate is the best choice, but if you are in doubt, you can read this page and scan through the past comments to get the pro and cons of the various choices.
Gary
Gary,
It is called Sound Choice 1/2 inch by 4 x 8 with an R value of 1.32.
Model- 717008, Internet 202090237, SKU 257322. (Home Depot)
One sheet cost $11.97 which I used one sheet to cut for the channels. I am thinking about covering the edges with tape to keep it from being so friable. It is not bad, just little piece of dust. I was trying to deaden the noise, and not going for insulation.
I live in Colorado, so after reading your site and others, I will go with a ISO sheet over that and then the plywood for the flooring. Ordered by Great Stuff gun last night, after not finding one in any of the box stores.
Gary,
After reading your reply and replies to others, I thought about noise reduction. I cut strips the size of the ribs on the floor using the sound deadening board from Home Depot. It appears to be a wood product with a wax mixture. I have found it to be very friable with small pieces coming off. My question is would this product absorb water and I wonder how it would handle heat.
Hi Cathy,
Can you provide a link to the product from the Home Depot site?
I’m not familiar with it.
Gary
Working on insulation now– it appears the foil side Polyiso goes next to the van wall. Would double foil sided Polyiso work well as a moisture barrier on the inside? Or if you did two layers with the foil next to van wall and then the next sheet with foil facing the inside? I read that a lot of people are using the 3M adhesives– what are your thoughts on that?
Hi Cathy,
I think that I would put the foil side toward the inside. This is more for the thermal benefit as the foil facing an airspace acts as a radiant barrier and will add to the effective R value of the insulation.
I guess this works better as a vapor barrier on the inside as well as the inside surface will run warmer and there is less likely to be condensation on it and it keeps water vapor from getting into the insulation — but, the polyiso insulation itself is pretty resistant to water vapor penetration.
I don’t think that having the foil layer on both sides would add much, but it seems like a lot of the insulation panels are sold that way anyway.
I’ve used the Great Stuff polyurethane foam for many projects as an adhesive — its a very good adhesive and it fills gaps well. For this application, it seems like there are likely to be significant gaps, so the gap filling is an advantage. So, for me, I’d stick with the Great Stuff. I’ve been using the Great Stuff pro with the pro applicator, which I like — the applicator makes it quite a bit easier to apply the foam.
https://www.amazon.com/GREAT-STUFF-PRO-Dispensing-Gun/dp/B0002YOMJE/ref=sr_1_2?ie=UTF8&qid=1474731234&sr=8-2&keywords=great+stuff+pro+applicator
Gary
Gary-
Everytime I get stuck on my Van restoration project I just come back to this site. I think I would have given up by now if not for all this info and for that a big tks.
So I insulated the walls of the van with the Great Stuff and Polyiso rigid foam board. Was really not bad at all and i DID get the great stuff pro-gun and it worked great.
So now I am on to the doors and floor….
a) I plan on leaving places for vapor/water to escape the van…
b) that said, would you use the same great stuff/ polyiso plan to do these parts of the van? it seems at this point i’m thinking about sound deadening as much as anything else…
c) have you ever heard seen this article?
http://classiccars.about.com/od/restorationbasics/a/Temperature-And-Noise-Control-For-Your-Classic.htm
mentions 2 products (foam/foil duct insulation and closed-cell polyethylene foam core) that seem pretty affordable…..
any thoughts on these as it relates to door and floor insulation?
thanks for any advice…i’m either 2 or 3 years in on this project now and am ready to move on from insulation!!!! tks so much – john
Hi John,
Glad to hear the site was helpful!
I did the floor on mine with rigid polyiso with thin plywood over it — https://www.buildagreenrv.com/our-conversion/our-conversion-flooring/
I’m not at all sure that this is the optimal approach. It has held up well to traffic and given that the polyiso has a good R value, it likely does well as thermal insulation. I’m just not sure what works best from a noise point of view.
You do want something for the floor that will hold up to the foot traffic or to any heavy stuff you want to haul, and the polyiso has proven to be OK for this. The closed cell polyethylene would probably deform some as you walk on it, but that might be OK.
Since I did the writeup on my van, I’ve added some noise damping to the sliding door and also above the headliner. This is the stuff that has adhesive on one side and alum foil on the other with a layer about 1/8 inch thick of viscous stuff. Don’t know what the brand is, but its available on Amazon. I plan to insulate over this — probably with polyiso, but have not done it yet. The damping material did not make any dramatic difference in noise level, but maybe it helps a bit.
I wish I knew more about the noise treatment area — there seems to be a lot of conflicting material out there, and I just don’t know what works best.
Gary
Hey Gary-
Thanks for the reply. I’m still trying to figure out what to do with the doors….
What is the “stuff that has adhesive on one side and alum foil on the other with a layer about 1/8 inch thick of viscous stuff. Don’t know what the brand is, but its available on Amazon.”? Are you worried about it offgassing? From what i’ve read that viscous stuff is like tar/petroleum based..?!?!? I don’t know but it makes me nervous….
Then I go back to whether my insulation of polyiso and great stuff will off gas?!?! Who to believe on the internet?!?! this project is making me looney!
HELP HELP!
Hi John,
I know what you mean about the Internet — we need an Internet fact checking service.
I have no qualms about Great Stuff or Polyiso. I’ve probably gone through a couple hundred cans of Great Stuff on a wide variety of projects with not even a hint of a problem or any indication of outgassing — it my go-to solution for a lot problems. Its a very widely used product in many areas, so, I’d guess that if there were any valid problems there would be good data out there about the problems? You might also try the DOW Chemical website — they probably have at least an MSDS sheet on it.
I think that this is the noise damping I used: https://www.amazon.com/Noico-deadening-automotive-Insulation-dampening/dp/B00URUIKAK/ref=sr_1_12?ie=UTF8&qid=1475595124&sr=8-12&keywords=noise+damping
It says its a Butyl based product, so that might give something to search on. You might try asking the manufacturer about outgassing — they may have done some testing? I’ve had it in the van for several trips now, and not detected any odors or any tendency to “flow”. Its still well stuck to the van skin. Have to say I’ve also not observed any great reduction in noise, but I still have a few areas to treat.
Please let us know if you find any good info.
Gary
This is so interesting. I’m a real newbie – just bought a 2012 Transit Connect and will be using it for camping – not in super-cold temperatures but from spring through fall in Canada and the US. Heat is my bigger concern.
I think the polyiso sounds both sensible and do-able. My skills are fairly basic but I don’t mind going very slowly. My other option would be the spray foam, but I would have to have that done professionally.
My question is, does anyone cover this insulation with anything? I kinda wanted to make my little van look pretty. My initial idea was to use fabric like wallpaper. I don’t think this would work over the spray foam, but it might work over the polyiso.
Does anyone have any thoughts? I welcome all input. Thanks!
Hi Colette,
Most people do cover the insulation with some kind of paneling.
I used 1/8 inch white hardboard from the lumber yard — you can get it in white and in a number of patterns.
One popular approach is to put up hardboard and then glue fabric to the hardboard using some form of contact cement.
This page shows what I did on my conversion for the walls and ceiling: https://www.buildagreenrv.com/our-conversion/our-conversion-paneling/
One thing you have to work out is what to attach the paneling to. Most people use some kind of wood strips that attach to the van framing and that you then screw the paneling to.
There is some Polyiso that that has a finish surface on it (Google Atlas RBoard). You might be able to glue this form of Polyiso to the walls/ceiling and use it for the final finished surface on the inside, but it might be hard to work it around the ribs etc so you get a smooth looking surface.
There is lots of stuff out there on how people have done their paneling — they range from very simple to works of art. Try looking at some of the conversions here and also on the forums for the Transit, ProMaster and Sprinter — there are also lots of YouTube videos out there.
Please keep us posted on your conversion.
Gary
What are your thoughts on this layup?
metal van wall>polyiso 1/2 inch to 3/4 inch > thinsulate 1 inch SM400L > inside van wall(possibly lined with cork)
Hi Allan,
From the point of view of maximum thermal insulation (highest R value) more polyiso and no thinsulate would be better.
I guess you are using the Thinsulate for noise reduction? I just don’t know on the noise front — I’ve not seen any numbers that say how good Thinsulate is and for which sort of noise situations its effective. It would be great to know. I could see going the the extra work and expense of the two layer approach if it really makes a noticeable noise difference.
One thing I do like about using the polyiso against the van skin is that you will avoid condensation of warm moist air from inside on the cold van skin — this is something that Thinsulate definitely does not provide as it is very open to airflow.
So, I guess it hinges on how much you want the noise reduction and how effective the Thinsulate is at noise reduction in these circumstances.
If you find more data out there, please let us know what you find.
Gary
Thanks for the insight Gary.
Any thoughts on cork? It is seldom mentioned.
I don’t know know how effective cork is on noise reduction.
As far as thermal insulation I suspect its about the same as wood — about R1 per inch.
Gary
Three points of info regarding polyiso:
1. Its R-value is misleading because it is true for a test temperature of 75F, while its actual thermal resistance is lower at cold temperatures. Ballpark numbers I’ve seen are that the nominal R6.5 becomes about R4 at freezing temperatures, while XPS remains about R5 throughout.
http://www.greenbuildingadvisor.com/articles/dept/musings/cold-weather-performance-polyisocyanurate
http://www.energyvanguard.com/blog-building-science-HERS-BPI/bid/59419/Big-News-The-R-Value-of-Insulation-Is-Not-a-Constant
2. It is not a moisture barrier, rather a Class III retarder. It will slow the transmission of moisture, but not stop it (unlike polyethylene or metal, including the aluminum foil often used to face polyiso boards).
3. It does absorb water, and its R-value degrades significantly as a result. One study found 5% absorption that resulted in a 40% loss of thermal resistance:
http://inspectapedia.com/Energy/Polyisocyanurate_Slab_Insulation.php
I am a newbie at all this, recently bought a step-van and a pile of 4″ reclaimed polyiso boards, and am learning that there’re deeper levels of knowlede than nominal R-values. Temperature range of XPS is worth studying further (I suspect that 165F is quite conservative), but apart from that factor, it appears to be a superior product.
Hi Geva,
I still like polyiso and think its the best all around choice for van conversions — of course nothing is perfect.
The R value loss for lower temperatures is very small for the kind average insulation temperatures for typical RV service. As a practical matter, I don’t think its significant.
When used as house insulation, it is is considered enough of a vapor barrier to stop the water vapor migration through to the outer (colder) layers of the wall and prevents condensation. So, as a practical matter it acts as a vapor barrier and many thousands of homes are built using it in that way with no bad results reported that I have seen.
The test you mention on absorbing water is a very severe one and not really representative of the kind of wall or ceiling application for a van conversion where the insulation has an opportunity to dry to the inside.
I do a lot of solar thermal collector work and early on used some XPS in collectors with and managed to seriously deform/melt XPS insulation. I did not log temperatures in these cases, but I don’t think its a big stretch to say that you might get similar temperatures near the van skin in a van conversion.
http://www.builditsolar.com/Experimental/pinkfoam.htm
I guess if you wanted to know for sure you could put a small sample of XPS in a regular kitchen oven and run the temp up to 170F or so and see what happens — best to use a separate oven temperature gage to verfy the temperature as the oven thermostats are sometimes not very good.
The other thing I don’t like about XPS is that that the gas used to “blow” the insulation is a very strong greenhouse gas that diffuses out over time. When used in home insulation applications, it takes many years of energy saving due to its insulating value and heating fuel savings to offset the effect of the greenhouse gas emissions from the blowing gas. This is not true for EPS, so that might be worth considering if you want to avoid using polyiso.
https://www.buildinggreen.com/news-article/avoiding-global-warming-impact-insulation
If you decide to use XPS or EPS, I’d like to hear what your experience with it is.
Gary
While it’s true that most RVs are not designed for or used in below-freezing weather, such conditions are exactly where high thermal resistance is needed most. The temperatures at which the R-value loss is insignificant (say, below 10%) are those where insulation is hardly needed in the first place. Someone building for properly cold climates using only the nominal R-value may find themselves uncomfortable, or worse, when they actually go to use it as designed.
I’m such a someone; my step-van build is designed to be comfortable inside when the outside temperature is not merely uncomfortable, but dangerous. My materials are reclaimed 4″ polyiso that I got for a great price, and in my case I’m merely annoyed that I didn’t learn about this soon enough, not actually worried about freezing to death. Someone building with 2″ polyiso expecting to fulltime in Minnesota, on the other hand…
I came to this site to admire the well-documented building technique and temperature analysis, not to rain on any parades, but I feel this is important information that needs to be more common knowledge than it is.
Take a look at this: http://www.greenbuildingadvisor.com/sites/default/files/Karagiozis%20-%20thermal%20conductivity%20of%20a%20variety%20of%20insulations%20as%20a%20function%20of%20mean%20temperature.jpg
According to that graph, at -15C, it really is hardly better than wood. There are millions of people in North America living in areas that stay that cold for days, and many that see -30 regularly. It’s a practical matter for them.
The only major mitigation to the polyiso temperature problem is that only outer layers are affected.
Polystyrene melts at about 100C but plastically deforms at well under that. 165F (about 60C) seems on the upper extreme of how hot a vehicle body can get in the sun, but your concern is valid I think. Perhaps there’s a case to be made for layering insulation? Polyiso (which does very well at high temps) on the outside, XPS on the inside?
Hi Geva,
I think you make some good points for vans used in very cold climates.
Some more numbers to think about just below.
So, if you look at an inch of polyiso vs and inch of xps…
At 75F mean insulation temperature, the polyiso is at R 5.75 and XPS is at R5, so polyiso is 15% better
At 50F mean insulation temperature, the polyiso is at R5.5 and XPS is at about R5.2, so polyiso is about 6% better.
At 25F mean insulation temperature, the polyiso is at R4.8 and XPS is at R5.5, so polyiso is about 13% worse that XPS.
It looks to me like at a mean insulation temperature of about 40F the polyiso and xps R values are about equal at R5.4. Above 40F mean temp the polysio outperforms the XPS and below 40F the XPS outperforms the polyiso.
If you assume an inside of van temp of 70F, then a 40F mean insulation temp would mean about an 10F outside air temp. So, at 10F and above outside temps the polyiso probably beats the xps.
At 25F mean insulation temp, the polyiso is about 13% down compared to XPS, and with a 70F inside of van temp, this would imply and outside temp of -25F. I live in one of the coldest states in the US (SW MT), and this would be really, really cold for us. Weatherspark.com is great for looking up temps where you are.
You could offset the polyiso shortfall by just increasing the insulation thickness 13%. And, since you already have very thick polyiso in hand, maybe you have already done this?
The above (I think) is a bit hard on the polyiso in that 1) the reflective (low emissivity) layer on most polyiso adds some to the effective R value of the polyiso as long as there is an airspace between the polyiso and the next inside layer, and 2) there is some insulation value outside of the polyiso in the form of the insulation value of the air layer near the van skin (maybe R0.2 to R 0.7 depending on wind) — this makes the outer layer of polyiso run a bit warmer that I assumed above and improves its effective R value a bit.
Just as one sort of practical data point, we have used our van which is insulated with about 1 inch of spray polyurethane at temps down to a bit under 20F outside air temp, and with the smallest RV furnace I could find (output of 8000 BTU/hr), the furnace ran roughly half the time. This is with single pane windows that have a Reflectex layer inside the window, but with door panels with no insulation.
You might find this calculator helpful in running some actual heat loss numbers that include wall, floor, ceiling, window, door, and infiltration heat losses.
You could plug in the effective R vvalue for the temperatures of interest to you.
https://www.buildagreenrv.com/design-and-build-information-for-camper-vans/heat-loss-calculator-for-camper-van-conversions/
Its an Excel spreadsheet you can just download and change the numbers on.
The two layer insulation approach seems workable to me although it would add to cost and complexity. There are some relatively thin commercial products with adhesive on one side the people stick to the van skin as a first layer in their insulation build up — they have a reflective layer on the inside. They don’t have much R value, but it might be enough to lower the xps temp enough to not have a problem?
I’d really like to hear what you end up doing and how it works out — some pictures would be great.
I’ll try to remember to measure the van skin temperature on our next hot day and post it here.
Gary
References for the numbers above:
http://www.energyvanguard.com/blog-building-science-HERS-BPI/bid/59419/Big-News-The-R-Value-of-Insulation-Is-Not-a-Constant
file:///C:/Users/gdrey/Downloads/0901b80380902d94.pdf
Hi,
A quick survey of temperatures on the outside of our vehicles…
White camper van: about 108F on white paint, and about 148F on black trim
Dark blue Pilot SUV: up to 152F on the sheet metal (dark blue)
This with an air temp of 77F and a light breeze. Temperatures taken on the side of the vehicle facing the sun at 2:45 pm.
So, the white color helps a lot in keeping the skin temp down and maybe an all white van might be OK with XPS even on a hot day?
Will try to remember to do this again on a 90F plus day.
I do think you would want to stay below the 165F to insure that the xps stays well bonded to the van skin — if the bond degrades you might get all sorts of squeaking and open up the possibility of condensation on the van skin as moist air gets behind the insulation.
Gary
Gary- Thanks for all the hard work on this site. It’s amazing. Im glad I finally found it. I live in Central Texas and have just bought a new Ford Transit Connect. Temperatures below freezing only happens a couple of days each year. However, 90+ degrees F can last several months.
1. Would it be beneficial for me to use some type of additional insulation between polysi board and interior skin of roof and walls (Reflectix, foam board, or fiberglass batting)?
2.Should I try to maintain a one inch air space between insulation and outer walls?
3. Is Reflectix glued directly to the inside wall?
4. Will Tyvec help at all?
Thanks for any suggestions. I will not be camping in this vehicle. Just trying to cut down on the hollow sound and keep it from being a sauna in the summer.
Hi Ron,
It would be good to have a reflective layer to reduce radiant heat transfer into the van from the hot outer metal skin. This is particularly true if the van color is dark.
The reflective layer could be Reflectex or it could be the heavy aluminium foil type of material that is used for radiant barriers in home construction.
In order to work as a radiant barrier, the reflective material has to face an airspace — so there has to be an air gap on at least one side of the reflective layer. The reflective layer can be on the inside or the outside of the air gap (ie can face inward or outward) — either way works. If you can have have reflective layers on each side of the air gap (one facing and one facing out) that is even better.
You also want to have a layer of the solid polyiso insulation in the mix.
I’m not sure what the best stack up materials to use would be. Thermally it would work better to have the reflective layer closer to the van outer sheet metal skin.
I’d like to hear what you end up doing and how well it works out.
Gary
I didn’t know that there was so much to consider when you are installing insulation. I just thought it was about keeping the heat from escaping. I like that you mention condensation because that can make a huge difference especially if you want to make sure not to ruin the walls.
Hello. Excellent material here on a nebulous subject. I posed a comment in the flooring section that’s probably better placed here.
Looking at using products made by Lizard Skin for heat and sound deadening. Here are their product pages/demos.
http://www.lizardskin.com/sound-control-insulation.html
http://www.lizardskin.com/car-ceramic-insulation.html
I’m leaning toward going this route, even though it will be more expensive (about $1000 for each treatment).
Hi Steve,
I don’t have any experience with the LizardSkin noise damping material. It might be fine — I just don’t know.
I did just finish adding some of the adhesive backed 80 mil noise absorbing mat to some of the untreated areas on my van and it was easy to install, seems well stuck to the van metal, and just on a rough basis the mat I put on the sliding door did appear to quit it down. I’ll do the actual van noise test when we get back from the current trip.
My personal feeling is the the ceramic bead insulation is a scam.
I’d suggest that you go to the Green Building Adviser site and search for the article they did on using ceramic bead insulation on a home.
This is one of their articles: http://www.greenbuildingadvisor.com/blogs/dept/musings/insulating-paint-merchants-dupe-gullible-homeowners
Would like to hear what you end up doing and how it works out. If you can do this noise test before and after it would help other decide: https://www.buildagreenrv.com/our-conversion/our-promaster-camper-van-conversion-measuring-noise-levels/
Gary
Thinsulate(TM) is used in clothing. Notable characteristics in this application are a higher insulating value (compared to high loft/thicker materials) and ability to let moisture easily escape: The small fibers will draw moisture away from the skin of the van in a similar fashion:
multimedia.3m.com/mws/media/500656O/dressing-warm-info.pdf
Last summer, we had a small oil leak (now fixed) in the transmission of our boat. I placed a 12″ x 12″ piece of Thinsulate(TM) in the bilge where the oil was dripping. The Thinsulate(TM) would trap the oil and let the water escape. I would remove the piece after a few days on the water. It was never wet or soggy when I took it out. Only the trapped oil remained.
I recently received a call from a customer who was ordering some of our van components and had previously purchased Thinsulate(TM) for his van. He had recently gone skiing in his van and was very happy with how comfortable he had been in cold temperatures. He also commented how easy it was to install. That is exactly the feedback we hear from many other customers. Thinsulate(TM) SM600L is engineered for use in vehicles and appears to work very well. There simply is no other material that is as well suited for the application.
Hi Hein,
Wicking works due to capillary action between the fibers of the wick — https://en.wikipedia.org/wiki/Capillary_action
It seems to me that the fibers of the Thinsulate are much to widely separated (at least in the small sample I have) to support any sort of capillary action. It seems to me that any accumulated moisture has to be removed via airflow through the insulation – one reason I like the idea of a vent fan set up to move some air through the space behind the paneling.
The 3M brochure you mention states very strongly that the outer layer MUST be vapor permeable (as in fabrics like GoreTex that stop liquid water from entering, but allow water vapor from inside to escape). This is definitely not true for the van situation where the outer layer is completely impermeable to water vapor. So, its really a much different situation.
This source http://www.rockywoods.com/Fabric-Information-Help/App-Notes/Insulation-Properties-of-Thinsulate-from-3M says the R value of Thinsulate is about 3.3 per inch. This is OK, but polyiso is R6 per inch, so, to me, Thinsulate is OK, but nothing special in terms of R value.
If I were making the decision again on which insulation scheme to use on a new van conversion, I would still come down on the side of an insulation like the spray urethane or polyiso sheets that prevents water vapor from ever getting to the van skin and condensing. Without some real, long term field experience in camper vans that show no rust problems, the vapor permeable insulations are just a risk I would not take.
I have been thinking about doing a test setup that can compare two insulations side by side for moisture problems. It would have a sheet metal outer skin with a way to run it at a low temperature, then a layer of the test insulation, then inner paneling with some air leaks, then an open chamber with a way to control the humidity. There would be two side by side compartments so that a baseline insulation could be tested against a number of candidate insulation materials.
I’d log temperatures and humidity levels at several points in the setup, and check for visible condensation on the sheet metal.
Would you be up for providing a sample of Thinsulate to use in this kind of test?
Gary
I think you have it backwards, Gary. Thinsulate(TM) will allow moisture to escape. It does have a tendency to distribute (not via capillary action) moisture within it’s structure which reduces moisture at the surface and promotes drying.
Spray foams and polyiso sheets will trap moisture in the unavoidable air spaces between their inner surfaces and the metal skin. There is no way to ensure that there is no moisture present in these areas upon installation or from subsequent air leakage. This moisture has no where to go so these areas will be prone to corrosion over time.
You are welcome to purchase some Thinsulate(TM) to do some comparison testing. We know that Thinsulate(TM) endures rigorous testing by automotive OEMs. This includes long term performance tests including humid climates, moisture retention, salt sprays and countless others. Passing these tests as well meeting Federal Motor Vehicle Safety Standards is a prerequisite for any material approved for use in vehicles.
All the best,
Hein
Hi Hein,
I guess we will just have to agree to disagree on this one.
There are simply no air pockets behind spray urethane foam at all — no place for moisture. Anyone can convince themselves of this by simply spraying a piece of sheet metal with the urethane foam, letting it cure overnight, and then removing the foam. It is very very very well adhered to the metal over 100% of the surface — its a real chore to get it off. There is simply no place for water corrosion or rust.
The most expensive, multimillion dollar bus based RV’s use spray urethane insulation.
When using the polyiso sheets, its more up to the person doing the install to make sure there is through coverage of the Great Stuff Pro adhering the sheets to the van skin is complete, but this is certainly doable. But, even if there are some small, isolated pockets of air, these are not going to do any harm as there is no way for new water vapor to get to them and the minuscule amount of water vapor in the original air in the pocket is not enough to make any difference.
Gary
Hello Mark,
We can ship Thinsulate(TM) to Quebec. Thinsulate is hydrophobic and allows moisture to escape very quickly. It will wick moisture away from the metal skin. A vapor barrier is optional and doesn’t really seal the wall up like the vapor barrier in a building. In vehicles there are places where air can get in and out of the wall cavities and air flows through especially when driving. The moisture “barrier” is really just to control moisture created inside the van. A vent fan can do a great job of keeping that under control. Be aware that Roxul can release small fibers if subjected to vibration. It also and contains borates which can leach out if it gets wet. Some people can have espiratory sensitivities to borates. Thinsulate is engineered for vehicles and used by major OEMs like Honda. If contains no harmful chemicals. If you are under a time crunch, Thinsulate is by far the easiest and safest to install. Please call if you would like more info. Thanks, Hein 54l-49O-5O98
Mark?!!
Hi Hein,
Hard for me to understand how the thinsulate could wick moisture away from the van skin — it does not seem to have any of the properties that make a wick work??
Have you actually tested this wicking capability?
Like the idea of vent fan — wonder if something could be set up that would cause a gentle circulation of air behind the paneling and through the insulation?
Gary
Hi Gary, thank you for all the infos,
If you were to use Roxul for insulation, would you suggest a vapor barrier on the warm side anyway, or just let the humidity to dry out by itself??
Thanks
Patrick
Hi Patrick,
That’s a good question — not sure what the right answer is.
In home construction its a no-no to have a vapor barrier both inside outside the insulation because it does not allow a way for the insulation to dry out if it gets moist due to a flaw in the vapor barrier or water leaks. That is, the Building Science people feel that its essential to have a way for the insulation to dry out.
On the other hand, if you don’t have a vapor barrier on the inside, water vapor from inside the van can easily pass through the Roxul and condense on the van sheet metal.
I think I might skip the vapor barrier inside and provide for some way to inspect the inside of the van sheet metal for any signs of problems and make changes if needed.
Is there some reason you don’t like the glued in polyios panels approach?
Gary
Hello Gary, thanks again for your input.
I was leaning on no vapor barrier as well.
As for the polyios panels approach, the only problem is finding them. I live near Montreal and can’t seem to find them anywhere in Quebec.
But then again, the boards don’t fit in the ribs!!
And time is ticking, i have to leave at the end of may.
Patrick
Hi Gary,
I was wondering why you would choose Polyios panels + great stuff? Why not just shoot the whole van with Spray Foam instead?
Patrick
Hi Patrick,
I think both methods are acceptable.
I did do the spray urethane on my conversion, but would probably go with the polyiso sheet and Great Stuff if I were doing it again.
The polyiso sheet method is cheaper, and while the total hours involved may be about the same for both methods, with the polyiso you can take your time and do it right. The urethane spray is kind of a high pressure job in which things can go wrong if you don’t take great care with the preparation and take the time to educate yourself on the technique.
Gary
Hi Gary,
Finally decided to go with spray foam done by a pro. Very please with the result and i’ll be doing the floor like you did.
Thanks again for everything
I’ve posted the picture of the result on instagram: @raztine
Here is a link to the spec sheet for 3M automotive grade Thinsulate(TM):
http://www.impact3d.com/3M_Thinsulate_SM600L_specs.jpg
Gary,
I’m starting the insulation of our van next week and I jusr wanted to acknowledge you once again for your outstanding contribution to the van builder’s movement. Your blog is incredible! I’ve gone round the block on this topic researching zillions of web sites ad forums. So much stuff, and opinions, and ways to do it. Yours clarifies the whole issue. I suggest you put this all together in a book. You deserve to be amply compensated for your painstaking and thorough research and work. Bravo! Well done.
Thanks David,
The book is an interesting idea — maybe an ebook at a low price. I think a lot of people prefer the structure of a book with chapters and all to a website.
Gary
Anyone who is DIY building a van should be aware that many materials being used for insulation DO NOT pass Federal Motor Vehicle Safety Standard 302 for flammability. Not only is this a serious safety issue but could give your insurance company reason not settle in case of a loss due to a fire.
Please make sure what ever you are using passes FMVSS 302. 3M Thinsulate(TM) SM600L which is not mentioned on this site is a good example of a sound/thermal insulation which is engineered for vehicles and passes all mandated tests.
Safety is important to your precious cargo!
Yes, we do sell Thinsulate.
Hi Hein,
That’s a good thing to consider, but on the other hand, the whole living area of most RV’s is made from highly flamable material.
Gary
Thanks for your reply, Gary. There are fabrics and other materials that do meet the FVMSS standard. But they are not normally available at the local fabric or hardware store. Risk-aware professional up-fitters use these compliant materials for obvious reasons. I don’t think there is the same level of knowledge among the DIY builders simply because they are up-fitting for the first time. As a supplier to these fine folks, we feel that it is important for us to make our customers more safety conscious. But at the end of the day, a DIY up-fitter is the one responsible for the safety of themselves and their precious cargo.
All the best,
Hein
Maybe I’m being paranoid or OCD…
If one fills the cavity of a van’s walls with insulation (regardless of type of insulation) but leaves air pockets, doesn’t that mean there is potential for condensation to form in those air pockets which would eventually result in rust and/or mold? After all, how can one know if even spray foam filled 100% of the cavity leaving zero air pockets?
If this is true, would the ideal solution be to simply not fill the van cavity? Maybe put furring/strapping strips all around the inner shell/hull, then attach the outermost insulation to the strips?
Thanks in advance for any feedback.
Hi BD,
Hi,
I think that the type of insulation does make a difference. If you have some small air pockets in the foam insulation or between the foam insulation and the van skin, and the insulation is impermeable to water vapor and air, then the only condensation you would get would be from the moisture in the air pocket itself which would be very very little. But, if the insulation is permeable to water vapor and air, then new water vapor would continue to move in and you would get continued condensation — I guess this would happen whether you had the air pockets or not as the water vapor can just move through the insulation itself.
I do think that there will always be some small areas that you can’t get to with the foam and in these areas there may be some condensation. I think these areas should dry out on their own as long as there is no vapor barrier to the inside of them.
If you install insulation spaced away from the van skin, if the insulation is permeable to water vapor (eg fiberglass, thinsulatine, rockwool, …) then the water vapor will just pass easily through the insulation and condense on the cold van skin. I guess you could try to space insulation that is not permeable to water vapor (eg spray urethane, poyiso, XPS, EPS…) away from the van skin, but I think it would be hard to do this and not have areas that would leak water vapor and air to the area behind the insulation which would lead to condensation.
Gary
Reply to BD – Bryce
Yes, there will be some condensation, but never enough to create problems. Softwood lumber can efficiently disperse the small amount of moisture before it can cause any problem. In my situation, I don’t see it as a problem, because my selection of wall covering will be of low permeability (but not completely). I have also purchased a small dehumidifier http://www.amazon.ca/gp/product/B00KWKONAG?psc=1&redirect=true&ref_=oh_aui_detailpage_o08_s01 if the moisture gets above 50%. Also purchased, a humidity indicator http://www.amazon.ca/gp/product/B0006TIEXK?psc=1&redirect=true&ref_=oh_aui_detailpage_o08_s00 to enable me to track moisture buildup.
In your situation, you may vary well benefit from a barrier between the strapping and the metal rib, providing it is thick enough. However, I would suggest that Gary is far better qualified than myself to assess this situation. Especially for those further south than me.
Reply to BD
Strapping is the term used here in frame construction for usually wood strips that are fastened crosswise to studs or joists prior to applying paneling, tiles or similar finish material. In aircraft fuselage design it is called a longeron. In my case it is a strip of wood lumber (3/4×1 3/4) that will run lengthwise in the van (crosswise to the ribs). I might even go 1″ thick. This would then enable me to use 1″ insulation between, and then apply my paneling, etc.
Hi Bob
Thanks for the explanation. For the strapping, should a synthetic material (maybe vinyl or PVC?) be used instead of wood? Couldn’t the wood get wet from condensation? I’d like your thoughts on this.
Thanks
Bryce
Hi Bryce,
I think, as Bob says, that you won’t have much condensation in the van. The insulation acts to keep the temperature higher in the van and to lower the dew point, so condensation is less likely. If you do have some condensation once in a while, it will be able to dry out as there is no vapor barrier between the condensation and the van air.
The PVC “wood” is nice from the point of view of water resistance, but its very flexible and because of that it may not work so well as a support. I guess if you want a little more inherent condensation resistance you could use cedar wood strips, but probably not necessary.
Gary
Gary,
Love your build out on BIS and appreciate the new site. I’ve integrated a lot of what I learned from your build into my upcoming plans.
I have a question about iso board on the ceiling. Won’t moisture (due to condensation, among other things, but mainly condensation) get between the iso board and the embossed ribbing channels on the van?
Would you recommend filling those in? Perhaps with strips of iso board or some other material.
Would putting something like EZ-Cool that contours the van surface on the ceiling as a base layer followed by 1/2in iso board work better? Thinking standard rolled insulation (EZ-Cool or similar) across the van ceiling between the beams, and then iso board over that.
Any reason the above is a bad idea?
Hi Justin,
I think that if you run a large bead of the Great Stuff around the perimeter of the polyiso pieces and then bands of Great Stuff across the whole surface of he polyiso and then pressed the polyiso up into place and held it in contact with the van skin with spring sticks until the Great Stuff cures that it would pretty well cut off any path that water vapor has to the van skin. The Great Stuff expands as it cures, so it does a pretty good job of filling voids. That is, the water vapor can’t get through the polyiso itself, and it can’t get in from the perimeter due to the large bead of Great Stuff around the full perimeter. There would likely be some voids where the Great Stuff does not fully fill the space behind the polyiso sheets, but no way for the water vapor to get to the voids. That’s my 2 cents, but I’ve had no direct experience with using the polyiso boards myself — it just looks like a good way to go to me — I used a spray foam kit on on mine and I guess one advantage of that approach is that it surely fills all the van skin ribs.
Not sure about the EZ-Cool — I’ve never used it and don’t have any feel for how well it adheres and lasts.
If you go that way, it would be great to get a full report.
Gary
Nice site, thanks for the effort!
Question. Why didn’t you stick the nozzle into all the little holes, especially on the ribs?
As for Great Stuff, I’ve read too much controversy over it trapping moisture to feel comfortable with it. I’ve also seen it degrade over time, no UV involved. And I imagine that you’ve seen first hand that despite it technically being a closed cell, there’s really a world of difference between it and the 2 part kits as far as density, strength and cell uniformity when shaped/shaved.
I certainly don’t know the definitive answer, I’m just going with a combination of “where there’s smoke the might be fire” and firsthand observation of the differences compared to a 2 part…
Hi Brad,
I’m trying to remember why the two component kit nozzle was not great for getting into the small places –but not remembering too well. I was probably pretty focused with getting the big areas done and it was the first time I used the two component kit and felt pressure to not screwup. I probably could have done more of the little areas with the two component stuff.
I’ve not had any bad experiences with Great Stuff and have used it a lot. DOW (the maker) says that its a closed cell polyurethane foam. So, I guess my experience has been different than yours. I really don’t see much difference between the Great Stuff and the two component kit I used for the van — they both seem fine and well adhered to the van skin. I do tend to be pretty careful with having the temperatures right before applying, and temperature can effect both quality and quantity of foam.
I have been using the Great Stuff Pro foam instead of the regular Great Stuff, but this is mostly because the Pro applicator is so much better than the little straw that comes with the regular Great Stuff — the foam itself seems pretty similar except for color.
If I were doing it again, I’d consider using the rigid sheets of polyiso insulation glued to the van skin with Great Stuff and with the areas between done with Great Stuff.
Gary
One of the reasons I am leaning towards spray foam is because it adds some structural rigidity and by all accounts, the Transit roof needs all the help it can get. I also like the moisture barrier aspect.
I’m thinking of going 1 inch+ on roof, filling ribs and small holes, thin coat on walls for moisture protection, then Heims system. Your comments about noise reduction has me leaning back toward the thinsulate. Not decided yet tho…still have some months and will certainly change my mind at least 20 more times.
Did you do roof penetrations before or after foam? Looks like before, and I wonder if you would do it differently next time? Ty!
It would be really nice if we could get some noise reduction data for the spray foam or polyiso rigid sheet vs the Thinsulate. I don’t have any idea how the two compare.
I suppose this is not a very data driven mode of decision, but when I hold a piece of the Thinsulate in my hand its hard to imagine how it can be very effective at noise reduction — it seems like it has almost no mass and almost no resistance to airflow. But, I just don’t know.
Gary
Sorry – missed the roof penetrations part.
The insulation was the first thing I did, and I think for the spray foam this might be the best way to go as it minimizes the masking, which is time consuming.
I did the hole for the roof fan after the insulation, and I don’t remember this causing any difficulties.
Gary
hi Gary–
I found your site from the Transit forum – in the planning stages of a build. Thanks for the informative data.
I agree with your comments about insulation – why use the three layer method unless it was providing say an acoustic benefit and most importantly with insulation, reduce condensation by ensuring all surfaces are covered.
Regarding condensation, the disadvantage I see with the rigid sheet versus spray-on foam is that the sheets most likely won’t fully conform to a non-planar surface and will definitely leave gaps on any ribbed section. In a perfectly sealed panel, these concerns might go away, but in reality, this keeps me searching for the best insulation package. Like you say, many decisions involved.
Hi Tom,
I’ve not used the polyiso method myself, so can’t speak with any great authority on it, but I think that if you use the spring sticks to hold the sheets tightly against the van skin and you use a generous amount of the Great Stuff Pro on the back of the sheet (particularly all around the edge) and then come back after the Great Stuff has set and go around filling any gaps around the edges that (I think) it should keep an water vapor from getting behind the polyiso sheets.
You might post the question on the ProMaster Forum as there are a couple people who have used the polyiso method and could comment on it.
Gary
Hi Gary,
Thank you so much for taking time to share so much great info. I’ve found your site extremely informative.
I have a new Ford Transit and I’m working on the surprisingly challenging topic of how to best insulate the vehicle. I live in rainy Portland, Oregon, but the vehicle is going to be used as an adventure rig and will be used for everything from skiing, to damp coastal trips, to hot, sunny travels in the Desert Southwest.
I’m interested in using the spray foam method you describe above, but I noted your comment on possibly going the route of polysio if you were to do the project again. Would you mind sharing your thought’s around why you’d consider making that choice? The idea of using polysio is attractive to me, as it seem much less intimidating and messy than spray foam.
Thanks much,
Michael
Hi Michael,
I think both methods are fine.
I’d probably go with the rigid polyiso instead of the spray if I were doing it again because it (I think) gives just as good a job at a lower cost. It probably takes somewhat longer to do it with the polyiso, but I think its a more straight forward method and you have time to think over the steps as you go without the time pressure that the spray foaming has.
Would like to hear what you decide and how it works out.
Gary
Of interest mostly to Canadian readers.
From DOW site and http://www.energyvanguard.com
EPS = R4/in (Expanded)
XPS = R5/in (eXtruded) – holds R-value better than EPS foam at lower mean temperatures when water is present*
Polyiso = R6/in – Polyiso, it turns out, can lose as much as 25% of its R-value when the temperature drops to 25 F, putting it below EPS.
Reasons for not using Polyiso in Canada:
Many parts of Canada, even the most southern part of the Alaska Highway (Dawson Creek, BC), can get below 25F any month of the year. Most RVers in Canada routinely travel the Alaska Highway to the northern part (Fairbanks). Some even travel to Inuvik and Tuktoyaktuk https://www.google.ca/maps/@68.3750323,-135.0068174,312261m/data=!3m1!1e3. To avoid the summer rush, Canadian retires often take their Canadian vacations in September.
Another big use of RVs in Canada are hunters (a late season sport).
Polyiso is difficult to source in Canada. Home Depot.ca and Rona don’t carry it. Staff couldn’t even find it on their website.
I have just purchased a new 2015 Promaster 3500, diesel, high roof, extended. It will be a dual purpose unit. Used both for hauling domestic stuff and for RVing short trips. Only the furnace will be a permanent installation. The rest will slide out as needed to make room for hauling. Planning will allow for upgrading at a later date, either for myself or after I sell. This will include things like plastic conduits in the walls and roof. Allowing for future runs of wiring, piping or whatever.
I plan on using 3/4 spray foam on the metal and ROXUL http://www.roxul.com/products/residential/products/roxul+comfortbatt on top of it. I will also be using 3/4 inch strapping over the ribs to break the thermal bridge effect of the metal ribs. This space will be filled with 3/4 inch EPS. The floor will be DRIcore® Subfloor R+ http://www.dricore.com/en/rplus_about.aspx. I will allow a 2″ set back from the front of the van compartment and the side opposite the side door. This will provide a gutter for better airflow to vent the grooves in the Dricore. The grooves in the Dricore can also be used to run wires across the van floor when needed, rather than have to up, over and down. An industrial grade floor covering will go on top the Dricore or simply apply a few coats of polyurethane. Whatever I end up putting down, the wife will be throwing lots of scatter mats about when we are RVing.
Two Maxxair fans will be used for ventilation and cooling.I won’t be installing an air conditioner, as I will be mostly traveling off grid.
Hi Bob,
Even at 25F, the polyiso is at (0.75)(6) = R4.5 — so, better than EPS. The link I gave before shows results for 5 varieties of polyiso, and at 25F, the lowest is R4.5 and the highest R5.5.
But, for me, the most important plus for the polyiso is that it has a high max service temperature (270F), while the polystyrene (EPS and XPS) have a max service temp around 160F. It seems to me its quite possible to get temperatures near the van skin over 160F.
This is not just an academic concern — I build a lot of solar thermal panels and managed to turn a number of sheets of EPS and XPS into “thermal sculptures” by using them in places that got to warm.
http://www.builditsolar.com/Experimental/pinkfoam.htm
One caution about the Roxul is that apparently some people are allergic to it. Guy on the ProMaster forum used it in his van conversion and ended up tearing it all out due to allergies.
Thanks — Gary
Hi Bob.
When you say “using 3/4 inch strapping over the ribs to break the thermal bridge ” what do you mean by strapping? What exactly is strapping?
Thanks.
Hi all, My clone of Gary’s van is coming along well. I cut a vent hole in the van for my furnace and got a nice cross section of the foam insulation, almost 2″ thick! I am really glad I went with foam and lucky I had a spray foam contractor that was cheap and easy to work with.
http://postimg.org/image/crapbwai1/
Hi,
Looks like you got a really good spray foam job — 2 inches of urethane should perform really well.
If you don’y mind, I’m wondering what the cost was?
I take it there were no problems with deforming the van skin?
Gary
Your information is very helpful and timely for me. Many thanks!
I just bought a new 2015 Promaster (diesel, high roof, extended) that I plan on converting it for over night camping. Aside from the furnace, everything will be easily removable to allow for domestic hauling use.
Here is an easy to understand comparison of insulation that I found very helpful. Especially re the polyiso R value at colder temps here in Canada: http://www.ecohome.net/guide/choosing-right-insulation-pros-cons-applications.
A quote from the article: The performance starts to drop significantly below 10°C, and its performance at much lower temperatures (-20°C and below) is abysmal, hardly better than wood. A great product for interior use, but it must be on the warmer side of a wall assembly to do any good at all.
Hi Bob,
That’s an interesting site, but I think the picture they paint for polyiso is more pessimistic than polyiso deserves.
This site gives a plot of R value vs temperature for polysio: http://www.energyvanguard.com/blog-building-science-HERS-BPI/bid/59419/Big-News-The-R-Value-of-Insulation-Is-Not-a-Constant
There is certainly a drop in performance with colder temperatures, but it does not seem that dramatic to me. This is especially true when you consider that camper vans are not normally used in extremely low temperatures — most people van camping think of 32F as pretty cold. The degradation in R value is small to nothing depending on the particular polyiso tested.
Some other types of insulation also lose R value at lower temps. Fiberglass has been carefully tested for this by NREL and they found that the convetion currents that form inside the FG significantly reduce R value at lower temps. My guess that this happens to some extent in any kind of insulation that allows airflow — eg insulting materials like Thinsulate.
XPS has a more constant R value with temperature, but it is blown with a very potent greenhouse gas which is released over time. I never use XPS for this reason.
Besides the high R value per inch, polyiso has other advantages. It has a high maximum service temperature — about 270F — this can be important for a van in that on hot sunny days the the van can get hot and the space between the inside wall and the van skin even hotter. EPS and XPS (polystyrene) have much lower service temps (about 160F? — I think this is too low for a van). Polyiso is impermeable to water vapor, so if you glue to the van skin, water vapor cannot get to the van skin and condense, and since the temperature on the inside of the polyiso is normally above the dew point, you don’t get condensation on the inside either.
For my money, polyiso is still the best all around choice for vans — but, I realize that not everyone agrees with this.
Gary