This page goes over the thermal insulation for the inside of the camper van.
I decided to use one of the DIY two component spray on polyurethane foam — an exciting new experience 🙂
Go back to the main camper van conversion page…
Overview
Thermal insulation is important to make it easier to heat and cool the van when its cold or hot outside. But, it seems to me that moisture control may be just as much of an issue. The van has moisture sources inside (like people and cooking) and the outer skin is totally non-porus metal that will be very cold at times. Its seems like a lot of condensation is going to form on the inside of the metal skin, and that this can’t be a good thing from the point of view of rust or things growing. So, to me, it was as important to control moisture and condensation as it was to control heat loss.
There are lots of van insulating schemes out there. The thing I did not care for about many of them is that they did not prevent water vapor from reaching the metal walls.
Some schemes include a vapor barrier to the inside of the insulation, so from inside to outside you have: paneling, vapor barrier, insulation, and then the metal van wall. I am a bit leery of this scheme as it makes it hard for moisture that does get between the two vapor barriers to dry out — for this reason, vapor barriers on the inside and outside is a no-no in home construction. I have read a small number of stories of people redoing van conversions and finding quite a bit of rust under several year old insulation. On the other hand, there are thousands of van conversions out there and you don’t often hear of rust under insulation being a problem. So, I’m not sure, but I decided to use the spray foam to be safe. Maybe I’m wrong about this?
The things that I like about the spray in place foam are that:
- it insulates well (R7 per inch)
- It forms a water vapor impervious layer inside the metal that prevents water vapor from reaching the metal surface and condensing.
- If the insulation is thick enough, the temperature at the inside surface of the insulation will say above the dew point, and no condensation will occur at all because the water vapor impervious inside face fo the insulation is too warm for condensation to form. For example if the air inside the van is 70F at 50% relative humidity, as long as the inside surface of the insulation is 50F or more, no condensation will form.
All of the above plus the fact that some of the good references on van conversions listed spray foam as the best way to insulate, and it is the method used on at least one brand of premium busses convinced us to go with the spray foam.
On the negative side:
- Its expensive (maybe twice as much?).
- Its messy to do.
- There is the potential for distortion of the sheet metal panels if the foam is put on as a thick layer.
- Its a bit intimidating — especially if (like me) you have never done it before.
I did think about cutting out pieces of 1 inch thick polyiso rigid insulation board, spraying them on the back side with Great Stuff foam in a can, pressing them against the metal, and bracing them until the foam cures. The areas around the polyiso board could be filled with Great Stuff. It seems like this method might also provide a way of keeping water vapor from getting to the cold metal. It would also be a good deal cheaper than the spray foam.
Preparing
I would recommend watching some of the YouTube videos on spraying. This is one good one…
Once you start spraying, if you have to stop for more than 30 seconds, the nozzle will have to be replaced, so you want to have everything setup such that you can do it with a minimal number of stops. My kit included 5 fan spray nozzles and 5 regular nozzles, so you could break the job up into several sessions if that works out better.
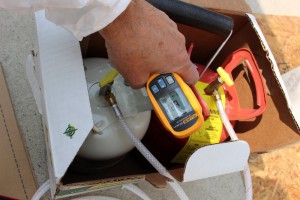
Check the temperature of your foam cans. I’m told that ideal is about 80F. Mine were about 72F, so I placed them in an ice cooler and filled the cooler with warm water to warm up while I was masking. From what the manufacturer and others who use the foam, having the right temperatures for the foam and for the surfaces you are foaming is very important if you want to get anywhere near the full promised volume of foam.
Figure out which areas you want to foam. There may be places you don’t want to foam until later after you have run wires or plumbing through them. I left a few areas for wires, figuring that I can always fill them with Great Stuff later. I also did not foam where I knew I was going to put windows.
I did some sound proofing in the wheel well area before foaming — this is the GT sticky back product. Its easy to apply — not sure how much good it does.
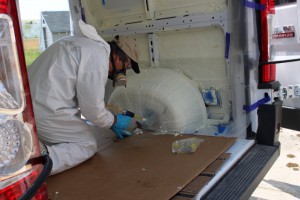
Did not get a good picture of the masking, but the right picture above shows some of it.
Masked off the cab area with poly, cardboard and newspaper on the floor, poly over the main vertical pillars.
Lots of other small things masked. The masking takes more time then the spraying.
Mask off all the areas you don’t plan to foam and cover the entire floor with cardboard or the like. There will be a lot of foam overspray on the floor by the time you finish, and its very difficult to get off once it cures.
During the masking time, if the foam cans are not up to temperature, this is a good time to get them warmed up.
The foaming process is messy with a fair bit of overspray, so good masking is essential.
I decided to put off doing the inside of the doors and delay that to a 2nd session. Since I used all of the foam in the first session, I’m going to have to find another way to do the doors.
Spraying
Its important to have a plan for what you are going to foam and what order. The foam should be put applied in layers with the first layer pretty thin. If the layers are to thick, the foam does not cure properly, and there is more risk of distorting the van sheet metal.
You want to carefully go through the instructions with the kit you have a couple times, but here is what I ended up doing:
- Clear all the junk out of the way.
- Arrange for some forced ventilation (like a fan) if the area is not already well ventilated.
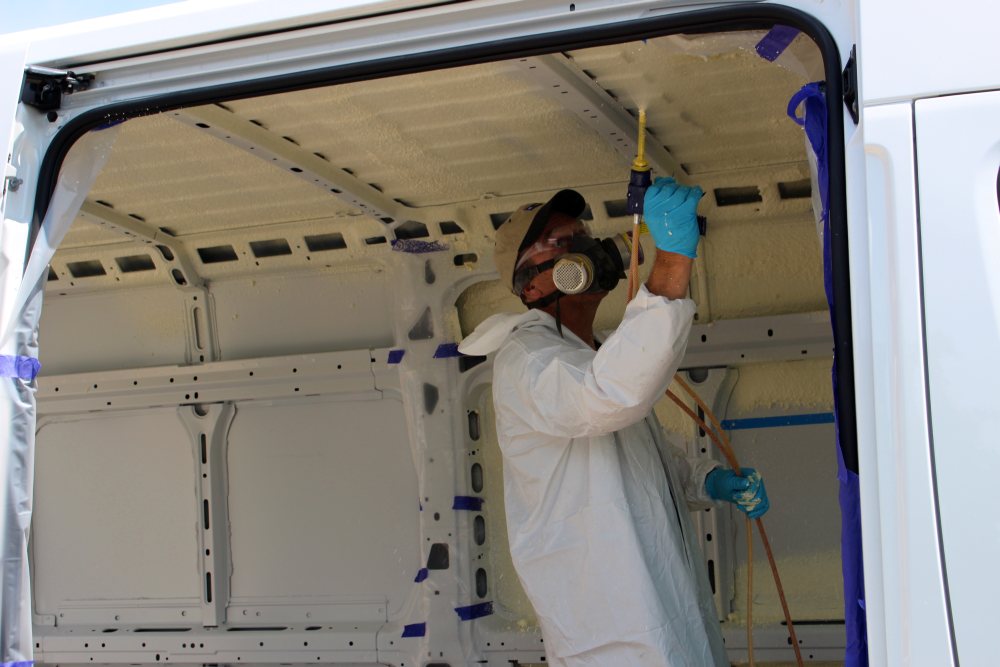
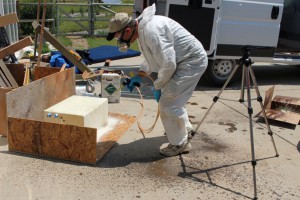
- Put on the silly suit — this is the first time I’ve ever worn one of these — fashionable and it does the job!
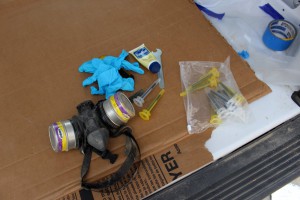
- have your eye protection, hat , gloves, and mask ready to go.
- Layout the nozzles and Vaseline.
- Have an scrap cardboard box you can test spray into ready.
- Tip the cans back and forth to make sure they are mixed (at least 30 secs)
- Apply some Vaseline. to the end of the spray gun.
- Put on the eye protection, mask, gloves, and hat.
- Check that the tanks and hoses are where you want them.
- Open the valves on each bottle — slowly. On my first kit, one of the hoses had a big leak in the middle of it, and sprayed that component all over the place, including over my camera. Luckily it was just the one component and wiped off relatively easily. Had to go back to Home Depot and exchange for a new kit.
- Without putting the nozzle on, point the nozzle at a cardboard box and pull the trigger briefly. You are checking for two streams of material of the same size coming out of the nozzle.
- Install the nozzle — its just a quick twist on.
- Start spraying.
I did a little warm up on what (I thought at the time) will become our grey water tank — sticks well even to a roughened up poly tank.
Start spraying. Spray on a thin coat. Avoid putting too much on as the foam does not cure properly, won’t give full expansion, and may end up distorting the sheet metal as it cures. It helps to have watched the videos of others spraying to have an idea how fast to move and how far from the work to be. Its not difficult.
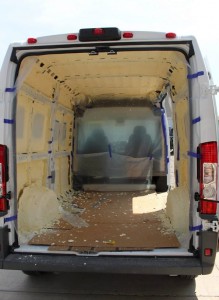
I may have over done it on the thinness of the coats, but I probably coated most areas about 4 times to build up about 3/4 inch before the cans ran out.
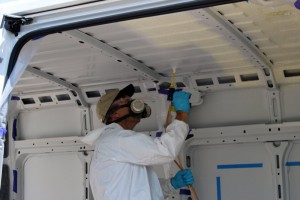
The foam will tend to build up on the end of the nozzle — just wipe it away. I got to a point about half way through where the nozzle did not seem to be working uniformly, and I changed to a new one — this was easy and quick.So, start at one end and apply a thin coat over each area til you reach the other end. At that point, go back to the beginning and check the foam — its should be pretty well cured, not to hot, and firming up to the touch — if so, do the whole thing over again. I did this whole cycle about 4 times. This goes pretty fast. I don’t think I was spraying for much more than half an hour.
As the bottles run out of material, one will finish while the other still has a little bit of material left — this will come out as a sticky goo that does not cure, so when you are getting toward the end look out for this and stop. There is a slight color change when there is just one component coming out.
I was hoping to get to about 1 inch of foam thickness all over, but only achieved about 3/4 inch. I’m still debating whether to just go with this, or add a 2nd layer of some other type of insulation.
Cleanup
There were a few areas that I got some foam spray that I did not want it. I cleaned these off with a plastic putty knife. This went pretty fast — maybe 45 minutes.
I will say that any of this that gets on your skin is going to be there for a while — it sticks to skin even better than Great Stuff.

How Well Did It Work?
The foam went on pretty easily and it cured to what appears to be good quality polyurethane foam. It appears to be very well adhered to the metal surfaces it was sprayed on.
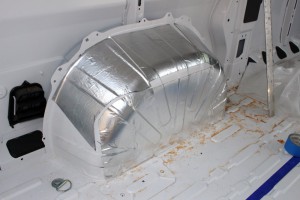
It is certainly nice for highly curved areas like the wheel wells.
It was pretty quick — one day, including masking, spraying, a couple trips to Home Depot, and cleanup (but, there is a bit more to go — see below).
I was a bit disappointed in not getting the full inch I was shooting for — it seems like the package that was advertised to provide 200 sqft at 1 inch did not, and this was with careful attention to getting all the temperatures right. I would say I got about 170 sqft to an average depth of about 3/4 inch.
I checked carefully after spraying for any sign of sheet metal panel distortion and did not see any. I did see a picture of a Sprinter van that was spray foamed that showed noticable distortion of some of the panels, so, this can be a problem. I think the answer is just to use thin layers. This may be more of a problem for commercial sprayers than the DIY kits.
Update: One person on the ProMaster Forum reported enough distortion of the van sidewalls that he decided to remove the foam insulation (not a fun job), and go with a different method. This was commercially applied and appeared to have been done carefully. Why most jobs result in no distortion of the sheet metal, but a small number do I don’t know.
If I were to do it again, I’d probably go with using the rigid Polyiso foam boards adhered with Great Stuff foam in the cans, and taking great care to have a means to push the insulation board against the van walls while the foam is curing, and using plenty of Great Stuff around the edges of the insulation board trying to eliminate places where water vapor can get to the van walls.
If you have done your van using the rigid foam board and Great Stuff method, it would be great to get a detailed report with pictures.
Took it on a short ride after the spraying to see if the noise level had dropped. It was somewhat quieter, but no where near a Bentley yet. I suspect the flooring and paneling may help.
I still have some insulating to finish up. This includes filling in remaining areas (like inside the ribs and frame) that did not get foamed with the kit. I’m also thinking about adding another thin layer of some kind of insulation inside the foam before paneling.
Cost
The spray kit that was supposed to do 200 sqft to 1 inch thick cost $349 (gulp) at Home Depot. The silly suit was $10, and the rest of the stuff I had on hand or came with the kit.
I will fill in some of the remaining gaps with Great Stuff, so probably another $10 for that.
If I decide to add another layer of thin insulation inside the foam, that will add some additional cost.
Go back to the main camper van conversion page..
Gary
July 19, 2014, June 23, 2015
Hi Gary,
It’s interesting that so many people in the US use PU foam.
Here, in Europe, most people rather advise against using it.
From my own understanding, the reason seems to be that it is not a 100% vapour barrier (might vary per product), but waterproof. This means that vapour enters the foam and condenses at the cold metal sheet. The water is then trapped between foam and metal.
Since almost all the condensation is caused by “living” inside the fan, a vapour barrier could prevent this. I also saw some YouTubers using different kinds of vapour barriers with foam insulation.
Personally, I chose to use PIR panels on the walls and Spaceloft where I need it to bend. Since both do not have a vapour barrier, I’m adding it on top (it’s called Siga Majrex).
Hi Christoph,
Actually, using the spray foam in the US is not that common. It seems like rigid Polyiso insulation board, Thinsulate, and lately Wool are the common ones with a few going for the spray foam. Honestly, I think they are all OK – I did do some side by side testing here: https://www.buildagreenrv.com/insulation-testing-for-van-conversions/
I think if I were doing it again, I’d probably go with the rigid Polyiso (not sure what they call that outside the US?) as it appears to attain a high R value, is pretty much vapor impermeable, cheap and pretty easy to install. BUT, if you want a lively discussion, just express a preference for any insulation type on one of the van forums and stand back:)
After 8 years, I’m happy with the spray foam. I’ve had parts of it exposed and it looks like the day it got sprayed on. No sign of de-bonding or of water vapor problems. We do live in a dry climate.
I do like the idea of having a flexible insulation for the highly curved areas – it would make using a rigid insulation board a lot easier.
Gary
Hey I’m just started researching about the van life and what not did you have to put your electrical in first then spray foam? Kinda confused on how that works.
Thanks brady
Hi Brady,
I did insulation first and then wiring.
I did leave the large vertical pillar that is about 5 ft behind the drivers seat clear of foam to allow wires to be run in it. Since my electronics bay is right at this pillar, keeping it clear of insulation did help with wiring that goes to the other side of the van or that goes up from the electronics bay.
Did not really have any problems with this approach — there is generally enough room to run wires over the top of the insulation.
Gary
Did you use open cell or closed cell foam?
Did you use open cell or closed cell spray foam?
How about using aircrete on the floor?
I was curious… forgot what ‘aircrete’ was… but saw the pics and then saw this article: “AAC has a very high vapor permeance and moisture absorption — a moisture reservoir that passes both water vapor and liquid water more readily than most building materials, making it a far-less-than-perfect choice for Atlanta’s high latent-load summertime issues,”
http://www.greenbuildingadvisor.com/blogs/dept/qa-spotlight/does-autoclaved-aerated-concrete-make-sense
Hi Gary,
Thank you for such a thorough and thoughtfully laid out web site!
If you have time to weigh in, I’m looking at a 2014 promaster that the dealership tells me was previously used as a camper van. There is no inside wall panelling so I can see the entire layer of spray foam insulation and 2 things –
1) there are some large areas of yellow-brown discolouration in the foam on the wall across from the sliding door, on the bulkhead just adjacent to the sliding door and on the inside of the sliding door. All I have seen online regarding this is that sunlight can cause foam to yellow and darken, though that wouldn’t explain the inside of the door. Have you seen or heard of anything like this?
2) The bulkhead is still in place and was completely spray-foamed – what are the chances I’d be able to remove enough spray foam to get to the hardware that’s holding the bulkhead in place? Maybe a curry brush from what the last person posted!
This is a link to the ad with photos showing the discoloured areas – a couple shots at the end of the series really show it well.
https://www.windsorford.com/en-CA/used/ram-promaster-2014-622929
Cheers,
Laura
Hi Laura,
I think the foam is probably OK.
I did mine with the same type of foam, and there is some color variation and some areas that are more yellow than others.
I’d take something like a scraper or screwdriver and poke away at the foam. I think you will find that the discoloration is only on the surface.
If you break off a small piece of the foam, it should be solid and not real easy to pick apart with your fingers. It should be well adhered to the van skin.
I’ve not seen a sliding door foamed like the one on this van is — I’d check to make sure that they did not get foam into the door mechanism or handle area and that it works freely — same for the two back doors if they are foamed.
It is possible to get the foam off, but its time consuming. For some small areas, I used a stiff bladed scrapper. Get the scraper blade down to the paint and pry off the foam — it tends to come off in fairly small pieces — maybe 2 by 2 inches.
I don’t know how much of a job it is to take out the partition. I’d ask on the ProMaster forum what’s involved.
Gary
Thank you for the advice!
I built out my last 4×4 van, an E350 extended body, with a commercially applied spray foam with excellent results. I prepared the interior with plywood strips, as vertical ribs, screwed to the interior (for decorative paneling to attach to later), on floors, walls, and ceiling. Covered the outward facing ribs with duct tape, as the foam will stick to the tape instead of the ribs, greatly reducing clean up. I stuffed various materials like paper and such that could be torn out later around door mechanisms and such to protect them, and had the spray guys (who came to my home and did the whole job out of their trailer in a couple hours) shoot the foam in every void in the van. The thickness was generally 2″ top and sides, and 1″ on the floor. Some unevenness in the foam itself is inevitable and can be removed easily with only one thing in the known universe: A Curry Comb (comb for grooming horses and livestock), it will shave the stuff off like parmesan cheese. I just sprayed foam over the wheel wells and then shaped and smoothed them with the curry comb afterwards. The end product was amazing; my big diesel van was quiet on the road and in the rain. I spent nights up at ski areas and months in the deserts of the S.W., all in perfect comfort. In fact the catalytic heater that I installed in the van was never used; two bodies in the space was enough to heat the van to a livable level. I did have reflectix covers for the few windows that the van had in the rear area and a curtain to close off the front area. The guy that sprayed my van charged me $600. and the product was non toxic (it off gassed in minutes, with no fumes or residual smell). There was no warping of sheet metal and I loved the results. However, when I sold the van the fellow who had it next got into an accident and he had to remove the tenacious foam from the damaged area to get the body repair work done, and I heard it was a real bear. I’m in the process of building another even bigger 4×4 van now (more of an overland vehicle really) and will likely use a blend of 2″ Polyiso sheets and the spray foam just due to the sheer size of my project, otherwise I’d go all foam again. Regardless, insulation is the most important thing you will do with your van; you can have an ornate interior with every widget, but if you’re not well insulated you will freeze and melt in your metal box. I’d rather have a stark insulated empty box to camp in, and be cool, warm and safe in first. Of course I finished my van off nicely, but that’s another story.
Best of luck,
Nathan, Bellingham WA
Thanks Nathan — very helpful information.
Did you every find any indication of rust under the spray foam? Having done my van with spray foam, I don’t see how this could happen, but its a question that comes up from time to time on the forums.
Gary
Hi Nathan, thanks for sharing. Im in WA state and would love to get ahold of the guy that did your insulation. Any chance I can get his contact info?
Thanks,
Alex
can you tell me who did your spray foam please?
thanks
Hi Pam,
It was me.
I used the large, two bottle DIY spray foam kit that Home Depot sells.
Gary
Not. Why would you say this?
Unfortunately I don’t believe he is still in business, maybe that’s because he only charged me $600 to spray my van and drive up from Bellevue or somewhere with a very large trailer that had all the equipment and tanks in it. I believe he called his business Enviro Green or something like that. I have done a web search for him and not found him, nor have I found his business card. I will search again for that card, I know I kept it. Obviously I don’t check this forum often but I’ll try to update soon.
I thought of insulating by tongue and groove wood, just 3 planks up from the bottom at a time, with a plastic vapor barrier against the inside of the wood plank and then fill with foam slowly, allow to cure, up to near the top of the plank, then add a couple more planks and continue to fill, to allow room for expansion. The vapor barrier would be mostly for isolation between the wood plank and the spray foam. Do you see any problem with this method?
Hi,
I guess that could work.
It would certainly give a good R value.
It seems like its going to be quite a bit more work and time to do it this way as opposed to the spray urethane described above or the using sheets of polyiso discussed on this page: https://www.buildagreenrv.com/design-and-build-information-for-camper-vans/install-insulation/
It seems like it would be hard to use one of the larger two bottle spray foam kits as described above on this page as you would have to change nozzles each time you stopped to add more T&G. If you used cans of Great Stuff, it would end up being a whole lot of cans.
Gary
Hi Gary,
Great write-up. Thanks.
How would you use Great Stuff Pro and the polyiso board? How would you get a nice even coat on the van and polyiso board so that there are no gaps in the bond? Looking at the Great Stuff website, it looks like that ‘stuff’ comes out of a little tube like all their other ‘stuff’. (Took great pleasure in writing that sentence! 🙂 )
Would the spray foam you used be a better ‘sticking’ agent to get the poly and van completely covered so that there are no gaps?
Obviously this would require many hands and lots of staging.
Your thoughts?
Hi Peter,
The Great Stuff expands as it cures, so you don’t need full coverage to get a bond that covers all. One technique is to do a heavy run of the Great Stuff around the periphery and then do a set of runs that form a grid on the inside.
While the foam is curing, the polyiso panel needs to be held against the van skin for good contact. The foam will expand to cover the whole back of the panel as it cures. If some small spots don’t fully covered by the foam, its not a big deal as long as the panel is foamed well around the periphery. Most people use spring sticks to hold the panels against the wall while its curing — there is a picture or two on this page https://www.buildagreenrv.com/design-and-build-information-for-camper-vans/install-insulation/
Great Stuff is polyurethane and while its sold for its insulating properties, it is a very good adhesive (basically the same as Gorilla Glue) — if you get any on your hands you will be wearing it for a week.
Once the foam cures, you can run more beads to fill around the edges of the polyiso panels.
I would strongly reccommend using Great Stuff Pro instead of Great Stuff and use one of the Pro applicators.
Gary
My friend tech for Chrysler and he told me about one guy who spray insulation in every possible holes in Promaster and guess what happened his door locks stop working. Just remember alot wiring in Promaster run inside walls. If something happens and you need something changes you screwed.
Yes, I guess it obvious that you want to be a bit careful spraying the area inside the doors — I used sheet insulation in those places.
I did avoid spraying inside the main vertical ribs where the bulk of the wiring runs, but I don’t think that some spraying of areas where wire runs is a big deal. In the very rare event that something goes wrong along a wire run, you can pull the wire out of the foam, or just run a new wire over the foam.
Gary
Hi there, I just found this website and it’s really a fantastic resource for anyone thinking of doing a camper conversion. I’m in the design stage now and considering different insulation products.
I’m really leaning towards DIY spray foam but one concern I have, that I didn’t see addressed yet, is potential cracking of the spray foam?? Is this an issue? Is the foam resistant to all the forces driving a van around produces?
If anyone has any experience with or has had spray foam in their vehicle for a while please share your experience and outcome of spray foam over time. Thanks so much and again awesome resource, super happy I found this page!
Hi Paul,
I’ve not seen any tendency for the spray foam on my van conversion to crack. It seems very well stuck to the van skin. I think that if you follow the instructions carefully (particularly that the temperature of the van and the resin bottles are warm enough) that won’t have a problem. And, of course, don’t spray on layers that are overly thick — use multiple thinner layers instead.
Gary
Hi Gary,
Been following your website–love the great info here!
I’m working on a 2001 Ford E-350 XLT Super Duty, and am at the insulation stage now. I did the floor in polyiso, but the rest of the van is going to be rock wool (mineral wool)–Roxul brand (only one I found w/o formaldehyde or any other nasty stuff). It’s great to work with, in general, but not that easy to get into the thinner, longer rib spaces, so I’m filling-in with Great Stuff, which brings me to my question (finally!): how do you know when you’ve gotten enough foam in those voids? Do you just spray until it’s oozing out of all the small homes, or what? I’m concerned with the possibility of using too much and distorting the walls, but I haven’t seen anyone actually describe how they decided when they had enough in there.
In the couple of spots I’ve used it, so far, (e.g., void over the right side of the side doors), I sprayed in quite a bit, but had no way of judging how much was in there, so I stopped after a while and let it cure. After a few days (it’s getting colder here, freezing at night), I saw the foam had extruded from a couple of spots, but not others, and could tell from feeling inside and knocking on the rib that there were empty spaces inside.
So, anyone, please advise…I hate to move so slowly, but don’t want to cause irreparable damage, either.
Thanks, everyone!
Hi,
I guess that one way to be sure you don’t put too much foam in would be to use the low expansion version of Great Stuff. Its made for things like installing windows in homes where the windows can be easily deformed by the foam expansion.
If you use the regular Great Stuff, which expands more, I’d think that if you fill the rib cavities to the point where just a little of the foam extrudes from the holes after a few minutes, you should be OK.
I’m guessing that your van is probably less likely to have sheet metal distortioon problems in that it does not have as many large flatish sheet metal areas as the PM, Transit, and Sprinter vans.
Please let us know how this comes out.
There was a case reported on the ProMaster Forum from someone who used Roxul insulation and ended up removing it due to an allergy. I assume that this is rare, but you could probably find the post on the PM forum by searching for “Roxul”.
Gary
Hi Gary-
I’ve isolated the roof of my Nissan NV2500 with max between the ribs, but I’d like to insulate inside the ribs to prevent condensation. Can I use great stuff for that? The can cannot be upside down, but sideways. Thoughts on this?
Hi Jon,
I think you can make that work — I did some insulating with Great Stuff in the ribs.
One thing you can do with the regular Great Stuff is replace the plastic tube that come with the can with a longer tube of same diameter — that would give you a bit more room to keep the can so it will spray ok.
I don’t see any downside to sprayin the foam inside the ribs, and it should help on the condensation front.
Please let us know how it works out or if you run into any problems.
Gary
I have been having a hard time finding info. On wheather to vapor barrier or not. When is it pertinent and at what layer and with what materials. I am also concerned about wiring. Do you use pvc tubes? I’m a newbie with a ’76 Chevy 350. I just discovered today that there is a rotten wood floor underneath the carpet layers. I appreciate your conversation. It’s the most helpful I have found yet to my specific needs.
Thanks
Cheryl
Hi Cheryl,
Both questions on which there is some disagreement, but I’ll give you my 2 cents.
The outer metal shell of the van is a vapor barrier and you are stuck with it whether you want it or not. If you add a vapor barrier to the inside of the insulation, then the insulation is trapped between vapor barriers. In house building this is a serious no no as any moisture that gets into the insulation has no where to go — it can’t dry to the inside or the outside. I think the same applies to vans, and I don’t think an inside vapor barrier is a good idea.
I like to use insulation that is not permeable to water vapor (eg polyiso or spray polyurethane) so that water vapor does not have a path to the cold metal van skin, and therefore you won’t get condensation.
More on this on this page: https://www.buildagreenrv.com/design-and-build-information-for-camper-vans/install-insulation/
On the wiring, I used Romex style house wiring. This is 3 strands of solid copper each in its own insulation and them the whole thing is covered by a plastic jacket. In a small number of places where it looked like there was a potential for damage or wear on the wire I put the Romex in plastic electrical conduit.
This is a pretty popular approach both in DIY and commercial RVs, but not all agree. Some think that stranded wire should be used because the RV vibration might lead to failure of the solid wire — I’ve not heard of this actually happening, but some say its a real risk. Some people like to use the rubber jacketed stranded wire that is similar to extension cords — this is available in marine grades that are said to be more robust. There is quite a bit of discussion on this topic on the Sprinter Forum — might be worth a search their.
I like the Romex approach because its cheap, provides full sized wires for both the positive and the negative return wire, has the outer jacket that provides some extra protection, and its relatively easy to rout through the frames etc.
More on this page: https://www.buildagreenrv.com/design-and-build-information-for-camper-vans/install-electrical/
Gary
Hi Gary,
What are your plans for insulating inside the ribs?
How are you masking off the places with wire connections and grounds so that you can get to them for repair?
I’m prepping my Transit for spray foam insulation and I’m running into trouble with how to keep the electrical system accessible. I’m running conduit for the wiring runs, but there are places like where the DC is grounding to the metal frame that I am not sure how to handle.
Hi Tom,
I think that if you want the highest possible R value for the insulation that the scheme you mention for the walls and ceiling will accomplish that. The spray foam has a high R value per inch (about 6.5), and you will get the maximum thickness by spraying as you describe. You may find it hard to get the exact thickness you want and may end up having to trim off excess insulation in areas where you spray too deep — which will be time consuming.
I don’t know on the spraying the floor on the underside. It would be kind of tricky to do given all the stuff in the way and the hot items like the exhaust system you would have to protect the insulation from. I guess you would have to raise the van up in the air a ways to have enough clearance to spray. The main thing I’d be concerned about is that over the long term there may be consequences that are hard to anticipate in advance.
It seems like increasing the thickness of the insulation on top of the floor might be more straightforward?
I’d certainly like to hear how it works out if you decide to go that way.
I actually like the idea of using something like a 1 inch thick polyiso sheet that is bonded to the van sheet metal using Great Stuff Pro. It gives you an R6.5 insulation value and if done carefully it will not allow water vapor to get behind the insulation and condense. The advantage of using the rigid sheet is that its cheaper and easier (or at least less stressfull) to do.
I would not use XPS as it has a maximum service temperature of only 160F and I think that on a hot day the temperature of the van skin could above this and degrade or melt the XPS.
You might run the insulation heat loss spreadsheet and see how much insulation you need to meet your needs. This would also let you know how much heat is going out walls vs ceiling vs floor vs windows…
See the Insulation page under the Design Build tab for description of the calculator.
Gary
Hello Gary… Thank you so much for your detailed information on your RV build. I’m glad I found your site as it will help me in my Sprinter RV build.
I have read a fair bit of information on insulation and pondered the pros and cons of each. I will be using spray foam insulation for all your reasons and in the same manner you did however, I will be spraying to the level of the formers to achieve as much insulation as possible. I also intend on spraying the underside of the van with foam one or two inches thick and then using Rhino Liner as a tougher protective coating…
Although I have never used spray foam, I agree that spraying thin layers of foam will prevent or minimize distortion of the body panels and therefore I am not too concerned.
My biggest concern using foam is thermal conduction. Have you ever felt the outside of your ice filled Igloo Cooler after ice has been sitting in it for a few hours? It is cold and sweating. Perhaps you have done some research on it as well and have a little more insight to my concern?
I also pondered the idea of using Polyiso or XPS foam sheets but quickly decided it was probably not a good idea unless I sealed up the interior envelop extremely well as not to allow heated or cooled air trapped between the layers to convect either upward or downward into the living space. Condensation would also be an issue I believe.
Please let me know your thoughts on all all my plans and thoughts?
Kind regards,
Tom