This page covers the installation of the propane system that powers the furnace and the stove on our DIY ProMaster camper van conversion.
Go back to the main camper van conversion page…
Propane Tank Type and Location
We had a commercial van conversion RV some time back that had the propane tank mounted under the van. While this setup was OK, it did have some disadvantages: 1) the tank was always dirty from the road and tire splatter and all this dirt and mud made for a short life for the components like valves, gauges, and regulators, 2) the tank was one of the low points on the van and it seemed like it could be damaged, especially on back roads 3) the tank was difficult for the propane guys to fill due to its location and dirt, and 4) you had to find a place that refills cylinders and wait for them to find someone with the time to do the refill.
On this conversion, we decided on using a standard 5 gallon refillable cylinder (e.g. a standard BBQ cylinder) and to locate it in a sealed compartment within the van that is vented to the outside.
On the plus side, this arrangement 1) keeps the entire propane system out of the weather and mud, 2) allows you to either refill the cylinder or just trade it for a new cylinder at one of the many places that offers this service, and 3) its much cheaper than using one of the under van tanks.
On the negative side, 1) it takes up some space inside the van, 2) the capacity is only 5 gallons as compared to (typically) 8 gallons for the under frame tanks, and 3) some may feel there is a safety issue with having propane inside the van (see below).
My guess is that the five gallon capacity will work out to be fine. For warm weather trips with little furnace use, the propane usage for just the stove will be small and the tank should easily last several trips. For cold weather trips, the van is small and pretty well insulated — I believe (based on a little testing) that the propane usage per night at 32F will be about half a gallon, so the change tank interval should be at least a week. But, if you are doing the Dempster Highway in the middle of winter, you might want to carry an extra cylinder.
Note: for those looking for a propane tank that mounts under a ProMaster van, this one is reported to work well and provide adequate ground clearance…
Update 2016: I changed to lid to be hinged on one edge and latched on the opposite edge. This allows much faster access to the tank for tank exchanges.
Update January 2017: The 5 gallon tank has worked out fine. We have had several cold weather trips and propane usage has not been a problem at all.
Another consideration for propane is that if you make a ferry crossing, the propane tank will likely have to be turned off at the tank shutoff valve.
There are some potential safety issues both plus and minus to this arrangement. On the plus side, 1) the tank is protected from physical damage, 2) the propane compartment is strong, securely attached to the van, vented to the outside, and separated from ignition sources, 3) the whole propane system is inside and not subject to malfunction caused by dirt/mud/debris.
On the negative side, you have the propane tank inside the van. All stuff for YOU to consider, research and make up your own mind about.
There will, of course, be propane and CO alarm system to detect any leaks and incomplete combustion — as there must be with any vehicle that uses propane (or any fuel).
Some Information on 5 Gallon Propane TanksThe 5 gallon or 20 lb propane tanks are very widely used — mostly to power gas barbecues, but also for many other things like cooking, heating, weed burning, … They can be refilled at places that sell propane or there are many exchange services (e.g. Blue Rhino) that will exchange your empty tank for a full tank. While the tanks have a nominal capacity of 20 lbs of propane, the overfill protection (OPD) float and valve limit the capacity to 17 lbs. And, many of the exchange services (e.g. Blue Rhino) only fill the tanks to 15 lbs. Propane weighs 4.2 lbs per gallon, so 15 lbs is 3.6 gallons — if you get a full 17 lb fill, that’s 4 gallons. The tanks are only filled to 4 gallons max so that there is always a gas space above the liquid propane to allow for expansion if the tank is subjected to a hot environment. A gallon of propane has a heating capacity of about 92,000 BTU, so a full tank gives you about 330,000 to 370,000 BTU total. The empty weight of each tank is stamped on the collar of the tank — usually about 17 lbs. If you have something like a 50 lb fish scale, you can weigh the tank to get an idea how much propane is left. The tanks start at about 32 to 34 lbs full, and go down in weight as the propane is used. When the total tank weight is down to about 17 lbs, you are about out. Update 12/7/16: Tried this Grill Gage for checking how full the tank is. Found it to be very handy. You don’t have to lift the tank up high enough to see the gage scale, as it records the reading. On the safety front: the tanks have overfill protection that prevents filling to more than 17 lbs of propane so that there is always a gas space above the liquid to limit the pressure inside the tank if the tank should be moved to a hot environment; there is a pressure relief valve in the tanks that blows out releasing the propane if the pressure inside the tank reaches a very high pressure; there are controls on the manufacturing of the tanks, and they have to be recertified after 10 years; there is a safety control in the tank valve that turns off the flow of propane if the flow exceeds a certain value (e.g. from a broken line). All this is good, but propane is dangerous and you should treat it with the utmost respect, and have a propane and CO alarm in your RV. One caution about the Blue Rhino tanks — some of them can only be refilled by Blue Rhino… This could be a big inconenience if you take your RV to a place where a Blue Rhino exchange is not available. Update: January 2017 It appears that my statement above that the OPD valve on a 20 lb tank prevents it from being filled to more than 17 lbs is not correct. It appears that a 20 lb tank can actually be filled to 20 lbs, and that the nominal 20 lb tank when filled to 20 lbs is only 80% full and has the required 20% vapor space. There is quite a bit of conflicting info out there, but this link appears to give truthful data. I have found a local propane tank exchange that actually fills cylinders to 20 lbs. This is clearly stated on the label, and I’ve weighed a full cylinder and it showed 19.6 lbs. This is in contrast to the very common Rhino tank exchange cylinders that are only filled to 15 lbs. You get an extra 25% more propane, which extends the time between exhcanges and means that in cold weather you can run more nights on a tank without refilling. They don’t charge anymore for these full 20 lb tanks than Rhino charges for the 15 lb exchange tanks. 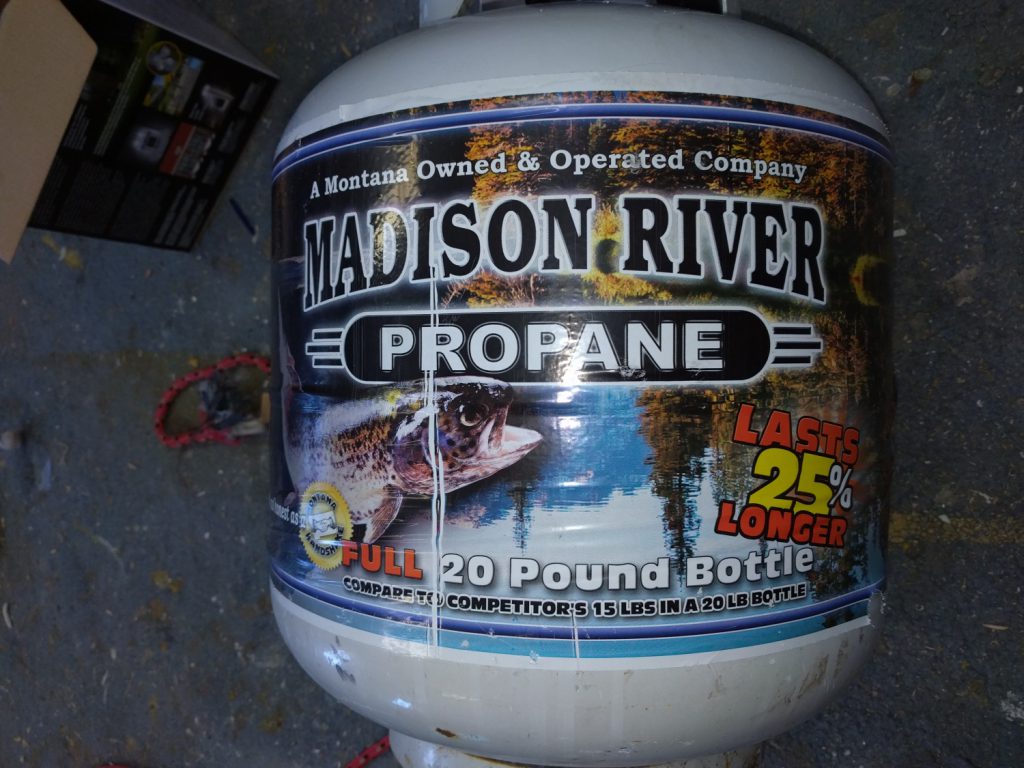 The picture above shows the tanks I’ve been getting. It clearly states that you get a full 20 lb. These tanks are equipped with the usual overfill protection valves (OPD valves). So, its worth looking around for a place that does 20 lb fills rather than the 15 lb fills that Rhino (and others) do. Maybe if enough of us do this Rhino will get the message and start doing full fills. Another option is to have your tank refilled at a propane place — they should be able to fill it to the full 20 lbs, and you also won’t be “losing” the propane that is left in the tank when you take it in. |
Installing the Propane System
Our propane tank lives inside the van in a sealed, strong and well anchored compartment that is vented through the floor to the outside. Its a regular 5 gallon barbecue to minimize the refill/exchange hassle when more propane is needed — its also a very inexpensive tank.
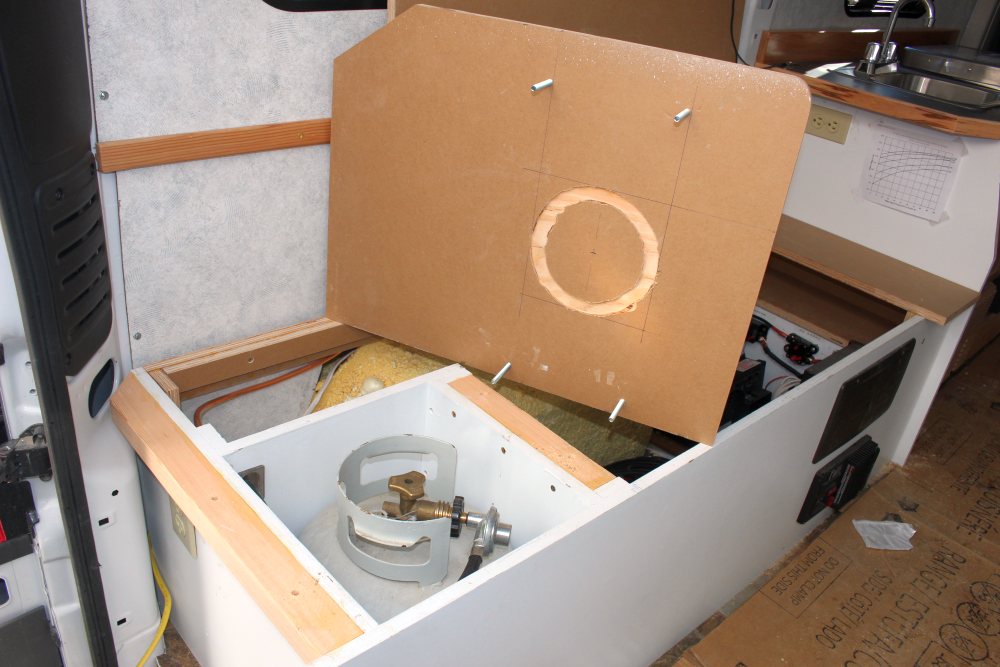
The Propane Tank Compartment
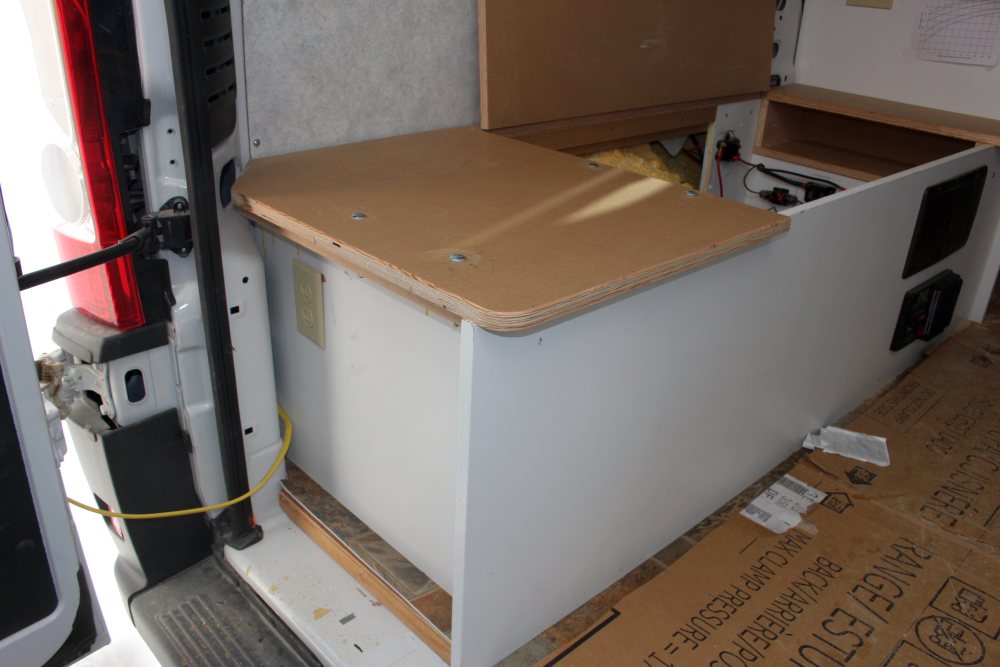
The propane storage compartment is built into the aft end of the driver side bed unit. It is made with 3/4 inch high strength Medium Density Overlay (MDO) plywood and is bolted down through the floor in several places with 3/8 inch steel bolts.
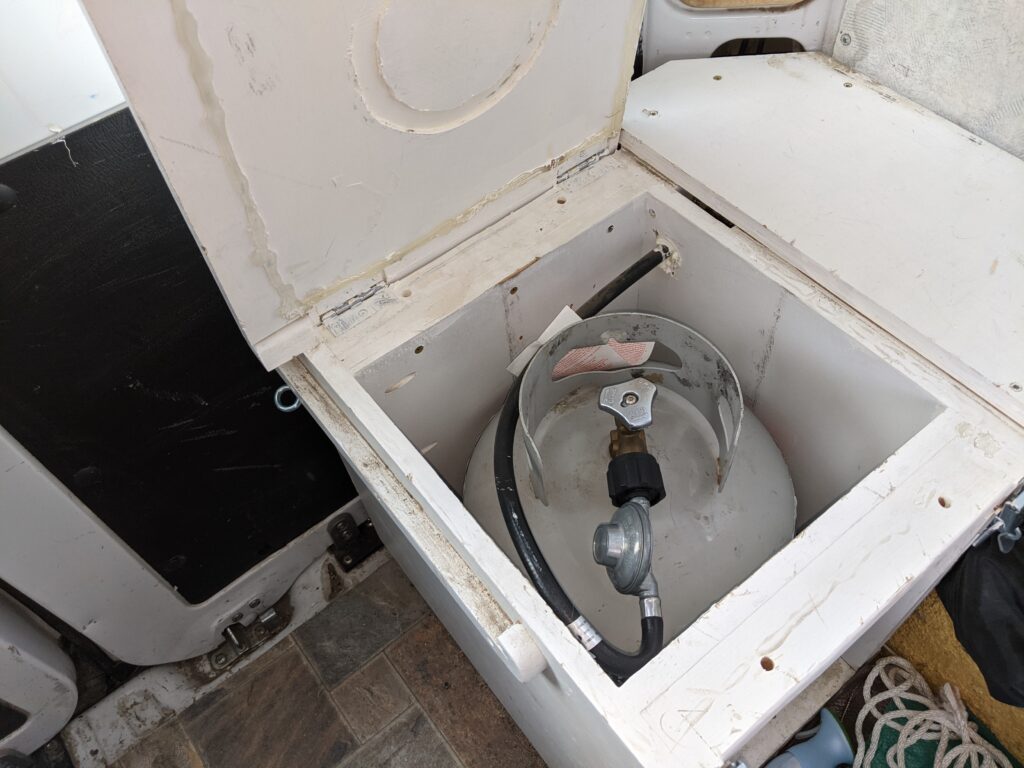
The compartment is made so that the cylinder just fits inside of it, so there is no need to fasten the cylinder to the compartment as there is no place for it to go — this makes it easy to do swap outs when the cylinder is empty.
The lid of the compartment is easily removable so that the propane cylinder can be removed for refilling or swapping out with a new cylinder. The lid is 3/4 MDO and is secured in place with 4 carriage bolts with wing nuts and washers on the bottom side — takes about a minute to remove the lid and get the cylinder out.
The tank is a regular BBQ cylinder and the gas connection can be disconnected or connected by hand without tools.
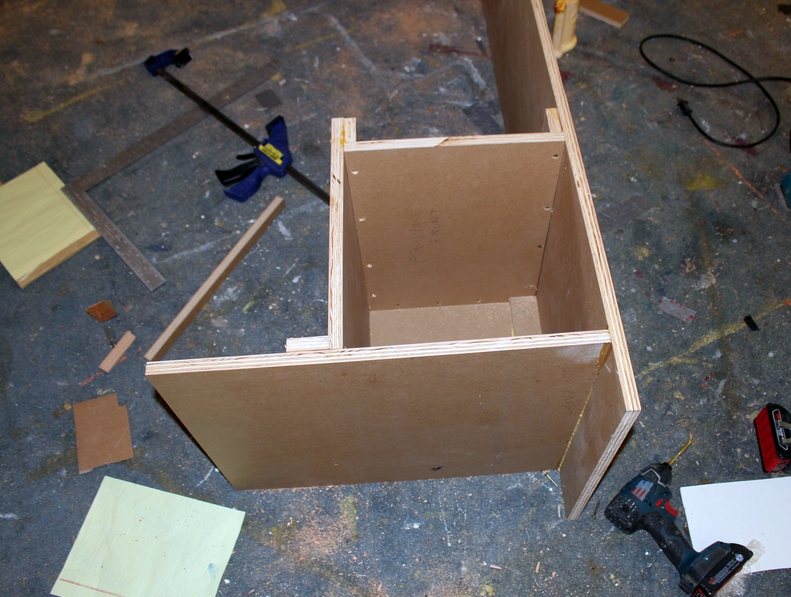
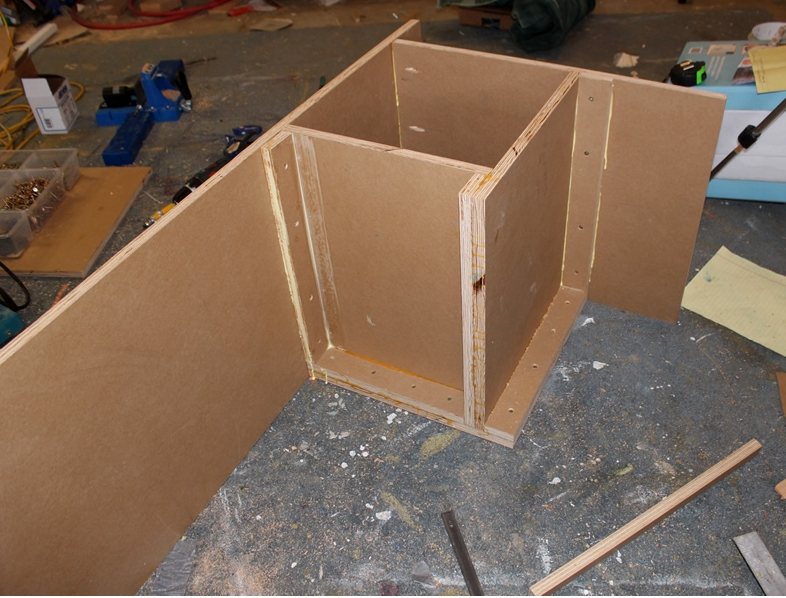
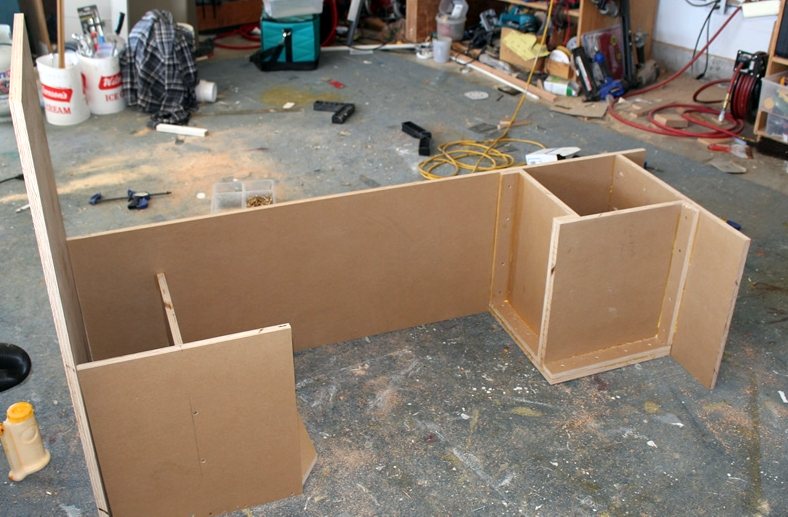
The next few pictures show the finished propane tank compartment and the removable lid that provides access to the tank when you want to put a new tank in.
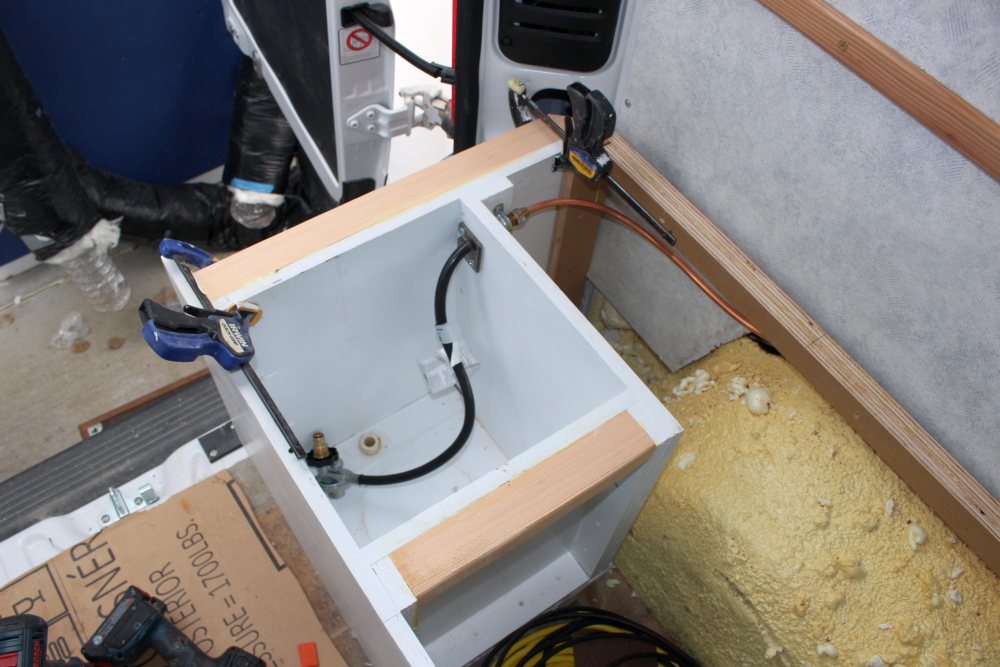
The 2 by blocks being glued and screwed in place provide a place secure anchor for the carriage bolts that hold the lid down.
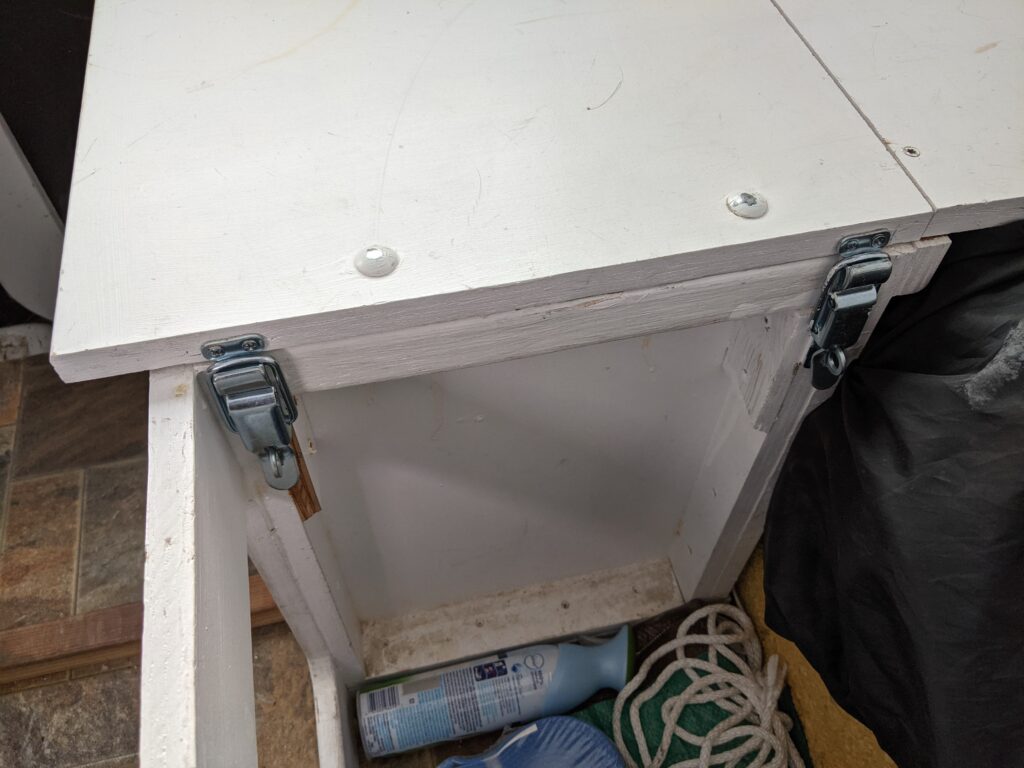
Update: While the above tank compartment lid works fine, I’ve since changed it so that the aft end of the lid is secured with a piano hinge, and the forward end of the lid is secured with two over center latches. This makes it faster to swap out tanks.
Venting the propane compartment
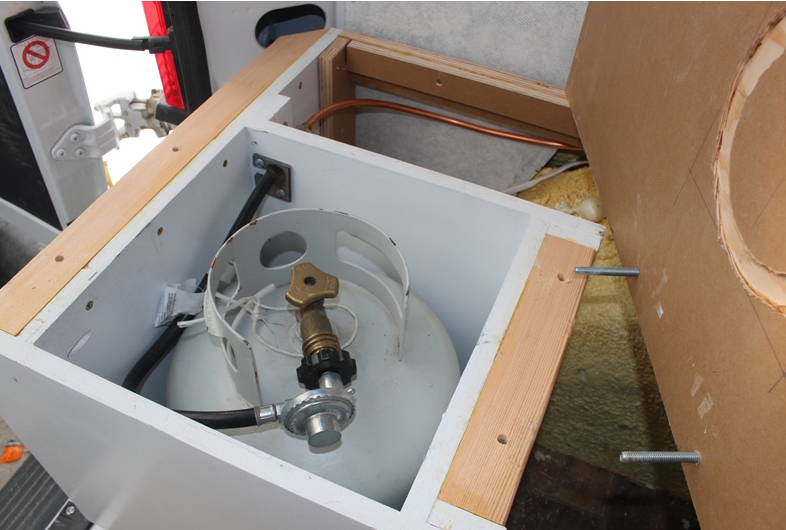
The compartment is vented with a 3/4 inch plastic line that goes from the bottom of the compartment straight down through the floor and is open at the bottom.
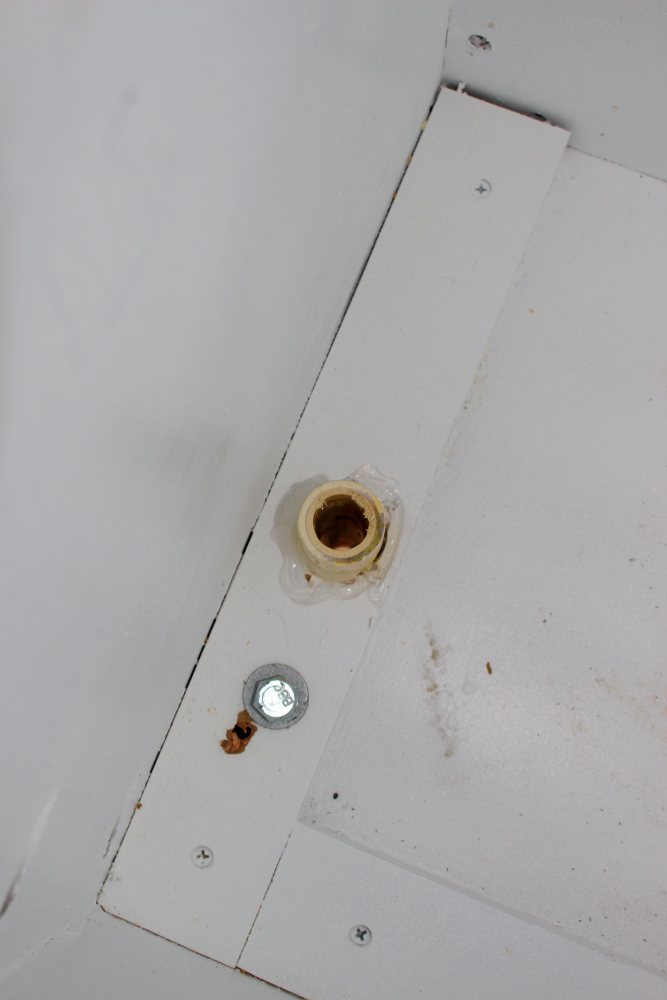
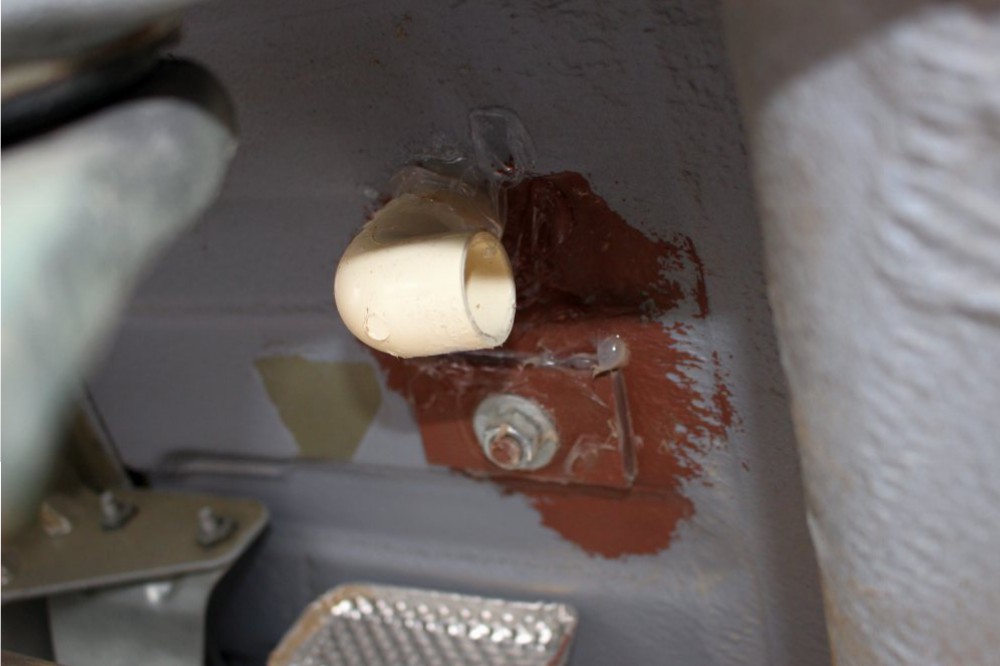
The outside end of the vent tube. Also visible is one of the bolts that hold the propane compartment in place.
Propane Plumbing
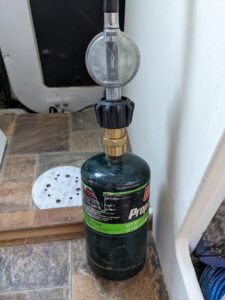
The regulator and hose arrangement is a standard BBQ style unit. It screws onto the cylinder by hand — no tools required. I have read that there are some advantages to using a 2 stage regulator, and I’m going to look into upgrading.
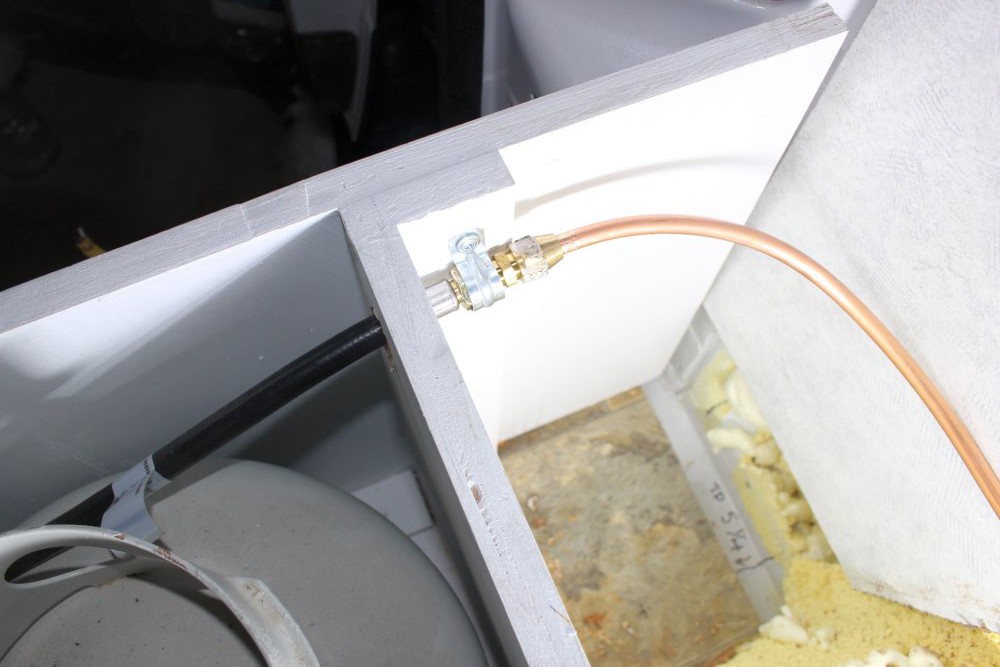
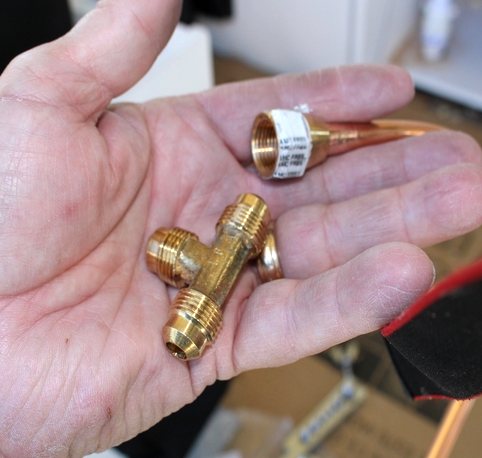
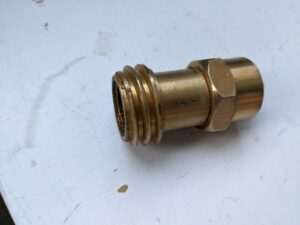
The rest of the propane plumbing is 3/8 inch flexible copper tubing with flare fittings used for the connections.
There is very little plumbing. A single 3/8 inch line runs forward from the tank along the drivers side near the van sidewall to a Tee that is located behind the furnace. One 3/8 copper line goes from the Tee to the furnace, and another goes from the other connection on the Tee to the propane stove.
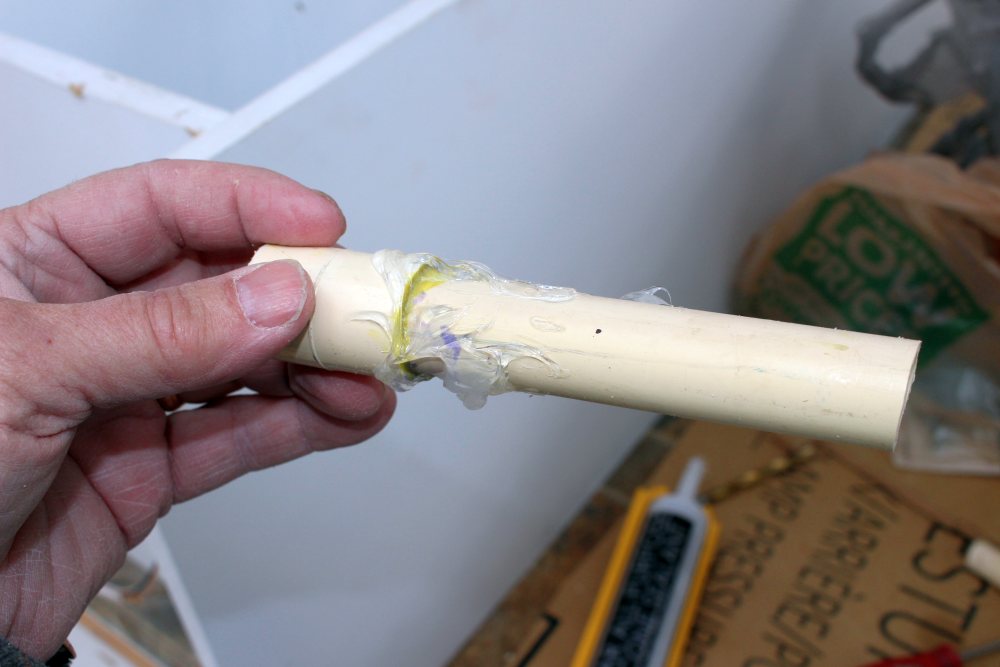
Connection of rubber hose from propane tank to the 3/8ths copper tubing.
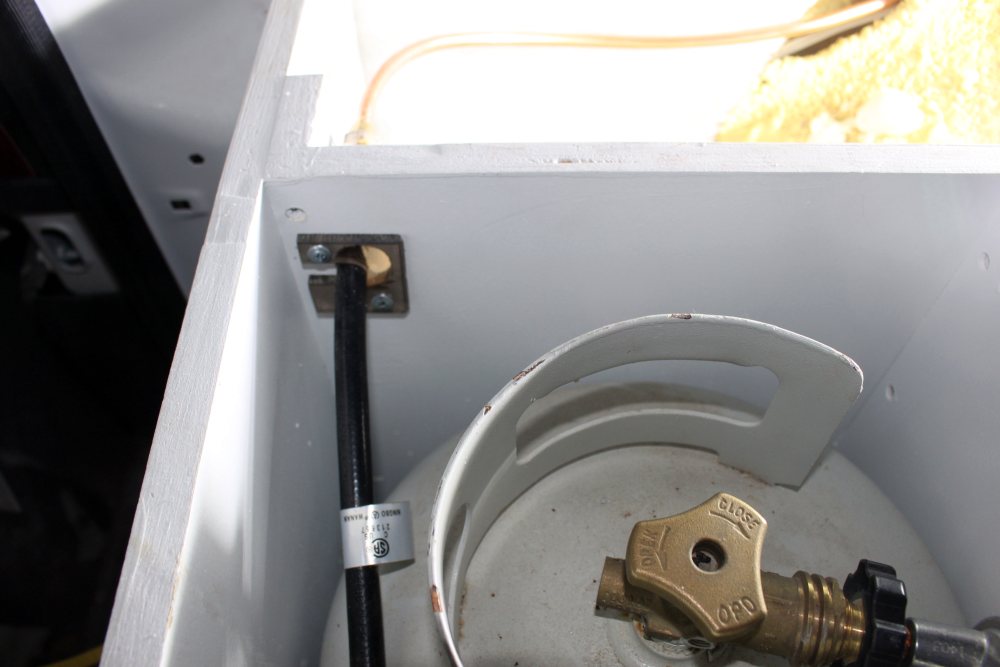
The sealing arrangement where the rubber tube leaves the propane tank compartment. A plastic “washer” and silicone seal.
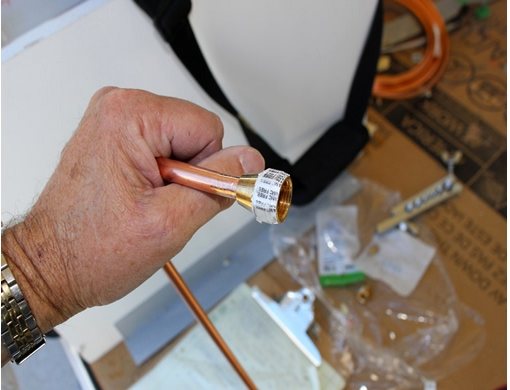
This is the first time I have used the flare fittings, and they seem relatively easy to make up correctly, quite secure mechanically and gas tight.The flare fitting procedure is: 1) slide the flare nut onto the tubing 2) use the flare tool to flare the end of the gas line, 3) thread the flare nut onto the flare fitting.
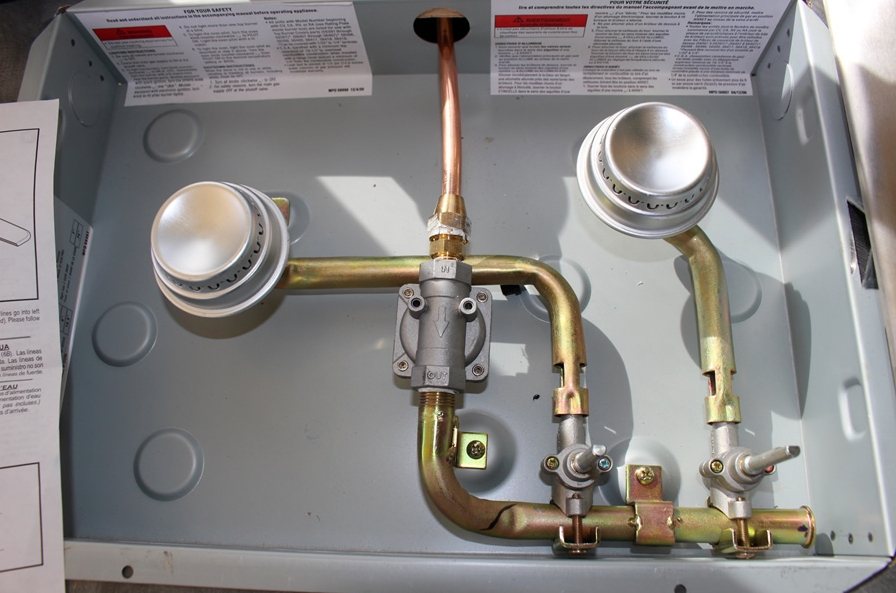
The 3/8 inch copper gas line coming into the propane stove.
Leak Check
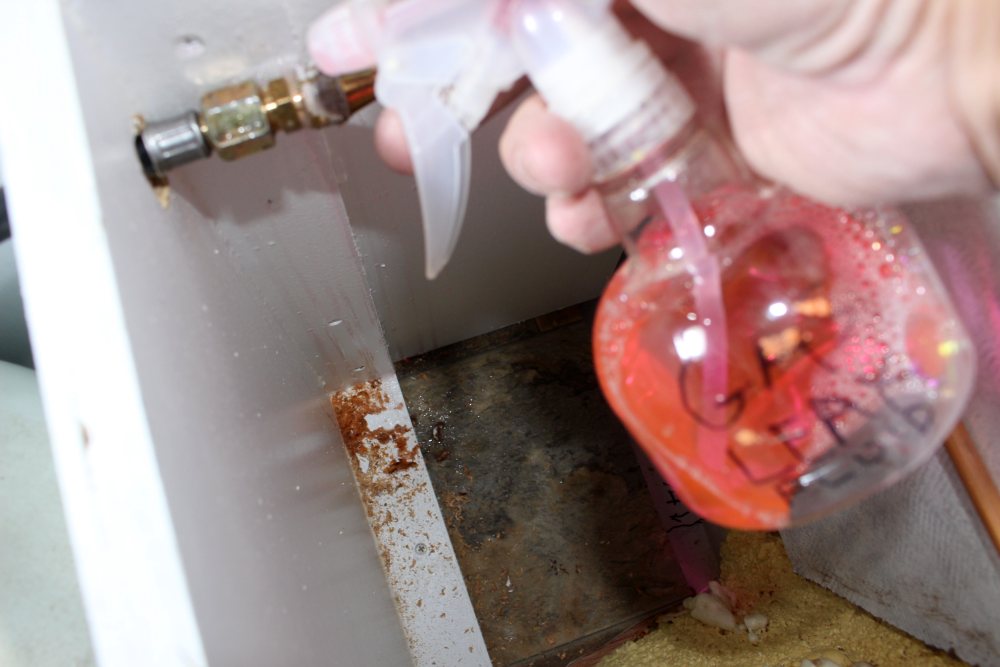
I checked all the connections with gas leak fluid — no leaks.
When to Refill?
I use a fish scale to measure how much propane is left in the cylinder — an empty cylinder weighs about 17 lbs (empty weight is stamped on the cylinder) and a full cylinder is about 38 lbs. The weighing is done by hooking the scale on the loop of cord around the valve plumbing — does not require removing the cylinder from the compartment or disconnecting the hose. A gauge of some sort would be handier, but have not had a chance to look for one.
Note: this Grill Gage for checking how full the tank is works quite well and is much easier to use than a fish scale in that you don’t have to lift the tank up to eye level. The scale on the Grill Gage is not calibrated fairly well, but if you want a more accurate reading, get a tank filled to the full 20 lbs, pick it up with the Grill Gage, then mark the full cylinder point on the gage with a marker pen, so you know where a full cylinder will read.
Backup Propane
In order to have some backup propane in case I screw-up and run my 20 lb cylinder down to nothing, I now carry a couple of 1 lb propane cylinders and an adapter that adapts the 1 lb cylinders to the regulator that my 20 lb tank normally plugs into. The one lb cylinders supply enough propane for hours of cooking and even for limited space heating.
If I were doing the compartment that holds the 20 lb tank again, I would allow slightly more room so that it would hold the 2o lb tank and a couple of 1 lb tanks. This would take very little more room as there is already some dead space in the corners.
Cost, Weight and Time
| Item | Cost ($) | Weight (lb) |
|---|---|---|
| 5 gallon propane cylinder | $0 (on hand) | 20 empty, 37 full |
| 3/8 inch copper line and fittings | $40? | 5 lb ? |
| Regulator and hose | $20 | 3 lb? |
| Total | $60 | 28 lb |
Installing the propane plumbing took a couple hours. The fabrication of the compartment for the propane tank is included in the Beds/Storage section.
Go back to the main camper van conversion page…
Gary
November 30, 2014, June 24, 2015
Update 2024: We are still using this propane system along with a propane cooktop and a propane furnace. It has performed well with no problems.
If I were doing another conversion now, we would consider an alternative that is now more practical than it was 10 years ago. We would consider dropping the propane, going to a somewhat larger LiFePo4 battery pack (maybe 300 amp-hrs), replacing the gas cooktop with and inductive cooktop, and replacing the propane furnace with a gasoline furnace that would draw from the van fuel tank.
Over the last 10 years, Li batteries have become a lot cheaper and more common, and small inductive cooktops are readily available. There are more gasoline furnace offerings, but a gasoline furnace that is reliable, low maintenance, and works at high altitudes still seems to be not quite there – but, maybe close. If you are trying to decide this issue, I’d check what the current experiences are with people on the ProMaster, Transit and Sprinter forums.
Hello Gary,
Fantastic resource for DIY conversion folks!
You mentioned an adapter that allows the use of the small 1lb tanks should the 20lb tank run out. May you elaborate on that a bit please? I am having trouble sourcing that item.
BTW, I took your advice and made my propane locker a bit larger so that I can carry 4 1lb cylinders in addition to the 20lb tank. Thanks so much.
Safe Travels,
Mr. Doug
I have planned to install a propane system in my van. The post you shared here inspires me and helped to know the installation process step by step. Thanks.
Good to know — thanks
Gary
Hi Doug,
Glad to hear the site has been helpful.
I added a couple pictures of the adapter setup in the page.
It occurred to me that I have never actually tested it, so this morning I tried it and it works fine. Just turn off the 20 lb tank valve, unscrew the regulator hose from the 20 lb tank and screw it into the adapter, then screw the 1 lb tank into the other end of the adapter. Not sure if the 1 lb tank has to be upright or not, but probably best to keep it upright.
I think this is the fitting:
https://www.amazon.com/GASPRO-Disposable-Throwaway-Connector-Appliance/dp/B01N2BD2XH/ref=sr_1_3?crid=QFQKAWBE1EBP&keywords=1+lb+propane+tank+adapter&qid=1657802299&sprefix=1+lb+propa%2Caps%2C228&sr=8-3
Gary
I believe the propane tank vent locker is right above the Promaster exaust pipe. Was locating the vent close to the exaust pipe of any concern?
Hi Donald,
The exhaust pipe does not seem that close to me.
But, no, not a concern to me.
Gary
Hi! Thanks for the write on this. I found it very helpful! Do you think its best to locate the propane locker in the rear driver’s side of the van? If it’s located on the rear passenger side it seems like the vent hole would be fairly close the exhaust pipe which might not be ideal.
Hi Sam,
I think it would be OK on either side.
If on the passenger side, maybe direct the vent pipe away from the exhaust?
I’d consider which side of the van keeps the propane plumbing to stove, furnace, … the simplest and choose that unless there are other considerations.
Gary
Hi Gary,
First off, this is an awesome guide and your comments between here and the Promaster forum have convinced me this is the ticket to heat my Promaster during ski season in Colorado.
One question I have is if you have any issues with road debris, mud, etc. clogging up your vent? I imagine this is just a standard maintenance check you do but would love any insight you have. Thanks!
Hi Dylan,
Sorry I missed your question earlier.
The vent does not seem to pick up any mud etc. We have had it on two trips up to the Yukon with lots of mud and gravel, and I’ve not had to clean the vent out.
After 3 days on the Dempster Highway in wet weather, the van was covered with mud, but vent OK.
But, still worth taking a look at it every once in a wile.
Gary
Gary, i love all the information you have shared about your PM camper build. Thanks! Could you share some information about your propane regulator and rubber hose? Did the hose come with the connector that you attached the flare fittings to? I can’t quite zoom in to see how the connection is made.
Thanks,
Bill
Hi Bill,
This is the regulator I’m currently using:
https://www.amazon.com/gp/product/B01GZPBCPU/ref=oh_aui_search_detailpage?ie=UTF8&psc=1
I think its a standard sort of BBQ regulator.
The hose on the regulator is terminated in a female fitting. On my setup, the copper pipe propane line in the RV is terminated with a female flare fitting, and I use a male to male adapter to connect the regulator hose to the RV pluming.
There are probably other ways to do it.
Gary
Thanks, so much, for this info. that’s exactly what i was looking for. I am so impressed with your build as well as your attitude in helping others with questions. Thanks, Again.
Bill
The current edition of NFPA 1192: Standard on Recreational Vehicles can be found on the NFPA website.
http://www.nfpa.org/codes-and-standards/all-codes-and-standards/list-of-codes-and-standards?mode=code&code=1192
Online access is free upon registration.
Thanks Larry.
Interesting reading.
I would read section 5.3.3.2 as allowing a propane compartment or locker inside the RV as long as long as it is “vapor resistant to the inside”.
And vented to the outside as specified in other parts.
Gary
FYI: Here are the ANSI RV build specs.
https://www.nfpa.org/assets/files/AboutTheCodes/1192/1192-F2001-rop.pdf
Dry reading, but searching/FIND for a key word is useful (CTL-F).
My solution plan is to screw the second door on the rear, so it will not open (then only one rear door opens). Then build a sealed propane box in it only accessible from the outside with 50% or more venting slits on the propane tank cover. I plan to use a used door to modify, which allows me to revert later or move to new camper.
I have looked at a lot of options for the propane location on a van conversion. There is a reason the professional conversions are outside and under the frame. DOT law saws a propane tank cannot be inside (must be in its own box COMPLETELY sealed from the inside of the RV and vented to the outside), cannot be outside the rear bumper, cannot be on the roof, and cannot be lower than the lowest part of the (vehicle? frame? axle differential?).
Some of the rules are to reduce damage while driving or damage during an accident and reducing the possibility of fire (frame and/or skid plate hits obstacles not tank, and bumper protects if hit from back). Other rules protect occupants if there is a gas leak, which more likely would result in poisoning rather than fire (more people die from propane poisoning).
A few questions about locating the propane tank inside. I don’t know how much “ventilation” is adequate if there is a catastrophic regulator or hose failure vs a little leak (e.g. same as just opening the valve all the way with nothing connected) — I currently have a 1lb that I cannot take off of my lantern, because it’s internal valve does not shut off – I’m glad I detected it and did not take it off and throw it into the van). I don’t know how reliable gas detectors are – never seen a test. Since propane sinks, does the propane detector need to be on the floor or even inside the propane box if there are paths to leak out of the propane box to the inside?
As a note, I have never even heard of anyone even being warned for violating any of these rules. I have seen homemade truck campers with propane tanks bolted to the back of the camper outside the bumper, and propane tanks on those racks that plug into the trailer hitch, which is even more in the path of an accident, and EVERYONE throws their refiled 20lb grill propane take in the trunk.
An important point: Self and family harm and legal liability is always a possibility if the rules are broken.
Hi Mike,
That does not sound like an unreasonable way to house the the tank as long as you are willing to lose the use of one of the rear doors. I guess you could do a similar arrangement using the side of the van for an access door and vent — this would preserve the use of both back doors and also make it easier to haul stuff in the van when not being used as an RV.
It is common in Europe to have a sealed and vented to the outside propane locker in RVs and these are also common on boats — there are commercial versions available.
To me the arrangement I have is safer than a tank mounted under the frame of the RV. I’ve had two RVs with the under frame mounted tanks, and they seem more susceptible to damage and to weather/mud related failures than our strongly made compartment inside the RV with a vent to the outside.
I believe that the 20 lb tanks have built in protection that limits the flow in the case of a regulator or line failure.
My propane detector/alarm is mounted close to the floor, and the instructions clearly state that you must do this.
Speaking of the 1 lb cans of propane, people throw them in the back in any old place and don’t give a thought to it — they certainly contain enough propane to cause all kinds of trouble and they get no protection at all.
Would like to get some pictures of your tank install if you go ahead with it.
Gary
Gary
Thanks, Gary. And before I get started, I also want to say “Thank You” for this discussion.
When I get to the point of actually making the “door propane cabinet” I will be more than happy to provide details.
Using the side door is another good option. I was going to install the propane cabinet in the left rear door, leaving the right rear door still usable. I go back and forth between using the back door or side door. My sleeping is in the rear, so those doors are not used as much except to grab a couple of larger items when packing and unpacking. My kitchen is exposed by the side doors, so I can use parts of the kitchen from both inside and outside. That multi-access kitchen has not been used as much as I thought. Thus, using the left-side side-door as the propane box holder would put the propane tank closer to the actual propane usage thus shorter lines when I install the inside burners then later a furnace (another problem to solve). I use a 12v Indel-B frig.
I agree that the under the chassis propane tanks do not seem to be as safe. I don’t know if they are stronger tanks or if they have built in skid plates. But they are used a lot. However, I don’t have the ability to install, and I wanted the ability to revert to a normal van, so I crossed out using an under the chassis tank.
As far as a self limiter on a propane tank, you can test that yourself with no regulator attached to the tank and outside (no where near an ignition source!!!!). It will put our quite a volume. Scary. They do make single-use catastrophic hose failure devices that screw in (before or after?) the regulator. Some regulators have a limiter that cuts off if the pressure in the output hose drops lower than a certain level indicating a leak. No experience or anecdotal information on either. I am aware of them, and plan to research later.
Thanks again, Gary.
I’m running a little low on my garage (under bed) space and am entertaining the idea of putting the propane locker directly under the stove in a kitchen cabinet. Is there any good reason I shouldn’t do this? It seems like most everybody puts them in the rear but with all my electrical and fresh water and fridge being back there, space is a hot commodity. What do you think? Still venter to the outside just behind the driver side… I haven’t gotten down on the ground to look yet but I’m assuming there’s some amount of space I can drill the exhaust tube in to because it doesn’t have to be terribly large…
Hi Lindsay,
I don’t see anything wrong with that approach as long as the part of the cabinet is holding the propane tank is sturdy and sealed.
You could vent the tank compartment out the side of the van if you can’t find a good spot under it.
Gary
Hi,
what about installing the tank above the rear bumper (inside a box) with a hose through the back door until the stove? Any ideas about it?
Hi Favio,
It seems like I have see this before, and, of course, its common to see the propane tanks mounted outside on the trailer hitch tongue of trailers.
If you wanted to keep the use of the back door, the hose installation would be kind of tricky.
It does seem like its a bit less safe in terms of collisions and a potential fire.
For me personally, I think I’d go for the under the van mount before putting the tank on the rear door.
Gary
I’m working on my own Ram pro master conversion. Have you got any tips on running the copper line from propane tank, back right corner to my refrigerator behind driver seat?
Hi Larry,
That’s pretty much the way my line runs. I used the 3/8 inch copper line. The pictures and text above show what I did. It was the first time I used the flare fittings, and they seem quite straight forward, but maybe do a practice joint on scrap before starting the actual ones?
It has been trouble free — no leaks or problems.
We have both propane and CO alarms, and I highly recommend using them.
Gary
Just one suggestion – It’s always a good idea to clamp tubing somewhere near the fitting, to prevent vibration from flexing the connection.
Thanks David — good suggestion.
Gary
Found this page! Belay the info request on the other.
Sounds well well thought out and quite safe.
OK 🙂
Gary
Hi Gary,
I got some really good advice from you a few years back while I was making my own PM conversion. Since then my wife and I traveled in it around the country for 8 months and now use it for camping trips here and there. I had a few questions as I am now trying to do some maintenance and re-configuring on it as its been heavily used now.
1) I’ve gone through 2 camco dual stage propane regulators already. I have no idea why they stop working. I looked back at your install and noticed you have the 1 stage. Just wondering if you’d recommend that instead? Any reason for that?
2) I have a CR Lawrence window that leaks when it rains. I was wondering if you encountered this at all with your window installs? I have no idea how to fix this issue. Luckily it doesn’t rain all that hard to often. I now live in Alamosa, CO.
Other than that its been a great setup. I’ll have to try to get more pictures one of these days. And again thanks for all your help. Its great to see the new site!
Thanks,
Kyle
Hi Kyle,
8 months of travel around the country sounds nice — did it all go well? Any “lessons” to pass on about spending lots of time in the PM?
I’ve not had any trouble with the regulator. There was not a lot of effort that went into selecting it — I just picked it off the shelf at the local AG store. I remember reading afterward about 2 stage regulators, and thinking that maybe I should have gone that way, but the one I got has been fine.
I’ve heard others having trouble with leaks around the CR windows. Mine have been OK. The only thing I’ve done is to seal up the weep holes on the top of the windows (they have weep holes on top and bottom since they can be used on either side of the van).
I’m pretty happy with the CR windows, but it would be nice if there was a window solution made specifically for the PM at a reasonable price.
Thanks — Gary
You’ve done a very nice job and thanks for sharing. Did you look into making your propane storage NFPA 1192 compliant?
Hi Gary,
Love the site…I look at it once a week as I slowly shape up plans for my 06′ Sprinter conversion. Alas, what dimensions were you using for your sealed propane box? I assume, as well, that you screwed the MDO box together and then glued the seams to provide the correct seal?
Lastly, is your vent hole in the floor covered by the tank when it is in the compartment box?
Thank you!
Best,
Al
Hi Al,
The compartment dimensions are to fit a standard 20 lb (barbeque type) propane tank. There is about 1 inch of clearance on each side to the tank — maybe less clearance would be desirable? In the vertical dimension, the cover actually presses the tank down just slightly.
Yes — I did glue and screw the box together and the glue provides a good seal.
The floor vent is off to the side of the propane tank. The tank has a support ring that acts as a base for the tank — the floor vent is just outside this support ring.
Gary
Great, thanks Gary…I appreciate how helpful you are!
Cheers,
Hi Craig,
No — I was not aware that there was a standard in the works.
I did look through this draft https://www.nfpa.org/Assets/files/AboutTheCodes/1192/1192_F2013_FDR.pdf and it does go on and on. I read through several pages of the requirements and I believe that my system would meet many of the requirements. One exception would be the venting of the compartment that the propane tank is in on both the bottom and top.
I do feel that the system I built is very simple and safe and I feel better about it than the system on our last RV with a tank mounted under the vehicle and exposed to the weather and road abuse.
Gary