Finally got around to mounting our large PV panel to the roof, and the routing of the wires from the PV panel to the Charge controller. All the details below.
See the main Electrical Page for more on the full electrical installation.
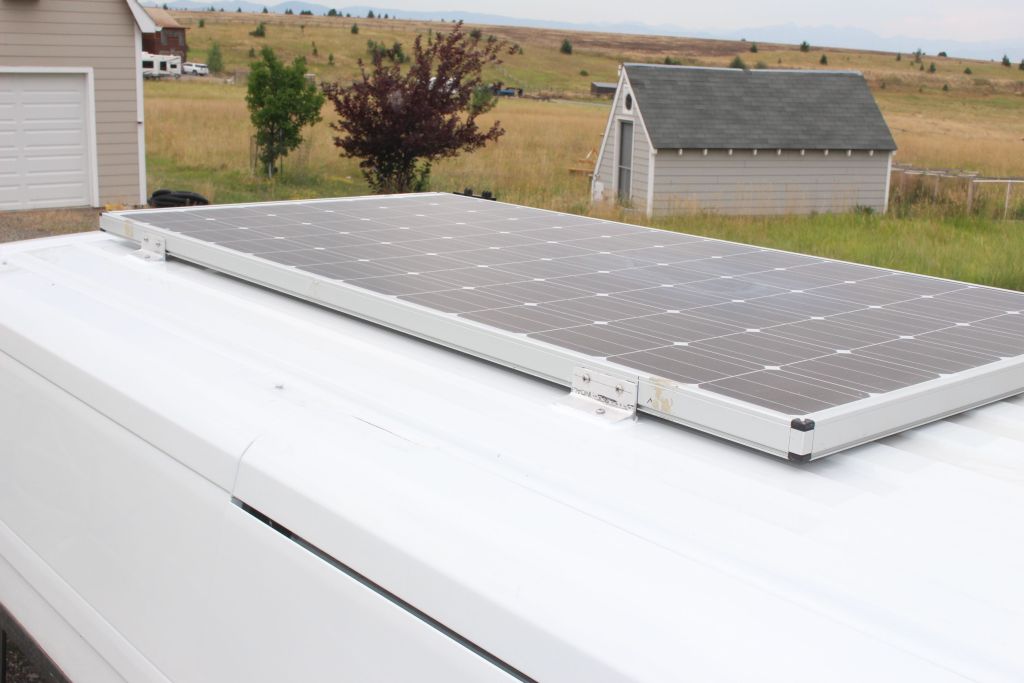
We decided to use one large PV panel (325 watts) rather than two or three smaller ones. Its a bit more awkward to mount the big panel on the roof, but it seems like it makes for a cleaner and simpler installation with fewer holes in the roof to use the single panel, and no need for roof top wiring of multiple panels together.
See the main electrical page for the details on how to pick a large PV panel and a compatible charge controller.
Lining Things Up
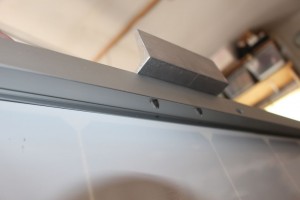
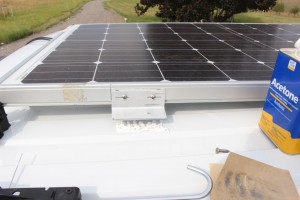
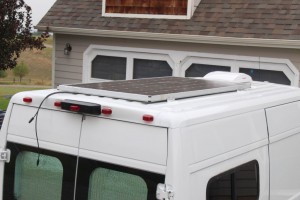
I decided to keep the PV panel low to the roof along the idea that this would minimize aero drag due to the PV panel. There will be a hit for this on the power output of the panel as it will get less ventilation, run hotter, and be a bit less efficient.
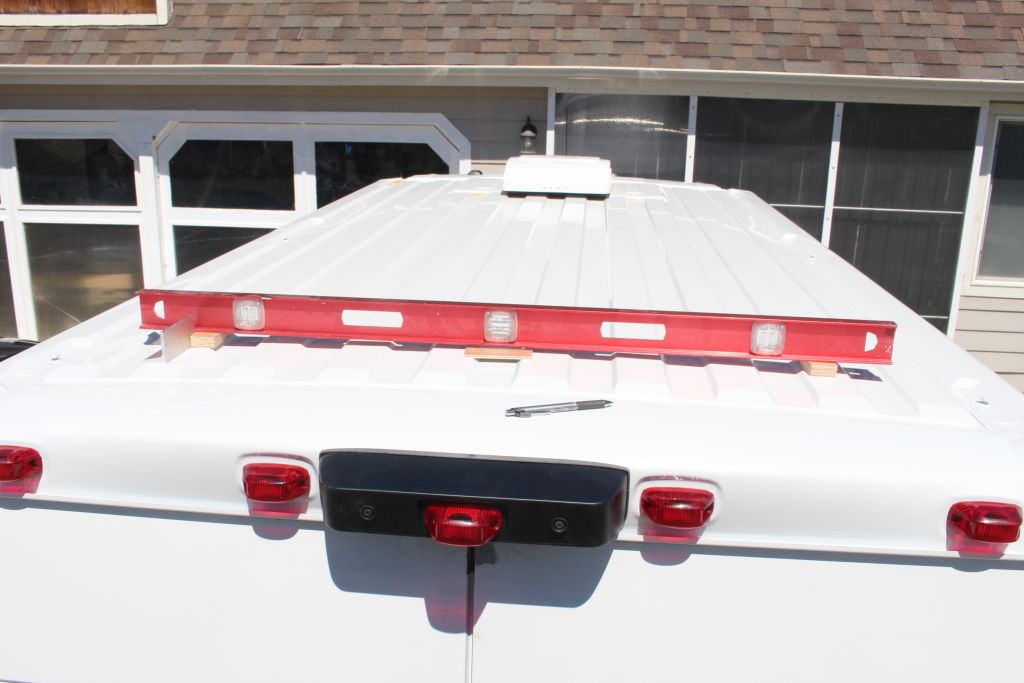
Wanted the PV panel to clear the center of roof by only 1/4 inch. The picture above shows determining how much the brackets have to extend below the PV panel frame on the edges to get the 1/4 inch clearance at the center — about 3/4 inch.
Mounting Brackets
After reading a number of descriptions on PV panel mounting and looking at some of the commercial mountings available, we decided to go with some simple, homemade brackets.
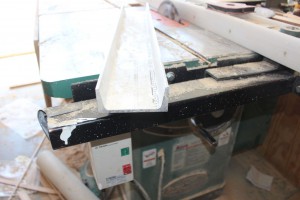
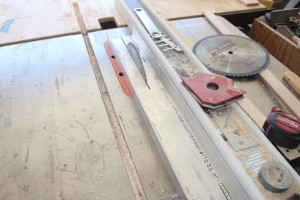
The brackets are made from some left over aluminum channel from the old Boeing Surplus before they closed it. I cut it down the middle to make two sets of 90 degree mounting brackets (see pics). These are likely heavier duty than required, but they work fine. I made the brackets on the long side (4 inches) in that I wanted the PV panel to be held in place primarily by adhesive and the longer brackets provide more bond area.
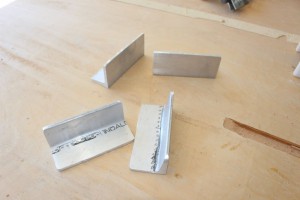
I installed the brackets on the PV panel in the shop. Each bracket is screwed to the PV panel frame by two #14 (1/4 inch) stainless steel sheet metal screws. The frame of the PV panel is a box section, and the screws go through both walls of the box section.
Mounting the PV Panel
The brackets were mounted to the PV panel frame in the shop and before placing the PV panel on the roof.

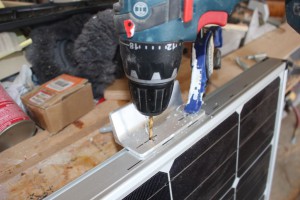
The pilot holes through the brackets are about 1/4 inch (to just clear the full diameter of the screws), and the pilot holes through the PV frame are about 3/16 to provide good holding power for the screws. It would be a bit more desirable to use 1/4 inch bolts and nuts with lock washers, but once installed, it would be nearly impossible to remove the bolts with the PV panel so close to the roof.
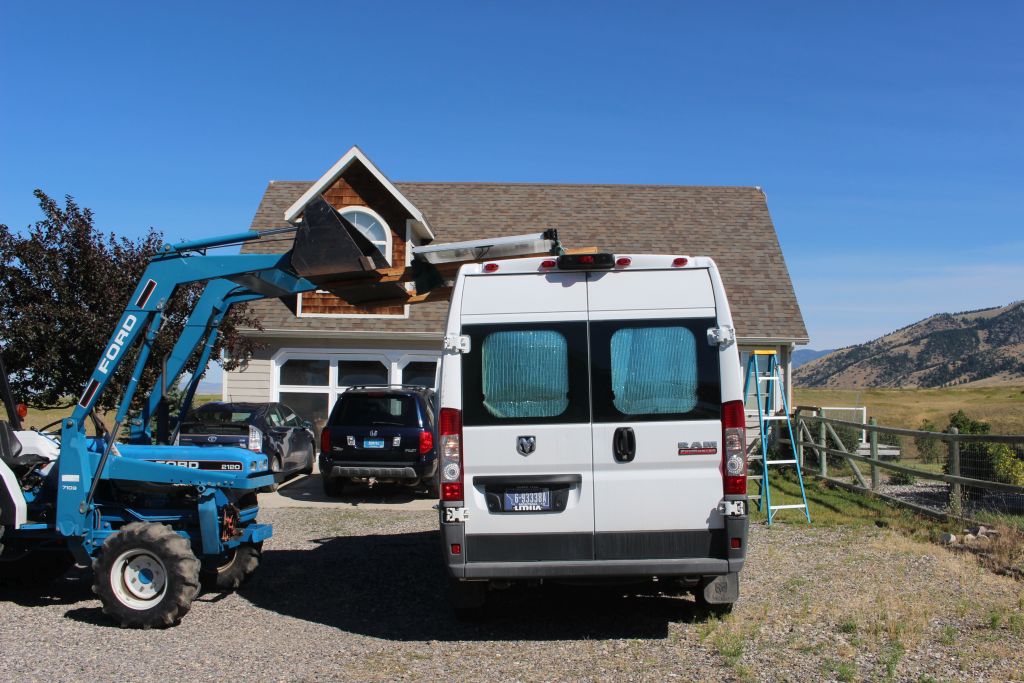
The panel is big, awkward, and breakable making it a challenge get onto the roof of the van. I ended up using the tractor bucket with extensions on it to get the panel in place, but two people would not have much trouble getting it up working from ladders. I tied pieces of towel to the mounting brackets so that they would not scratch the van paint.
In attaching the PV panel to the roof, I had originally decided to use only adhesive. I read about a build in AU in which SikaFlex adhesive sealant only had been used to hold the PV panel to the roof and it had held up fine to a rough trip around AU. But, in the end I chickened out and decided to use one #14 (1/4 inch) stainless steel screw in each bracket along with the SikaFlex. While I expect that the SikaFlex will be doing all the work, the stainless screw provides some backup, and it also acts a clamp to compress the bracket into the SikaFlex. So, four 1/4 inch holes in the roof won’t be so bad to seal up if for some reason the PV panel has to go.
Update: Here is an build in which the solar panels are held in place with 3M VHB tape and then sealed over with Dicor sealant. They say that AM Solar has been using this method for years and has not had any problems.
I’ve made some small test brackets glued with SikaFlex and also with a polyurethane adhesive that I plan to pull apart in a few weeks and measure the failure force. I’m waiting a long time because the adhesive in from the edges cures very slowly — its a water vapor cure, and it just takes a long time to cure when gluing materials that are not permeable to water vapor. A two component adhesive that cures when the components are mixed would really be better for this job. I’ll report on how the test goes.
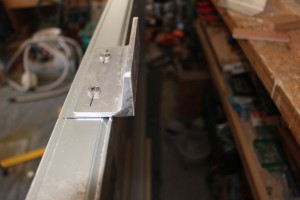
After getting the PV panel in place, I sanded the bottom of the bracket lightly, and then cleaned paint and bracket with Acetone.
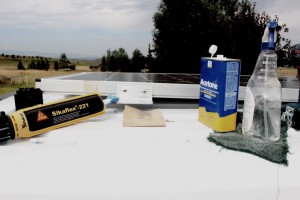
I then applied the SikaFlex under the bracket. Note that the bottom of bracket surface is not parallel to the roof metal, so the thickness of the SikaFlex is greater on the outside of the bracket than on the inside. This means that the adhesive used should be able to accommodate this variation in thickness of the glue line (or you could bend the brackets to get a parallel fit).
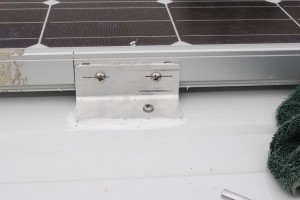
I sprayed a very fine mist from the water bottle in the area just before tightening the screw down on the sealant — the hope being that this would help the cure go a little faster. The sealant cures around the edges in a day or so, but I expect that the cure in the center will take quite a while.
The #14 stainless steel screw is then tightened to bring the bracket into close contact with the van roof. Then smooth out the SikaFlex that oozes out to seal around the bracket.
I do plan to add some beads of the SikaFlex at the points near the center of the PV panel where the panel is 1/4 inch from van roof. The idea is just to keep the panel from vibrating or striking the van roof.
Running the Wires
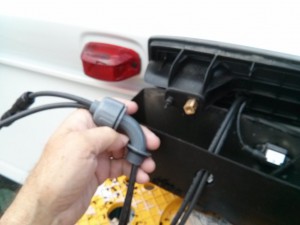
I was able to run the wires through the backup camera housing and into the van — so, avoided another hole in the roof.
The PV panel had standard MC4 connectors on it. I bought a 50 ft long MC4 extension cable on Amazon and cut it in half to make the two wires that come down from the PV panel to the charge controller. The two weather proof MC4 connections that connect the PV panel wires to the MC4 extension cable wires are the only outside connections. And, the MC4 extension cord halves were long enough to reach the charge controller, so no splices inside the van either.
The MC4 wire is #10. At the full 315 watts (very optimistic), the PV panel output is about 36 volts, so the current through the #10 wire is about (315 watts/36 volts) = 8.75 amps. The voltage drop for the 25 ft of #10 wire is 0.44 volts, or 1.2% — this seems fine. This is another advantage of the larger, higher voltage PV panel compared to multiple 12 volt panels — smaller gauge wire can be used to connect between the panels to the charge controller. One not advantage is that the charge controller for this kind of panel is more expensive — see the electrical page for charge controller details.
I was able to run the wire through the backup camera housing, and then into the van using the same opening as the camera wires go through, then along the space above the back doors over to the wall, then down the middle of the sheet metal vertical post at the van corner, then forward through the bed platform to the charge controller. A little fishing, but pretty easy.
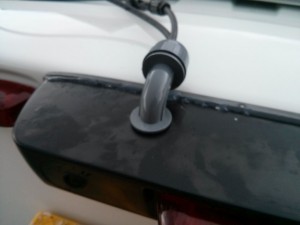
I used an electrical fitting from Home Depot that has a rubber gasket to seal the hole where it enters the camera housing. The other end was a fairly snug fit for the two #10 wires and was sealed with the SikaFlex sealant. I also added a bead of silicone caulk along the top of the camera housing where it joins the fan — it did not seem all that secure and I thought the silicone would reinforce it some, but would also be relatively easy to remove if need be.
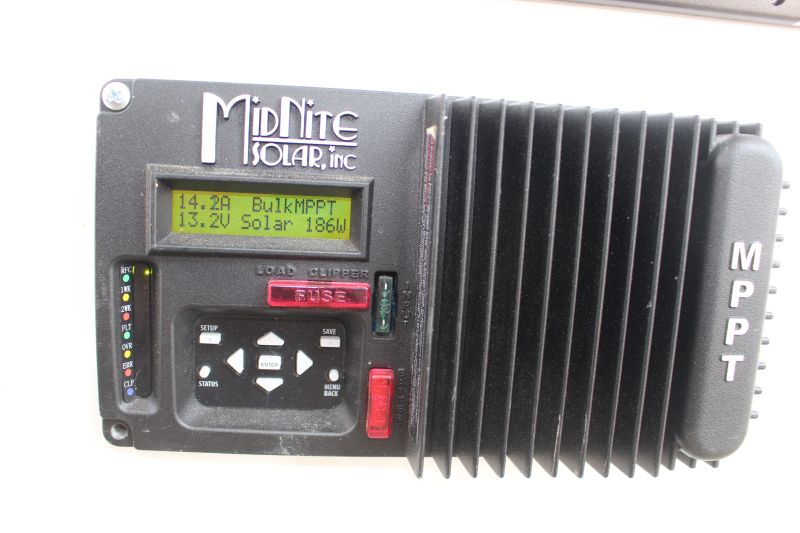
The PV panel hooked up to charge controller — PV suppling 186 watts and 14.2 amps charging current. The charge controller is maintaining a charging voltage of 13.2 volts.
Aero Treatment
I would like to work out some sort of aero treatment for the PV panel that reduces the drag increase that it causes. Perhaps a fairing at the front that brings the air smoothly up to the top surface of the panel. Also thinking that an about 6 inch long sheet of aluminum might be mounted across the back of the PV panel with vortex generators mounted on it — this might help to reduce the separation at the back of the van?
Any ideas on this are very welcome.
Update 2024: We have been using this panel for about 9 years now, and no problems at all. In our Electrical System Upgrade, we changed to a Kisae DMT 1250 combination solar charge controller and DC to DC charger. This did not require any change to the solar panel. Overall, I think this turns out to be a reliable and low aero drag solution.
Gary
August 7, 2015
Comments, Questions, Suggestions?
Great write up! Do you notice any added wind noise when driving?
Hi Pete,
I did not notice any wind noise increase, but was not really looking for it.
I guess if there had been a marked increase, I’d probably have noticed it.
Gary
Thanks for the backup camera conduit idea.Im thinking of puttin two aero bars in the factory mounts putting grid mesh or similar and lashing the flexible panels underneath that.Its easy to make custom solar cableing if you have the right crimper/parts
Hi Joel,
Sounds good, but make sure you don’t shade the PV panels. Even a little shading can have a dramatic effect on output — google something like “partial shading of pv panels” for more.
Gary
I’ve decided to not use solar panels in my van because of the limited time I’ll actually spend in the van (weekend surf/climb/bike trips). My plan is to use a battery isolator and shore power to charge my battery. I’ll being drawing power for lights, fan, charging laptop, running a small pump for a sink, and potentially a refrigerator.
Do people have recommendations for the following:
Isolator
Inverter
Battery and voltage meter display
Shore power (receptacle, adapter, cord)
Hi Corey,
This page has the choices I made for all of those. You can just take out the solar panels and solar charge controller.
https://www.buildagreenrv.com/design-and-build-information-for-camper-vans/install-electrical/
One thing I would change from the choices I made is that I would probably go for a pure sine wave inverter charger rather than the one I used. Lots of choices – Xantrex makes some nice ones.
The other thing to think about is how much AC you will actually use. I use so little AC that I could probably get along without any inverter.
This is another page that gives some more choices: https://www.buildagreenrv.com/design-and-build-information-for-camper-vans/install-electrical/
In the end, it depends a lot on what your electrical loads are going to be. Depending on your loads, all of these components will change. You can start with the loads spreadsheet that is on the page ref above.
Gary
I am researching a 200 watt portable solar system for my van. I’m looking at using 2 of these panels: https://www.amazon.com/Newpowa-Polycrystalline-Efficiency-Module-Marine/dp/B0725RZ22H/ref=cm_cr_arp_d_product_top?ie=UTF8&th=1
I think I will use a 20 amp MPPT controller.
My electrical set up is very similar to yours. What do you think about this ideas? Will it provide an adequate amount of charge for the system?
Hi Dennis,
A lot of people with electrical demands similar to ours (a fridge, furnace, lights and some misc) have found 200 watts to be OK. Does not mean it will always meet all your needs — northern areas in the winter get less solar, and it can always be rainy or cloudy.
When you say “portable” do you mean panels not mounted to the roof? This changes the equation a bit — on the plus side, when you deploy them, you can make sure they are in the sun and tilted to a good angle, but on the other hand they won’t be collecting energy when you are driving.
If you want a more exact answer, the PVWatts calculator can be used — it takes into account time of year, local weather, and panel orientation.
You might also look at flexible panels. They are not necessarily better, but different. They may be easier to store when not in use?
Gary
I am researching a 200 watt portable solar system for my van. I’m looking at using 2 of these panels: https://www.amazon.com/Newpowa-Polycrystalline-Efficiency-Module-Marine/dp/B0725RZ22H/ref=cm_cr_arp_d_product_top?ie=UTF8&th=1
I think I will use a 20 amp MPPT controller.
My electrical set up is very similar to yours. What do you think about this ideas? Will it provide an adequate amount of charge for the system?
Gary – Thanks for the advice on a roof rack. I also talked with a friend who has solar panels at his house and he shared the same thing about shadows affecting the panels more since they are wired in series.
I’ve considered adding a roof rack over the solar panel. The gear will be removed when parked. Would the minimal two rods over the PV reduce the output too much?
Hi Dennis,
PV panels are odd in that small blockages can result in big drops in output. It has to do with the individual cells in the pv panel being wired in series, and if one cell gets cut off from the light enough, it wipes out the whole sting of cells wired in series to it.
Don’t thing I would do it without some testing to see how much of a hit you get — or, you might be able to find some test results on internet search.
Any chance of removing the bars that cross the PV panel?
Gary
Hi Gary,
Thanks for your generosity… A little question about your solar panel installation. How do you fix the wires between the panel and the camera box? It looks like the wires can move when the camper mis on the road and it can damage the paint and the roof.
Thanks a lot for all the shared information`s
Sorry for my english I am from Québec, Canada;)
Nicolas
Hi Nic,
The wires on mine are pretty short as the connection box on the PV panel is pretty close to the camera box.
I used a dab of the SikaFlex in a couple places to bond the wire to the van skin. Don’t remember for sure, but probably just held the wires in place with a weight while the Sikaflex cured.
Just went out to take a look at it and see how its holding up, and it looks fine — the SikaFlex is still holding and don’t see any sign of paint wear.
Gary
Hi Gary, You have a been a tremendous help to me in planning my Promaster van conversion project.
Above, you said “I’ve made some small test brackets glued with SikaFlex and also with a polyurethane adhesive that I plan to pull apart in a few weeks and measure the failure force.”, were you able to find the time to do the test?
Hi,
I was looking for those the other day, and did not find.
Will have a better look when we get back – but will be a while.
Last time I looked at the stuff on the roof it looked good.
Gary
I’m working on getting a system set up on my own conversion but we’re having some difficulties figuring out the best way to take the wiring from the panel in through the roof. Our van is older and we’re not lucky enough to have the back up camera option like you did, so we will have to make a hole in the roof to run the wiring through. Any suggestions on the best way to seal the hole and make it water tight around the wires?
hi Theresa,
Here is one method from Amazon: https://www.amazon.com/Link-Solar-Weatherproof-Project-Campervan/dp/B0111RNZDY/ref=sr_1_12?ie=UTF8&qid=1495200176&sr=8-12&keywords=rv+solar
One from BlueSea: https://powerwerx.com/blue-sea-bs1002-cableclam-thru-roof?gclid=CjwKEAjwr_rIBRDJzq-Z-LC_2HgSJADoL57HqnVv6jNXG_Huoy64H3B-kNFDdhA8udGC144GQnKvNxoCIy7w_wcB
But, I think I have seen people use just an outdoor electrical box that is fastened and sealed to the van roof. Then use a weather tight fitting where the wires enter the box (similar to what I used to get the wire into the backup camera housing). On these outdoor boxes, the top of the box is sealed with a gasket, so when you put it on, it should be weather tight. Should be able to get all this stuff at Home Depot. The sealant you use to seal the box to the van roof should be a good one like Dicor.
If you posted the question on the ProMaster, Sprinter, or Transit forums, I’m pretty sure someone would come up with a picture or two.
Gary
While the mounting configuration of your PV is excellent for traveling down the road, you might consider replacing the aluminum angle brackets with some industrial door hinges (with pins that pull) so that while camping you can park in an optimal direction to raise either side of the panel to the optimal angle to significantly increase your output. Then simply reverse the procedure to secure the panel for travel.
I also doubt the aero effect of VGs placed over halfway back on the van (already in a turbulent flow area) would be enough to offset their weight and parasite drag. Large Slots or Vanes would be required that far back.
Hi John,
That sounds like a good and simple way to do the tilting panel.
I did look at the benefit of tilting the panels using PVwatts and there is a significant advantage in mid winter, but not so much the rest of the year. Since we don’t do much mid winter camping, I decided to keep it simple. Part of it being that the top of the roof is not so easy to get to on the full height vans.
These guys http://www.airtab.com/ always mount their votex generators right at the back end of the vehicle — the idea being (I guess) that adding energy to the boundary layer allows it to stay attached to the van further into the back surface of the van and reduces the pressure drag on the back of the van caused by separation. Its a little hard to tell from the data they show how much (if any) the benefit is, but a lot of people seem to believe they are getting something out of them.
My pv panels ends about a foot short of the end of the van and I am wondering if I could attach a turning van along the back of it that would help the air turn the corner a bit and stay attached longer to the back of the van.
If I could work out a good way to test the before to after benefit, I would give it a try, but I don’t want to do it if I can’t figure out some kind of test method to see if its actually a benefit. Perhaps some kind of coast down drag measurement, or before and after runs on under the same conditions while using the fuel computer on the van to assess any change?
Thanks Gary
Regarding PV panels, roof vents and aero treatments I think there are some better options out there than I ended up with and thought I would share my experience. I ended up putting my Maxxair fan about 2/3’s of the way back, behind the last roof support on my 136″ Promaster. Not enough room behind the vent for the 47″X21″ PV panel unless I put it crosswise. If I was going to do it again I would put the vent a bit more forward and and place the panels length wise, one in front of the vent and one behind to get the least drag.
Still thinking about putting the back panel crosswise to act as a turbulence generator. Thoughts?
Hi,
The configuration with the vent more forward and the two PV panels mounted one behind the other to minimize frontal area sounds pretty good to me.
My PV panel ends just forward of the back of the van, and I’ve thought about mounting some kind of turning vane to the back of the pv panel to which would attempt to turn the air going over the top of the van around the corner to the back of the van. The idea being that this would keep the flow attached to the van surface part way around the corner and would reduce the high pressure drag that you get from the separated air at the back of the van. Don’t know if this would be effective or not. If I can figure out a way to actually test the before and after vane to see what the benefit (if any) then I’ll give it a try.
Thanks Gary
Gary,
Want to thank you for the great and easy to duplicate techniques you share with us. Initially, I didn’t plan to add solar to my PM. Well, after reading a lot here and the PM site I couldn’t resist. I got a 100X2 Renogy kit with MPPT and remote and finished the install today. Hardest part was finding where HD had that fitting; not where I expected. Even at 6pm under an oak tree completely shaded they were putting out 32v at 2.6A. Can’t wait to see what happens tomorrow when I get it in some hot Texas sun. Thanks again. rob
Nice!
One side benefit I like about the solar is that it keeps the batteries up between trips — you don’t have to remember to charge the batteries and plug in a charger every couples weeks or so.
Gary
Sweet! Thanks for the information!
Hi Jean-Paul,
Sorry about being slow to get to your comment — still learning the comment system for WordPress.
I like the idea of the fairing to bring the airflow over the top of the PV panel smoothly — to try to avoid separation of the airflow at the leading edge of the PV panel. So, I think the aft end of the fairing where it comes into the PV panel should be tangent to the top of the PV panel (that is, no abrupt change in angle between the back end of fairing and top of PV panel).
I don’t know my aero well enough to say whether the 3/4 holes in the front frame of the PV panels would be a good or bad idea.
I do think there is some opportunity at the back of the PV panel to add something that would help the air turn the corner a little and reduce the separated area behind the flat back of the van — this low pressure separation zone is a large part of the vehicle drag. A line of the AirTabs might be a good thing to try.
We just got back from a 2000 mile trip in the PM, and the PV panel mounts look fine — no sign of problems.
Please keep us posted on how things go with your PV panels.
Gary
PS –I’m still working on getting the site up to the point where there is enough here to “open” it — in the mean time is marked for Google not to index it or use it in search results. But, a few people have found it anyway, and its good to get some early feedback.
Hi Gary,
Another comment/question about the installation of solar panels.
Me also I will use Sika 252 for sticking the brackets made of aluminum 2 x 2 angle on the top, but all along the longitudinal sides of my 2 panels (one in front, the other on the rear, with 2 Fantastic Fans in the center of the top). With this large sticking surface i’m not concerned by the solidity and resistance of the fixation, so no hole in the top of the van ! (Too much problems of water infiltration in the past RV’s…)
And as you, I « decided to keep the PV panels low to the roof along the idea that this would minimize aero drag due to the PV panel. There will be a hit for this on the power output of the panel as it will get less ventilation, run hotter, and be a bit less efficient. ».
So I was thinking of making some holes (diameter one inch, 3/4 ?) in the front frame of the panels, in order to increase the air flow under the panels. I’am conscious it will reduce the solidity of the panels structure, but the aluminum 2 x 2 all along used on the sides for fixing them on the top would add some rigidity to the panels…
Me also I was thinking of « working out some sort of aero treatment for the PV panel that reduces the drag increase that it causes. Perhaps a fairing at the front that brings the air smoothly up to the top surface of the panel », as you write. That fairing would be fixed in the lower fixation holes of theses horrible clearance lights I want take out. But, for me, this would contributes for diminishing the air flow refreshing the panels… and makes the holes above mentioned quite inoperative.
So, what is better ?
I’m very interested to have your opinion and discuss the pro and cons of these ideas.
My daily driver is an Audi A4 wagon. I occasionally tow a small Sportsrig with bikes. I thought Airtabs would help with the airflow over the trailer. Bought enough to go around all three sides of the wagon, taped them on with painter’s tape and did some A-B-A testing, no luck. Returned them within 30 days. Could do a similar thing with the PM and testing.
Now, back to topic, I’m looking forward to getting my solar panels chosen and installed. Going to be covering nearly all of the roof with ~600w of panels and Trimetric charging equipment.
Hi — How did you do the AB testing?
I was thinking about picking a flat couple miles of highway and on a low wind day check the mpg using the dashboard computer and going both directions first without vortex generators and then with them?
I guess if the difference is too small to measure on this kind of test, then maybe that is an answer in itself?
Gary
Hi — I’m not too worried about ugly, but I also wonder what the net benefit is.
Gary
I keep thinking about the AirTab vortext generators. Its been a thought to have them across all of the rear of the van, including the roof. Two things are holding me back though… not sure its really worth it, but also having seen an older Sprinter that had them on the sides, it did look… ugly. Not just weird, but plain ol’ ugly.
Regarding the solar panel mount, nicely done. My current plan is to go with 3-4 12v panels, so I’ll have to have the larger wires coming down from the roof. And with my Maxxfan mounted all the way aft, not sure I can use the great idea of coming through the center light box.