In order to build your electrical system, you will need to know things like: what size battery do I need? What size alternator? How large should the wire be? What size fuses should I use? etc. This page provides some simple help on sizing the electrical system components.
Safety Warning and Disclaimer
There are serious safety issues involved with wiring your own system. The voltages are high, and potentially lethal. Doing the system incorrectly can lead to serious consequences down the road. PV systems have the added hazard that even when the grid power is turned off, the system can be “live” and present a serious shock hazard.
If you don’t feel like you want to put in the time to learn how to do this correctly, then find an electrician that you can partner with to do this part.
I want to make it very clear that I am not an electrician, and I take no responsibility whatever for the correctness of the material below — you need to do your own homework!
Estimating Energy Use and Battery Size
To estimate how large a capacity your house battery should have, you need to take into account: 1) what your electrical loads are, 2) how long you want to be able to go without recharging the batteries, 3) what limit you want to set on how deeply you discharge the batteries.
Estimating your electrical loads: Work out what electrical devices you want to run in the van and how much time you think you will use them each day. You will also need to know roughly how much power each device uses. The spreadsheet below has data for the common loads.
How long do you want to go without recharging: If you camp out in the “boondocks” for several days at a time and you don’t want to be running the van a lot to charge the batteries, then you will want a larger set of batteries that can last for several days. Solar charging can be help in this regard as the PV panels will charge the batteries.
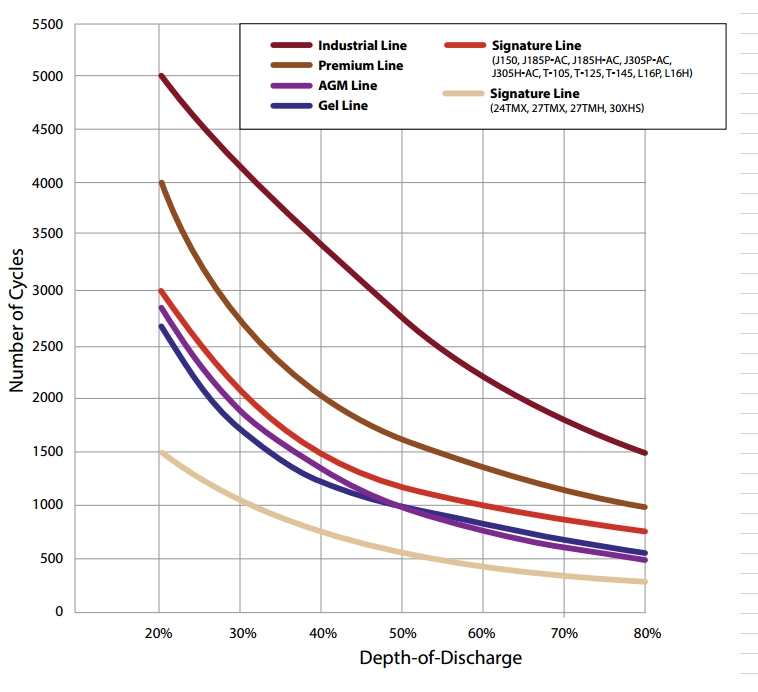
How deeply will you allow the batteries to be discharged? Lead acid batteries last longer if they are not routinely deeply discharged. A battery discharged only down to 20% might last 3000 cycles, while if discharged down to 80%, it will only last about 750 cycles. 50% maximum depth of discharge is a level that is recommended quite a bit for long battery life. These numbers will vary some with battery type and brand, but you get the general idea.
On our conversion, I used 80% depth of discharge to size our batteries. The logic for this is that the cycle life at 80% depth of discharge is still 750 cycles, and with an RV (maybe) only seeing 30 or so cycles a year, the battery would last 25 years before getting to 750 cycles — it will certainly die of something else long before this. Of course, the advantage of using a higher depth of discharge is that the battery bank is small, lighter, and less costly.
Update 2018: It turns out that even while sizing for 80% depth of discharge, in practice we rarely go below 20% depth of discharge. I think the reasons are that 1) you tend to be a bit conservative when estimating how much power you will use and 2) we drive on most days so, its very rare that the house battery has to go more than one day without charging, and 3) the solar is always charge the battery if there is sun.
To help with determining battery size, I’ve put together a spreadsheet you can download and just fill in the inputs for your situation and get a battery size estimate. It takes into account the three factors listed just above.
Download the Battery Sizing Spreadsheet…DBELBatterySize
If you don’t want to use the spreadsheet, there are some rough rules of thumb for battery size listed at the end of this section.
Here is a picture of the spreadsheet:
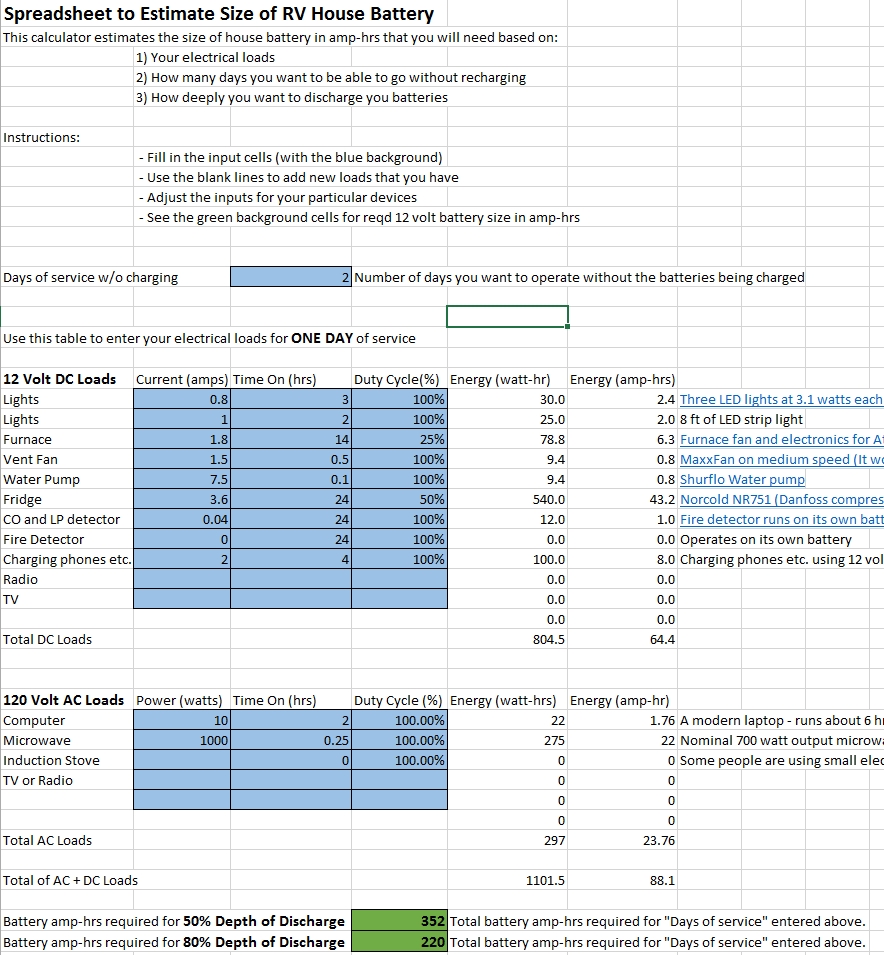
You can use the spreadsheet to see what the effect of adding or removing specific electrical loads make on the battery size. Some loads like an electric fridge, or a microwave are fairly large and can make the battery size, weight and cost go up quickly.
If you want to add loads not already listed in the spreadsheet, for DC loads you need to know how much amperage they draw (often listed on the device or in the specs), and if its a device that like a fridge that runs only enough to keep a target temperature you have to measure or estimate its duty cycle (the fraction of time it will typically be on). For AC devices, instead of amperage, you enter the power the device uses in watts — usually listed on the device.
Its interesting to look at different approaches. For example, using an ice box for cooling rather than an electric fridge not only saves money on the fridge, but also lets you use a smaller, lighter and cheaper battery. If you plan to add solar charging you can also use a smaller PV panel.
Some loads are seasonal, so its good to run both a summer and winter case. The summer case will likely include lots of fan use, but little furnace use, and winter will be vice-versa. You want to use the one that gives the largest battery. Likewise, different types of trips may result in different battery sizes.
Especially if you use the 80% depth of discharge to determine the battery size, you want to be sure your loads cover everything for the worst case. You don’t want to every run your batteries below 80% depth of discharge.
If you and spreadsheets are not getting along, here are some rules of thumb for picking a rough battery size:
Simple RV conversion with only these electrical loads:
LED lights, water pump, phone & tablet charging, some use of laptop and TV, some use of a powered vent fan (eg a Fantastic Fan for 3 hrs).
Battery: about a 35 amp-hr, 12 volt, deep cycle battery.
Add battery capacity for these heavier loads:
Efficient electric RV fridge: add 70 amp-hrs
Efficient furnace (to run fan and electronics): add 15 amp-hrs
A 700 watt output microwave for 10 minutes: add 30 amp-hrs
All of the above are for 1 day of service without charging.
If you want more than one day without charging, then just scale up by the number of days — that is for the simple conversion that takes a 35 amp-hr battery for 1 day, use a 70 amp-hr battery for 2 days.
For example: if you wanted to add limited use of a small microwave to the basic loads and go for up to 2 days without charging, the rough battery size would be: 35 amp-hr for basic loads + 30 amp-hr for microwave = 65 amp-hr for 1 day, so for two days the battery size would be about a 130 amp-hr, 12 volt, deep cycle battery.
The battery sizes listed above are about as low as you want to go — adding some more capacity if you have the room and budget is good.
We recorded our actual electricity use for one trip — details here…
Type of Battery
You will have to choose the type of battery to buy. You always want to use a deep cycle battery — regular car batteries (not deep cycle) will simply not hold up to frequent deep discharges. Among the deep cycle batteries you will have to chose between a traditional Flooded Lead Acid (FLA) battery and an Absorbed Glass Mat (AGM) battery. While both can be good, this is a decision that depends on a number of factors — this page goes over the pros and cons of each…
Batteries last longer if you don’t discharge them deeply — for example Trojan says that their T105 six volt golf cart battery will provide 3000 discharge cycles at 20% depth of discharge, 1200 discharge cycles at 50% depth of charge, and 750 discharge cycles at 80% depth of charge.
This is an argument for picking a larger battery so that it won’t be discharged as deeply and will last longer. But, for typical Camper Van or RV use the battery won’t actually see that many charge cycles — for example it you use it 30 nights a year, it would take 25 years to reach the 750 cycles that Trojan gives for an 80% depth of discharge. Your battery will die of something else long before 25 years and 750 cycles rolls around. And, if you design for 80% depth of discharge under the worst conditions (you never want to go below 80% depth of discharge), then for most cases (most nights) your depth of discharge will likely be less than 80% anyway.
What I did was to conservatively estimate my electrical loads, and then size the battery for an 80% discharge — this resulted in a smaller, lighter, and cheaper battery than if I had designed for 50% depth of discharge. If you use your RV every day, than designing for 50% depth of discharge probably makes more sense.
There are a lot of ways to kill a battery long before it wears out from the number of discharges — you can chronically over charge it, chronically under charge it, not water it, freeze it, … If you can actually keep your batteries alive until they die from too many cycles, you are a much better than average battery maintainer.
Sizing Your Solar Charging System
To be added soon…
Sizing Your Shore Power Charger
Most camper vans include a battery charger that can charge the battery when you are hooked up to shore power. For regular flooded lead acid batteries, most of the manufacturers recommend a charging current about equal to 10% of the 20 hour amp-hr rating of the battery. So, as an example, our van uses two 6 volt batteries in series, each rated at 220 amp-hrs — so, a charger providing (0.1)(220AH) = 22 amps charging current is about right. Smaller is probably OK, it just takes longer to charge the battery. A bit larger is probably also OK as well, but excessive charging currents result in more gassing and shorter battery life.
For AGM batteries, the charging current might be able to be higher, but at least some of the AGM manufactures still recommend 10% of the C20 battery rating. I have seen some that recommend up to 20% of the C20 battery rating — this would 44 amps for a 220 amp-hr rating.
It is best to contact the manufacturer of your battery to get their recommendation on maximum charging current.
Sizing Your Inverter
The inverter supplies power to run 120 VAC to things that require regular household power. It should have a rated output at least as large as all of the AC power devices you plan to run at the same time. Most loads have a startup surge that is larger than their nominal power rating, and most inverters have a start up surge rating that can handle this, but some loads with heavy startup surges may require going to an inverter with a higher power rating than the nominal rating of the load.
One thing to note is that microwaves are rated at output power, so a 1000 watt microwave actually draws more like 1200 watts.
Inverters come in “pure sine wave” or in “modified sine wave” flavors. The pure sine wave inverters provide cleaner power but are more expensive. Some sensitive devices won’t run on a modified sine wave inverter. The price difference between pure sine wave and modified sine wave inverters is decreasing, so if you are in doubt about whether your devices will run on the modified sine wave, it is probably worth springing for the pure sine wave.
Most people find that its better to run things that can either be run on 120 VAC or 12 VDC to run on the 12 VDC. The advantage of running on 12 VDC is that the inverter does not have to be turned on as much (it draws power even when there is no load on it), and you eliminate the inefficiency of the inverter, and, if the inverter has a cooling fan, you don’t have to listen to it as much.
Sizing Wire Runs and Fuses/Breakers
DC Circuits
For most camper van conversions, most of the loads are 12 volts. This includes things like the LED lights, water pumps, charging phones and laptops, etc. This can make for a lot of 12 volt circuits, so try to use a DC distribution panel with room for more circuits that you think you will need.
The maximum current carrying capacity of the wires (the ampacity) must be at least as much as the actual current draw of the devices on a circuit. Most camper van circuits use #14 with a maximum current of 15 amps or #12 with a maximum current of 20 amps. But, some circuits with a heavier demand (eg the inverter) will require larger gauge wires. The calculator below is probably the easiest way to get to the right wire size.
In addition to choosing a wire with a high enough maximum current carrying capacity, you also need to check that the voltage drop on the circuit is not to high — this gets to be more of a problem as the wire runs get longer. You should keep the voltage drop to 2% or less. The calculator below is probably the easiest way to get to the right wire size.
In some cases, 12 volt circuits that power large loads will require heavy gauge wires. For example, a 1000 watt inverter will draw about (1000 watts/12 volts) / (0.9) = 93 amps (the 0.9 is the inverter efficiency) in the wires from the house battery to the inverter. This would require at least #6 wire, and if the run is longer than 3 ft, it would require a larger gauge to avoid going over 2% voltage drop.
BlueSea (a seller of electrical supplies for boats) has a good wire sizing calculator that takes into account both the ampacity of the wire and voltage drop. The calculator is intended for sizing wires for boats, which seems like a good fit for RVs. Its called the Circuit Wizard and it looks like this:
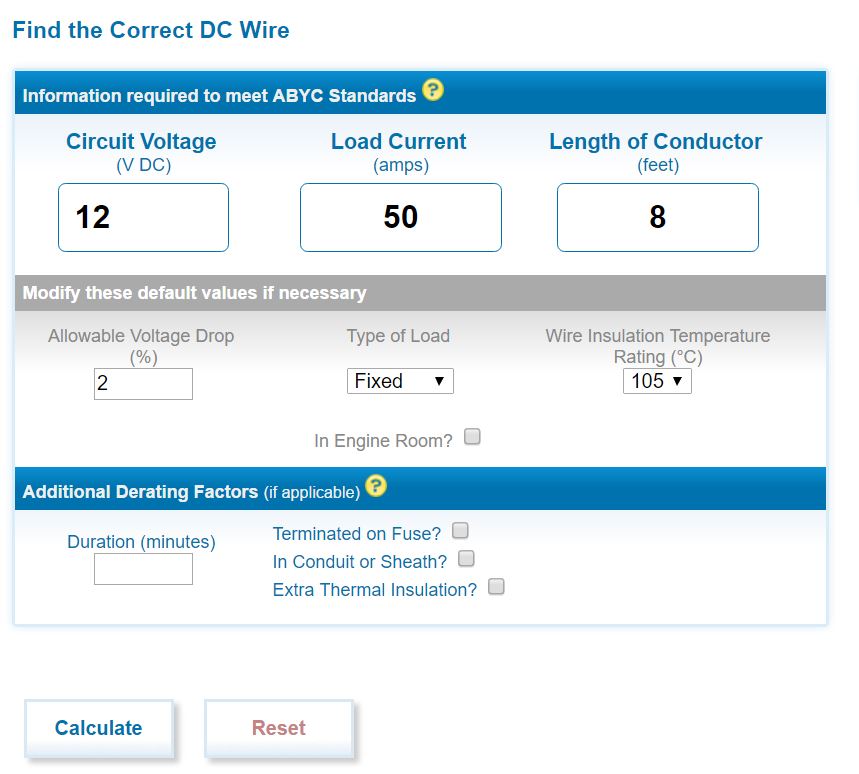
The current should be the maximum you expect the circuit to draw.
Select the temperature rating for the insulation on the wire you are using. The temperature rating of the wire will be printed on the wire (the most common is 90C).
The length you enter is the total length of the supply plus the return wire. That is, if the positive wire going to the load is 2 ft and the negative wire coming back is also 2ft, then enter 4 ft.
Click the calculate button and it will give you the required minimum wire gage. Clicking the Explain Results will show what gage is required for ampacity reasons and what gage is required for voltage drop reasons .
The calculator is available for the PC and also as an app for Android and IOS smart phones.
The fuses on 12 volt circuits are there to protect the wiring, so they should be no larger than the ampacity rating of the wire used on the circuit. The fuse or breaker should placed as close to the power source (battery) as possible.
Loads that are continuous need special attention. As a rough guide: for continuous loads (30 minutes or more) bump up the load current by 25% when selecting wire size, but use a fuse/breaker rated for the nominal load size.
Don’t bury wires inside insulation as it will cause them to overheat.
Circuit breakers or fuses should be placed as close to the current source (battery) as possible. If a short to ground occurs in the wire between the battery and the fuse, the fuse does not provide any protection because it does not see the short circuit current.
Some useful references:
Maximum current for wire gages…
From BlueSea and based on ABYC standards.
Combined current and voltage drop wire sizing table…
From BlueSea and based on ABYC standards.
The ABYC is the American Boat and Yacht Council — they publish safety standards that are widely used in boat design.
Sizing the Battery Isolator
The battery isolator is a relay that only connects the van battery to the house battery when the engine is running. It keeps electrical loads from the furnace etc. from discharging the van battery overnight and leaving you with no juice to start the van in the morning. A VSR (Voltage Sensing Relay) is similar to a battery isolator, but just uses the alternator voltage to determine when to close and charge the house battery.
The isolator should be rated to carry a current at least equal to the maximum the alternator will supply to the house battery with the engine running. Normally this can be substantially lower than the maximum rating of the alternator. In our case, the alternator is rated at 180 amps, but the charge current to our house battery has never exceeded 60 amps, and that only briefly. The maximum charge current may be somewhat greater for AGM batteries with their lower internal resistance.
Gasoline Generators
Gas generators are just about universally disliked in campgrounds because of the noise and fumes, so if you can possibly work out a way to not require a gasoline generator, that would be great — your neighbors will be grateful.
About the only load large enough to require a gas generator on a van conversion is an air conditioner.
Gary
August 15, 2015
March 23, 2017
Comments, Suggestions, Questions, Ideas?
while basic info is good. this is fairly outdated its almost 2024 since i have not seen anyone using Trojan or even sla in RVs due to lithium getting more economical and all lead batteries getting mor expensive requiring core charges depending where you buy up to $22 each, and lithium much lower weight although cannot be charged under 32f
without battery warming. and solar panels have shrunk in size and or higher capacity
so i suggest updating the site.
Hi Joseph,
The Electrical Section does cover Lithium in some depth.
I agree that Li batteries have become much more attractive, but a pair of 6 volt golf cart batteries is still a substantial cost saving.
Two Costco 210 amp-hr golf cart batteries are $250 including recycle fee, and will last 6 to 8 years if taken care of. Walmart has Duracell golf cart batteries for about the same price.
The same capacity SOK Li batteries is about $800 to $900 depending on whether you get the heater version or not. You can get no brand Li batteries on Amazon for somewhat less, but there is a risk on quality and life.
I do like the new Li batteries that are coming out at around 300 amp-hrs in a single battery – makes for a nice simple system.
Gary
Gary,
Thanks. I thought the answer had something to do with voltage. The AC formula used 1.1 which I thought might be 110 volts.
Thanks again. Great site with excellent information.
Michael
This might be a dumb question, but, in your Battery Sizing Spreadsheet, the formula for calculating Energy (watt-hr) divides the amps x hrs x duty cycle and then divides this by 12.5. What is the 12.5?
Also to calculate the Energy (amps/hr) the formula divides the Watt-hr by 12.5. Again, what is the 12.5.
Thanks
My bad. The question should read, “the formula for calculating Energy (watt-hr) multiplies (not divides) the amps x hrs x duty cycle and then divides this by 12.5. What is the 12.5?”
Hi Michael,
The 12.5 is the nominal battery voltage.
So, the amps * volts are the watts, (where the 12.5 is the voltage)
then multiple by hours on for watt-hrs,
then correct the time on by multiplying by duty cycle (% of time on)
Gary
I have been looking at buying Promaster and converting it. Oue thing I don’t find on all the conversion sites is where/location in the van people put the batteries and electrical systems. Such as drivers side or passenger side? Behind the seats or back by the wheel wells? Some van pictures would be helpful.
Hi Mike,
People have used a variety of places.
Mine are about midway back on the drivers side, just aft of the galley. Pictures here:
https://www.buildagreenrv.com/our-conversion/promaster-diy-camper-van-conversion-electrical-and-solar/
The batteries are basically just forward of the rear tire fender well, and under the driver side bed. More pictures here:
https://www.buildagreenrv.com/our-conversion/
The batteries can go on either the driver or passenger side. Driver side makes it a little easier to run the wire from the van battery to the house battery, but that’s not a major problem.
On my conversion, the two heaviest items are the fresh water tank and the batteries, and I located them on opposite sides.
If you search the ProMaster Forum for electrical installs, you will find a variety of placements.
Gary
All should be cautious when playing with power. Always keep these points in mind. When are you going to update the Sizing Your Solar Charging System section? It would be great if you can ASAP.
Best RV Generators
Hi Ann,
Thanks for the reminder on the Solar Charger section — will try to get to that soon.
I have to admit to being very negative on the whole idea of generators. People really don’t want to go camping to listen to their neighbors generator.
I think (hope) that they will dissappear from RVs as solar gets better. Some campgrounds do not allow generators or have special sections of the campground where generators can be used.
It seems like the only area that is difficult do do without a generator is air conditioning, but even this can be done with good insulation, efficient ACs and a good sized battery and solar.
Gary
Thank you for the wonderful and timely info on electrical systems. I just got a 2017 promaster 2500 van Ana am adding a battery doctor 150 amp. Advantage Outfitters has a video on adding inverter cables with a stinger isolator to the positive on battery. They don’t show that negative should be unhooked. The battery doctor instructions say to unhook net first thing. I am afraid I will screw the computer settings if unhooked. Who is right? vaughank237@gmail.com.
Hi Kennith,
I’m not very familiar with the Battery Doctor.
There are a lot people who have used Battery Doctor on the ProMaster Forum, and quite a few discussions on it there. I’d go there and do a search and if you don’t get what you need from the search, ask the forum a question — I’m sure you will get some quality advice.
Gary
Gary,
Thanks very much for responding! With the heater I’d likely do a Propane powered and forgo the one you can get with the A/C unit. One other question – not electrical – I have quite a bit of 1/2″ MDF which I understand does not play nice with moisture. I’d like to use it in the van for boxes for some of the heavier stuff – maybe like batteries. Do you think that’s a bad idea? Probably! Maybe there is something I could coat it with that would make it less susceptible to spills – some rubbery stuff. Funny on that 9200BTU Coleman A/C unit – I’m having a hard time finding one in black which would look better on my dark gray Promaster. I guess maybe I can find the black shroud separately to switch out.
Hi Luca,
I’m probably not the right person to ask about MDF as I really dislike the stuff.
But, my (prejudiced) advise would don’t use it in the van. Lots of people use Baltic Birch plywood, which is good quality and looks really nice. I like MDO (Medium Density Overlay) plywood and used it a lot in my van conversion — good surface, very solid and very water resistant. Unfortunately both are on the pricey end of the plywood scale. But, what’s a couple hundred more on a $6000 conversion 🙂
Gary
Addition to just posted message. We also have some laptops and phones which we will run off 12v and not through the inverter.
Hi, thank you for this resource – I think I might have posted elsewhere here on a different topic. Hope you don’t mind yet another question…
Since my wife and I live in Central Virginia and plan to travel in the South East as much as anywhere we like the idea of A/C – run off shore power. I was looking at a top mount unit by Coleman – the Mach 8 Cub , a 9200 BTU unit – to put on our Promaster.
A link to specs is here: https://www.airxcel.com/coleman-mach/products/air-conditioners/ultra-low-profile/mach-8/mach-8-cub
Given that we are challenged when it comes to RV electricity – I’m having a hard time determining what we might need in terms of an Inverter / Charger to handle this and also the proper connector or Inlet for the shore power. Is pure Sine wave a necessity? Or could we use a cheaper modified? Just fyi – We also have a 12v fridge, an inverter microwave, a few led lights, and would like to have a water pump and maybe a heater. I know some of these (most) are going to run off 12v. We will have some solar as well and 2 x 6v GC2 batteries. Thanks for your help!
Hi Luca,
I think the 9200 BTU AC would have no trouble cooling an insulated ProMaster.
As you say, you would not be able to run it for very long off the two golf cart batteries, but should be fine on shore power.
I think a 30 amp shore power setup would be fine — this is the most commonly used on RVs and a standard at commercial campgrounds. Its also simpler to setup up and wire than a 50 amp setup.
If you are using the electrical diagrams I provided as a base, there is not much change — the distribution panel with 30 amp main breaker and 20 amp individual circuit breakers is fine, but you will need a 30 amp cord and plug to go to the campground pedestal.
The price on sine wave intverter/chargers has come down significantly since I did my system, and I’d say its worth putting the extra money into a sine wave vs a modified sine wave. I would if I were doing it again now.
As long as you are only going to power the AC from shore power only, I think a 2000 watt inverter would be OK. It should be able to power the microwave (but not the microwave and toaster at the same time 🙂
Whatever charger that comes with the 2000 watt inverter/charger should be fine.
Your DC loads are about the same as mine, and should be fine for the two golf cart batteries.
You mention a heater. An electric heater powered by shore power (like the one built into the AC unit) would be fine, but powering an electric space heater from the inverter will take the golf cart batteries down just as fast as the AC. Most people use some type of fuel powered heater because of this.
I’ve not had any actual experience with an RV that has these larger loads, so I’d do some more Googling around before taking the above advice as gospel.
Gary
First of all thank you very much for all the information. Your site has been invaluable in the gathering of information for building my camper van. I had a question about selecting the amperage on the fuses. Right now I have all my loads combined and have a large 130 amp fuse right on the battery. My question is should I split and add two fuses from the battery, one for the inverter and one separate fuse for the loads (Lights and fridge ext.) I added all the loads and it was about 30 Amps on a fuse panel and the inverter was about 90 amps which is where I got 130 amps. If something happens with the inverter not sure if it will be enough to pop the 130 amp fuse if nothing else is running. Should I run two wires and two different fuses? Thanks in advance!
Hi Javier,
Remember that the fuses are there to protect the wiring from the house battery to the devices. The devices are supposed to have their own internal protection and not rely on the external fuses.
Most people use separate fuses on each major load (inverter, DC distribution panel, …). I guess the main reason for this is that if you use only one large fuse is that all the wiring downstream from that fuse would have to be appropriate for that fuse (ie large). You would have to run that large gage wire to all of your main loads even though it would be oversize fro most of them.
Basically, using separate fuses allows you to run (say) a smaller fuse and wire for your DC panel and a lager fuse and wire for you inverter.
In all cases for loads powered off your house battery, the fuses or breakers for these loads need to be as close to the house battery as possible as any wire between the house battery and the fuse in unprotected.
Hope that makes sense?
Gary
Gary,
I’m just starting the planning process for my soon-to-be conversion van and this website has been *invaluable* in helping me decipher some of the aspects of the build that were totally foreign to me beforehand. THANK YOU so much for taking the time to document your experience and share your knowledge. You’re the man!
Thanks!
Gary, I’d like to thank you for providing so much helpful information; you are a key resource for me as I begin my own camper van conversion. To that end, I have a nagging question about electrical systems I hope you can answer for me.
In your diagram (and most others I’ve looked at), multiple sources of 12v current (charger, solar & alternator) simply join together at the coach battery. But these can all have different charging patterns (1 stage, 3 stages, etc.). What is it that makes them play nice together? E.g., if two or more are active at one time, what keeps the combination from overcharging the house battery. And if one is able to switch over to topping or floating and the other is not, what is the result?
I could just build the system according to the diagrams, but I hate to build something I don’t understand.
Thanks,
David
Hi David,
Sorry about slow response — we are in the Yukon for next couple weeks with limited internet.
This is a concern that comes up quite a bit, and I’m not sure there is a really good answer except that people have been doing it for a long time and it does not seem to cause serious problems.
I guess to add to the discomfort level, when the engine is running and the alternator (and maybe solar) are hooked to both the house and van batteries in parallel, so they see some mix of the two batteries.
There are some “battery to battery” chargers that (at least on paper) do a better job of handing this. I believe that Ctek is one of these brands. At least one of the products in this area offers both charging from the van battery and also has a solar controller built in, and claims to do all this correctly.
You might find some details on the ProMaster forum search for “battery to battery” or “Ctek”, or maybe “sterling”.
Gary
Thanks, Gary. Wish I was in the Yukon too, but there is the small matter of building out my van to deal with first. ;-D
As to my question, I’ve been doing some further research, and as I understand it the various charging sources are doing a rather intricate dance together. They all track the state of the battery being charged and turn their own charge down or off depending on that state. They will back off their charging if the battery has a reading above the charger’s threshold, even if that reading is due to another charging source raising the battery’s reading even though the battery hasn’t actually reached that level of charge. (I hope that makes sense; I don’t think I said it well.) So as long as they all have a charging profile that matches the battery type (and proper diodes, of course), the battery absorbs its charge as fast as it can handle it — and no faster — regardless of where that charge is coming from.
Hi Gary,
While the “Download the Battery Sizing Spreadsheet DBELLoadDetermination” file is helpful it is not the same as …. “Here is a picture of the spreadsheet:” titled Spreadsheet to Estimate Size of RV House Battery.
I understand how continuous improvement can result in multiple versions.
Would it be possible to get a copy of the “Spreadsheet to Estimate Size of RV House Battery” file ?
Thanks for the inspiration !
Jim
Hi Jim,
Oops! — should be OK now. Let me know if not.
Thanks — Gary
Any suggestions on lighting? Seems like 12v LED would be the way to go.
Hi Jon,
Yes — I think the 12 volt LED lighting is definitely the way to go. The low current draw and not needing to have the inverter on make the LEDs very attractive.
We used some LED broad spot lights and also some LED strip lights.
I did not do much of a job of documenting them, but there is a picture of each type on this page: https://www.buildagreenrv.com/our-conversion/our-conversion-paneling/
The spot lights are over the galley, and over the head of each bed.
The strip lights the we got came with a dimmer and we like the effect — they give a nice soft lighting to the inside of the van. I installed them in a routed groove in the strip of wood where the wall and ceiling meet. They come with an adhesive backing.
We got both from Amazon.
I think this is the spot light: https://www.amazon.com/Gold-Stars-GW21500-Chrome-Reading/dp/B00AQKC7LO/ref=sr_1_25?ie=UTF8&qid=1475724365&sr=8-25&keywords=rv+led+lights
I think this is the dimmer we used on the LED strip lights:
https://www.amazon.com/LEDwholesalers-LED-Strip-Lights-Controller/dp/B003L4KKF2/ref=sr_1_34?ie=UTF8&qid=1475724456&sr=8-34&keywords=led+strip+lights+12+volt
Searching Amazon for RV LED lights or LED strip lights 12 volts brings up a bunch of them.
We are happy with the lighting, but it might be nice to have some smaller focused lights for reading in bed without disturbing the sleeping spouse.
Gary
In terms of sizing the isolator, the alternator is rated at 180 amps, but only puts out a maximum of 60, so what size isolator did you use? Thanks!
Hi Mark,
I suppose one sensible way to do this would be to 1) find out the maximum recommended charging current for your batteries from the manufacturere, 2) put in a breaker or fuse in the line from the van battery to the house battery that is a bit above the maximum recommended charging current, 3) choose an isolator with a rating that is somewhat above the fuse rating.
The logic being that you don’t want to charge the battery any harder than the battery manufacturer recommends, so insure this by putting the fuse in the charging line — if the fuse blows, you are charging at too high a current, and you have figure out a way to prevent this — maybe add some resistance. Since the fuse is in the line, there is no need to have an isolator that is rated from much more than the fuse, since the fuse protects it from higher currents.
In my case, the max charging rate I have measured is around 38 amps, which is close to what Trojan batteries recommends as a maximum, and I have a 50 amp breaker in the chargiing line to tell me if the charging rate gets to high (which is never has).
Maybe others have alternative ideas on this?
Gary
Greetings,
I did not see an active link to download the spreadsheet. Any fix you can provide please?
Thanks for all the info!
Cheers,
Al
Hi Al,
Thanks for pointing out the missing link — should be OK now.
Gary
Great, thanks Gary!
Cheers,
Al
My pleasure.
Please keep in touch on how the conversion goes.
Gary
Hi,
I’m in the design stage of building my 2015 Sprinter 4x and found your info on electrical systems great, with several useful links.
Thank you for documenting this for the benefit of others. I really appreciate your help.
Take Care…Jeff